
Spring框架详解【重点】
1.1 Spring概述Spring是一个开源的支持控制反转(IOC)和面向切面编程(AOP)的容器框架,Spring为简化企业级开发而生,使用Spring开发可以将Bean对象,Dao组件对象,Service组件对象等交给Spring容器来管理,这样使得很多复杂的代码在Spring中开发却变得非常的优雅和简洁,有效的降低代码的耦合度,极大的方便项目的后期维护、升级和扩展。Spring的优良特性非
1.1 Spring概述
Spring是一个开源的支持控制反转(IOC)和面向切面编程(AOP)的容器框架,Spring为简化企业级开发而生,使用Spring开发可以将Bean对象,Dao组件对象,Service组件对象等交给Spring容器来管理,这样使得很多复杂的代码在Spring中开发却变得非常的优雅和简洁,有效的降低代码的耦合度,极大的方便项目的后期维护、升级和扩展。
Spring的优良特性
- 非侵入式:基于Spring开发的应用中的对象可以不依赖于Spring的API
- 控制反转:IOC——Inversion of Control,指的是将对象的创建权交给Spring去创建。使用Spring之前,对象的创建都是由我们自己在代码中new创建。而使用Spring之后。对象的创建都是由给了Spring框架。
- 依赖注入:DI——Dependency Injection,是指依赖的对象不需要手动调用setXX方法去设置,而是通过配置赋值。
- 面向切面编程:Aspect Oriented Programming——AOP
- 容器:Spring是一个容器,因为它包含并且管理应用对象的生命周期
- 组件化:Spring实现了使用简单的组件配置组合成一个复杂的应用。在 Spring 中可以使用XML和Java注解组合这些对象。
- 一站式:在IOC和AOP的基础上可以整合各种企业应用的开源框架和优秀的第三方类库(实际上Spring 自身也提供了表述层的SpringMVC和持久层的Spring JDBC)
1.2 Spring的模块介绍
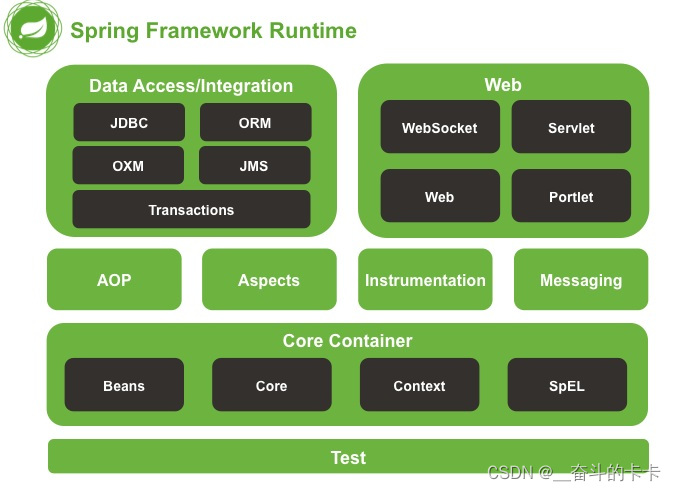
- 核心容器(Spring Core)
核心容器提供Spring框架的基本功能。Spring以bean的方式组织和管理Java应用中的各个组件及其关系。Spring使用BeanFactory来产生和管理Bean,它是工厂模式的实现。BeanFactory使用控制反转(IoC)模式将应用的配置和依赖性规范与实际的应用程序代码分开。
- 应用上下文(Spring Context)
Spring上下文是一个配置文件,向Spring框架提供上下文信息。Spring上下文包括企业服务,如JNDI、EJB、电子邮件、国际化、校验和调度功能。
- 面向切面编程(Spring AOP)
AOP(Aspect Oriented Programming)
通过配置管理特性,Spring AOP 模块直接将面向切面的编程功能集成到了 Spring框架中。所以,可以很容易地使 Spring框架管理的任何对象支持 AOP。Spring AOP 模块为基于 Spring 的应用程序中的对象提供了事务管理服务。通过使用 Spring AOP,不用依赖 EJB 组件,就可以将声明性事务管理集成到应用程序中。
- JDBC和DAO模块(Spring DAO)
JDBC、DAO的抽象层提供了有意义的异常层次结构,可用该结构来管理异常处理,和不同数据库供应商所抛出的错误信息。异常层次结构简化了错误处理,并且极大的降低了需要编写的代码数量,比如打开和关闭链接。
- 对象实体映射(Spring ORM)
ORM(Object Relational Mapping)
SpringORM模块提供了对现有ORM框架的支持,各种流行的ORM框架已经做得非常成熟,并且拥有大规模的市场,Spring没有必要开发新的ORM工具,它对Hibernate提供了完美的整合功能,同时也支持其他ORM工具。注意这里Spring是提供各类的接口(support),目前比较流行的下层数据库封闭映射框架,如ibatis,Hibernate等。
- Web模块(Spring Web)
此模块建立在SpringContext基础之上,它提供了Servlet监听器的Context和Web应用的上下文。对现有的Web框架,如JSF、Tapestry、Structs等,提供了集成。
- MVC模块(Spring Web MVC)
MVC(Model View Controller)
MVC框架是一个全功能的构建Web应用程序的MVC实现。通过策略接口,MVC框架变成为高度可配置的。MVC容纳了大量视图技术,其中包括JSP、POI等,模型来有JavaBean来构成,存放于m当中,而视图是一个街口,负责实现模型,控制器表示逻辑代码,由c的事情。Spring框架的功能可以用在任何J2EE服务器当中,大多数功能也适用于不受管理的环境。Spring的核心要点就是支持不绑定到特定J2EE服务的可重用业务和数据的访问的对象,毫无疑问这样的对象可以在不同的J2EE环境,独立应用程序和测试环境之间重用。
1.3 IOC和DI
控制反转是一种通过描述(XML或注解)并通过第三方去生产或获取特定对象的方式。在Spring中实现控制反转的是IoC容器,其实现方法是依赖注入(Dependency Injection,DI);控制反转IoC(Inversion of Control)是一种设计思想,DI(依赖注入)是实现IoC的一种方法
1.3.1 IOC: 控制反转
即控制权的转移,将我们创建对象的方式反转了,以前对象的创建是由我们开发人员自己维护,包括依赖关系也是自己注入。使用了spring之后,对象的创建以及依赖关系可以由spring完成创建以及注入,反转控制就是反转了对象的创建方式,从我们自己创建反转给了spring创建
1.3.2 DI: Dependency Injection 依赖注入
Spring这个容器中,替你管理着一系列的类,前提是你需要将这些类交给spring容器进行管理,然后在你需要的时候,不是自己去定义,而是直接向spring容器索取,当spring容器知道你的需求之后,就会去它所管理的组件中进行查找,然后直接给你所需要的组件。
实现IOC思想需要DI做支持
注入方式: set方式注入、构造方法注入、P命名空间注入
注入类型: 值类型注入、引用类型注入
1.3.3 Spring IOC(依赖注入的三种方式)
1.3.3.1 Setter方法注入
package com.jpeony.spring.setter;
import com.jpeony.spring.common.HelloServiceImpl;public class HelloWord {
private HelloService helloService;

    // setter方式注入Bean
    public void setHelloService(HelloService helloService) {
        this.helloService = helloService;
    }

    @Override
    public void selfIntroduction() {
        // 向大家打招呼
        helloService.sayHello("大家好!");
    }

}
<?xml version="1.0" encoding="UTF-8"?>
<beans xmlns="http://www.springframework.org/schema/beans"
       xmlns:xsi="http://www.w3.org/2001/XMLSchema-instance"
       xsi:schemaLocation="http://www.springframework.org/schema/beans http://www.springframework.org/schema/beans/spring-beans.xsd">
    <!--
       Bean声明:
         该bean类似于javaConfig中的@Bean注解;
         用于创建bean的类通过class属性来指定,并且需要使用全限定的类名。
         通过id指定bean的ID。如果不显示指定,默认使用class的全限定名进行命名。
         eg:
         com.jpeony.spring.common.HelloServiceImpl#0,其#0是一个计数器的形式,
         用来区分相同类型的其他bean。
         使用自动化命名很方便,但是没有多少实际用处,还是建议自己给bean显示设定ID。
     -->
    <bean id="helloService" class="com.jpeony.spring.common.HelloServiceImpl"/>

    <!-- setter注入bean -->
    <bean id="HelloWord" class="com.jpeony.spring.setter.HelloWord">
        <property name="helloService" ref="helloService"/>
    </bean>

</beans>
1.3.3.2 构造方法注入
package com.jpeony.spring.setter;
import com.jpeony.spring.common.HelloServiceImpl;

public class HelloWord {
    private HelloService helloService;

    // 构造方法注入
    public HelloWord (HelloService helloService) {
        this.helloService = helloService;
    }
}
<?xml version="1.0" encoding="UTF-8"?>
<beans xmlns="http://www.springframework.org/schema/beans"
       xmlns:xsi="http://www.w3.org/2001/XMLSchema-instance"
       xsi:schemaLocation="http://www.springframework.org/schema/beans http://www.springframework.org/schema/beans/spring-beans.xsd">
    <!--
       Bean声明:
         该bean类似于javaConfig中的@Bean注解;
         用于创建bean的类通过class属性来指定,并且需要使用全限定的类名。
         通过id指定bean的ID。如果不显示指定,默认使用class的全限定名进行命名。
         eg:
         com.jpeony.spring.common.HelloServiceImpl#0,其#0是一个计数器的形式,
         用来区分相同类型的其他bean。
         使用自动化命名很方便,但是没有多少实际用处,还是建议自己给bean显示设定ID。
     -->
    <bean id="helloService" class="com.jpeony.spring.common.HelloServiceImpl"/>

    <!-- 构造方法注入bean -->
    <bean id="HelloWord" class="com.jpeony.spring.setter.HelloWord">
        <constructor-arg><ref bean="helloService"/></constructor-arg>
    </bean>

</beans>
下面列举以下构造方法注入存在多个参数:

1.3.3.3 P命名空间注入
package com.jpeony.spring.setter;
import com.jpeony.spring.common.HelloServiceImpl;

public class HelloWord {
    //名字
    private String name;
    //年龄
    private String age;
    //方法类
    private HelloService helloService;

    public void setName (String name) {
        this.name = name;
    }

    public void setAge (String age) {
        this.age = age;
    }

    public void setHelloService(HelloService helloService) {
        this.helloService = helloService;
    }

    @Override
    public void selfIntroduction() {
        // 向大家打招呼
        helloService.sayHello("我叫"+ name + ",今年" + age + "岁,大家好!");
    }

}
<?xml version="1.0" encoding="UTF-8"?>
<beans xmlns="http://www.springframework.org/schema/beans"
       xmlns:xsi="http://www.w3.org/2001/XMLSchema-instance"
       <!-- 引入p命名标签 -->
       xmlns:p="http://www.springframework.org/schema/p"
       xsi:schemaLocation="http://www.springframework.org/schema/beans http://www.springframework.org/schema/beans/spring-beans.xsd">

    <bean id="helloService" class="com.jpeony.spring.common.HelloServiceImpl"/>

    <!-- p标签注入bean -->
    <bean id="HelloWord" class="com.jpeony.spring.setter.HelloWord"
     p:name="明明" p:age="24" p:helloService-ref="helloService"></bean>

</beans>
P标签注入集合bean
package com.jpeony.spring.setter;
import com.jpeony.spring.common.HelloServiceImpl;
import java.util.List;

public class HelloWord {
    //名字
    private String name;
    //年龄
    private String age;
    //方法类
    private List<HelloService> helloServices;

    public void setName (String name) {
        this.name = name;
    }

    public void setAge (String age) {
        this.age = age;
    }

    public void setHelloServices(List<HelloService> helloServices) {
        this.helloServices = helloServices;
    }

    @Override
    public void selfIntroduction() {
        // 向大家打招呼
        helloServices[0].sayHello("我叫"+ name + ",今年" + age + "岁,大家好!");
    }

}
<?xml version="1.0" encoding="UTF-8"?>
<beans xmlns="http://www.springframework.org/schema/beans"
       xmlns:xsi="http://www.w3.org/2001/XMLSchema-instance"
       <!-- 引入p命名标签 -->
       xmlns:p="http://www.springframework.org/schema/p"
       <!-- 引入util命名标签 -->
       xmlns:util="http://www.springframework.org/schema/util"
       xsi:schemaLocation="http://www.springframework.org/schema/beans http://www.springframework.org/schema/beans/spring-beans.xsd">

    <bean id="helloService" class="com.jpeony.spring.common.HelloServiceImpl"/>

    <bean id="helloService2" class="com.jpeony.spring.common.HelloServiceImpl">
    ...........
    </bean>

    <util:list id="helloServices">
        <ref bean="helloService"/>
        <ref bean="helloService2"/>
    </util:list>

    <!-- p标签注入bean -->
    <bean id="HelloWord" class="com.jpeony.spring.setter.HelloWord"
     p:name="明明" p:age="24" p:helloServices-ref="helloServices"></bean>

</beans>
测试代码:以上的代码都可以使用如下测试模板进行测试工作
public class MyTest {
   @Test
   public void testMethodAutowire() {
       ApplicationContext context = new ClassPathXmlApplicationContext("beans.xml");
       User user = (User) context.getBean("user");
       user.getCat().shout();
       user.getDog().shout();
  }
}
1.3.4 Spring IOC(依赖注入的常用数据类型)
1.3.4.1 注入直接量(基本数据类型、字符串)
<bean id="HelloWord" class="com.jpeony.spring.setter.HelloWord">
    <property name="name" value="明明"></property>
    <property name="age" value="24"></property>
</bean>
1.3.4.2 引用其他Bean组件(面向接口编程)
使用ref属性:
    <bean id="helloService" class="com.jpeony.spring.common.HelloServiceImpl"/>

    <bean id="HelloWord" class="com.jpeony.spring.setter.HelloWord">
        <property name="helloService" ref="helloService"></property>
    </bean>
使用ref标签:
<bean id="helloService" class="com.jpeony.spring.common.HelloServiceImpl"/>

    <bean id="HelloWord" class="com.jpeony.spring.setter.HelloWord">
        <property name="helloService">
            <ref bean="helloService" />
        </property>
    </bean>
使用P命名空间:
     <!-- 头文件加上这句 -->
    xmlns:p="http://www.springframework.org/schema/p"

    <bean id="helloService" class="com.jpeony.spring.common.HelloServiceImpl"/>

    <bean id="HelloWord" class="com.jpeony.spring.setter.HelloWord" p:helloService-ref="helloService"></bean>
1.3.4.3 使用内部Bean
    <bean id="HelloWord" class="com.jpeony.spring.setter.HelloWord">
        <property name="helloService">
            <bean class="com.jpeony.spring.common.HelloServiceImpl" />
        </property>
    </bean>
1.3.4.4 集合类型的属性
// 对应的getter setter
public class ALLCollection {
    private List listElement;
    private String[] arrayElement;
    private Set setElement;
    private Map mapElement;
    private Properties propsElement;


   public void setListElement (List listElement) {
       this.listElement = listElement;
   }

   public List getListElement () {
       return listElement;
   }

   public void setArrayElement (String[] arrayElement) {
       this.arrayElement= arrayElement;
   }

   public String[] getArrayElement () {
       return arrayElement;
   }

   public void setSetElement (Set setElement) {
       this.setElement= setElement;
   }

   public Set getSetElement () {
       return setElement;
   }

   public void setMapElement (Map mapElement) {
       this.mapElement= mapElement;
   }

   public Map getMaptElement () {
       return mapElement;
   }

   public void setPropsElement (Properties propsElement) {
       this.propsElement= propsElement;
   }

   public Properties getpropsElement () {
       return propsElement;
   }

}
<bean id="collection" class="com.zxf.DO.ALLCollection">
    <property name="listElement">
        <list>
            <value>list苹果</value>
            <value>list香蕉</value>
        </list>
    </property>
    <property name="arrayElement">
        <array>
            <value>array苹果</value>
            <value>array香蕉</value>
        </array>
    </property>
    <property name="setElement">
        <set>
            <value>set苹果</value>
            <value>set香蕉</value>
        </set>
    </property>
    <property name="mapElement">
        <map>
            <entry>
                <key><value>map1</value></key>
                <value>map苹果</value>
            </entry>
            <entry>
                <key><value>map2</value></key>
                <value>map香蕉</value>
            </entry>
        </map>
    </property>
    <property name="propsElement">
        <props>
            <prop key="prop1">prop苹果</prop>
            <prop key="porp2">prop香蕉</prop>
        </props>
    </property>
</bean>
测试代码:以上的代码都可以使用如下测试模板进行测试工作
public class MyTest {
   @Test
   public void testMethodAutowire() {
       ApplicationContext context = new ClassPathXmlApplicationContext("beans.xml");
       User user = (User) context.getBean("user");
       user.getCat().shout();
       user.getDog().shout();
  }
}
1.4 applicationContext & BeanFactory
1.4.1 BeanFactory接口
BeanFactory,以Factory结尾,表示它是一个工厂类(接口), 它负责生产和管理bean的一个工厂。在Spring中,BeanFactory是IOC容器的核心接口,它的职责包括:实例化、定位、配置应用程序中的对象及建立这些对象间的依赖。
(1)Spring的原始接口,针对原始接口的实现类功能较为单一
(2)BeanFactory接口实现类的容器,特点是每次在获得对象时才会创建对象
BeanFactory和FactoryBean的区别
区别:BeanFactory是个Factory,也就是IOC容器或对象工厂,FactoryBean是个Bean。在Spring中,所有的Bean都是由BeanFactory(也就是IOC容器)来进行管理的。但对FactoryBean而言,这个Bean不是简单的Bean,而是一个能生产或者修饰对象生成的工厂Bean,它的实现与设计模式中的工厂模式和修饰器模式类似。
1.4.2 ApplicationContext接口
BeanFactory和ApplicationContext就是spring框架的两个IOC容器,现在一般使用ApplicationnContext,其不但包含了BeanFactory的作用,同时还进行更多的扩展
(1)每次容器启动时就会创建容器中配置的所有对象
(2)相比BeanFactory,提供了更多功能
(3)从类路径下加载配置文件: ClassPathXmlApplicationContext
从硬盘的绝对路径下加载配置文件: FileSystemXmlApplication
1.5 Spring配置详解
1.5.1 Bean的配置
<!--bean就是java对象,由Spring创建和管理-->
<!--
   id 是bean的标识符,要唯一,如果没有配置id,name就是默认标识符
   如果配置id,又配置了name,那么name是别名
   name可以设置多个别名,可以用逗号,分号,空格隔开
   如果不配置id和name,可以根据applicationContext.getBean(.class)获取对象;

class是bean的全限定名=包名+类名
-->
<bean id="hello" name="hello2 h2,h3;h4" class="com.kuang.pojo.Hello">
   <property name="name" value="Spring"/>
</bean>
name和id之间的一些注意点:
1、配置两个相同的 id 或者 name 都不能通过。
2、如果既配置了id,也配置了 name ,则两个都生效。如果id和name都没有指定,则用类全名作为name,如<bean class="com.stamen.BeanLifeCycleImpl">,则你可以通过getBean(“com.stamen.BeanLifeCycleImpl”)返回该实例。
3、如果配置基本类的时候,注解和配置文件都使用的时候,注解和配置文件中 name 相同的时候, 则两个冲突,配置文件生效。
如果配置基本类的时候,注解和配置文件都使用的时候,注解和配置文件中 name 不相同的时候, 则两个不冲突,都能够生效。
1.5.2 import
主要是存在多个配置文件,然后可以通过import引入的方式进行引入。
<import resource="{path}/beans.xml"/>
1.5.3 Bean的作用域
Spring中的bean默认都是单例的,在Spring中,那些组成应用程序的主体及由Spring IoC容器所管理的对象,被称之为bean。简单地讲,bean就是由IoC容器初始化、装配及管理的对象。
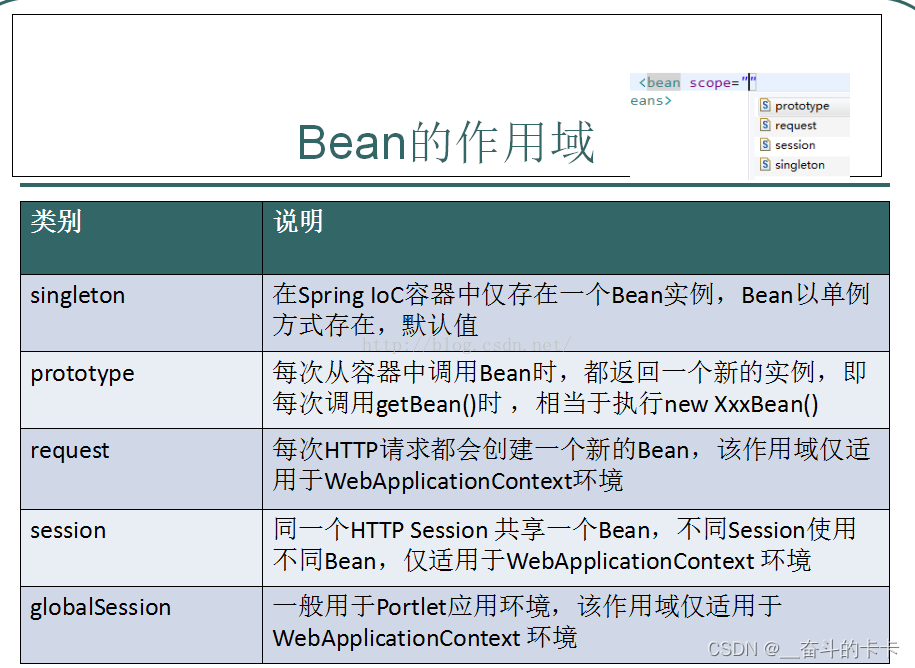
五种作用域中,request、session和global session三种作用域仅在基于web的应用中使用,只能用在基于web的Spring ApplicationContext环境。
- Singleton
当一个bean的作用域为Singleton,那么Spring IoC容器中只会存在一个共享的bean实例,并且所有对bean的请求,只要id与该bean定义相匹配,则只会返回bean的同一实例。Singleton是单例类型,就是在创建起容器时就同时自动创建了一个bean的对象,不管你是否使用,他都存在了,每次获取到的对象都是同一个对象。
- Prototype
当一个bean的作用域为Prototype,表示一个bean定义对应多个对象实例。Prototype作用域的bean会导致在每次对该bean请求(将其注入到另一个bean中,或者以程序的方式调用容器的getBean()方法)时都会创建一个新的bean实例。Prototype是原型类型,它在我们创建容器的时候并没有实例化,而是当我们获取bean的时候才会去创建一个对象,而且我们每次获取到的对象都不是同一个对象。根据经验,对有状态的bean应该使用prototype作用域,而对无状态的bean则应该使用singleton作用域。
- Request
当一个bean的作用域为Request,表示在一次HTTP请求中,一个bean定义对应一个实例;即每个HTTP请求都会有各自的bean实例,它们依据某个bean定义创建而成。该作用域仅在基于web的Spring ApplicationContext情形下有效。
针对每次HTTP请求,Spring容器会根据loginAction bean的定义创建一个全新的LoginAction bean实例,且该loginAction bean实例仅在当前HTTP request内有效,因此可以根据需要放心的更改所建实例的内部状态,而其他请求中根据loginAction bean定义创建的实例,将不会看到这些特定于某个请求的状态变化。当处理请求结束,request作用域的bean实例将被销毁
- Session
当一个bean的作用域为Session,表示在一个HTTP Session中,一个bean定义对应一个实例。该作用域仅在基于web的Spring ApplicationContext情形下有效
针对某个HTTP Session,Spring容器会根据userPreferences bean定义创建一个全新的userPreferences bean实例,且该userPreferences bean仅在当前HTTP Session内有效。与request作用域一样,可以根据需要放心的更改所创建实例的内部状态,而别的HTTP Session中根据userPreferences创建的实例,将不会看到这些特定于某个HTTP Session的状态变化。当HTTP Session最终被废弃的时候,在该HTTP Session作用域内的bean也会被废弃掉
- Global Session
当一个bean的作用域为Global Session,表示在一个全局的HTTP Session中,一个bean定义对应一个实例。典型情况下,仅在使用portlet context的时候有效。该作用域仅在基于web的Spring ApplicationContext情形下有效。考虑下面bean定义:
global session作用域类似于标准的HTTP Session作用域,不过仅仅在基于portlet的web应用中才有意义。Portlet规范定义了全局Session的概念,它被所有构成某个portlet web应用的各种不同的portlet所共享。在global session作用域中定义的bean被限定于全局portlet Session的生命周期范围内
1.5.4 Bean的生命周期
Spring中bean的实例化过程(不好意思,我盗图了):
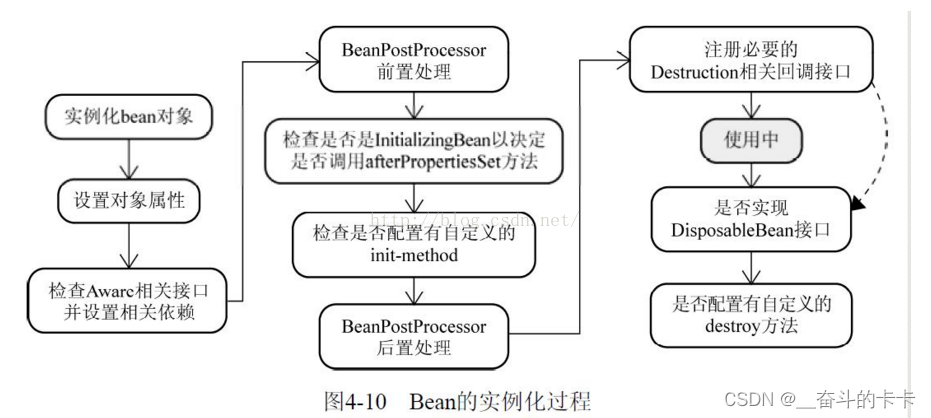
Bean实例生命周期的执行过程如下:
- Spring对bean进行实例化,默认bean是单例;
- Spring对bean进行依赖注入;
- 如果bean实现了BeanNameAware接口,spring将bean的id传给setBeanName()方法;
- 如果bean实现了BeanFactoryAware接口,spring将调用setBeanFactory方法,将BeanFactory实例传进来;
- 如果bean实现了ApplicationContextAware接口,它的setApplicationContext()方法将被调用,将应用上下文的引用传入到bean中;
- 如果bean实现了BeanPostProcessor接口,它的postProcessBeforeInitialization方法将被调用;
- 如果bean实现了InitializingBean接口,spring将调用它的afterPropertiesSet接口方法,类似的如果bean使用了init-method属性声明了初始化方法,该方法也会被调用;
- 如果bean实现了BeanPostProcessor接口,它的postProcessAfterInitialization接口方法将被调用;
- 此时bean已经准备就绪,可以被应用程序使用了,他们将一直驻留在应用上下文中,直到该应用上下文被销毁;
- 若bean实现了DisposableBean接口,spring将调用它的distroy()接口方法。同样的,如果bean使用了destroy-method属性声明了销毁方法,则该方法被调用;
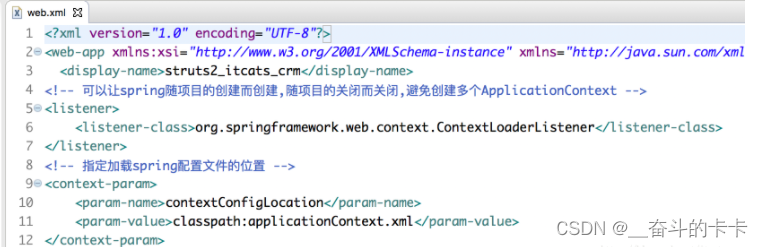
1.6 防止创建多个applicationContext取值/并指定记载spring配置文件的位置——web.xml
1、需要导入包spring-web
2、在web.xml中配置监听器
1.7 使用注解方式代替配置文件(官方推荐使用注解)
1.7.1 在applicationContext.xml中书写指定扫描注解

1.7.2 在类中书写Component

注意:假如不写括号内的值(即name或id),默认使用类名首字母小写作为搜索,为什么意思呢?
比如Student类中使用了@Component 没有书写括号和值,那么默认搜索id或name为student。
1.7.3 指定对象的作用范围Scope

下面是对singleton和prototype的一些补充:
- singleton作用域:当把一个Bean定义设置为singleton作用域是,Spring IoC容器中只会存在一个共享的Bean实例,并且所有对Bean的请求,只要id与该Bean定义相匹配,则只会返回该Bean的同一实例。值得强调的是singleton作用域是Spring中的默认作用域。
- prototype作用域:prototype作用域的Bean会导致在每次对该Bean请求(将其注入到另一个Bean中,或者以程序的方式调用容器的getBean()方法)时都会创建一个新的Bean实例。根据经验,对有状态的Bean应使用prototype作用域,而对无状态的Bean则应该使用singleton作用域。对于具有prototype作用域的Bean,有一点很重要,即Spring不能对该Bean的整个生命周期负责。具有prototype作用域的Bean创建后交由调用者负责销毁对象回收资源。
- singleton 只有一个实例,也即是单例模式。
- prototype访问一次创建一个实例,相当于new。
1.7.4 值类型的注入
1.7.4.1 实际通过反射field赋值

1.7.4.2 实际通过set方式赋值

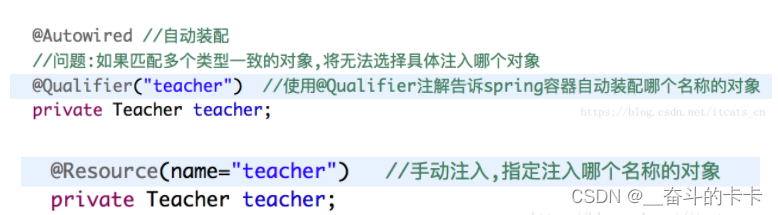
1.7.5 引用类型的注入
面试题: @AutoWired和@Resource的区别?
@AutoWired默认以类型进行查找,@Resource默认以名称进行查找
@AutoWired(required=false) + @Qualifier(“user”) == @Resource(name=“user”)
其中@Resource注解是jdk1.6后才有的
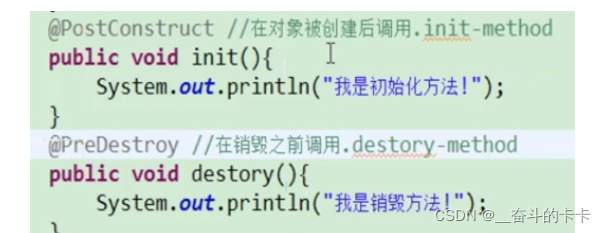
1.7.6 创建与销毁方法
1.7.7 导入其他配置类
@Configuration  //代表这是一个配置类
public class MyConfig2 {
}
@Configuration
@Import(MyConfig2.class)  //导入合并其他配置类,类似于配置文件中的 inculde 标签
public class MyConfig {

   @Bean
   public Dog dog(){
       return new Dog();
  }

}
1.8 Bean的自动装配
Spring Bean的装配方式分为以下三种:
通过xml显示配置
通过java代码进行显示配置
隐式的bean扫描发现机制和自动装配
1.8.1 隐式的Bean发现机制和自动装配
Spring从两个角度来实现自动化装配;组件扫描(Spring自动发现应用中上下文所需要的创建的Bean),自动装配(Spring自动满足Bean之间的依赖)
- 使用@Component将普通Java类配置成SpringBean
- 使用@Autowired(自动装配)使Spring满足Bean的依赖
- 配置组件扫描包(组件扫描)
-
在Java类中配置组件扫描
@ComponentScan("com.jimisun.controller") -
在XML配置文件配置组件扫描
<context:component-scan base-package="com.jimisun.controller,com.jimisun.service"/>
-
我们来看一下示例代码:
@Component
public class User {
    @Autowired
    private Article article;

    public void action() {
        article.action();
    }
}
注意:示例中使@Component将Java类声明成Spring Bean,除了这一注解你还可以使用@Controller,@Service,@Repository等注解… 同样@Autowired也可使用其他注解来代替,这里为了简明介绍不再陈述。
1.8.2 基于Java的Bean装配
同样我们可以再Spring的Java配置类中对SpringBean进行配置
- 使用 @Bean 注解将方法返回的实例对象添加到上下文中
- 在@Bean返回的实例对象中可以通过构造器注入传入相关依赖
@Configuration
@ComponentScan("com.jimisun")
public class WebConfig {

    @Bean
    public User user() {
        return new User(myArticle());
    }

    @Bean
    public MyArticle myArticle() {
        return new MyArticle();
    }
}
1.8.3 基于XML的Bean装配
对于在XML中进行配置可能是我们经常使用的,在以前的Spring版本中几乎我们都是使用XML进行配置Spring,下面我们简单来看一下。
<?xml version="1.0" encoding="UTF-8"?>
<beans xmlns="http://www.springframework.org/schema/beans"
       xmlns:xsi="http://www.w3.org/2001/XMLSchema-instance"
       xsi:schemaLocation="http://www.springframework.org/schema/beans http://www.springframework.org/schema/beans/spring-beans-4.0.xsd">

    <bean class="com.jimisun.spring.example.User" id="user">
        <constructor-arg ref="myArticle"/>
    </bean>

    <bean class="com.jimisun.spring.example.MyArticle" id="myArticle"></bean>

</beans>
注意:在实际应用中如何不想被海量的标签埋没前,你应当优先使用隐式的Bean发现机制和自动装配和在Java中进行装配,最后再选择使用在XML中配置。
1.8.4 小结
最后值得一提的是在实际项目中我们通常都会选择组合使用
- 隐式的Bean发现机制和Java中进行装配进行组合
- 隐式的Bean发现机制和XML配置进行组合
1.9 AOP
AOP (Aspect Orient Programming),直译过来就是 面向切面编程。AOP 是一种编程思想,是面向对象编程(OOP)的一种补充。面向对象编程将程序抽象成各个层次的对象,而面向切面编程是将程序抽象成各个切面。
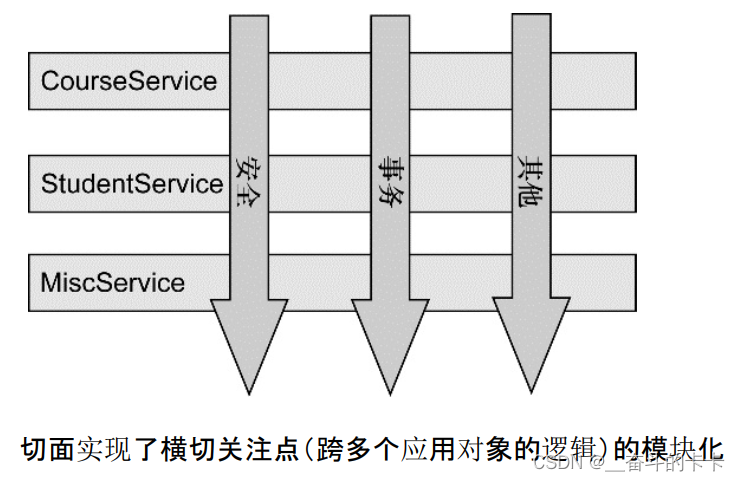
从该图可以很形象地看出,所谓切面,相当于应用对象间的横切点,我们可以将其单独抽象为单独的模块。
1.9.1 为什么需要 AOP
想象下面的场景,开发中在多个模块间有某段重复的代码,我们通常是怎么处理的?显然,没有人会靠“复制粘贴”吧。在传统的面向过程编程中,我们也会将这段代码,抽象成一个方法,然后在需要的地方分别调用这个方法,这样当这段代码需要修改时,我们只需要改变这个方法就可以了。然而需求总是变化的,有一天,新增了一个需求,需要再多出做修改,我们需要再抽象出一个方法,然后再在需要的地方分别调用这个方法,又或者我们不需要这个方法了,我们还是得删除掉每一处调用该方法的地方。实际上涉及到多个地方具有相同的修改的问题我们都可以通过 AOP 来解决。
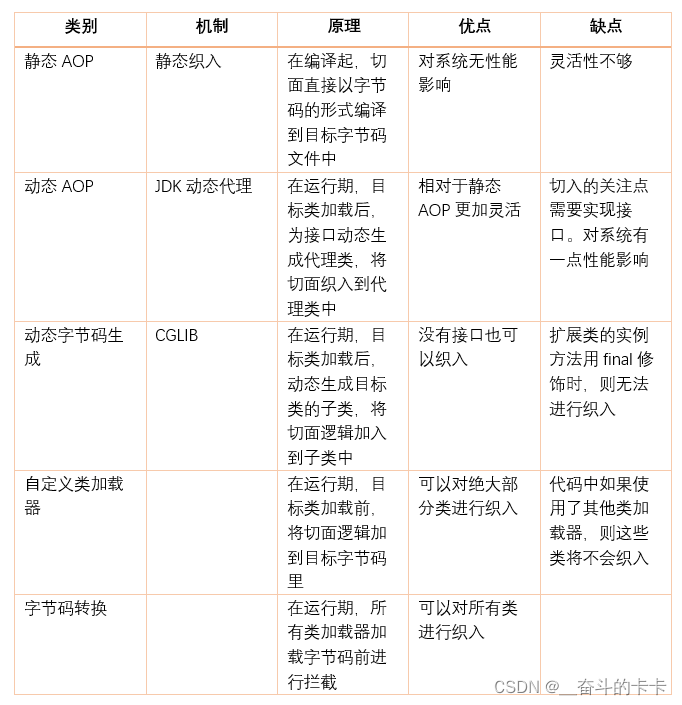
1.9.2 AOP 实现分类
AOP 要达到的效果是,保证开发者不修改源代码的前提下,去为系统中的业务组件添加某种通用功能。AOP 的本质是由 AOP 框架修改业务组件的多个方法的源代码,按照 AOP 框架修改源代码的时机,可以将其分为两类:
- 静态 AOP 实现, AOP 框架在编译阶段对程序源代码进行修改,生成了静态的 AOP 代理类(生成的 *.class 文件已经被改掉了,需要使用特定的编译器),比如 AspectJ。
- 动态 AOP 实现, AOP 框架在运行阶段对动态生成代理对象(在内存中以 JDK 动态代理,或 CGlib 动态地生成 AOP 代理类),如 SpringAOP。
下面给出常用 AOP 实现比较:
1.9.3 AOP 术语
AOP 领域中的特性术语:
- 通知(Advice): AOP 框架中的增强处理。通知描述了切面何时执行以及如何执行增强处理。
- 连接点(join point): 连接点表示应用执行过程中能够插入切面的一个点,这个点可以是方法的调用、异常的抛出。在 Spring AOP 中,连接点总是方法的调用。
- 切点(PointCut): 可以插入增强处理的连接点。
- 切面(Aspect): 切面是通知和切点的结合。
- 引入(Introduction):引入允许我们向现有的类添加新的方法或者属性。
- 织入(Weaving): 将增强处理添加到目标对象中,并创建一个被增强的对象,这个过程就是织入。
概念看起来总是有点懵,并且上述术语,不同的参考书籍上翻译还不一样,所以需要慢慢在应用中理解。
1.9.4 AOP简单示例
下面先上代码,对着代码说比较好说,看下面这个例子:
首先创建一个接口 IBuy.java
package com.sharpcj.aopdemo.test1;

public interface IBuy {
    String buy();
}
Boy 和 Gril 两个类分别实现了这个接口:
Boy.java
package com.sharpcj.aopdemo.test1;

import org.springframework.stereotype.Component;

@Component
public class Boy implements IBuy {
    @Override
    public String buy() {
        System.out.println("男孩买了一个游戏机");
        return "游戏机";
    }
}
Girl.java
package com.sharpcj.aopdemo.test1;

import org.springframework.stereotype.Component;

@Component
public class Girl implements IBuy {
    @Override
    public String buy() {
        System.out.println("女孩买了一件漂亮的衣服");
        return "衣服";
    }
}
配置文件, AppConfig.java
package com.sharpcj.aopdemo;

import org.springframework.context.annotation.ComponentScan;
import org.springframework.context.annotation.Configuration;

@Configuration
@ComponentScan(basePackageClasses = {com.sharpcj.aopdemo.test1.IBuy.class})
public class AppConfig {
}
测试类, AppTest.java
package com.sharpcj.aopdemo;

import com.sharpcj.aopdemo.test1.Boy;
import com.sharpcj.aopdemo.test1.Girl;
import org.springframework.context.annotation.AnnotationConfigApplicationContext;

public class AppTest {
    public static void main(String[] args) {
        AnnotationConfigApplicationContext context = new AnnotationConfigApplicationContext(AppConfig.class);
        Boy boy = context.getBean("boy",Boy.class);
        Girl girl = (Girl) context.getBean("girl");
        boy.buy();
        girl.buy();
    }
}
运行结果:

这里运用SpringIOC里的自动部署。现在需求改变了,我们需要在男孩和女孩的 buy 方法之前,需要打印出“男孩女孩都买了自己喜欢的东西”。用 Spring AOP 来实现这个需求只需下面几个步骤:
定义一个切面类,BuyAspectJ.java
package com.sharpcj.aopdemo.test1;

import org.aspectj.lang.annotation.Aspect;
import org.aspectj.lang.annotation.Before;
import org.springframework.stereotype.Component;

@Aspect
@Component
public class BuyAspectJ {
    @Before("execution(* com.sharpcj.aopdemo.test1.IBuy.buy(..))")
    public void haha(){
        System.out.println("男孩女孩都买自己喜欢的东西");
    }
}
这个类,我们使用了注解 @Component 表明它将作为一个Spring Bean 被装配,使用注解 @Aspect 表示它是一个切面。
类中只有一个方法 haha 我们使用 @Before 这个注解,表示他将在方法执行之前执行。
参数(“execution(* com.sharpcj.aopdemo.test1.IBuy.buy(…))”) 声明了切点,表明在该切面的切点是com.sharpcj.aopdemo.test1.Ibuy这个接口中的buy方法。
在配置文件中启用AOP切面功能
package com.sharpcj.aopdemo;

import org.springframework.context.annotation.ComponentScan;
import org.springframework.context.annotation.Configuration;
import org.springframework.context.annotation.EnableAspectJAutoProxy;

@Configuration
@ComponentScan(basePackageClasses = {com.sharpcj.aopdemo.test1.IBuy.class})
@EnableAspectJAutoProxy(proxyTargetClass = true)
public class AppConfig {
}
我们在配置文件类增加了@EnableAspectJAutoProxy注解,启用了 AOP 功能,参数proxyTargetClass的值设为了 true 。默认值是 false。
- proxyTargetClass
- true
- 目标对象实现了接口 – 使用CGLIB代理机制
- 目标对象没有接口(只有实现类) – 使用CGLIB代理机制
- false
- 目标对象实现了接口 – 使用JDK动态代理机制(代理所有实现了的接口)
- 目标对象没有接口(只有实现类) – 使用CGLIB代理机制
- true
表格形式
| proxyTargetClass | 目标对象特征 | 代理效果 |
|---|---|---|
| true | 目标对象实现了接口 | 使用CGLIB代理机制 |
| true | 目标对象没有接口(只有实现类) | 使用CGLIB代理机制 |
| false | 目标对象实现了接口 | 使用JDK动态代理机制(代理所有实现了的接口) |
| false | 目标对象没有接口(只有实现类) | 使用CGLIB代理机制 |
| 测试结果: | ||
 | ||
| 我们看到,结果与我们需求一致,我们并没有修改 Boy 和 Girl 类的 Buy 方法,也没有修改测试类的代码,几乎是完全无侵入式地实现了需求。这就是 AOP 的“神奇”之处 |
1.9.5 execution表达式写法
由于Spring切面粒度最小是达到方法级别,而execution表达式可以用于明确指定方法返回类型,类名,方法名和参数名等与方法相关的部件,并且在Spring中,大部分需要使用AOP的业务场景也只需要达到方法级别即可,因而execution表达式的使用是最为广泛的。
在Spring Aop中要使用AspectJ的切点表达式语言来定义切点,Spring仅仅支持AspectJ切点指示器的一个子集,下表列出了Spring AOP所支持的AspectJ切点指示器:
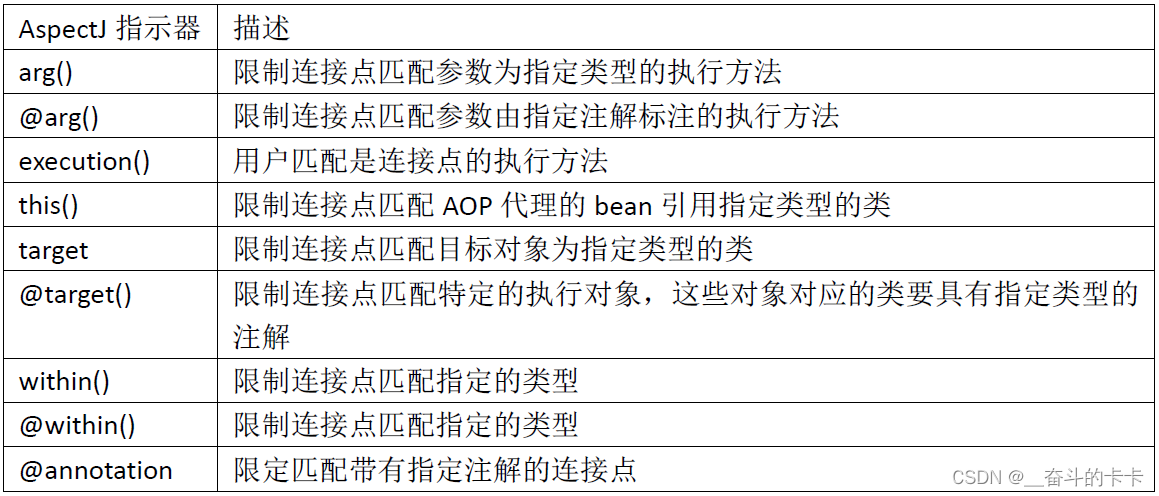
在Spring中尝试使用AspectJ其他指示器时会抛出IlleagalArgumentException。以上指示器中只有execution指示器是实际执行匹配的,而其他的指示器都是用来限制匹配的。
一个常见的切点表达式如下图:
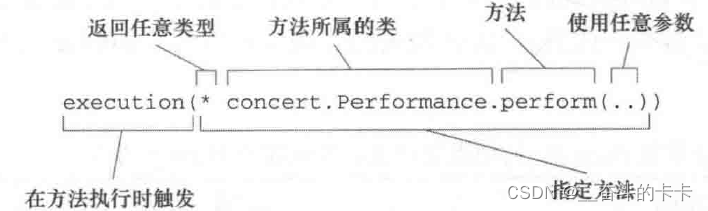
表达式以“*”号开始,表明了可以返回任何数据类型。对于参数列表使用两个点号(…),表明切点要选择任意的perform方法,不关心入参。
多个匹配之间我们可以使用链接符 &&、||、!来表示 “且”、“或”、“非”的关系。但是在使用 XML 文件配置时,这些符号有特殊的含义,所以我们使用 “and”、“or”、“not”来表示。
举例:
限定该切点仅匹配的包是 com.sharpcj.aopdemo.test1,可以使用
execution(* com.sharpcj.aopdemo.test1.IBuy.buy(..)) && within(com.sharpcj.aopdemo.test1.*)
1.9.4.1 execution示例
拦截任意公共方法
execution(public * *(..))
拦截以set开头的任意方法
execution(* set*(..))
拦截类或者接口中的方法
拦截AccountService(类、接口)中定义的所有方法
execution(* com.xyz.service.AccountService.*(..))
拦截包中定义的方法,不包含子包中的方法
拦截com.xyz.service包中所有类中任意方法,不包含子包中的类
execution(* com.xyz.service.*.*(..))
拦截包或者子包中定义的方法
拦截com.xyz.service包或者子包中定义的所有方法
execution(* com.xyz.service..*.*(..))
1.9.4.2 within表达式
within表达式的粒度为类,其参数为全路径的类名(可使用通配符),表示匹配当前表达式的所有类都将被当前方法环绕。
表达式格式:包名.* 或者 包名…*
拦截包中任意方法,不包含子包中的方法
拦截service包中任意类的任意方法
within(com.xyz.service.*)
拦截包或者子包中定义的方法
拦截service包及子包中任意类的任意方法
within(com.xyz.service..*)
1.9.4.3 args
args表达式的作用是匹配指定参数类型和指定参数数量的方法,无论其类路径或者是方法名是什么。这里需要注意的是,args指定的参数必须是全路径的。
如下示例表示匹配所有只有一个参数,并且参数类型是java.lang.String类型的方法:
args(java.lang.String)
也可以使用通配符,但这里通配符只能使用…,而不能使用*。如下是使用通配符的实例,该切点表达式将匹配第一个参数为java.lang.String,最后一个参数为java.lang.Integer,并且中间可以有任意个数和类型参数的方法:
args(java.lang.String,..,java.lang.Integer)
1.9.6 通过注解配置 Spring AOP
修改 BuyAspectJ.java
package com.sharpcj.aopdemo.test1;

import org.aspectj.lang.annotation.Aspect;
import org.aspectj.lang.annotation.Before;
import org.springframework.stereotype.Component;

@Aspect
@Component
public class BuyAspectJ {
    @Before("execution(* com.sharpcj.aopdemo.test1.IBuy.buy(..)) && within(com.sharpcj.aopdemo.test1.*) && bean(girl)")
    public void hehe(){
        System.out.println("男孩女孩都买自己喜欢的东西");
    }
}
此时,切面只会对 Girl.java 这个类生效,执行结果:

1.9.6.1 通过注解声明 5 种通知类型
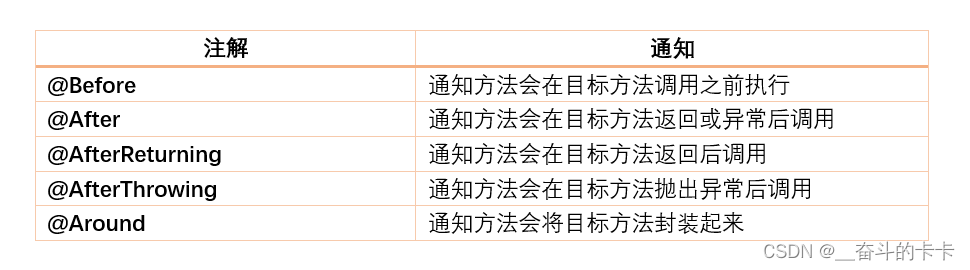
下面修改切面类:
package com.sharpcj.aopdemo.test1;

import org.aspectj.lang.ProceedingJoinPoint;
import org.aspectj.lang.annotation.*;
import org.springframework.stereotype.Component;

@Aspect
@Component
public class BuyAspectJ {
    @Before("execution(* com.sharpcj.aopdemo.test1.IBuy.buy(..))")
    public void hehe() {
        System.out.println("before ...");
    }

    @After("execution(* com.sharpcj.aopdemo.test1.IBuy.buy(..))")
    public void haha() {
        System.out.println("After ...");
    }

    @AfterReturning("execution(* com.sharpcj.aopdemo.test1.IBuy.buy(..))")
    public void xixi() {
        System.out.println("AfterReturning ...");
    }

    @Around("execution(* com.sharpcj.aopdemo.test1.IBuy.buy(..))")
    public void xxx(ProceedingJoinPoint pj) {
        try {
            System.out.println("Around aaa ...");
            pj.proceed();
            System.out.println("Around bbb ...");
        } catch (Throwable throwable) {
            throwable.printStackTrace();
        }
    }

}
为了方便看效果,我们测试类中,只要 Boy 类:
package com.sharpcj.aopdemo;

import com.sharpcj.aopdemo.test1.Boy;
import com.sharpcj.aopdemo.test1.Girl;
import org.springframework.context.annotation.AnnotationConfigApplicationContext;

public class AppTest {
    public static void main(String[] args) {
        AnnotationConfigApplicationContext context = new AnnotationConfigApplicationContext(AppConfig.class);
        Boy boy = context.getBean("boy",Boy.class);
        Girl girl = (Girl) context.getBean("girl");
        boy.buy();
        // girl.buy();
    }
}
执行结果如下:

结果显而易见。指的注意的是 @Around 修饰的环绕通知类型,是将整个目标方法封装起来了,在使用时,我们传入了 ProceedingJoinPoint 类型的参数,这个对象是必须要有的,并且需要调用 ProceedingJoinPoint 的 proceed() 方法。 如果没有调用 该方法,执行结果为 :
Around aaa …
Around bbb …
After …
AfterReturning …
可见,如果不调用该对象的 proceed() 方法,表示原目标方法被阻塞调用,当然也有可能你的实际需求就是这样。
1.9.7 通过注解声明切点表达式
如你看到的,上面我们写的多个通知使用了相同的切点表达式,对于像这样频繁出现的相同的表达式,我们可以使用 @Pointcut注解声明切点表达式,然后使用表达式,修改代码如下:
BuyAspectJ.java
package com.sharpcj.aopdemo.test1;

import org.aspectj.lang.ProceedingJoinPoint;
import org.aspectj.lang.annotation.*;
import org.springframework.stereotype.Component;

@Aspect
@Component
public class BuyAspectJ {

    @Pointcut("execution(* com.sharpcj.aopdemo.test1.IBuy.buy(..))")
    public void point(){}

    @Before("point()")
    public void hehe() {
        System.out.println("before ...");
    }

    @After("point()")
    public void haha() {
        System.out.println("After ...");
    }

    @AfterReturning("point()")
    public void xixi() {
        System.out.println("AfterReturning ...");
    }

    @Around("point()")
    public void xxx(ProceedingJoinPoint pj) {
        try {
            System.out.println("Around aaa ...");
            pj.proceed();
            System.out.println("Around bbb ...");
        } catch (Throwable throwable) {
            throwable.printStackTrace();
        }
    }
}
程序运行结果没有变化。
这里,我们使用
@Pointcut("execution(* com.sharpcj.aopdemo.test1.IBuy.buy(..))")
public void point(){}
声明了一个切点表达式,该方法 point 的内容并不重要,方法名也不重要,实际上它只是作为一个标识,供通知使用。
1.9.8 通过注解处理通知中的参数
上面的例子,我们要进行增强处理的目标方法没有参数,下面我们来说说有参数的情况,并且在增强处理中使用该参数。
下面我们给接口增加一个参数,表示购买所花的金钱。通过AOP 增强处理,如果女孩买衣服超过了 68 元,就可以赠送一双袜子。
更改代码如下:
IBuy.java
package com.sharpcj.aopdemo.test1;

public interface IBuy {
    String buy(double price);
}
Girl.java

package com.sharpcj.aopdemo.test1;

import org.springframework.stereotype.Component;

@Component
public class Girl implements IBuy {
    @Override
    public String buy(double price) {
        System.out.println(String.format("女孩花了%s元买了一件漂亮的衣服", price));
        return "衣服";
    }
}
Boy.java
package com.sharpcj.aopdemo.test1;

import org.springframework.stereotype.Component;

@Component
public class Boy implements IBuy {
    @Override
    public String buy(double price) {
        System.out.println(String.format("男孩花了%s元买了一个游戏机", price));
        return "游戏机";
    }
}
再看 BuyAspectJ 类,我们将之前的通知都注释掉。用一个环绕通知来实现这个功能:
package com.sharpcj.aopdemo.test1;

import org.aspectj.lang.ProceedingJoinPoint;
import org.aspectj.lang.annotation.*;
import org.springframework.stereotype.Component;

@Aspect
@Component
public class BuyAspectJ {

    /*
    @Pointcut("execution(* com.sharpcj.aopdemo.test1.IBuy.buy(..))")
    public void point(){}

    @Before("point()")
    public void hehe() {
        System.out.println("before ...");
    }

    @After("point()")
    public void haha() {
        System.out.println("After ...");
    }

    @AfterReturning("point()")
    public void xixi() {
        System.out.println("AfterReturning ...");
    }

    @Around("point()")
    public void xxx(ProceedingJoinPoint pj) {
        try {
            System.out.println("Around aaa ...");
            pj.proceed();
            System.out.println("Around bbb ...");
        } catch (Throwable throwable) {
            throwable.printStackTrace();
        }
    }
    */


    @Pointcut("execution(String com.sharpcj.aopdemo.test1.IBuy.buy(double)) && args(price) && bean(girl)")
    public void gif(double price) {
    }

    @Around("gif(price)")
    public String hehe(ProceedingJoinPoint pj, double price){
        try {
            pj.proceed();
            if (price > 68) {
                System.out.println("女孩买衣服超过了68元,赠送一双袜子");
                return "衣服和袜子";
            }
        } catch (Throwable throwable) {
            throwable.printStackTrace();
        }
        return "衣服";
    }
}
前文提到,当不关心方法返回值的时候,我们在编写切点指示器的时候使用了 * , 当不关心方法参数的时候,我们使用了 …。现在如果我们需要传入参数,并且有返回值的时候,则需要使用对应的类型。在编写通知的时候,我们也需要声明对应的返回值类型和参数类型。
测试类:AppTest.java
package com.sharpcj.aopdemo;

import com.sharpcj.aopdemo.test1.Boy;
import com.sharpcj.aopdemo.test1.Girl;
import org.springframework.context.annotation.AnnotationConfigApplicationContext;

public class AppTest {
    public static void main(String[] args) {
        AnnotationConfigApplicationContext context = new AnnotationConfigApplicationContext(AppConfig.class);
        Boy boy = context.getBean("boy",Boy.class);
        Girl girl = (Girl) context.getBean("girl");
        String boyBought = boy.buy(35);
        String girlBought = girl.buy(99.8);

        System.out.println("男孩买到了:" + boyBought);
        System.out.println("女孩买到了:" + girlBought);
    }
}
测试结果:

可以看到,我们成功通过 AOP 实现了需求,并将结果打印了出来。
1.9.10 通过注解配置织入的方式
前面还有一个遗留问题,在配置文件中,我们用注解 @EnableAspectJAutoProxy() 启用Spring AOP 的时候,我们给参数 proxyTargetClass 赋值为 true,如果我们不写参数,默认为 false。这个时候运行程序,程序抛出异常。

这是一个强制类型转换异常。为什么会抛出这个异常呢?或许已经能够想到,这跟Spring AOP 动态代理的机制有关,这个 proxyTargetClass 参数决定了代理的机制。当这个参数为 false 时,通过jdk的基于接口的方式进行织入,这时候代理生成的是一个接口对象,将这个接口对象强制转换为实现该接口的一个类,自然就抛出了上述类型转换异常。
反之,proxyTargetClass 为 true,则会使用 cglib 的动态代理方式。这种方式的缺点是拓展类的方法被final修饰时,无法进行织入。
测试一下,我们将 proxyTargetClass 参数设为 true,同时将 Girl.java 的 Buy 方法用 final 修饰:
AppConfig.java
package com.sharpcj.aopdemo;

import org.springframework.context.annotation.ComponentScan;
import org.springframework.context.annotation.Configuration;
import org.springframework.context.annotation.EnableAspectJAutoProxy;

@Configuration
@ComponentScan(basePackageClasses = {com.sharpcj.aopdemo.test1.IBuy.class})
@EnableAspectJAutoProxy(proxyTargetClass = true)
public class AppConfig {
}
Girl.java
package com.sharpcj.aopdemo.test1;

import org.springframework.stereotype.Component;

@Component
public class Girl implements IBuy {
    @Override
    public final String buy(double price) {
        System.out.println(String.format("女孩花了%s元买了一件漂亮的衣服", price));
        return "衣服";
    }
}
此时运行结果:

可以看到,我们的切面并没有织入生效。
1.9.11 通过 XML 配置文件声明切面
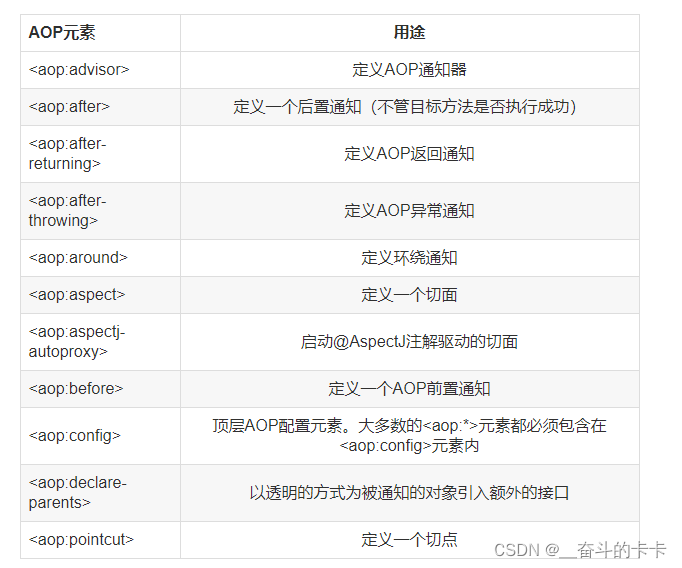
前面的示例中,我们已经展示了如何通过注解配置去声明切面,下面我们看看如何在 XML 文件中声明切面。下面先列出 XML 中声明 AOP 的常用元素:
我们依然可以使用<aop:aspectj-autoproxy>元素,他能够自动代理AspectJ注解的通知类。
1.9.11.1 XML 配置文件中切点指示器
在XML配置文件中,切点指示器表达式与通过注解配置的写法基本一致,区别前面有提到,即XML文件中需要使用 “and”、“or”、“not”来表示 “且”、“或”、“非”的关系。
1.9.11.2 XML 文件配置 AOP 实例
下面我们不使用任何注解改造上面的例子:
BuyAspectJ.java
package com.sharpcj.aopdemo.test2;

import org.aspectj.lang.ProceedingJoinPoint;

public class BuyAspectJ {

    public void hehe() {
        System.out.println("before ...");
    }

    public void haha() {
        System.out.println("After ...");
    }

    public void xixi() {
        System.out.println("AfterReturning ...");
    }

    public void xxx(ProceedingJoinPoint pj) {
        try {
            System.out.println("Around aaa ...");
            pj.proceed();
            System.out.println("Around bbb ...");
        } catch (Throwable throwable) {
            throwable.printStackTrace();
        }
    }
}
在 Resource 目录下新建一个配置文件 aopdemo.xml :
<?xml version="1.0" encoding="UTF-8"?>
<beans xmlns="http://www.springframework.org/schema/beans"
       xmlns:xsi="http://www.w3.org/2001/XMLSchema-instance" xmlns:aop="http://www.springframework.org/schema/aop"
       xsi:schemaLocation="http://www.springframework.org/schema/beans http://www.springframework.org/schema/beans/spring-beans.xsd http://www.springframework.org/schema/aop http://www.springframework.org/schema/aop/spring-aop.xsd">

    <bean id="boy" class="com.sharpcj.aopdemo.test2.Boy"></bean>
    <bean id="girl" class="com.sharpcj.aopdemo.test2.Girl"></bean>
    <bean id="buyAspectJ" class="com.sharpcj.aopdemo.test2.BuyAspectJ"></bean>

    <aop:config proxy-target-class="true">
        <aop:aspect id="qiemian" ref="buyAspectJ">
            <aop:before pointcut="execution(* com.sharpcj.aopdemo.test2.IBuy.buy(..))" method="hehe"/>
            <aop:after pointcut="execution(* com.sharpcj.aopdemo.test2.IBuy.buy(..))" method="haha"/>
            <aop:after-returning pointcut="execution(* com.sharpcj.aopdemo.test2.IBuy.buy(..))" method="xixi"/>
            <aop:around pointcut="execution(* com.sharpcj.aopdemo.test2.IBuy.buy(..))" method="xxx"/>
        </aop:aspect>
    </aop:config>
</beans>
这里分别定义了一个切面,里面包含四种类型的通知。
测试文件中,使用
ClassPathXmlApplicationContext context = new ClassPathXmlApplicationContext("aopdemo.xml");
来获取 ApplicationContext,其它代码不变。
1.9.11.3 XML 文件配置声明切点
对于频繁重复使用的切点表达式,我们也可以声明成切点。
配置文件如下:aopdemo.xml
<?xml version="1.0" encoding="UTF-8"?>
<beans xmlns="http://www.springframework.org/schema/beans"
       xmlns:xsi="http://www.w3.org/2001/XMLSchema-instance" xmlns:aop="http://www.springframework.org/schema/aop"
       xsi:schemaLocation="http://www.springframework.org/schema/beans http://www.springframework.org/schema/beans/spring-beans.xsd http://www.springframework.org/schema/aop http://www.springframework.org/schema/aop/spring-aop.xsd">

    <bean id="boy" class="com.sharpcj.aopdemo.test2.Boy"></bean>
    <bean id="girl" class="com.sharpcj.aopdemo.test2.Girl"></bean>
    <bean id="buyAspectJ" class="com.sharpcj.aopdemo.test2.BuyAspectJ"></bean>

    <aop:config proxy-target-class="true">
        <aop:pointcut id="apoint" expression="execution(* com.sharpcj.aopdemo.test2.IBuy.buy(..))"/>
        <aop:aspect id="qiemian" ref="buyAspectJ">
            <aop:before pointcut-ref="apoint" method="hehe"/>
            <aop:after pointcut-ref="apoint" method="haha"/>
            <aop:after-returning pointcut-ref="apoint" method="xixi"/>
            <aop:around pointcut-ref="apoint" method="xxx"/>
        </aop:aspect>
    </aop:config>
</beans>
1.9.11.4 XML文件配置为通知传递参数
BuyAspectJ.java
package com.sharpcj.aopdemo.test2;

import org.aspectj.lang.ProceedingJoinPoint;

public class BuyAspectJ {
public String hehe(ProceedingJoinPoint pj, double price){
        try {
            pj.proceed();
            if (price > 68) {
                System.out.println("女孩买衣服超过了68元,赠送一双袜子");
                return "衣服和袜子";
            }
        } catch (Throwable throwable) {
            throwable.printStackTrace();
        }
        return "衣服";
    }
}
aopdemo.xml
<?xml version="1.0" encoding="UTF-8"?>
<beans xmlns="http://www.springframework.org/schema/beans"
       xmlns:xsi="http://www.w3.org/2001/XMLSchema-instance" xmlns:aop="http://www.springframework.org/schema/aop"
       xsi:schemaLocation="http://www.springframework.org/schema/beans http://www.springframework.org/schema/beans/spring-beans.xsd http://www.springframework.org/schema/aop http://www.springframework.org/schema/aop/spring-aop.xsd">

    <bean id="boy" class="com.sharpcj.aopdemo.test2.Boy"></bean>
    <bean id="girl" class="com.sharpcj.aopdemo.test2.Girl"></bean>
    <bean id="buyAspectJ" class="com.sharpcj.aopdemo.test2.BuyAspectJ"></bean>

    <aop:config proxy-target-class="true">
        <aop:pointcut id="apoint" expression="execution(String com.sharpcj.aopdemo.test2.IBuy.buy(double)) and args(price) and bean(girl)"/>
        <aop:aspect id="qiemian" ref="buyAspectJ">
            <aop:around pointcut-ref="apoint" method="hehe"/>
        </aop:aspect>
    </aop:config>
</beans>
1.9.11.5 Xml 文件配置织入的方式
同注解配置类似,
CGlib 代理方式:
<aop:config proxy-target-class="true"> </aop:config>
JDK 代理方式:
<aop:config proxy-target-class="false"> </aop:config>
1.10 Spring中的事务管理
Spring在不同的事务管理API之上定义了一个抽象层,使得开发人员不必了解底层的事务管理API就可以使用Spring的事务管理机制。Spring支持编程式事务管理和声明式的事务管理。
事务就是把一系列的动作当成一个独立的工作单元,这些动作要么全部完成,要么全部不起作用。
1.10.1 事务四个属性ACID
- 原子性(atomicity)
事务是原子性操作,由一系列动作组成,事务的原子性确保动作要么全部完成,要么完全不起作用
- 一致性(consistency)
一旦所有事务动作完成,事务就要被提交。数据和资源处于一种满足业务规则的一致性状态中
- 隔离性(isolation)
可能多个事务会同时处理相同的数据,因此每个事务都应该与其他事务隔离开来,防止数据损坏
- 持久性(durability)
事务一旦完成,无论系统发生什么错误,结果都不会受到影响。通常情况下,事务的结果被写到持久化存储器中
1.10.1 编程式事务管理
将事务管理代码嵌到业务方法中来控制事务的提交和回滚
缺点:必须在每个事务操作业务逻辑中包含额外的事务管理代码
自己手动控制事务,就叫做编程式事务控制
Jdbc代码:
Conn.setAutoCommit(false); // 设置手动控制事务
Hibernate代码:
Session.beginTransaction(); // 开启一个事务
【细粒度的事务控制: 可以对指定的方法、指定的方法的某几行添加事务控制】
1.10.2 声明式事务管理
将事务管理代码从业务方法中分离出来,以声明的方式来实现事务管理,Sping提供了两种实现声明式事务的方式:
- XML版配置
- 注解版配置
将事务管理作为横切关注点,通过aop方法模块化。Spring中通过Spring AOP框架支持声明式事务管理。
Spring提供了对事务的管理, 这个就叫声明式事务管理。
Spring提供了对事务控制的实现。用户如果想用Spring的声明式事务管理,只需要在配置文件中配置即可; 不想使用时直接移除配置。这个实现了对事务控制的最大程度的解耦。
Spring声明式事务管理,核心实现就是基于Aop。
Spring声明式事务管理器类:
Jdbc技术:DataSourceTransactionManager
Hibernate技术:HibernateTransactionManager
【粗粒度的事务控制: 只能给整个方法应用事务,不可以对方法的某几行应用事务。】 (因为aop拦截的是方法。)
1.10.2.1 事务管理器
无论使用Spring的哪种事务管理策略(编程式或者声明式)事务管理器都是必须的。
就是 Spring的核心事务管理抽象,管理封装了一组独立于技术的方法。
JDBC事务管理器
<bean id="transactionManager"class="org.springframework.jdbc.datasource.DataSourceTransactionManager">
       <property name="dataSource" ref="dataSource" />
</bean>
1.10.2.2 Spring声明式事务管理------XML版配置
<!-- AOP事务管理start。。。 -->
<!--HibernateTransactionManager类中有setSessionFactory(),将sessionFactory注入-->
    <bean id="txManager" class="org.springframework.orm.hibernate3.HibernateTransactionManager">
        <property name="sessionFactory" ref="sessionFactory"/>
    </bean>

<!--将我们想要施加在事务中的语义封装在<tx:advice/>中,其中默认的设置为:事务性传播设置是REQUIRED;隔离级别为DEFAULT;事务是读/写;事务超时默认是依赖于事务系统的,或者事务超时没有被支持;任何 RuntimeException将触发事务回滚,但是任何checked Exception 将不触发事务回滚。-->
    <tx:advice id="txAdvice" transaction-manager="txManager">
        <tx:attributes>
            <tx:method name="save*" propagation="REQUIRED"/>
            <tx:method name="add*" propagation="REQUIRED"/>
            <tx:method name="delete*" propagation="REQUIRED"/>
            <tx:method name="test*" propagation="REQUIRED"/>
        </tx:attributes>
    </tx:advice>

<!--设置一个pointcut确保由"txAdvice"bean定义的事务通知在应用中合适的点来执行,然后使用一个通知器(advisor)将该切面与txAdvice绑定到一起,其中expression的属性是织入点语法,com.niu.service包下任意包(..)的任意实现类(*)的任意方法(*)参数任意(..)-->
    <aop:config>
        <aop:pointcut expression="execution(public * com.niu.service..*.*(..))" id="transactionAop"/>
        <aop:advisor advice-ref="txAdvice" pointcut-ref="transactionAop"/>
    </aop:config>
<!-- AOP事务管理-->
以上配置为service层的一些方法加入了事务管理,当它们被调用时,一个事务将被启动、挂起、被标记为只读,或者其他(取决于你定义的语义)。
回滚规则:
<!--指定异常回滚类型-->
<tx:method name="save*" propagation="REQUIRED"
rollback-for="NoProductInStockException"/>

<!--即使遇到没有经过处理的InstrumentNotFoundException异常,也不要回滚事务-->
<tx:method name="save*" propagation="REQUIRED"
no-rollback-for="InstrumentNotFoundException"/>
<tx:method>设置:
| 属性 | 是否需要 | 默认值 | 描述 |
|---|---|---|---|
| name | 是 | 与事务属性关联的方法名 | |
| propagation | 不 | REQUIRED | 事务传播行为 |
| isolation | 不 | DEFAULT | 事务隔离级别 |
| timeout | 不 | -1 | 事务超时时间,以秒为单位 |
| readonly | 不 | false | 事务是否只读 |
| rollback-for | 不 | 将被触发回滚的Exception,以逗号隔开 | |
| no-rollback-for | 不 | 不被触发回滚的Exception,以逗号隔开 |
1.10.2.3 Spring声明式事务管理------注解版配置
<beans xmlns:tx="http://www.springframework.org/schema/tx"
    xsi:schemaLocation=
        "http://www.springframework.org/schema/tx
         http://www.springframework.org/schema/tx/spring-tx-2.5.xsd">

<bean id="txManager" class="org.springframework.orm.hibernate3.HibernateTransactionManager">
    <property name="sessionFactory" ref="sessionFactory" />
</bean>
<!--启动注解版事务管理开关-->
<tx:annotation-driven transaction-manager="txManager"/>

<beans/>
在xml中的配置工作就完成了,将@Transactional标签加入需要开启事务管理的接口定义、接口方法、类定义、类方法(public)上。注:@Transactional只是一种元数据,根本在于tx:annotation-driven标签开启了事务。建议将@Transactional 使用在具体类(方法)上。
tx:annotation-driven配置
| 属性 | 默认值 | 描述 |
|---|---|---|
| transaction-manager | transactionManager | 使用的事务管理器的名字 |
| mode | proxy | 默认的模式“proxy”会用Spring的AOP框架来代理注解过的bean;另一种可行的模式“aspectj”会使用Spring的AspectJ事务切面来编织类 |
| proxy-target-class | false | 只对代理模式有效。决定为那些使用了@Transactional注解的类创建何种事务代理。 如果 “proxy-target-class” 属性被设为 “true”, 那么基于类的代理就会被创建。如果 “proxy-target-class”属性被设为”false” 或者没设,那么基于接口的标准JDK代理就会被创建 |
| order | Ordered.LOWEST_PRECEDENCE | 定义事务通知的顺序会作用到使用@Transactional注解的bean上 |
@Transactional注解的属性
| 属性 | 类型 | 描述 |
|---|---|---|
| propagation | 枚举型:Propagation | 可选的传播性设置 |
| isolation | 枚举型:isolation | 可选的隔离性级别(默认值:ISOLATION_DEFAULT) |
| readOnly | 布尔型 | 读写型事务 vs. 只读型事务 |
| timeout | int型(秒为单位) | 事务超时 |
| rollbackFor | 一组 Class 类的实例,必须是Throwable 的子类 | 一组异常类,遇到时 必须 进行回滚。默认情况下checked exceptions不进行回滚,仅unchecked exceptions(即RuntimeException的子类)才进行事务回滚 |
| rollbackForClassname | 一组 Class 类的名字,必须是Throwable的子类 | 一组异常类名,遇到时必须进行回滚 |
| noRollbackFor | 一组 Class 类的名字,必须是Throwable的子类 | 一组异常类名,遇到时必须不回滚 |
| noRollbackForClassname | 一组 Class 类的名字,必须是Throwable的子类 | 一组异常类名,遇到时必须不回滚 |
1.10.4 Spring事务传播特性
事务传播行为就是多个事务方法相互调用时,事务如何在这些方法间传播。spring支持7种事务传播行为:
propagation_requierd:如果当前没有事务,就新建一个事务,如果已存在一个事务中,加入到这个事务中,这是最常见的选择。
propagation_supports:支持当前事务,如果没有当前事务,就以非事务方法执行。
propagation_mandatory:使用当前事务,如果没有当前事务,就抛出异常。
propagation_required_new:新建事务,如果当前存在事务,把当前事务挂起。
propagation_not_supported:以非事务方式执行操作,如果当前存在事务,就把当前事务挂起。
propagation_never:以非事务方式执行操作,如果当前事务存在则抛出异常。
propagation_nested:如果当前存在事务,则在嵌套事务内执行。如果当前没有事务,则执行与propagation_required类似的操作
Spring 默认的事务传播行为是 PROPAGATION_REQUIRED,它适合于绝大多数的情况。

CSDN联合极客时间,共同打造面向开发者的精品内容学习社区,助力成长!
更多推荐


 22
22 0
0- 0


 已为社区贡献1条内容

所有评论(0)