Nacos + Gateway 实现动态刷新路由
Nacos + Gateway 实现动态刷新路由文章目录Nacos + Gateway 实现动态刷新路由一、一次微服务组件的替换二、Nacos + Spring Cloud Gateway + loadbalancer + resilience4j + openfeign 整合Demo2.1 创建工程spring-cloud-gateway-demo2.2 创建工程provider2.3 Naco
Nacos + Gateway 实现动态刷新路由
文章目录
一、一次微服务组件的替换
原有系统架构中的一些组件因着技术、业务不断的更新迭代已经渐现颓势,为此需要对一些微服务组件进行替换升级。
本文记录了其中的一部分升级过程,有不专业的地方还请指正。
替换项
服务注册中心:
Kubernetes DNS → Nacos
服务配置中心:
Spring Cloud Config → Nacos
路由网关:
Zuul → Spring Cloud Gateway
替换理由
-
注册中心
原有方案是使用linux的DNS作为注册中心,iptables路由表作转发规则。缺点是当iptables路由表逐渐增大时,路由效率会越来越低。
替代为Nacos后,首先在Spring Cloud Alibaba生态下,Nacos的功能迭代更新以及Bug修复能得到保障,同时能保证在服务增多的同时性能不会有太大的损耗。
同时Nacos最新的2.x版本已经支持gRPC的服务上/下线方式,能够做到几乎实时的服务上/下线感知,这是之前版本中的心跳机制所不能及的。
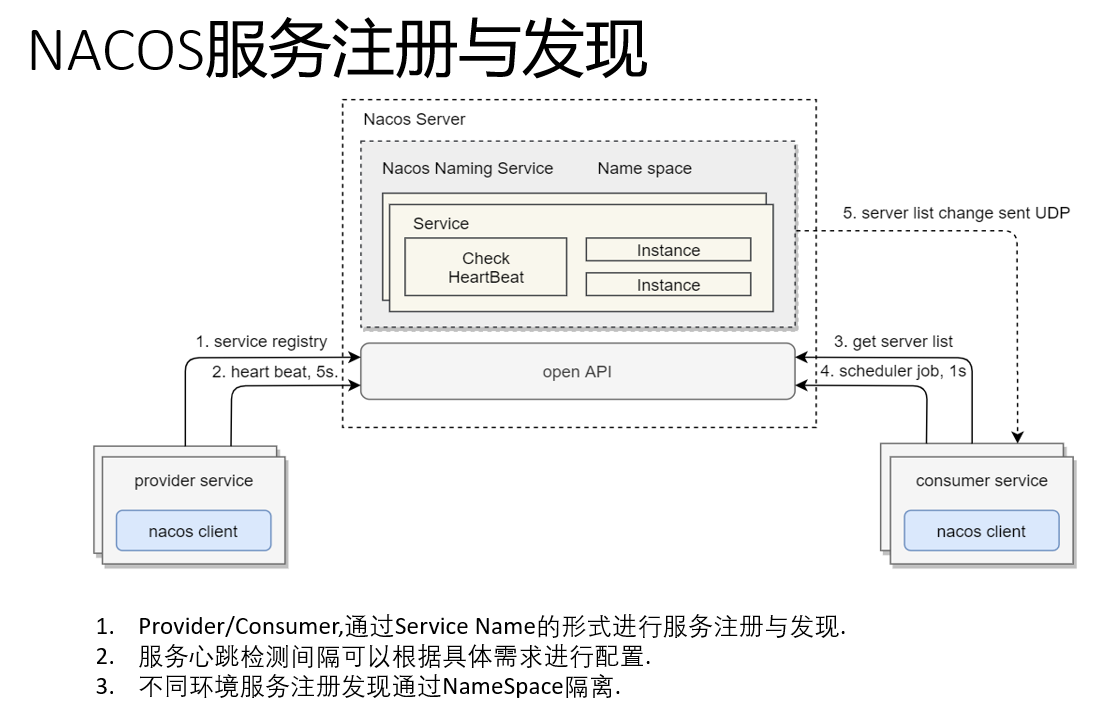
上图摘自某同事PPT -
配置中心
首先Nacos本身就是一个配置中心,既然已经使用其作为注册中心,那么为了后期便于维护,也没有必要引入别的组件。
同时Nacos不像Spring Cloud Config需要有一个git仓库来存储配置文件,它自身就提供了存储能力,同时也可以和DB结合使用。
Nacos还支持基于长轮询的方式来热更新配置文件,结合上Spring Cloud Gateway就能实现动态路由,这也是本文的主题。
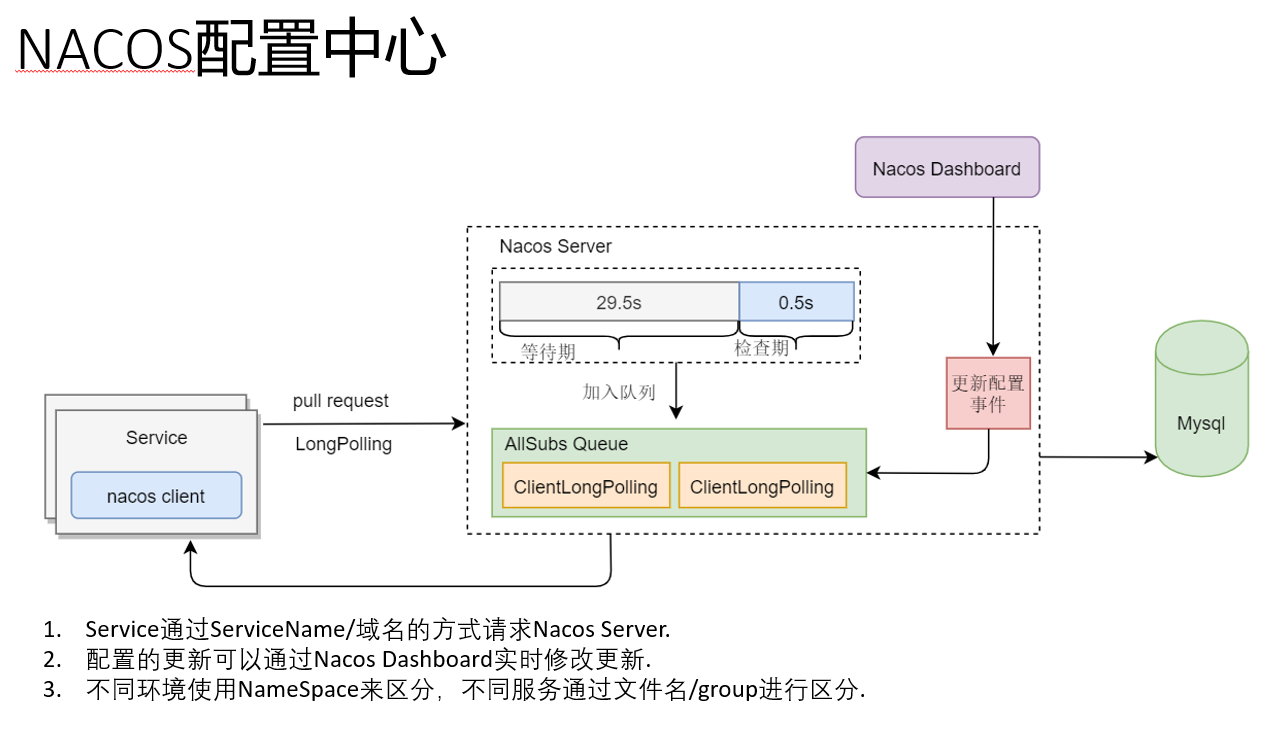
上图还是摘自那位同事PPT -
路由网关
Zuul 1.x已经不再维护,并且Zuul 2.x Spring官方似乎也无意集成。
Spring官方提供了一个简单、强大的替代方案——Spring Cloud Gateway。
网关的本质是对请求进行路由转发,以及对请求进行前置和后置的过滤,它类似于门面模式,接收客户端的所有请求,经过层层过滤后转发到后端的微服务中。
Spring Cloud Gateway较于Zuul的优势是显而易见的:
Zuul 1.x采用的是传统的thread per connection,也就是针对每一个请求,会为这个请求专门分配一个线程来处理,直到请求完成后才会释放线程,若后台服务器响应较慢,该线程就会被阻塞,所以性能并不是很好。
而Spring Cloud Gateway是基于WebFlux开发的响应式网关,WebFlux扫盲可以参考我引用部分WebFlux相关文章。

网关示意——摘自《Spring Cloud Alibaba 微服务原理与实战》
二、Nacos + Spring Cloud Gateway + loadbalancer + resilience4j + openfeign 整合Demo
因为是整体组件的升级,除了路由网关和注册/配置中心的升级外,本次也对负载均衡器、断路器做了升级,当然后两个并不是本文的重点。
负载均衡升级
Ribbon → loadbalancer
断路器升级
hystrix → resilience4j
2.1 创建工程spring-cloud-gateway-demo
build.gradle
plugins {
    id 'org.springframework.boot' version '2.5.3'
    id 'io.spring.dependency-management' version '1.0.11.RELEASE'
    id 'java'
}

group = 'com.individual'
version = '1.0.0-SNAPSHOT'
sourceCompatibility = '11'

configurations {
    compileOnly {
        extendsFrom annotationProcessor
    }
}

repositories {
    mavenCentral()
}

ext {
    set('springCloudVersion', "2020.0.3")
    set('springCloudAlibabaVersion', "2021.1")
}

dependencies {
    implementation 'org.springframework.boot:spring-boot-starter-data-jpa'
    implementation 'org.springframework.boot:spring-boot-starter-jdbc'
    implementation 'org.springframework.cloud:spring-cloud-starter-circuitbreaker-reactor-resilience4j'
    implementation 'org.springframework.cloud:spring-cloud-starter-gateway'
    implementation 'org.springframework.boot:spring-boot-starter-tomcat'
    implementation 'org.springframework.cloud:spring-cloud-starter-loadbalancer'
    implementation 'com.alibaba.cloud:spring-cloud-starter-alibaba-nacos-discovery'
    implementation 'com.alibaba.cloud:spring-cloud-starter-alibaba-nacos-config'
    implementation 'org.springframework.cloud:spring-cloud-starter-bootstrap'
    implementation 'org.springframework.cloud:spring-cloud-starter-openfeign'
    implementation 'mysql:mysql-connector-java'
    compileOnly 'org.projectlombok:lombok'
    developmentOnly 'org.springframework.boot:spring-boot-devtools'
    annotationProcessor 'org.springframework.boot:spring-boot-configuration-processor'
    annotationProcessor 'org.projectlombok:lombok'
    testImplementation 'org.springframework.boot:spring-boot-starter-test'
    testImplementation 'io.projectreactor:reactor-test'
}

dependencyManagement {
    imports {
        mavenBom "org.springframework.cloud:spring-cloud-dependencies:${springCloudVersion}"
        mavenBom "com.alibaba.cloud:spring-cloud-alibaba-dependencies:${springCloudAlibabaVersion}"
    }
}

test {
    useJUnitPlatform()
}
bootstrap.yml
因为application相关配置都放到nacos,所以一些前置配置都放在bootstrap.yml文件中
新版的spring-boot中使用bootstrap务必引用'org.springframework.cloud:spring-cloud-starter-bootstrap'
spring:
  application:
    name: spring-cloud-gateway-demo
  cloud:
    nacos:
      discovery:
        server-addr: localhost:8848
      config:
        server-addr: localhost:8848
        file-extension: yml
        shared-configs[0]:
          data-id: gateway-routes.yml # 配置文件名-Data Id
          group: DEFAULT_GROUP   # 默认为DEFAULT_GROUP
          refresh: true   # 是否动态刷新,默认为false
server:
  port: 8081
ProviderClient 调用下游服务的Client
@FeignClient("provider")
public interface ProviderClient {

    @GetMapping("/test")
    String test();

}
SpringCloudGatewayDemoApplication gateway 和 open-feign混用会导致feign找不到converter,需要自己配置一个bean
@RestController
@EnableDiscoveryClient
@SpringBootApplication
@EnableFeignClients
@RequiredArgsConstructor
public class SpringCloudGatewayDemoApplication {

    private final ProviderClient providerClient;

    @Bean
    @LoadBalanced
    RestTemplate getRestTemplate(){
        return new RestTemplate();
    }

    // https://q.cnblogs.com/q/128774/
    @Bean
    @ConditionalOnMissingBean
    public HttpMessageConverters messageConverters(ObjectProvider<HttpMessageConverter<?>> converters) {
        return new HttpMessageConverters(converters.orderedStream().collect(Collectors.toList()));
    }

    @GetMapping("/test")
    public String test(){
        return providerClient.test();
    }

    public static void main(String[] args) {
        SpringApplication.run(SpringCloudGatewayDemoApplication.class, args);
    }

}
2.2 创建工程provider
build.gradle
plugins {
    id 'org.springframework.boot' version '2.5.3'
    id 'io.spring.dependency-management' version '1.0.11.RELEASE'
    id 'java'
}

group = 'com.individual'
version = '1.0.0-SNAPSHOT'
sourceCompatibility = '11'

repositories {
    mavenCentral()
}

ext {
    set('springCloudVersion', "2020.0.3")
    set('springCloudAlibabaVersion', "2021.1")
}

dependencies {
    implementation 'org.springframework.boot:spring-boot-starter-data-jpa'
    implementation 'org.springframework.boot:spring-boot-starter-jdbc'
    implementation 'org.springframework.boot:spring-boot-starter-tomcat'
    implementation 'org.springframework.cloud:spring-cloud-starter-circuitbreaker-reactor-resilience4j'
    implementation 'org.springframework.cloud:spring-cloud-starter-gateway'
    implementation 'org.springframework.cloud:spring-cloud-starter-loadbalancer'
    implementation 'com.alibaba.cloud:spring-cloud-starter-alibaba-nacos-discovery'
    implementation 'org.springframework.cloud:spring-cloud-starter-bootstrap'
    implementation 'org.springframework.cloud:spring-cloud-starter-openfeign'
    implementation 'mysql:mysql-connector-java'
    compileOnly 'org.projectlombok:lombok'
//    developmentOnly 'org.springframework.boot:spring-boot-devtools'
    annotationProcessor 'org.springframework.boot:spring-boot-configuration-processor'
    annotationProcessor 'org.projectlombok:lombok'
    testImplementation 'org.springframework.boot:spring-boot-starter-test'
    testImplementation 'io.projectreactor:reactor-test'
}

dependencyManagement {
    imports {
        mavenBom "org.springframework.cloud:spring-cloud-dependencies:${springCloudVersion}"
        mavenBom "com.alibaba.cloud:spring-cloud-alibaba-dependencies:${springCloudAlibabaVersion}"
    }
}

test {
    useJUnitPlatform()
}
bootstrap.yml
spring:
  application:
    name: provider
server:
  port: 8082
application.yml
spring:
  datasource:
    driver-class-name: com.mysql.cj.jdbc.Driver
    username: root
    password: 123456
    url: jdbc:mysql:///otr_gateway
ProviderApplication
@Slf4j
@RestController
@EnableDiscoveryClient
@SpringBootApplication
public class ProviderApplication {

    @Value("${server.port}")
    Integer port;

    @GetMapping("/test")
    public String test(){
        log.info("port is: " + port);
        return "load balance service port: " + port;
    }

    public static void main(String[] args) {
        SpringApplication.run(ProviderApplication.class, args);
    }

}
2.3 Nacos Server Setup
下载nacos最新稳定版,解压并进入bin目录,在目录下打开shell,键入以下命令启动单点
.\startup.cmd -m standalone
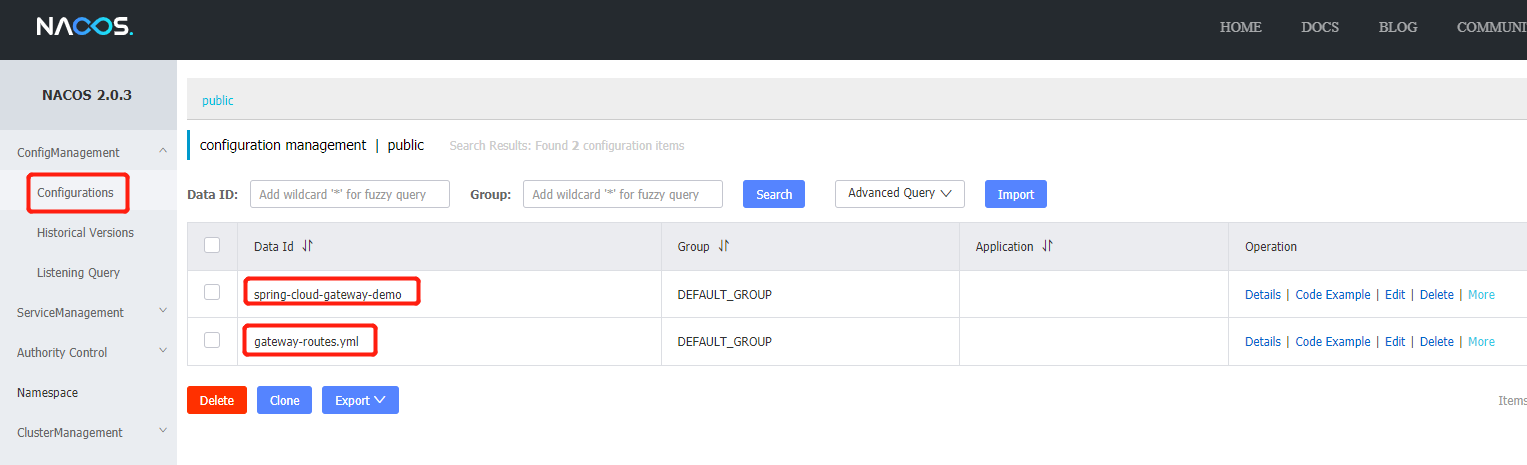
在configurations中创建两个yml文件(主要是为了演示Nacos中的配置分离 shared-config)
- spring-cloud-gateway-demo
- gateway-routes.yml
spring-cloud-gateway-demo
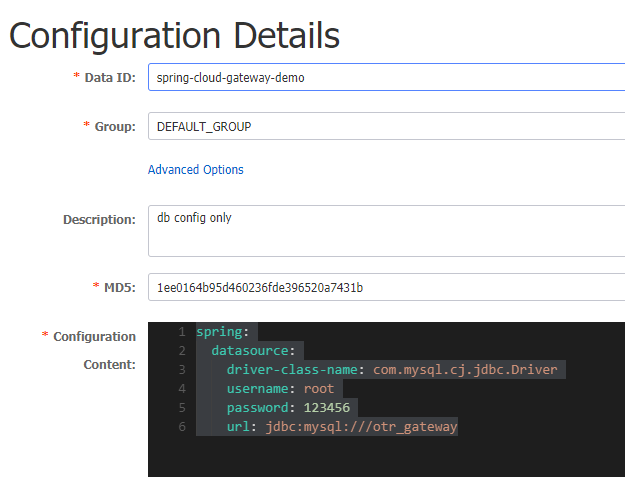
spring: datasource: driver-class-name: com.mysql.cj.jdbc.Driver username: root password: 123456 url: jdbc:mysql:///otr_gateway
gateway-routes.yml
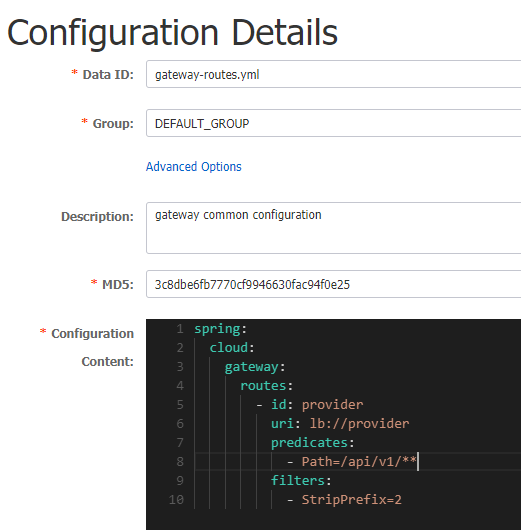
spring: cloud: gateway: routes: - id: provider uri: lb://provider predicates: - Path=/api/v1/** filters: - StripPrefix=2
2.4 启动工程并测试
启动gateway,同时启动两个provider(可以一个run,一个debug,也可以设置parallel run,记得换配置文件中的端口)
接下来就可以测试效果了(下面为动图演示,打不开可以在浏览器独立窗口中打开查看)

引用
《Spring Cloud Alibaba 微服务原理与实战》 谭峰·著
通过Nacos动态刷新Spring Cloud Gateway的路由
Spring Cloud Gateway reference

开源、云原生的融合云平台
更多推荐
 0
0 0
0- 0


 已为社区贡献1条内容

所有评论(0)