针对uniApp在地图、视频上增加弹窗层级问题记录(强烈推荐!!!)
打从使用uniApp,一直有个重大问题困扰我,那就是在地图和视频使用时,产品往往喜欢搞一些视觉效果爆炸的“特殊”弹窗,还动不动就来句这也实现不了,那也实现不了???我就没受过这样的气!!!方法一:nvue在这里特别说明,针对杠精提问:为什么不使用cover-view、cover-image?呵呵,脑子有问题。只有这两种标签,且还不能嵌套组件,这怎么能拿来做复杂效果?除非你只需要放一句话,那你一定要
打从使用uniApp,一直有个重大问题困扰我,那就是在地图和视频使用时,产品往往喜欢搞一些视觉效果爆炸的“特殊”弹窗,还动不动就来句这也实现不了,那也实现不了???我就没受过这样的气!!!
方法一:nvue
在这里特别说明,针对杠精提问:为什么不使用cover-view、cover-image?呵呵,脑子有问题。只有 这两种标签,且还不能嵌套组件,这怎么能拿来做复杂效果?除非你只需要放一句话,那你一定要用cover-view😁。
回到主题,简单介绍一下nvue:vue文件走的webview渲染,nvue走weex方式的原生渲染。uni-app的App端内置了一个基于weex改进的原生渲染引擎,提供了原生渲染能力,所以一般nvue是使用在app项目中的,其用法与vue页面一样,可嵌套组件,主要要注意的是css的限制:
1、在nvue中,只能使用默认的flex布局方式,默认是竖排(column)排列;不能使用百分比
2、只有text标签才能给文字设置颜色、大小;文字内容,必须、只能在text组件下。不能在div、view的标签里直接写文字。否则即使渲染了,也无法绑定js里的变量。
3、不支持背景图片;进行class绑定的时候,只支持数组语法
最后说一句,官网说复杂页面推荐用nvue,因为weex原生渲染性能好啊,若果你信了,那么当你用过后,你一定会和我一样把它当个笑话(坑多的填不完🤣),所以我建议还是以vue为主,废话不再说,直接上代码:
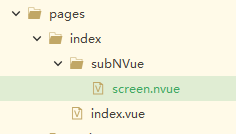
一、pages.json路由定义
{
	"pages": [
		{
			"path": "pages/index/index",
			"style": {
				"app-plus": {
					"titleNView": false, //不启用系统导航
					"subNVues": [{
						"id": "comment",
						"path": "pages/index/subNVue/screen",
						"style": {
							"height": "100%",
							"width":"100%",
							"position":"absolute",
							"top":"0",
							"right":"0",
							"bottom":"0",
							"left":"0",
							"color":"#000000",
							"background":"transparent",
							"zindex":10000000
						}
					}]
				}
			}
		},
	]
}

二、index.vue中使用screen.nvue(内容无所谓,这里不展示)
export default {
		data() {
			return {
				subNvue: '',
			}
		},
		created() {
			this.subNvue = uni.getSubNVueById('comment'); //获取
			this.subNvue.show() // 显示
			setTimeout(function(){
				this.subNvue.hide() // 隐藏
			},2000)

		},
	}
方法二、透明页面
如果对uniapp路由跳转方式有一定了解的话并心细的话你就会发现uni.navigateTo之所以能uni.navigateBack是因为上一个页面并未被销毁🎉!!!既然如此,那么新页面不就是在就业面之上吗,如果我将新页面的背景改成透明的。。。
这里以一个以一个利用socket实现对话框输入,视频实时推流响应的案例为例
pages.json(注意关键代码transparent)
...
{
            "path" : "pages/home/monitoring-modal",
            "style": {
            	"navigationStyle": "custom",
            	"backgroundColor": "transparent",
            	"app-plus": {
            		"animationType": "fade-in",
            		"background": "transparent",
            		"popGesture": "none"
            	}
            }

        }
monitoring-modal.vue(整个页面为视频浮层,以路由跳转方式打开)
<template>
	<view class="modal-view">
		<div class="input-box flex-align">
					<input @focus="handleFocus" @confirm="chatChange" class="form-input"
						placeholder="与ta对话吧" v-model="inputValue" />
					<text class="send-btn" style="margin-left: 24upx;" @tap="chatChange">
						发送
					</text>
				</div>
	</view>
</template>
<script>
	export default {
		data(){
			return {
				inputValue: ''
			}
		},
		onLoad(option) {
			//实时监听视频页发送的消息
			uni.$on('videoChange', this.videoChange)
		},
		onUnload() {
			//关闭监听
			uni.$off('videoChange')
		},
		methods: {
			chatChange() {
				//浮层页发送全局消息
				uni.$emit('chatChange', {
					data: '浮层消息'
				})
			},
			videoChange() {}
		}
	}
</script>

<style>
page {
		background: transparent;
	}
</style>
此处一定注意样式:page {background: transparent;},该样式不可或缺,且只在手机端有效(小程序、android),浏览器无效(浏览器看不到背后视频)
使用浮层或弹窗
monitoring-video.vue
<view id="videpView" class="digitalDialogue-page">
	<!-- <video	:src="videoSrc"
			id="rtcVidoe"
			style="position: absolute;left: 0;top: 0;right: 0;"
			object-fit="fill"
			:controls="false"
			:autoplay="true"
			:webkit-playsinline="true"
			:x-webkit-airplay="true"
			:playsinlin="true">
		</video>-->
	</view>
</template>
<script>
	export default {
		data() {
			return {
				stream: '',
			}
		},
		mounted() {
			//模拟打开浮层或弹窗
			setTimeout(() => {
				uni.navigateTo({
					url: './monitoring-modal'
				});
			}, 1000)
		},
		onLoad(option) {
			//实时监听浮层页发送的消息
			uni.$on('chatChange', this.chatChange)
			this.socket()
		},
		onUnload() {
			//关闭监听
			uni.$off('chatChange')
		},
		methods: {
			videoChange() {
				//视频页发送全局消息
				uni.$emit('videoChange', {
					data: 3
				})
			},
			chatChange(e) {
				// console.log(e.data, '对话传值')

				// 发送socket
				uni.sendSocketMessage({
					data: e.data
				});
			},
			socket() {
				//创建webSocket
				this.webSocketTask = uni.connectSocket({
					url: 'ws://***.***.61.13:8000/humanecho',
					header: {
						'content-type': 'application/json'
					},
					success(res) {
						// console.log('成功', res);
					},
				})
				// 监听WebSocket连接打开事件
				this.webSocketTask.onOpen((res) => {
					// console.info("监听WebSocket连接打开事件", res)
				});
				uni.onSocketOpen(function(res) {
					// console.log('WebSocket连接已打开!');
				});
				// 监听WebSocket错误
				uni.onSocketError((res) => {
					// console.info("监听WebSocket错误" + res)
				});
			},
			// 接收renderjs发回的数据
			getMessage(options) {
				this.stream = options
				// console.log("测试renderjs调用此方法:" + JSON.stringify(options))
			},
		}
	}
</script>
//使用renderjs实时渲染视频流
<script module="webRTC" lang="renderjs">
	//视频推流工具
	import {
		SrsRtcWhipWhepAsync
	} from '@/static/srs.sdk.js'

	export default {
		data() {
			return {
				stream: '',
			}
		},
		mounted() {
			let player = null;
			var host = "http://***.***.61.13:1985";
			var url = host + "/rtc/v1/whep/?app=live&stream=livestream";
			if (player) {
				player.destroy();
			}
			let std = new SrsRtcWhipWhepAsync();
			this.stream = std.stream;
			console.log(this.stream, '视频流')
			var url = host + "/rtc/v1/whep/?app=live&stream=livestream";
			std
				.play(url)
				.then(function(session) {
					// console.log(session,'视频推流进行中');
				})
				.catch(function(reason) {
					std.close();
					//   $("#rtc_media_player").hide();
					// console.error(reason);
				});

			setTimeout(() => {
				var video2 = document.getElementById('videpView')
				const video = document.createElement('video');
				video.srcObject = this.stream;
				video.style.width = '100%';
				video.style.height = 'auto';
				video2.appendChild(video)
				video.play()
			}, 2000)

		},
		methods: {
			updateData() {
				// ownerInstance.callMethod('getMessage', {
				// 	test: '123'
				// })
				this.$ownerInstance.callMethod('getMessage', this.stream)
			},
		}

	}
</script>
以上既是关键代码,也是我目前发现的最佳解决方案,强烈推荐!!!
srs.sdk.js下载地址,也可自行百度srs.sdk.js下载
更多推荐
 已为社区贡献1条内容


所有评论(0)