
4.8【HarmonyOS鸿蒙开发】自定义组件
4.8【HarmonyOS鸿蒙开发】自定义组件作者:韩茹公司:程序咖(北京)科技有限公司鸿蒙巴士专栏作家HarmonyOS提供了一套复杂且强大的Java UI框架,其中Component提供内容显示,是界面中所有组件的基类。ComponentContainer作为容器容纳Component或ComponentContainer对象,并对它们进行布局。Java UI框架也提供了一部分Componen
4.8【HarmonyOS鸿蒙开发】自定义组件
作者:韩茹
公司:程序咖(北京)科技有限公司
鸿蒙巴士专栏作家
HarmonyOS提供了一套复杂且强大的Java UI框架,其中Component提供内容显示,是界面中所有组件的基类。ComponentContainer作为容器容纳Component或ComponentContainer对象,并对它们进行布局。
Java UI框架也提供了一部分Component和ComponentContainer的具体子类,即常用的组件(比如:Text、Button、Image等)和常用的布局(比如:DirectionalLayout、DependentLayout等)。如果现有的组件和布局无法满足设计需求,例如仿遥控器的圆盘按钮、可滑动的环形控制器等,可以通过自定义组件和自定义布局来实现。
自定义组件是由开发者定义的具有一定特性的组件,通过扩展Component或其子类实现,可以精确控制屏幕元素的外观,也可响应用户的点击、触摸、长按等操作。
自定义布局是由开发者定义的具有特定布局规则的容器类组件,通过扩展ComponentContainer或其子类实现,可以将各子组件摆放到指定的位置,也可响应用户的滑动、拖拽等事件。
一、常用接口
当Java UI框架提供的组件无法满足设计需求时,可以创建自定义组件,根据设计需求添加绘制任务,并定义组件的属性及事件响应,完成组件的自定义。
| 接口名 | 作用 |
|---|---|
| setEstimateSizeListener | 设置测量组件的侦听器。 |
| onEstimateSize | 测量组件的大小以确定宽度和高度。 |
| setEstimatedSize | 将测量的宽度和高度设置给组件。 |
| EstimateSpec.getChildSizeWithMode | 基于指定的大小和模式为子组件创建度量规范。 |
| EstimateSpec.getSize | 从提供的度量规范中提取大小。 |
| EstimateSpec.getMode | 获取该组件的显示模式。 |
| addDrawTask | 添加绘制任务。 |
| onDraw | 通过绘制任务更新组件时调用。 |
二、如何实现自定义组件
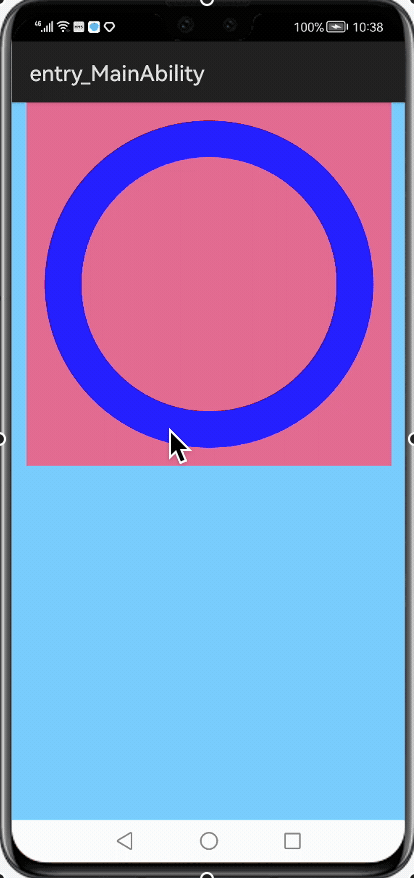
下面以自定义圆环组件为例,介绍自定义组件的通用配置方法:在屏幕中绘制蓝色圆环,并实现点击变化圆环颜色的功能。
1、创建自定义组件的类,并继承Component或其子类,添加构造方法。
新建一个java文件 :CustomComponent.java
示例代码如下:
public class CustomComponent extends Component{
    public CustomComponent(Context context) {
        super(context);
    }
}
2、实现Component.EstimateSizeListener接口,在onEstimateSize方法中进行组件测量,并通过setEstimatedSize方法将测量的宽度和高度设置给组件。
示例代码如下:
public class CustomComponent extends Component implements Component.EstimateSizeListener {
    public CustomComponent(Context context) {
        super(context);

        ...

        // 设置测量组件的侦听器
        setEstimateSizeListener(this);
    }

    ...

    @Override
    public boolean onEstimateSize(int widthEstimateConfig, int heightEstimateConfig) {
        int width = Component.EstimateSpec.getSize(widthEstimateConfig);
        int height = Component.EstimateSpec.getSize(heightEstimateConfig);
        setEstimatedSize(
            Component.EstimateSpec.getChildSizeWithMode(width, width, Component.EstimateSpec.NOT_EXCEED),
            Component.EstimateSpec.getChildSizeWithMode(height, height, Component.EstimateSpec.NOT_EXCEED));
        return true;
    }
}
-
注意事项
- 自定义组件测量出的大小需通过setEstimatedSize设置给组件,并且必须返回true使测量值生效。
- setEstimatedSize方法的入参携带模式信息,可使用Component.EstimateSpec.getChildSizeWithMode方法进行拼接。
-
测量模式
测量组件的宽高需要携带模式信息,不同测量模式下的测量结果也不相同,需要根据实际需求选择适合的测量模式。
| 模式 | 作用 |
|---|---|
| UNCONSTRAINT | 父组件对子组件没有约束,表示子组件可以任意大小。 |
| PRECISE | 父组件已确定子组件的大小。 |
| NOT_EXCEED | 已为子组件确定了最大大小,子组件不能超过指定大小。 |
3、实现Component.DrawTask接口,在onDraw方法中执行绘制任务,该方法提供的画布Canvas,可以精确控制屏幕元素的外观。在执行绘制任务之前,需要定义画笔Paint。
public class CustomComponent extends Component implements Component.DrawTask,Component.EstimateSizeListener {
    // 圆环宽度
    private static final float CIRCLE_STROKE_WIDTH = 100f;

    // 绘制圆环的画笔
    private Paint circlePaint;

    public CustomComponent(Context context) {
        super(context);

        // 初始化画笔
        initPaint();

        // 添加绘制任务
        addDrawTask(this);
    }

    private void initPaint(){
        circlePaint = new Paint();
        circlePaint.setColor(Color.BLUE);
        circlePaint.setStrokeWidth(CIRCLE_STROKE_WIDTH);
        circlePaint.setStyle(Paint.Style.STROKE_STYLE);
    }

    @Override
    public void onDraw(Component component, Canvas canvas) {

        // 在界面中绘制一个圆心坐标为(500,500),半径为400的圆
        canvas.drawCircle(500,500,400,circlePaint);
    }

    ...
}
4、实现Component.TouchEventListener或其他事件的接口,使组件可响应用户输入。
示例代码如下:
public class CustomComponent extends Component implements Component.DrawTask, Component.EstimateSizeListener, Component.TouchEventListener {
    ...
    public CustomComponent(Context context) {
        ...

        // 设置TouchEvent响应事件
        setTouchEventListener(this);
    }

    ...

    @Override
    public boolean onTouchEvent(Component component, TouchEvent touchEvent) {
        switch (touchEvent.getAction()) {
            case TouchEvent.PRIMARY_POINT_DOWN:
                circlePaint.setColor(Color.GREEN);
                invalidate();
                break;

        }
        return false;
    }
}
- 注意事项
- 需要更新UI显示时,可调用invalidate()方法。
- 示例中展示TouchEventListener为响应触摸事件,除此之外还可实现ClickedListener响应点击事件、LongClickedListener响应长按事件等。
5、在onStart()方法中,将自定义组件添加至UI界面中。
package com.example.hanrucustomcomponent.slice;

import ohos.aafwk.ability.AbilitySlice;
import ohos.aafwk.content.Intent;
import ohos.agp.colors.RgbColor;
import ohos.agp.components.Component;
import ohos.agp.components.DirectionalLayout;
import ohos.agp.components.element.ShapeElement;
import ohos.agp.utils.LayoutAlignment;

public class MainAbilitySlice extends AbilitySlice {
    @Override
    public void onStart(Intent intent) {
        super.onStart(intent);
        // super.setUIContent(ResourceTable.Layout_ability_main);
        drawCustomComponent();

    }
    // 自定义组件1
    public void drawCustomComponent(){
        // 声明布局
        DirectionalLayout myLayout = new DirectionalLayout(this);
        DirectionalLayout.LayoutConfig config = new DirectionalLayout.LayoutConfig(
                DirectionalLayout.LayoutConfig.MATCH_PARENT, DirectionalLayout.LayoutConfig.MATCH_PARENT);


        myLayout.setLayoutConfig(config);
        ShapeElement shapeElement1 = new ShapeElement();
        RgbColor rgbColor = new RgbColor(	135,206,250);
        shapeElement1.setRgbColor(rgbColor);
        myLayout.setBackground(shapeElement1);
        myLayout.setOrientation(Component.VERTICAL);
        myLayout.setAlignment(LayoutAlignment.HORIZONTAL_CENTER);

        CustomComponent customComponent = new CustomComponent(this);
        DirectionalLayout.LayoutConfig layoutConfig = new DirectionalLayout.LayoutConfig(1000, 1000);
        ShapeElement shapeElement2 = new ShapeElement();
        RgbColor rgbColor2 = new RgbColor(		219,112,147);
        shapeElement2.setRgbColor(rgbColor2);
        customComponent.setBackground(shapeElement2);
        customComponent.setLayoutConfig(layoutConfig);

        myLayout.addComponent(customComponent);
        super.setUIContent(myLayout);
    }
}
运行效果:
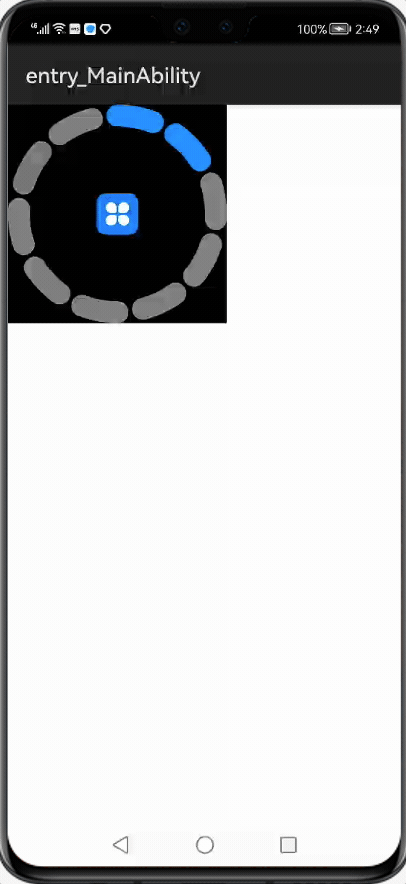
三、写个例子
利用自定义组件,绘制环形进度控制器,可通过滑动改变当前进度,也可响应进度的改变,UI显示的样式也可通过设置属性进行调整。
我们再创建一个自定义组件类CustomControlBar:
package com.example.hanrucustomcomponent.slice;

import com.example.hanrucustomcomponent.ResourceTable;
import ohos.agp.components.Component;
import ohos.agp.render.Arc;
import ohos.agp.render.Canvas;
import ohos.agp.render.Paint;
import ohos.agp.render.PixelMapHolder;
import ohos.agp.utils.Color;
import ohos.agp.utils.Point;
import ohos.agp.utils.RectFloat;
import ohos.app.Context;
import ohos.media.image.PixelMap;
import ohos.media.image.common.Size;
import ohos.multimodalinput.event.MmiPoint;
import ohos.multimodalinput.event.TouchEvent;

public class CustomControlBar extends Component implements Component.DrawTask,
        Component.EstimateSizeListener, Component.TouchEventListener {
    private final static float CIRCLE_ANGLE = 360.0f;

    private final static int DEF_UNFILL_COLOR = 0xFF808080;

    private final static int DEF_FILL_COLOR = 0xFF1E90FF;

    // 圆环轨道颜色
    private Color unFillColor;

    // 圆环覆盖颜色
    private Color fillColor;

    // 圆环宽度
    private int circleWidth;

    // 画笔
    private Paint paint;

    // 个数
    private int count;

    // 当前进度
    private int currentCount;

    // 间隙值
    private int splitSize;

    // 内圆的正切方形
    private RectFloat centerRectFloat;

    // 中心绘制的图片
    private PixelMap image;

    // 原点坐标
    private Point centerPoint;

    // 进度改变的事件响应
    private ProgressChangeListener listener;

    public CustomControlBar(Context context) {
        super(context);
        paint = new Paint();
        initData();
        setEstimateSizeListener(this);
        setTouchEventListener(this);
        addDrawTask(this);
    }

    // 初始化属性值
    private void initData() {
        unFillColor = new Color(DEF_UNFILL_COLOR);
        fillColor = new Color(DEF_FILL_COLOR);
        count = 10;
        currentCount = 2;
        splitSize = 15;
        circleWidth = 60;
        centerRectFloat = new RectFloat();
        image = Utils.createPixelMapByResId(ResourceTable.Media_icon, getContext()).get();
        listener = null;
    }

    @Override
    public boolean onEstimateSize(int widthEstimateConfig, int heightEstimateConfig) {
        int width = Component.EstimateSpec.getSize(widthEstimateConfig);
        int height = Component.EstimateSpec.getSize(heightEstimateConfig);
        setEstimatedSize(
                Component.EstimateSpec.getChildSizeWithMode(width, width, Component.EstimateSpec.PRECISE),
                Component.EstimateSpec.getChildSizeWithMode(height, height, Component.EstimateSpec.PRECISE)
        );
        return true;
    }

    @Override
    public void onDraw(Component component, Canvas canvas) {
        paint.setAntiAlias(true);
        paint.setStrokeWidth(circleWidth);
        paint.setStrokeCap(Paint.StrokeCap.ROUND_CAP);
        paint.setStyle(Paint.Style.STROKE_STYLE);

        int width = getWidth();
        int center = width / 2;
        centerPoint = new Point(center, center);
        int radius = center - circleWidth / 2;
        drawCount(canvas, center, radius);

        int inRadius = center - circleWidth;
        double length = inRadius - Math.sqrt(2) * 1.0f / 2 * inRadius;
        centerRectFloat.left = (float) (length + circleWidth);
        centerRectFloat.top = (float) (length + circleWidth);
        centerRectFloat.bottom = (float) (centerRectFloat.left + Math.sqrt(2) * inRadius);
        centerRectFloat.right = (float) (centerRectFloat.left + Math.sqrt(2) * inRadius);

        // 如果图片比较小,那么根据图片的尺寸放置到正中心
        Size imageSize = image.getImageInfo().size;
        if (imageSize.width < Math.sqrt(2) * inRadius) {
            centerRectFloat.left = (float) (centerRectFloat.left + Math.sqrt(2) * inRadius * 1.0f / 2 - imageSize.width * 1.0f / 2);
            centerRectFloat.top = (float) (centerRectFloat.top + Math.sqrt(2) * inRadius * 1.0f / 2 - imageSize.height * 1.0f / 2);
            centerRectFloat.right = centerRectFloat.left + imageSize.width;
            centerRectFloat.bottom = centerRectFloat.top + imageSize.height;
        }
        canvas.drawPixelMapHolderRect(new PixelMapHolder(image), centerRectFloat, paint);
    }

    private void drawCount(Canvas canvas, int centre, int radius) {
        float itemSize = (CIRCLE_ANGLE - count * splitSize) / count;

        RectFloat oval = new RectFloat(centre - radius, centre - radius, centre + radius, centre + radius);

        paint.setColor(unFillColor);
        for (int i = 0; i < count; i++) {
            Arc arc = new Arc((i * (itemSize + splitSize)) - 90, itemSize, false);
            canvas.drawArc(oval, arc, paint);
        }

        paint.setColor(fillColor);
        for (int i = 0; i < currentCount; i++) {
            Arc arc = new Arc((i * (itemSize + splitSize)) - 90, itemSize, false);
            canvas.drawArc(oval, arc, paint);
        }
    }

    @Override
    public boolean onTouchEvent(Component component, TouchEvent touchEvent) {
        switch (touchEvent.getAction()) {
            case TouchEvent.PRIMARY_POINT_DOWN:
            case TouchEvent.POINT_MOVE: {
                this.getContentPositionX();
                MmiPoint absPoint = touchEvent.getPointerPosition(touchEvent.getIndex());
                Point point = new Point(absPoint.getX() - getContentPositionX(),
                        absPoint.getY() - getContentPositionY());
                double angle = calcRotationAngleInDegrees(centerPoint, point);
                double multiple = angle / (CIRCLE_ANGLE / count);
                if ((multiple - (int) multiple) > 0.4) {
                    currentCount = (int) multiple + 1;
                } else {
                    currentCount = (int) multiple;
                }
                if (listener != null) {
                    listener.onProgressChangeListener(currentCount);
                }
                invalidate();
                break;
            }
        }
        return false;
    }

    public interface ProgressChangeListener {
        void onProgressChangeListener(int Progress);
    }

    // 计算centerPt到targetPt的夹角,单位为度。返回范围为[0, 360),顺时针旋转。
    private double calcRotationAngleInDegrees(Point centerPt, Point targetPt) {
        double theta = Math.atan2(targetPt.getPointY()
                - centerPt.getPointY(), targetPt.getPointX()
                - centerPt.getPointX());
        theta += Math.PI / 2.0;
        double angle = Math.toDegrees(theta);
        if (angle < 0) {
            angle += CIRCLE_ANGLE;
        }
        return angle;
    }

}
然后在onStart中:
package com.example.hanrucustomcomponent.slice;

import ohos.aafwk.ability.AbilitySlice;
import ohos.aafwk.content.Intent;
import ohos.agp.colors.RgbColor;
import ohos.agp.components.Component;
import ohos.agp.components.DirectionalLayout;
import ohos.agp.components.element.ShapeElement;
import ohos.agp.utils.LayoutAlignment;

public class MainAbilitySlice extends AbilitySlice {
    @Override
    public void onStart(Intent intent) {
        super.onStart(intent);
        // super.setUIContent(ResourceTable.Layout_ability_main);
        // drawCustomComponent();
        drawCustomControlBar();

    }
    ...

    // 自定义组件2
    public void drawCustomControlBar(){
        DirectionalLayout myLayout = new DirectionalLayout(this);
        DirectionalLayout.LayoutConfig config = new DirectionalLayout.LayoutConfig(
                DirectionalLayout.LayoutConfig.MATCH_PARENT, DirectionalLayout.LayoutConfig.MATCH_PARENT);
        myLayout.setLayoutConfig(config);

        // 在此创建自定义组件,并可设置其属性
        CustomControlBar controlBar = new CustomControlBar(this);
        controlBar.setClickable(true);
        DirectionalLayout.LayoutConfig layoutConfig = new DirectionalLayout.LayoutConfig(
                600, 600);
        controlBar.setLayoutConfig(layoutConfig);
        ShapeElement element = new ShapeElement();
        element.setRgbColor(new RgbColor(0, 0, 0));
        controlBar.setBackground(element);

        // 将此组件添加至布局,并在界面中显示
        myLayout.addComponent(controlBar);
        super.setUIContent(myLayout);
    }

}
运行结果:
更多内容:
1、社区:鸿蒙巴士https://www.harmonybus.net/
2、公众号:HarmonyBus
3、技术交流QQ群:714518656
4、视频课:https://www.chengxuka.com

鸿蒙生态一站式服务平台。
更多推荐
 1
1 0
0- 0


 已为社区贡献1条内容

所有评论(0)