小程序使用vant制作表格table并含有checkbox多选框搜索框
结果样式如下:wxml文件(样式可以自己修改)<view class="table"><view class="tr"><view class="th" style="width: 115%;">商品名称</view><view class="th">商品编号</view><view class="th">商品数量
·
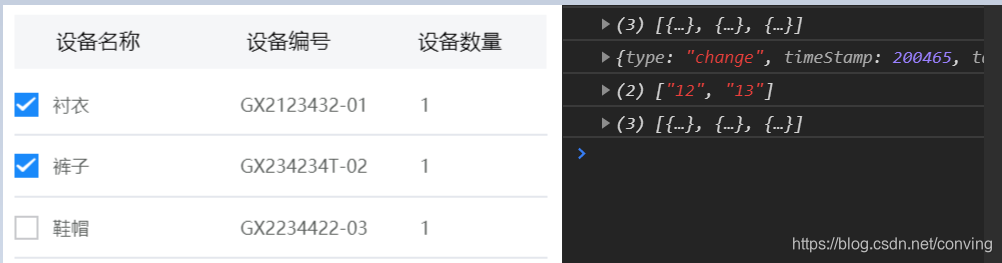
一、含有checkbox多选框 (不含搜索框)
结果样式如下:

wxml文件(样式可以自己修改)
<view class="table">
  <view class="tr">
     <view class="th">商品名称</view>
     <view class="th">商品编号</view>
     <view class="th">商品数量</view>
  </view>

  <van-checkbox-group value="{{ result }}" data-key="result3" bind:change="onChange">
   <view wx:for="{{list}}" wx:key="index" name="{{ item }}">
      <van-checkbox shape="square" name="{{item.id}}">
       <view class="tr">
         <view class="td">{{ item.goodsName}} </view>
         <view class="td">{{ item.goodsNo }} </view>
         <view class="td">{{ item.goodsCount }}</view>
       </view>
      </van-checkbox>
   </view>
  </van-checkbox-group>
</view>
js文件
Page({
   data: {
      result: [],
      goodsNo: '',
      list:[
        {id:12, goodsName:"衬衣", goodsNo:"GX2123432-01",goodsCount:"1"},
        {id:13, goodsName:"裤子", goodsNo:"GX234234T-02",goodsCount:"1"} ,
        {id:14, goodsName:"鞋帽", goodsNo:"GX2234422-03",goodsCount:"1"} ,
      ]
  },onChange(event) {
    console.log(event)
    console.log(event.detail)
    const { key } = event.currentTarget.dataset;
    console.log(this.data.list)
    this.setData({ [key]: event.detail });
    this.data.goodsNo = event.detail+",";
  }
});
这里可以看到获取到的id值
二、含有checkbox多选框 (含搜索框)
对以上进行改造,点击放大镜,弹出以下界面:

vant开发指南:https://vant-contrib.gitee.io/vant-weapp/
1、popup弹出层功能
<van-field value="{{ username }}" label="商品编号" placeholder="请选择商品编号" clearable right-icon="search"
right-icon-class="custom-icon" required bind:click-icon="showBasic"  />
<van-popup
      show="{{ showT.basic }}"
      custom-style="padding: 10px;width:100%; height:80%;"
      bind:close="hideBasic"
    >
Page({
data: {
show: false,
showT: {
basic: false,
},
},
toggle(type, showT) {
this.setData({
[`showT.${type}`]: showT
});
},
showBasic() {
this.toggle('basic', true);
},
hideBasic() {
this.toggle('basic', false);
},
})2、搜索框search 功能
<van-search
    model:value="{{ value }}"
    label="商品编号"
    placeholder="请输入搜索关键词"
    use-action-slot
    bind:search="onSearch"
   >
   <view slot="action" bind:tap="onClick">搜索</view>
</van-search>
//自行修改
value: '',
onSearch() {
if (this.data.value) {
console.log("--->" + this.data.value)
wx.showToast({
title: '搜索:' + this.data.value,
icon: 'none'
});
}
},
onClick() {
if (this.data.value) {
console.log("===>" + this.data.value)
wx.showToast({
title: '搜索:' + this.data.value,
icon: 'none'
});
}
},
searchBtn:function(){
const str = this.data.goodsNo;
const goodsNoVal = str.substring(0,str.length-1);
this.setData({
goodsNo: goodsNoVal
});
console.log(goodsNoVal);
this.toggle('basic', false);
},3、底部按钮
<view class="footer">
    <van-button size="small" bindtap="hideBasic">关闭</van-button>
    <van-button size="small" type="danger" bindtap="searchBtn">确认</van-button>
</view>
4、中间内容区域
该区域如果文本过多,会出现滚动条,附带标题th及搜索框一起滚动。如果只滚动内容,不滚动标题,单纯设置高,不起作用。故加scroll-view。
<scroll-view scroll-y="true" style="height: 60%">
        <view class="contentStyle">
          <van-checkbox-group value="{{ result3 }}" data-key="result3" class="groupStyle" bind:change="onChange">
            <view class="columVal">
              <view wx:for="{{list}}" wx:key="index" name="{{ item }}">
                <van-checkbox shape="square" name="{{item.id}}">
                  <view class="tr">
                    <view class="td">{{ item.goodsName}} </view>
                    <view class="td">{{ item.goodsNo }} </view>
                    <view class="td">{{ item.goodsCount }}</view>
                  </view>
                </van-checkbox>
              </view>
            </view>
          </van-checkbox-group>
        </view>
</scroll-view>
按需要处理即可:

三、全选与反选
参考:https://www.w3cschool.cn/vantlesson/vantlesson-uv4335v8.html
通过CheckboxGroup实例上的toggleAll方法可以实现全选与反选
<van-checkbox-group v-model="result" ref="checkboxGroup">
  <van-checkbox name="a">复选框 a</van-checkbox>
  <van-checkbox name="b">复选框 b</van-checkbox>
  <van-checkbox name="c">复选框 c</van-checkbox>
</van-checkbox-group>

<van-button type="primary" @click="checkAll">全选</van-button>
<van-button type="info" @click="toggleAll">反选</van-button>
export default {
data() {
return {
result: []
}
},
methods: {
checkAll() {
this.$refs.checkboxGroup.toggleAll(true);
},
toggleAll() {
this.$refs.checkboxGroup.toggleAll();
}
}
}

为开发者提供学习成长、分享交流、生态实践、资源工具等服务,帮助开发者快速成长。
更多推荐


 6
6 0
0- 0


 已为社区贡献7条内容

所有评论(0)