android fragment实现翻书效果,Unity3D UGUI实现翻书特效
本文实例为大家分享了unity3d ugui翻书展示的具体代码,供大家参考,具体内容如下参考大佬的,链接找不到了,找到了再加在这。下边是shader代码:// upgrade note: replaced 'mul(unity_matrix_mvp,*)' with 'unityobjecttoclippos(*)'shader "personal/pageturning" {properties
本文实例为大家分享了unity3d ugui翻书展示的具体代码,供大家参考,具体内容如下
参考大佬的,链接找不到了,找到了再加在这。
下边是shader代码:
// upgrade note: replaced 'mul(unity_matrix_mvp,*)' with 'unityobjecttoclippos(*)'
shader "personal/pageturning" {
properties
{
_color ("color", color) = (1,1,1,1)
_maintex("maintex",2d)="white"{}
_sectex("sectex",2d)="white"{}
_angle("angle",range(0,180))=0
_warp("warp",range(0,10))=0
_warppos("warppos",range(0,1))=0
_downward("downward",range(0,1))=0
}
subshader
{
pass
{
cull back
cgprogram
#pragma vertex vert
#pragma fragment frag
#include "unitycg.cginc"
struct v2f
{
float4 pos : position;
float2 uv : texcoord0;
};
fixed4 _color;
float _angle;
float _warp;
float _downward;
float _warppos;
sampler2d _maintex;
float4 _maintex_st;
v2f vert(appdata_base v)
{
v2f o;
v.vertex += float4(5,0,0,0);
float s;
float c;
sincos(radians(-_angle),s,c);
float4x4 rotate={
c,s,0,0,
-s,c,0,0,
0,0,1,0,
0,0,0,1};
float rangef=saturate(1 - abs(90-_angle)/90);
v.vertex.y += -_warp*sin(v.vertex.x*0.4-_warppos* v.vertex.x)*rangef;
v.vertex.x -= rangef * v.vertex.x*_downward;
v.vertex = mul(rotate,v.vertex);
v.vertex += float4(-5,0,0,0);
o.pos = unityobjecttoclippos(v.vertex);
o.uv = transform_tex(v.texcoord,_maintex);
return o;
}
fixed4 frag(v2f i):color
{
fixed4 color = tex2d(_maintex,-i.uv);
return _color * color;
}
endcg
}
pass
{
cull front
cgprogram
#pragma vertex vert
#pragma fragment frag
#include "unitycg.cginc"
struct v2f
{
float4 pos : position;
float2 uv : texcoord0;
};
fixed4 _color;
float _angle;
float _warp;
float _downward;
float _warppos;
sampler2d _sectex;
float4 _maintex_st;
v2f vert(appdata_base v)
{
v2f o;
v.vertex += float4(5,0,0,0);
float s;
float c;
sincos(radians(-_angle),s,c);
float4x4 rotate={
c,s,0,0,
-s,c,0,0,
0,0,1,0,
0,0,0,1};
float rangef=saturate(1 - abs(90-_angle)/90);
v.vertex.y += -_warp*sin(v.vertex.x*0.4-_warppos* v.vertex.x)*rangef;
v.vertex.x -= rangef * v.vertex.x*_downward;
v.vertex = mul(rotate,v.vertex);
v.vertex += float4(-5,0,0,0);
o.pos = unityobjecttoclippos(v.vertex);
o.uv = transform_tex(v.texcoord,_maintex);
return o;
}
fixed4 frag(v2f i):color
{
float2 uv = i.uv;
uv.x = -uv.x;
fixed4 color = tex2d(_sectex,-uv);
return _color * color;
}
endcg
}
}
}
下面是ui代码:
using system.collections;
using unityengine;
using unityengine.ui;
public class fanshuui : uibase
{
private gameobject plane;
private material m_material;
private coroutine effect;
private image leftpage;
private image rightpage;
private void awake()
{
initui();
}
public override void initui()
{
plane = getgameobject("plane");
leftpage = getcomp("leftpage");
rightpage = getcomp("rightpage");
plane.setactive(false);
m_material = plane.getcomponent().material;
}
public void playpageturneffect(bool isleft = true)
{
if (!gameobject.activeself)
{
return;
}
if (effect != null)
{
stopcoroutine(effect);
}
effect = startcoroutine(fanshueffect(0.5f, isleft));
}
public void showrightimage(string right)
{
rightpage.gameobject.setactive(true);
rightpage.sprite = resourcesmgr.instance.loadobj(right);
}
public void showleftimage(string left)
{
leftpage.gameobject.setactive(true);
leftpage.sprite = resourcesmgr.instance.loadobj(left);
}
private ienumerator fanshueffect(float time, bool isleft)
{
leftpage.gameobject.setactive(false);
rightpage.gameobject.setactive(false);
plane.setactive(true);
int angle = (int)(180 * 0.1f);
for (int i = 0; i < 10; i++)
{
if (isleft)
{
m_material.setfloat("_angle", angle * i);
}
else
{
m_material.setfloat("_angle", 180 - angle * i);
}
yield return new waitforseconds(time * 0.1f);
}
if (isleft)
{
m_material.setfloat("_angle", 180);
}
else
{
m_material.setfloat("_angle", 0);
}
plane.setactive(false);
oneffectover();
}
private void oneffectover()
{
//--callback
}
}
左右两页纸可以在翻书结束动态加载图片。
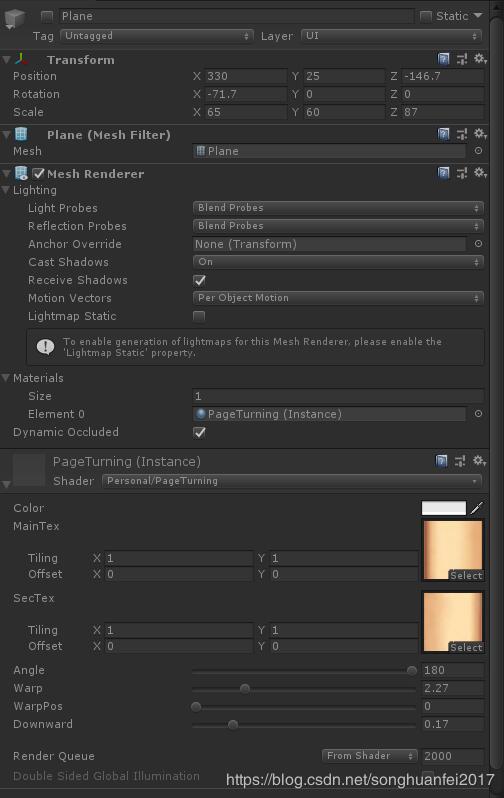
下边是plane的面板信息:
以上就是本文的全部内容,希望对大家的学习有所帮助,也希望大家多多支持萬仟网。

为开发者提供学习成长、分享交流、生态实践、资源工具等服务,帮助开发者快速成长。
更多推荐


 0
0 0
0- 0


 已为社区贡献2条内容

所有评论(0)