android 玻璃背景,Android 弹窗毛玻璃背景实践
Android 弹窗毛玻璃背景实践需求: 点击FloatingActionButton弹出弹层,弹层底部有多个图标可选,每一个图标都是一个功能入口,背景采用毛玻璃模糊效果。记录一下这个需求的思考和实现过程。查找Android原生API做法在Android API里面,有个FLAG_BLUR_BEHIND用于模糊背景的FLAG,尝试一下使用它来做Dialog的背景模糊。 代码如下:final Dia
Android 弹窗毛玻璃背景实践
需求: 点击FloatingActionButton弹出弹层,弹层底部有多个图标可选,每一个图标都是一个功能入口,背景采用毛玻璃模糊效果。
记录一下这个需求的思考和实现过程。
查找Android原生API做法
在Android API里面,有个FLAG_BLUR_BEHIND用于模糊背景的FLAG,尝试一下使用它来做Dialog的背景模糊。 代码如下:
final Dialog dialog = new Dialog(MainActivity.this, R.style.SquareEntranceDialogStyle);
Window window = dialog.getWindow();
if (window != null) {
window.setFlags(WindowManager.LayoutParams.FLAG_BLUR_BEHIND,
WindowManager.LayoutParams.FLAG_BLUR_BEHIND);
window.setGravity(Gravity.BOTTOM);
}
View layout = View.inflate(MainActivity.this, R.layout.square_posting_entrance_dialog, null);
dialog.setContentView(layout);
dialog.show();复制代码
true
true
@android:color/transparent
复制代码
最后出来的效果有点迷。在4.4的机器上,看不出任何模糊效果,而在7.0的机器上,dialog的弹窗背景出现了一片灰色,而遮罩层的效果没有任何变化。 查看了源码,发现这个FLAG已经在4.1以后就废弃了。
通过高斯模糊把处理后的图片作为弹层背景
换了一种思路,把遮罩模糊拆成了几个步骤来实现
把dialog弹层铺满整个屏幕
通过应用内截图的方式获得弹层背后的图片bitmap
通过高斯模糊算法对截图进行模糊处理
把模糊后的图片bitmap设置成dialog的background
把问题拆开以后,单独实现每一个步骤就容易多了。
1.把dialog弹层铺满整个屏幕:
在拆分问题的一开始,我的思路是怎么去更改dialog的遮罩层颜色,或者把遮罩层整体设置成图片,但尝试了多种方法都无法实现,最后在stackoverflow查到了另一种思路,把dialog铺满屏幕,然后修改dialog的windowBackground来达到跟修改遮罩层相同的效果。
通过修改dialog style的windowIsFloating为false,可以使dialog铺满屏幕
true
false
@android:color/transparent
复制代码
把dialog的根布局改成match_parent,并加上一点白色背景色和透明度
xmlns:tool="http://schemas.android.com/tools"
android:layout_width="match_parent"
android:layout_height="match_parent"
android:background="#ebebeb"
android:alpha="0.8"
android:gravity="center_horizontal|bottom">
...
复制代码2.通过应用内截图的方式获得弹层背后的图片bitmap
通过activity的window.getDecorView()获取到窗口最顶层的view,然后开启Cache机制使View可以保存成Bitmap,在每次获取View截图前通过destroyDrawingCache()先清除上一次的旧缓存,然后通过buildDrawingCache()重新生成一张最新截图,最后通过getDrawingCache()获取截图Bitmap
View activityView = getWindow().getDecorView();
activityView.setDrawingCacheEnabled(true);
activityView.destroyDrawingCache();
activityView.buildDrawingCache();
Bitmap bmp = activityView.getDrawingCache();复制代码
3.通过高斯模糊算法对截图进行模糊处理
高斯模糊算法直接搜索了一个封装好了的工具类,通过RenderScript进行模糊处理
public class BlurBitmap {
/**
* 图片缩放比例
*/
private static final float BITMAP_SCALE = 0.4f;
/**
* 最大模糊度(在0.0到25.0之间)
*/
private static final float BLUR_RADIUS = 15f;
/**
* 模糊图片的具体方法
*
* @param context 上下文对象
* @param image 需要模糊的图片
* @return 模糊处理后的图片
*/
public static Bitmap blur(Context context, Bitmap image) {
// 计算图片缩小后的长宽
int width = Math.round(image.getWidth() * BITMAP_SCALE);
int height = Math.round(image.getHeight() * BITMAP_SCALE);
// 将缩小后的图片做为预渲染的图片。
Bitmap inputBitmap = Bitmap.createScaledBitmap(image, width, height, false);
// 创建一张渲染后的输出图片。
Bitmap outputBitmap = Bitmap.createBitmap(inputBitmap);
// 创建RenderScript内核对象
RenderScript rs = RenderScript.create(context);
// 创建一个模糊效果的RenderScript的工具对象
ScriptIntrinsicBlur blurScript = ScriptIntrinsicBlur.create(rs, Element.U8_4(rs));
// 由于RenderScript并没有使用VM来分配内存,所以需要使用Allocation类来创建和分配内存空间。
// 创建Allocation对象的时候其实内存是空的,需要使用copyTo()将数据填充进去。
Allocation tmpIn = Allocation.createFromBitmap(rs, inputBitmap);
Allocation tmpOut = Allocation.createFromBitmap(rs, outputBitmap);
// 设置渲染的模糊程度, 25f是最大模糊度
blurScript.setRadius(BLUR_RADIUS);
// 设置blurScript对象的输入内存
blurScript.setInput(tmpIn);
// 将输出数据保存到输出内存中
blurScript.forEach(tmpOut);
// 将数据填充到Allocation中
tmpOut.copyTo(outputBitmap);
return outputBitmap;
}
}复制代码
4.把模糊后的图片bitmap设置成dialog的background
最后获取到模糊处理后的bitmap,设置到dialog的windowBackground中,即可做出弹层模糊背景的效果,完整代码如下:
final Dialog dialog = new Dialog(MainActivity.this, R.style.SquareEntranceDialogStyle);
Window window = dialog.getWindow();
Bitmap blurBg = null;
if (window != null) {
long startMs = System.currentTimeMillis();
// 获取截图
View activityView = getWindow().getDecorView();
activityView.setDrawingCacheEnabled(true);
activityView.destroyDrawingCache();
activityView.buildDrawingCache();
Bitmap bmp = activityView.getDrawingCache();
Log.d(TAG, "getDrawingCache take away:" + (System.currentTimeMillis() - startMs) + "ms");
// 模糊处理并保存
blurBg = BlurBitmap.blur(MainActivity.this, bmp);
Log.d(TAG, "blur take away:" + (System.currentTimeMillis() - startMs) + "ms");
// 设置成dialog的背景
window.setBackgroundDrawable(new BitmapDrawable(getResources(), blurBg));
bmp.recycle();
}
final Bitmap finalBlurBg = blurBg;
dialog.setOnDismissListener(new DialogInterface.OnDismissListener() {
@Override
public void onDismiss(DialogInterface dialog) {
// 对话框取消时释放背景图bitmap
if (finalBlurBg != null && !finalBlurBg.isRecycled()) {
finalBlurBg.recycle();
}
}
});
View layout = View.inflate(MainActivity.this, R.layout.square_posting_entrance_dialog, null);
dialog.setContentView(layout);
dialog.show();复制代码
通过打Log检测获取截图以及模糊处理所要消耗的时间,总处理时长大概在50~80ms,还算可以,没有出现卡顿的情况。
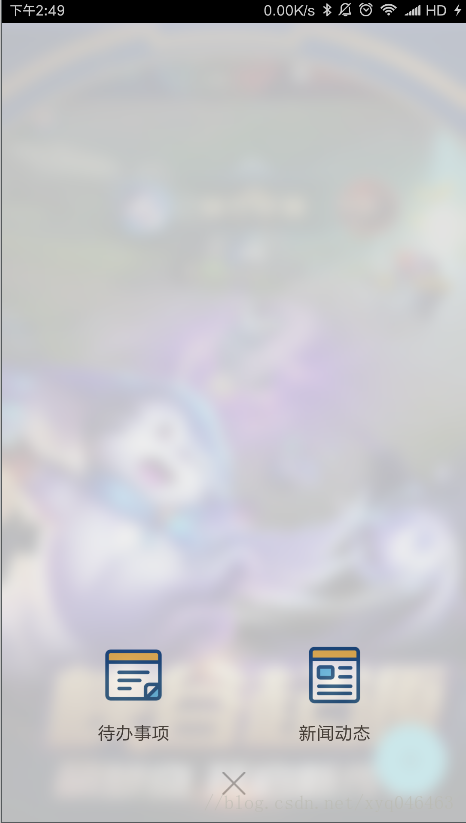
最后补一张效果图

为开发者提供学习成长、分享交流、生态实践、资源工具等服务,帮助开发者快速成长。
更多推荐


 0
0 0
0- 0


 已为社区贡献5条内容

所有评论(0)