android studio如何添加资源,添加应用资源_Android-Studio入门指南|入门小站
添加应用资源App resources such as bitmaps and layouts are organized into type-specificdirectories inside each module's [ res/ ] directory. You can also add alternativeversions of each file that are optimize
添加应用资源
App resources such as bitmaps and layouts are organized into type-specific
directories inside each module's [ res/ ] directory. You can also add alternative
versions of each file that are optimized for different device
configurations (such as a high-res version of a bitmap for high-density
screens).
Android Studio helps you add new resources and alternative resources in several
ways, depending on the type of resource you want to add. This page describes how
to add basic resource files, how to change the location of your resources, and
how resource merging works.
You should also see the following pages for details about how to create
specific resource types:
To add layout files, see Build a UI with Layout Editor.
To add string files, see Localize the UI with Translations Editor.
To add bitmaps, see Create app icons with Image Asset Studio.
To add SVG files, see Add multi-density vector graphics.
For information about how to reference the resources from your app
code, see
Providing resources.
Add an XML resource file
Although the pages linked above describe workflows that are customized to each
type of resource, you can add any XML resource file by following these
steps:
Click the target app module in the Project window (while in either
the Android or Project view), and then select File > New >
Android resource file.
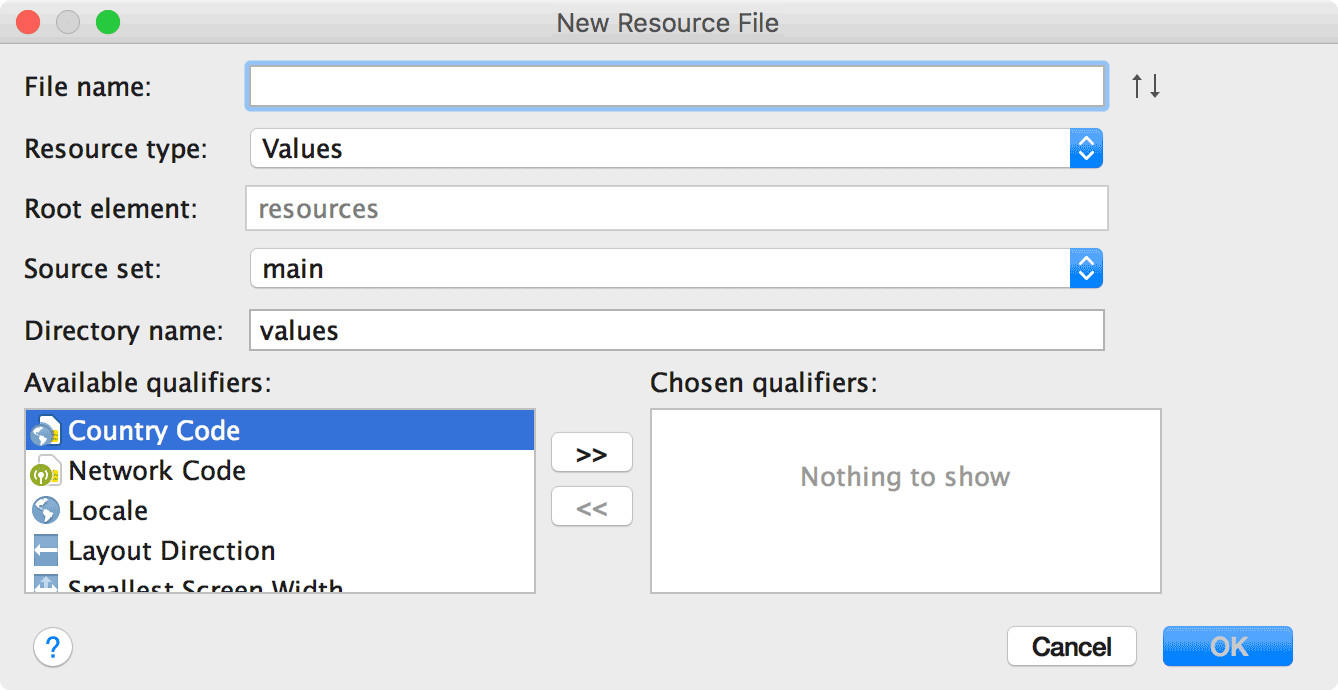
Fill in the details in the dialog:
File name: Type the name for the XML file (does not require the
[ .xml ] suffix).
Resource type: Select the type of resource you want to create.
Root element: If applicable, select the root XML element for the
file. Some resource types support only one type of root element, so
depending on the type selected above, this might not be editable.
Source set: Select the source set where you want to save the file.
Directory name: The directory must be named in a way that's specific
to the resource type and configuration qualifiers. So you should
not edit this unless you want to add configuration qualifiers to the
directory name by hand (see Available qualifiers instead).
Available qualifiers: Instead of typing configuration qualifiers for
your layout directory, you can add them by clicking a qualifier from the
list on the left, and then clicking Add
 .
.
Once you've added all the qualifiers you want, click OK.
Tip: Right-click an existing resource directory within the
res folder and select New > type-name resource file.
This opens a simplified version of the New Resource File dialog that's
specific to your desired resource type.
Tip:
Some complex resources require multiple XML resource files. For example, an
animated vector drawable has a vector drawable object and an animation object,
which requires at least three XML files.
You can keep the three separate XML files if you need to reuse one or more of
them. But, if the XML files are used only for this one animated vector drawable,
you can instead use the inline resource format provided in the Android Asset
Packaging Tool (AAPT). With AAPT, you can define all three resources in one XML
file. For more information, see
Inline Complex XML Resources.
Add a resource directory
If you need to add a new resource directory, follow these steps:
Click the target app module in the Project window, and then select
File > New > Android resource directory.

Fill in the details in the dialog:
Directory name: The directory must be named in a way that's specific
to the resource type and combination of configuration qualifiers. So you
should not edit this unless you want to add configuration qualifiers to the
directory name by hand (use Available qualifiers instead).
Resource type: Select the type of resource you want to create.
Source set: Select the source set where you want the layout.
Available qualifiers: Instead of typing configuration qualifiers for
your layout directory, you can add them by clicking a qualifier from the
list on the left, and then clicking Add
.
Once you've added all the qualifiers you want, click OK.
Change your resource directory
By default, your resources are located in
[ module-name/src/source-set-name/res/ ].
For example, resources for your module's main source set are in [ src/main/res/ ]
and resources for the debug source set are in [ src/debug/res/ ].
However, you can change these paths to any other
location (relative to the [ build.gradle ] file) with the [ res.srcDirs ] property
in the [ sourceSets {} ] block. For example:
android {
sourceSets {
main {
res.srcDirs = ['resources/main']
}
debug {
res.srcDirs = ['resources/debug']
}
}
}
You can also specify multiple resource directories for one source set, and then
the build tools will merge them together. For example:
android {
sourceSets {
main {
res.srcDirs = ['res1', 'res2']
}
}
}Note:If two or more resource directories contain the same resource file, an
error occurs during resource merging.
For more information, read about
source sets.
Resource merging
Resources in your final APK file may come from 3 different sources:
The main source set (generally located in [ src/main/res/ ])
Build variant source sets
Android libraries (AARs)
When all resources from each source set or library are unique, they're all
added into the final APK. A resource is considered unique if it's file name is
unique within both its
resource type directory
and the
resource qualifier
(if defined).
If there exist two or more matching versions of the same resource,
then only one version is included in the final APK. The build tools select
which version to keep based on the following priority order (highest priority
on the left):
build variant > build type > product flavor > main source set >
library dependencies
For example, if the main source set contains:
[ res/layout/foo.xml ]
[ res/layout-land/foo.xml ]
And the debug build type contains:
[ res/layout/foo.xml ]
Then the final APK includes [ res/layout/foo.xml ] from the debug build type and
[ res/layout-land/foo.xml ] from the main source set.
However, if your build configuration specifies
multiple resource folders for
a given source set and there are conflicts between those sources, an error
occurs and the merge fails because each resource directory has the same
priority.
原文链接:https://rumenz.com/android-studio/studio-write-add-resources.html
使用 Java 8 语言功能

为开发者提供学习成长、分享交流、生态实践、资源工具等服务,帮助开发者快速成长。
更多推荐


 0
0 0
0- 0


 已为社区贡献1条内容

所有评论(0)