android 坐标图绘制曲线,Android自定义View—贝塞尔曲线绘制及属性动画 (一)
原标题:Android自定义View—贝塞尔曲线绘制及属性动画 (一)最近上班可真是忙得很,好不容易有点属于自己的时间了,不用加班,其实有时候感觉忙点也挺好,起码不会有无所事事、空虚的感觉,忙里偷闲才是最开心的。闲暇时间也没用来挥霍,最近又重新温习了下自定义View,贝塞尔曲线的绘制及属性动画的使用等。好了,说了这么多还没见到图啊,无图无真相,看完下面这波图就开始挽起袖子撸代码了。实现效果: 送心
原标题:Android自定义View—贝塞尔曲线绘制及属性动画 (一)
最近上班可真是忙得很,好不容易有点属于自己的时间了,不用加班,其实有时候感觉忙点也挺好,起码不会有无所事事、空虚的感觉,忙里偷闲才是最开心的。闲暇时间也没用来挥霍,最近又重新温习了下自定义View,贝塞尔曲线的绘制及属性动画的使用等。好了,说了这么多还没见到图啊,无图无真相,看完下面这波图就开始挽起袖子撸代码了。
实现效果:

送心效果
这个效果不太重要,关键是如何去实现的方式。
实现
首先我们观察这个图上的View,整体可以看作是一个大容器,一个个心型图像可以看作是一个个ImageView,从容器底部中间部分冒出来的,因此我们可以自定义一个View继承自RelativeLayout我们动态的去把每个图片addView到我们这个View上。
...创建一个ImageView的属性
LayoutParams lp ;
...
//dWidth dHeight 是每张图片的长宽,这里所有心型图片尺寸一致。
dWidth = drawable[0].getIntrinsicWidth();
dHeight = drawable[0].getIntrinsicHeight();
lp = new LayoutParams(dWidth,dHeight);
lp.addRule(ALIGN_PARENT_BOTTOM);
lp.addRule(CENTER_HORIZONTAL);
//添加ImageView
ImageView image = new ImageView(getContext());
image.setImageDrawable(drawable[random.nextInt(5)]);
image.setLayoutParams(lp);
addView(image);
好了到此都很简单,现在我们已经可以实现把ImageView添加到容器底部了,接下来就实现动画移动飘动的效果。
通关观察可以看到心是从底部移动到顶部,运动的轨迹是曲线,并且到顶部的位置也是随机的,因此我们很容易想到只要让ImageView沿着一条曲线运动即可实现,于是我们想到了贝塞尔曲线,我们用二阶还是三阶的呢?
二阶贝塞尔曲线
二阶贝塞尔曲线公式
这是二阶贝塞尔曲线,我们先不管公式,我们就看绘制的曲线路径跟我们效果图上ImageView 运动的路径是不是不一致啊,接下来看三阶曲线:
三阶贝塞尔曲线
三阶贝塞尔曲线公式
我们可以看到三阶贝塞尔曲线是有2个控制点,只要图上2个控制点位置改变一下就可以达到S型运动轨迹的感觉。
回到图片移动问题上来,我们都知道Android给我们提供了绘制贝塞尔曲线的方法,我们可以通过调用Path的某些方法绘制不同贝塞尔曲线,但是在这个例子里面我们不是要绘制贝塞尔曲线,而是需要这个路径即可。我们获取到这个运动曲线上的每个点,获取x,y点然后把ImageView 的x,y设置成它。
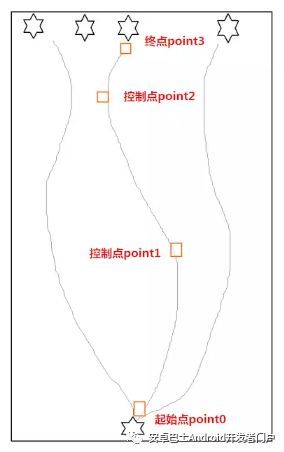
运动草图
我简单绘制了下运动的情况,画的不好请不要说我,因为我已经尽力了
啊。通过此图可以看到起点是固定的,终点也基本上算是定下来的,只是横坐标是在width范围内随机生成的。
接下来我们开始写动画吧,首先是刚开始的图片显示动画由小变大,透明度逐渐变为1:
/**
* 设置刚添加上imageview的属性动画,由小变大,逐渐清晰
* @param image
* @return
*/
public AnimatorSet getInitAnimationSet(final ImageView image){
ObjectAnimator scaleX = ObjectAnimator.ofFloat(image, "scaleX", 0.4f, 1f);
ObjectAnimator scaleY = ObjectAnimator.ofFloat(image, "scaleY", 0.4f, 1f);
ObjectAnimator alpha = ObjectAnimator.ofFloat(image, "alpha", 0.4f, 1f);
AnimatorSet animate = newAnimatorSet();
animate.playTogether(scaleX,scaleY,alpha);
animate.setDuration( 500);
returnanimate ;
}
....
//变化点PointF的时候调用此方法
ValueAnimator.ofObject(TypeEvaluator evaluator, Object... values)
ValueAnimator.ofObject可以生成一个ValueAnimator对象,TypeEvaluator 可以定制我们需要的变化规则,我们可以利用初始点PointF0经过贝塞尔三阶曲线变换到PointF3终止点,中间的控制点是PointF1和PointF2,于是我们自定义一个TypeEvaluator :
publicclassBezierEvaluatorimplementsTypeEvaluator{
/**
* 这2个点是控制点
*/
privatePointF point1 ;
privatePointF point2 ;
publicBezierEvaluator(PointF point1 ,PointF point2 ){
this.point1 = point1 ;
this.point2 = point2 ;
}
/**
* @paramt
* @parampoint0 初始点
* @parampoint3 终点
* @return
*/
@Override
publicPointF evaluate(floatt, PointF point0, PointF point3){
PointF point = newPointF();
point.x = point0.x*( 1-t)*( 1-t)*( 1-t)
+ 3*point1.x*t*( 1-t)*( 1-t)
+ 3*point2.x*t*t*( 1-t)*( 1-t)
+point3.x*t*t*t ;
point.y = point0.y*( 1-t)*( 1-t)*( 1-t)
+ 3*point1.y*t*( 1-t)*( 1-t)
+ 3*point2.y*t*t*( 1-t)*( 1-t)
+point3.y*t*t*t ;
returnpoint;
}
}
至于2个控制点的确定,保证一个点在上面一个点在下面即可:
privatePointF getPointF(intscale){
PointF pointF = newPointF();
pointF.x = random.nextInt((mWidth - 100)); //减去100 是为了控制 x轴活动范围,看效果
//再Y轴上 为了确保第二个点 在第一个点之上,我把Y分成了上下两半 这样动画效果好一些 也可以用其他方法
pointF.y = random.nextInt((mHeight - 100))/scale;
returnpointF;
}
有初始动画,有贝塞尔动画,顺序执行即可完成整个过程:
/**
* 动画效果
* @paramimage
*/
privateAnimatorSet getRunAnimatorSet(finalImageView image){
AnimatorSet runSet = newAnimatorSet();
PointF point0 = newPointF((mWidth-dWidth)/ 2,mHeight-dHeight); //起始点
PointF point3 = newPointF(random.nextInt(getWidth()), 0); //终止点
/**
* 开始执行贝塞尔动画
*/
TypeEvaluator evaluator = newBezierEvaluator(getPointF( 2),getPointF( 1));
ValueAnimator bezier = ValueAnimator.ofObject(evaluator,point0,point3);
bezier.addUpdateListener( newValueAnimator.AnimatorUpdateListener() {
@Override
publicvoidonAnimationUpdate(ValueAnimator animation){
//这里获取到贝塞尔曲线计算出来的的x y值 赋值给view 这样就能让爱心随着曲线走啦
PointF pointF = (PointF) animation.getAnimatedValue();
image.setX(pointF.x);
image.setY(pointF.y);
image.setAlpha( 1-animation.getAnimatedFraction());
}
});
runSet.play(bezier);
runSet.setDuration( 3000);
returnrunSet;
}
/**
* 合并执行两个动画
* @paramimage
*/
publicvoidstart(finalImageView image){
AnimatorSet finalSet = newAnimatorSet();
finalSet.setInterpolator(interpolators[random.nextInt( 4)]); //实现随机变速
finalSet.playSequentially(getInitAnimationSet(image), getRunAnimatorSet(image));
finalSet.setTarget(image);
finalSet.addListener( newAnimatorListenerAdapter() {
@Override
publicvoidonAnimationEnd(Animator animation){
removeView(image);
}
});
finalSet.start();
}
执行完一次动画之后从容器中移除此ImageView~
在写一个方法去调用动画即可:
/**
* 创建可移动的View
*/
publicvoidstartAnimation(){
ImageView image = newImageView(getContext());
image.setImageDrawable(drawable[random.nextInt( 5)]);
image.setLayoutParams(lp);
addView(image);
start(image);
}
在activity调用该控件的 startAnimation()方法我们就可以看到一个心飘啊飘的到顶部了。
现在我需要一点击不断的出现很多心的效果,再次调用该方法暂停动画,因此加入一个定时器:
/**
* 定时器,可以自动执行动画
*/
publicvoidstartAutoAnimation(){
isPlayingAnim = !isPlayingAnim ;
if(isPlayingAnim){
if(timer!= null){
timer.cancel();
}
if(task!= null){
task.cancel();
}
} else{
timer = newTimer();
task = newTimerTask() {
@Override
publicvoidrun(){
// 需要做的事:发送消息
Message message = handler.obtainMessage();
message.what = 1;
handler.sendMessage(message);
}
};
timer.schedule(task, 0, 150); // 执行task,经过150ms循环执行
}
}
Handler handler = newHandler(){
@Override
publicvoidhandleMessage(Message msg){
super.handleMessage(msg);
if(msg.what== 1){
ImageView image = newImageView(getContext());
image.setImageDrawable(drawable[random.nextInt( 5)]);
image.setLayoutParams(lp);
addView(image);
start(image);
}
}
};
好了,至此,大功告成,附上完整代码,这里很多属性可以抽取出来定义在xml布局里面写,我是图方便快捷写死在控件里面了。
最后附上完整源代码:
packagecom.wzh.ffmpeg.study.view;
importandroid.animation.Animator;
importandroid.animation.AnimatorListenerAdapter;
importandroid.animation.AnimatorSet;
importandroid.animation.ObjectAnimator;
importandroid.animation.TypeEvaluator;
importandroid.animation.ValueAnimator;
importandroid.content.Context;
importandroid.graphics.Point;
importandroid.graphics.PointF;
importandroid.graphics.drawable.Drawable;
importandroid.os.Handler;
importandroid.os.Message;
importandroid.support.annotation.Nullable;
importandroid.support.v4.content.ContextCompat;
importandroid.util.AttributeSet;
importandroid.view.View;
importandroid.view.animation.AccelerateDecelerateInterpolator;
importandroid.view.animation.AccelerateInterpolator;
importandroid.view.animation.AnimationSet;
importandroid.view.animation.DecelerateInterpolator;
importandroid.view.animation.Interpolator;
importandroid.view.animation.LinearInterpolator;
importandroid.widget.ImageView;
importandroid.widget.RelativeLayout;
importcom.wzh.ffmpeg.study.R;
importjava.util.Random;
importjava.util.Timer;
importjava.util.TimerTask;
publicclassBezierViewextendsRelativeLayout{
privateInterpolator[] interpolators ;
privateDrawable drawable[];
/**
* 图片的宽高
*/
privateintdWidth = 0;
privateintdHeight = 0;
privateLayoutParams lp ;
privateRandom random ;
/**
* 父控件宽高
*/
privateintmWidth = 0;
privateintmHeight = 0;
privateTimer timer = null;
privateTimerTask task = null;
privatebooleanisPlayingAnim = true;
publicBezierView(Context context){
this(context, null);
}
publicBezierView(Context context, @Nullable AttributeSet attrs){
this(context, attrs, 0);
}
publicBezierView(Context context, @Nullable AttributeSet attrs, intdefStyleAttr){
super(context, attrs, defStyleAttr);
init();
}
/**
* 初始化数据
*/
privatevoidinit(){
drawable = newDrawable[ 5];
drawable[ 0] = ContextCompat.getDrawable(getContext(), R.drawable.red);
drawable[ 1] = ContextCompat.getDrawable(getContext(),R.drawable.yellow);
drawable[ 2] = ContextCompat.getDrawable(getContext(),R.drawable.deep_red);
drawable[ 3] = ContextCompat.getDrawable(getContext(),R.drawable.blue);
drawable[ 4] = ContextCompat.getDrawable(getContext(),R.drawable.green);
interpolators = newInterpolator[ 4];
interpolators[ 0] = newAccelerateInterpolator();
interpolators[ 1] = newDecelerateInterpolator();
interpolators[ 2] = newAccelerateDecelerateInterpolator();
interpolators[ 3] = newLinearInterpolator();
dWidth = drawable[ 0].getIntrinsicWidth();
dHeight = drawable[ 0].getIntrinsicHeight();
lp = newLayoutParams(dWidth,dHeight);
lp.addRule(ALIGN_PARENT_BOTTOM);
lp.addRule(CENTER_HORIZONTAL);
random = newRandom();
}
@Override
protectedvoidonMeasure(intwidthMeasureSpec, intheightMeasureSpec){
super.onMeasure(widthMeasureSpec, heightMeasureSpec);
//再此处才能准确获取到控件的宽高
mWidth = getMeasuredWidth();
mHeight = getMeasuredHeight();
}
/**
* 创建可移动的View
*/
publicvoidstartAnimation(){
ImageView image = newImageView(getContext());
image.setImageDrawable(drawable[random.nextInt( 5)]);
image.setLayoutParams(lp);
addView(image);
start(image);
}
/**
* 定时器,可以自动执行动画
*/
publicvoidstartAutoAnimation(){
isPlayingAnim = !isPlayingAnim ;
if(isPlayingAnim){
if(timer!= null){
timer.cancel();
}
if(task!= null){
task.cancel();
}
} else{
timer = newTimer();
task = newTimerTask() {
@Override
publicvoidrun(){
// 需要做的事:发送消息
Message message = handler.obtainMessage();
message.what = 1;
handler.sendMessage(message);
}
};
timer.schedule(task, 0, 150); // 执行task,经过150ms循环执行
}
}
Handler handler = newHandler(){
@Override
publicvoidhandleMessage(Message msg){
super.handleMessage(msg);
if(msg.what== 1){
ImageView image = newImageView(getContext());
image.setImageDrawable(drawable[random.nextInt( 5)]);
image.setLayoutParams(lp);
addView(image);
start(image);
}
}
};
/**
* view销毁之后调用,释放资源
*/
@Override
protectedvoidonDetachedFromWindow(){
super.onDetachedFromWindow();
if(timer!= null){
timer.cancel();
}
if(task!= null){
task.cancel();
}
}
/**
* 设置刚添加上imageview的属性动画,由小变大,逐渐清晰
* @paramimage
* @return
*/
publicAnimatorSet getInitAnimationSet(finalImageView image){
ObjectAnimator scaleX = ObjectAnimator.ofFloat(image, "scaleX", 0.4f, 1f);
ObjectAnimator scaleY = ObjectAnimator.ofFloat(image, "scaleY", 0.4f, 1f);
ObjectAnimator alpha = ObjectAnimator.ofFloat(image, "alpha", 0.4f, 1f);
AnimatorSet animate = newAnimatorSet();
animate.playTogether(scaleX,scaleY,alpha);
animate.setDuration( 500);
returnanimate ;
}
/**
* 动画效果
* @paramimage
*/
privateAnimatorSet getRunAnimatorSet(finalImageView image){
AnimatorSet runSet = newAnimatorSet();
PointF point0 = newPointF((mWidth-dWidth)/ 2,mHeight-dHeight); //起始点
PointF point3 = newPointF(random.nextInt(getWidth()), 0); //终止点
/**
* 开始执行贝塞尔动画
*/
TypeEvaluator evaluator = newBezierEvaluator(getPointF( 2),getPointF( 1));
ValueAnimator bezier = ValueAnimator.ofObject(evaluator,point0,point3);
bezier.addUpdateListener( newValueAnimator.AnimatorUpdateListener() {
@Override
publicvoidonAnimationUpdate(ValueAnimator animation){
//这里获取到贝塞尔曲线计算出来的的x y值 赋值给view 这样就能让爱心随着曲线走啦
PointF pointF = (PointF) animation.getAnimatedValue();
image.setX(pointF.x);
image.setY(pointF.y);
image.setAlpha( 1-animation.getAnimatedFraction());
}
});
runSet.play(bezier);
runSet.setDuration( 3000);
returnrunSet;
}
/**
* 合并执行两个动画
* @paramimage
*/
publicvoidstart(finalImageView image){
AnimatorSet finalSet = newAnimatorSet();
finalSet.setInterpolator(interpolators[random.nextInt( 4)]); //实现随机变速
finalSet.playSequentially(getInitAnimationSet(image), getRunAnimatorSet(image));
finalSet.setTarget(image);
finalSet.addListener( newAnimatorListenerAdapter() {
@Override
publicvoidonAnimationEnd(Animator animation){
removeView(image);
}
});
finalSet.start();
}
/**
* 获取控制点
* @paramscale
* @return
*/
privatePointF getPointF(intscale){
PointF pointF = newPointF();
pointF.x = random.nextInt((mWidth - 100)); //减去100 是为了控制 x轴活动范围,看效果
//再Y轴上 为了确保第二个点 在第一个点之上,我把Y分成了上下两半 这样动画效果好一些 也可以用其他方法
pointF.y = random.nextInt((mHeight - 100))/scale;
returnpointF;
}
publicclassBezierEvaluatorimplementsTypeEvaluator{
/**
* 这2个点是控制点
*/
privatePointF point1 ;
privatePointF point2 ;
publicBezierEvaluator(PointF point1 ,PointF point2 ){
this.point1 = point1 ;
this.point2 = point2 ;
}
/**
* @paramt
* @parampoint0 初始点
* @parampoint3 终点
* @return
*/
@Override
publicPointF evaluate(floatt, PointF point0, PointF point3){
PointF point = newPointF();
point.x = point0.x*( 1-t)*( 1-t)*( 1-t)
+ 3*point1.x*t*( 1-t)*( 1-t)
+ 3*point2.x*t*t*( 1-t)*( 1-t)
+point3.x*t*t*t ;
point.y = point0.y*( 1-t)*( 1-t)*( 1-t)
+ 3*point1.y*t*( 1-t)*( 1-t)
+ 3*point2.y*t*t*( 1-t)*( 1-t)
+point3.y*t*t*t ;
returnpoint;
}
}
}
Acitivity调用
BezierView bse = (BezierView) findViewById(R.id.bse);
bse.startAutoAnimation(); //自动播放动画效果
其实最主要的就是自定义属性动画的属性,TypeEvaluator ,这个是最核心的思想。如果要兼容3.0以下版本,那么自己加入nineoldandroids包,可以支持低版本的动画。
不对的地方望大家指出,相互学习,谢谢~
责任编辑:

为开发者提供学习成长、分享交流、生态实践、资源工具等服务,帮助开发者快速成长。
更多推荐


 0
0 0
0- 0


 已为社区贡献6条内容

所有评论(0)