qt利用腾讯云服务器实现不同局域网的通信(tcp)
网上大多数关于qt通信的文章都是同一局域网通信,这种根本没有达到自己想象中的那种通信的要求(不同局域网的通信)。这里用到的方法是客户端发送消息给服务器,然后服务器再发送给另一个局域网的客户。首先我们需要购买一个腾讯云服务器,并在自己电脑登录腾讯云服务器的虚拟机。点击这里的登录。登录完成后,就需要把自己写的服务器架在虚拟机上(就是把自己写的服务器在虚拟机上运行)。以下是我写的服务器代码.h#ifnd
·
网上大多数关于qt通信的文章都是同一局域网通信,这种根本没有达到自己想象中的那种通信的要求(不同局域网的通信)。这里用到的方法是客户端发送消息给服务器,然后服务器再发送给另一个局域网的客户。
首先我们需要购买一个腾讯云服务器,并在自己电脑登录腾讯云服务器的虚拟机。

点击这里的登录。
登录完成后,就需要把自己写的服务器架在虚拟机上(就是把自己写的服务器在虚拟机上运行)。
以下是我写的服务器代码
.h
#ifndef WIDGET_H
#define WIDGET_H

#include <QWidget>
#include<QTcpServer>
#include<QTcpSocket>
#include<QList>
QT_BEGIN_NAMESPACE
namespace Ui { class Widget; }
QT_END_NAMESPACE

class Widget : public QWidget
{
    Q_OBJECT

public:
    Widget(QWidget *parent = nullptr);
    void newConnectSoket(QTcpSocket *,QString);
    void send_data_to_user(QString);
    ~Widget();

private:
    Ui::Widget *ui;
    QTcpServer *tcpServer;
    QTcpSocket *tcpSoket;
    QMap<QString,QTcpSocket*> user_tcpSokets;//用户账号对应一个socket
    int client_Num;//用户数量
};
#endif // WIDGET_H
.cpp
#include "widget.h"
#include "ui_widget.h"
Widget::Widget(QWidget *parent)
    : QWidget(parent)
    , ui(new Ui::Widget)
{
    ui->setupUi(this);
    client_Num=0;//初始化客户端数量
    tcpServer=new QTcpServer(this);
    tcpServer->listen(QHostAddress::AnyIPv4,8888);
    setWindowTitle("服务器:8888");
    connect(tcpServer,&QTcpServer::newConnection,
            [=]()
    {
        tcpSoket=tcpServer->nextPendingConnection();
        connect(tcpSoket,&QTcpSocket::readyRead,
                [=]()
        {
            QByteArray array=tcpSoket->readAll();
            char *m=array.data();
            QString dataStr=m;
            ui->textEdit->append(dataStr);
            qDebug()<<dataStr;
            if(dataStr.startsWith("Load"))
            {
                newConnectSoket(tcpSoket,dataStr);//当有新用户连接时,保存用户账号和socket
            }
            else if(dataStr.startsWith("Send"))
            {
                send_data_to_user(dataStr);//当有需要发送消息时
            }
        });

    });
}
void Widget::newConnectSoket(QTcpSocket *soket,QString str)
{
    qDebug()<<str;
    user_tcpSokets[str.section("#",1,1)]=soket;//保存
    tcpSoket->disconnect();//保存完关闭连接
}
void Widget::send_data_to_user(QString str)
{
    qDebug()<<str;
    tcpSoket=user_tcpSokets[str.section("#",1,1)];//获取需要发送到的账号对应的socket
    tcpSoket->write(str.section("#",2,2).toUtf8().data());//发送消息
    tcpSoket->disconnect();//关闭连接
}
Widget::~Widget()
{
    delete ui;
}
服务器架完之后就需要用客户端发送和接收消息了,这里只是个简单的测试,所以简单的写了两个测试的客户端。
客户端0001,用于接收客户端0002发送过来的消息
以下是0001客户端的代码
.h
#ifndef WIDGET_H
#define WIDGET_H

#include <QWidget>
#include<QTcpSocket>
#include<QTextEdit>
#include<QGridLayout>
QT_BEGIN_NAMESPACE
namespace Ui { class Widget; }
QT_END_NAMESPACE

class Widget : public QWidget
{
    Q_OBJECT

public:
    Widget(QWidget *parent = nullptr);
    ~Widget();

private:
    Ui::Widget *ui;
    QTcpSocket *tcpSoket;
    QTextEdit *text=new QTextEdit;
};
#endif // WIDGET_H
.cpp
#include "widget.h"
#include "ui_widget.h"

Widget::Widget(QWidget *parent)
    : QWidget(parent)
    , ui(new Ui::Widget)
{
    ui->setupUi(this);
    setWindowTitle("客户端0001");
    tcpSoket=new QTcpSocket(this);
    tcpSoket->connectToHost("购买的云服务器的公网ip",8888);//打开应用首先连接服务器
    QString str=QString("Load#0001");//发送登录以及自己的账号给服务器
    tcpSoket->write(str.toUtf8().data());
    connect(tcpSoket,&QTcpSocket::readyRead,
            [=]()
    {
       QByteArray array=tcpSoket->readAll();
       ui->textEdit->append(array);
    });
}
Widget::~Widget()
{
    delete ui;
}
0002客户端的作用是给0001客户端发送消息。代码类似0001客户端的代码。以下是0002的代码。
.h(与0001一样)
#ifndef WIDGET_H
#define WIDGET_H

#include <QWidget>
#include<QTcpSocket>
#include<QTextEdit>
#include<QGridLayout>
QT_BEGIN_NAMESPACE
namespace Ui { class Widget; }
QT_END_NAMESPACE

class Widget : public QWidget
{
    Q_OBJECT

public:
    Widget(QWidget *parent = nullptr);
    ~Widget();

private:
    Ui::Widget *ui;
    QTcpSocket *tcpSoket;
    QTextEdit *text=new QTextEdit;
};
#endif // WIDGET_H
.cpp
#include "widget.h"
#include "ui_widget.h"

Widget::Widget(QWidget *parent)
    : QWidget(parent)
    , ui(new Ui::Widget)
{
    ui->setupUi(this);
    setWindowTitle("客户端0001");
    tcpSoket=new QTcpSocket(this);
    tcpSoket->connectToHost("购买的云服务器的公网ip",8888);//打开应用首先连接服务器
    tcpSoket->write(QString("Send#0001#hello").toUtf8().data());
    connect(tcpSoket,&QTcpSocket::readyRead,
            [=]()
    {
       QByteArray array=tcpSoket->readAll();
       ui->textEdit->append(array);

    });
}
Widget::~Widget()
{
    delete ui;
}
以下是实现的效果

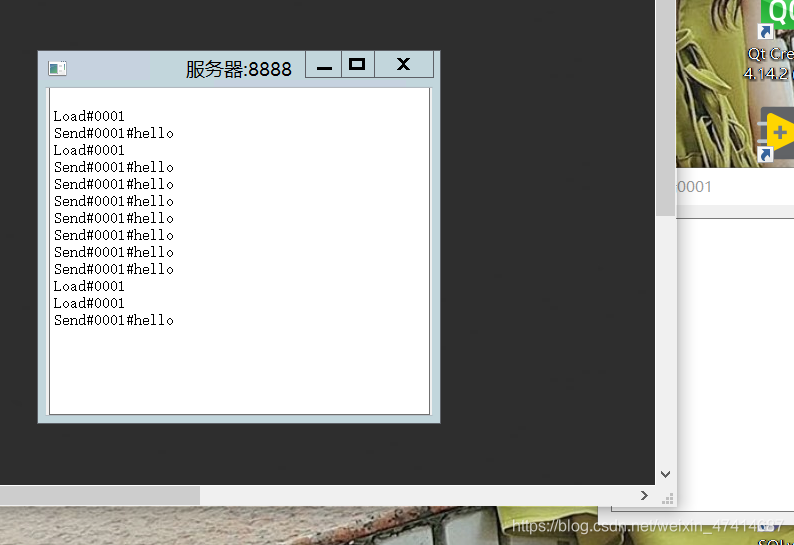
以上只是实现了不同局域网的简单通信,更多功能还需要自己拓展。

腾讯云面向开发者汇聚海量精品云计算使用和开发经验,营造开放的云计算技术生态圈。
更多推荐
 3
3 0
0- 0


 已为社区贡献1条内容

所有评论(0)