
QCustomPlot 框选放大,拖动,选中数据
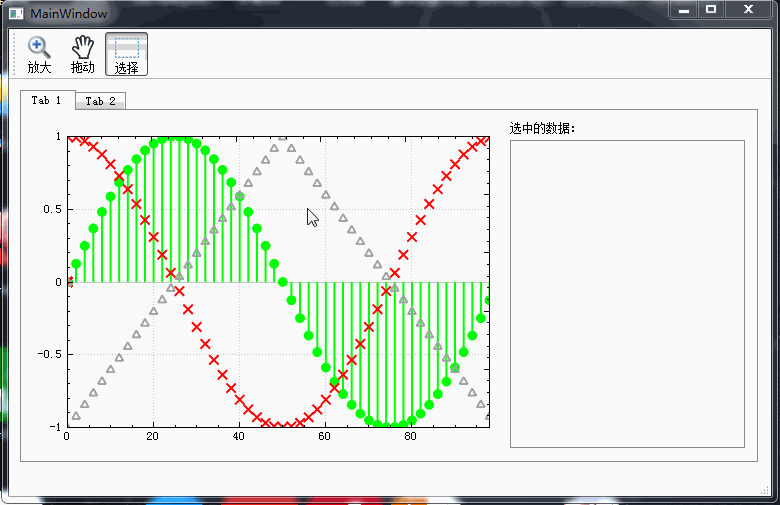
一、先看效果图框取数据后,还可以按Ctrl追加数据点二、原理qcustomPlot是有鼠标选择框功能的,只是默认是不使能,所以平常拖动鼠标没有反应,调用setSelectionRectMode可以开启选框,如下开启:customPlot->setSelectionRectMode(QCP::SelectionRectMode::srmZoom);//模式:框选放大QCP::Selection
一、先看效果图
框取数据后,还可以按Ctrl追加数据点
二、原理
qcustomPlot是有鼠标选择框功能的,只是默认是不使能,所以平常拖动鼠标没有反应,调用setSelectionRectMode可以开启选框,如下开启:
customPlot->setSelectionRectMode(QCP::SelectionRectMode::srmZoom);//模式:框选放大
QCP::SelectionRectMode有几个枚举值
| QCP::SelectionRectMode | 说明 |
|---|---|
| srmNone | 选择矩形被禁用 |
| srmZoom | 拖动鼠标选择框变为活动,放开时缩放轴的范围 |
| srmSelect | 拖动鼠标时,选择框变为活动。在释放时,如果绘图表的可选性设置允许,则选择选择矩形内的绘图表数据点 |
| srmCustom | 连接到选择rect的信号(例如QCPSelectionRect::accepted),以便处理用户交互。 |
(1)设置选框的边框和颜色
customPlot->selectionRect()->setPen(QPen(Qt::black,1,Qt::DashLine));//虚线
customPlot->selectionRect()->setBrush(QBrush(QColor(0,0,100,50)));//半透明浅蓝
(2)框选放大和拖动无法同时使用
setSelectionRectMode如果设置为srmZoom放大模式, 即使Interaction设置了拖动iRangeDrag,鼠标按下后依然是框选放大,而不会是拖动曲线,如下代码拖动是无效的:
customPlot->setSelectionRectMode(QCP::SelectionRectMode::srmZoom);//模式:框选放大
customPlot->setInteraction(QCP::iRangeDrag,true);//使能拖动
原因:跟踪源码,可以看到如果鼠标按下事件里,如果选择框模式不为srmNone,就执行选框操作了,而不会执行Interaction操作。

(3)框选数据
setSelectionRectMode设置为srmSelect选取数据模式,接着还需要setSelectable (QCP::SelectionType selectable)设定数据选取的方式,SelectionType的枚举效果分别如下:

| QCP::SelectionType | 说明 |
|---|---|
| stNone | 图表不可选 |
| stWhole | 选择的行为类似于stMultipleDataRanges,但是如果选择了任何数据点,则整个绘图表将被选中 |
| stSingleData | 一次可以选择一个单独的数据点 |
| stDataRange | 可以选择多个连续数据点(一个数据范围)。 |
| stMultipleDataRanges | 可以选择任何数据点/范围的组合。 |
想要选中数据后再追加数据,默认是按住Ctrl在选择数据,这个按键有需要可以修改Shift、Atl等:
customPlot->setMultiSelectModifier(Qt::KeyboardModifier::ControlModifier);//多选按键Ctrl
最后Interaction还要设置图表可选和多选,才能真正的选取任意曲线的数据点,代码例子:
    //数据多选
    customPlot->graph(0)->setSelectable(QCP::SelectionType::stMultipleDataRanges);
    customPlot->graph(1)->setSelectable(QCP::SelectionType::stMultipleDataRanges);
    customPlot->graph(2)->setSelectable(QCP::SelectionType::stMultipleDataRanges);
    //选择框模式:选取数据
    customPlot->setSelectionRectMode(QCP::SelectionRectMode::srmSelect);
    //选框黑色虚线
    customPlot->selectionRect()->setPen(QPen(Qt::black,1,Qt::DashLine));
    customPlot->selectionRect()->setBrush(QBrush(QColor(0,0,100,50)));
    //滚动缩放、图表可选、多选
    customPlot->setInteractions(QCP::iRangeZoom | QCP::iSelectPlottables| QCP::iMultiSelect);//
三、例子关键代码
第一个动态图例子的关键代码贴在下面,工程已打包,可以直接下载调试
头文件里:
    void on_customplot_selectionChangedByUser();
    void on_act_zoomIn_toggled(bool arg1);
    void on_act_move_toggled(bool arg1);
    void on_act_select_toggled(bool arg1);
    void contextMenuRequest(QPoint pos);
    void rescaleAxes();
构造函数里:
 //右键菜单自定义
    ui->customplot->setContextMenuPolicy(Qt::CustomContextMenu);
    //信号连接槽函数
    connect(ui->customplot, SIGNAL(customContextMenuRequested(QPoint)), this, SLOT(contextMenuRequest(QPoint)));

    QCustomPlot* customPlot=ui->customplot;
    //四边显示坐标轴
    customPlot->axisRect()->setupFullAxesBox();
    // 生成数据:
    int n=100;
    QVector<double> x(n), y1(n),y2(n),y3(n); //
    for (int i=0; i<n; i+=2)
    {
        x[i] = i; //
        y1[i] = qSin(i/(double)n*M_PI*2); //
        y2[i] = qCos(i/(double)n*M_PI*2); //
        y3[i] = (i<=50)? i/(double)50*2-1 : -(i-50)/(double)50*2+1;
    }

    // 创建3个graph
    customPlot->addGraph();
    customPlot->graph(0)->setData(x, y1);
    customPlot->addGraph();
    customPlot->graph(1)->setData(x, y2);
    customPlot->addGraph();
    customPlot->graph(2)->setData(x, y3);
    //曲线颜色
    customPlot->graph(0)->setPen(QPen(Qt::green,2));
    customPlot->graph(1)->setPen(QPen(Qt::red,2));
    customPlot->graph(2)->setPen(QPen(Qt::gray,2));
    //连接方式
    customPlot->graph(0)->setLineStyle((QCPGraph::LineStyle::lsImpulse));//脉冲线
    //customPlot->graph(1)->setLineStyle((QCPGraph::LineStyle::lsStepCenter));//阶梯线,左对齐
    // customPlot->graph(2)->setLineStyle((QCPGraph::LineStyle::lsStepLeft));//阶梯线,左对齐
    //不显示连线
    //customPlot->graph(0)->setLineStyle(QCPGraph::LineStyle::lsNone);
    customPlot->graph(1)->setLineStyle(QCPGraph::LineStyle::lsNone);
    customPlot->graph(2)->setLineStyle(QCPGraph::LineStyle::lsNone);
    //数据点显示图案
    customPlot->graph(0)->setScatterStyle(QCPScatterStyle(QCPScatterStyle::ScatterShape::ssDisc,8));
    customPlot->graph(1)->setScatterStyle(QCPScatterStyle(QCPScatterStyle::ScatterShape::ssCross,8));
    customPlot->graph(2)->setScatterStyle(QCPScatterStyle(QCPScatterStyle::ScatterShape::ssTriangle,8));
    //自动调整范围
    customPlot->graph(0)->rescaleAxes();
    customPlot->graph(1)->rescaleAxes(true);
    customPlot->graph(2)->rescaleAxes(true);
    //数据多选
    customPlot->graph(0)->setSelectable(QCP::SelectionType::stMultipleDataRanges);
    customPlot->graph(1)->setSelectable(QCP::SelectionType::stMultipleDataRanges);
    customPlot->graph(2)->setSelectable(QCP::SelectionType::stMultipleDataRanges);
    //选择框模式:无
    customPlot->setSelectionRectMode(QCP::SelectionRectMode::srmNone);
    //选框黑色虚线
    customPlot->selectionRect()->setPen(QPen(Qt::black,1,Qt::DashLine));
    customPlot->selectionRect()->setBrush(QBrush(QColor(0,0,100,50)));
    //修改多选按键,默认Ctrl
    //customPlot->setMultiSelectModifier(Qt::KeyboardModifier::ControlModifier);
    //滚动缩放、图表可选、多选
    customPlot->setInteractions(QCP::iRangeZoom | QCP::iSelectPlottables| QCP::iMultiSelect);//

    customPlot->replot();
放大、拖动、选择action槽函数:
//放大action
void MainWindow::on_act_zoomIn_toggled(bool arg1)
{
    QCustomPlot* customPlot=ui->customplot;
    if(arg1)
    {
        ui->act_move->setChecked(false);//取消拖动选项
        customPlot->setInteraction(QCP::iRangeDrag,false);//取消拖动
        ui->act_select->setChecked(false);//取消选择
        customPlot->setSelectionRectMode(QCP::SelectionRectMode::srmZoom);
    }
    else
    {
        customPlot->setSelectionRectMode(QCP::SelectionRectMode::srmNone);
    }
}

//拖动action
void MainWindow::on_act_move_toggled(bool arg1)
{
    QCustomPlot* customPlot=ui->customplot;
    if(arg1)
    {
        ui->act_zoomIn->setChecked(false);//取消放大
        ui->act_select->setChecked(false);//取消选择
        customPlot->setSelectionRectMode(QCP::SelectionRectMode::srmNone);
        customPlot->setInteraction(QCP::iRangeDrag,true);//使能拖动
    }
    else
    {
        customPlot->setSelectionRectMode(QCP::SelectionRectMode::srmNone);
        customPlot->setInteraction(QCP::iRangeDrag,false);//取消拖动
    }
}

//选择action
void MainWindow::on_act_select_toggled(bool arg1)
{
    QCustomPlot* customPlot=ui->customplot;
    if(arg1)
    {
        ui->act_zoomIn->setChecked(false);//取消放大
        ui->act_move->setChecked(false);//取消拖动选项
        customPlot->setInteraction(QCP::iRangeDrag,false);//取消拖动
        customPlot->setSelectionRectMode(QCP::SelectionRectMode::srmSelect);
    }
    else
    {
        customPlot->setSelectionRectMode(QCP::SelectionRectMode::srmNone);
    }
}
选择变化槽函数:
//选择的数据变化
void MainWindow::on_customplot_selectionChangedByUser()
{
    QCustomPlot* customPlot=ui->customplot;
    //清空listwidget
    ui->lst_data->clear();
    for(int i=0;i<customPlot->graphCount();i++)
    {
        //遍历有被选中的graph
        if(customPlot->graph(i)->selected())
        {
            QCPDataSelection selection =customPlot->graph(i)->selection();
            //遍历选中范围
            for(int j=0;j<selection.dataRangeCount();j++)
            {
                QCPDataRange dataRange = selection.dataRange(j);
                //遍历数据
                for(int k=dataRange.begin();k<dataRange.end();k++)
                {
                    QString str_key = QString::number(customPlot->graph(i)->data()->at(k)->key);
                    QString str_value = QString::number(customPlot->graph(i)->data()->at(k)->value);
                    QString str_at= QString::number(i);
                    //添加到listwidget
                    ui->lst_data->addItem("曲线"+str_at+":"+str_key+", "+str_value);
                }
            }
        }
    }
    //滚动到底部
    ui->lst_data->scrollToBottom();
}

鸿蒙生态一站式服务平台。
更多推荐
 7
7 0
0- 0


 已为社区贡献1条内容

所有评论(0)