靠谱的app加固分享
先来看看大概流程加固俯瞰1、编写加密方法,作为工具方法用于后续的加密和解密准备。2、编写代理Application(ProxyApplication),作为加固后的apk的伪入口。(ProxyApplication作为伪入口时,需要将加密apk进行解密并重新加载于classLoader中)3、对需要加密的apk的AndroidManifest文件的Application:name 标签经行更改为P
先来看看大概流程
加固俯瞰
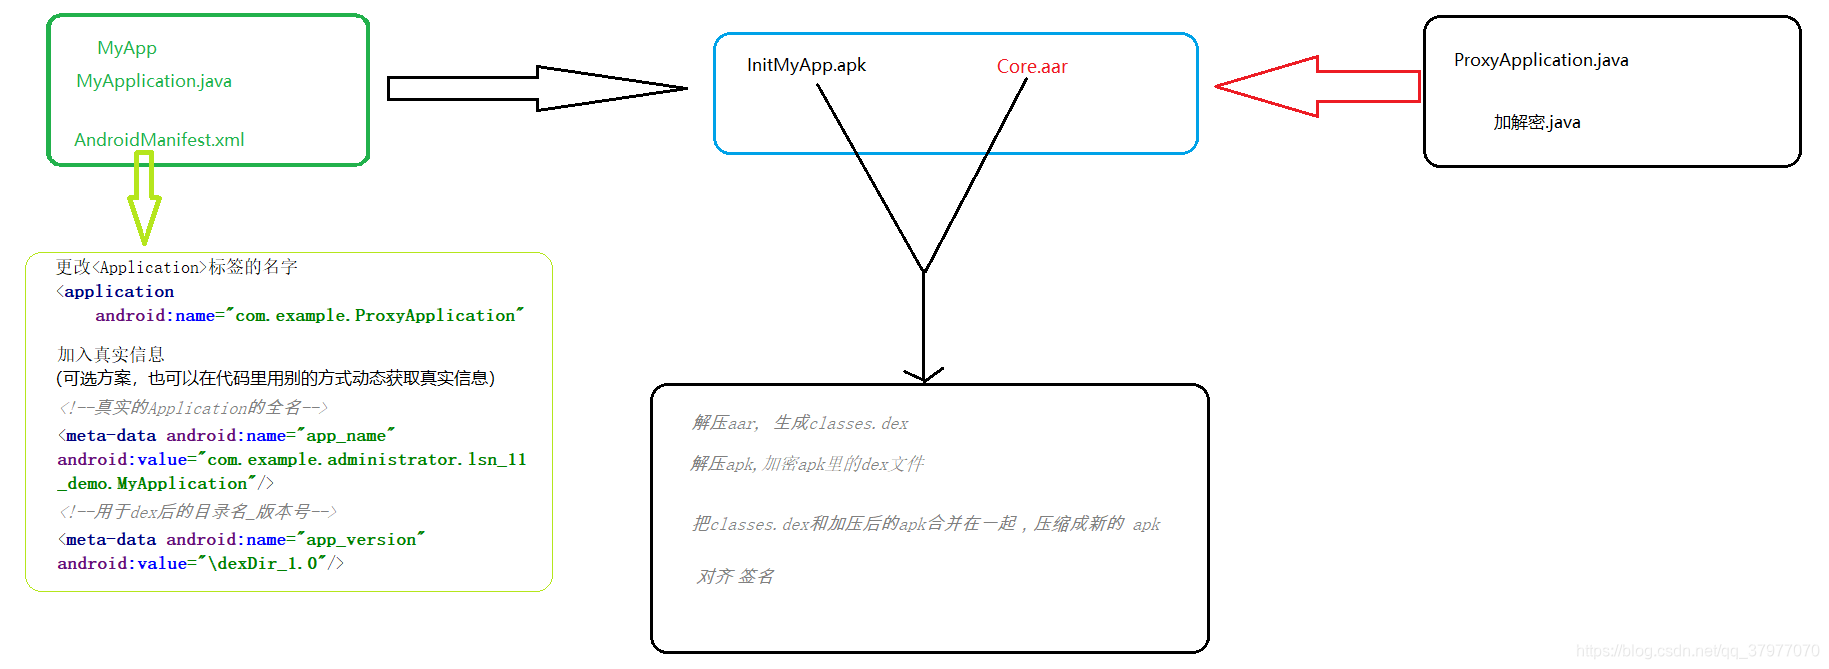
1、编写加密方法,作为工具方法用于后续的加密和解密准备。
2、编写代理Application(ProxyApplication),作为加固后的apk的伪入口。(ProxyApplication作为伪入口时,需要将加密apk进行解密并重新加载于classLoader中)
3、对需要加密的apk的AndroidManifest文件的Application:name 标签经行更改为ProxyApplication,并用标签声明真正的Application入口和版本号。
4、将1、2步的文件打包成aar包。
5、解压aar包(于aarTemp文件夹),并将解压后的jar文件,编译成dex文件(Entrance.dex)(安卓虚拟机可识别的机器码文件)。
6、解压需要加密的apk(于apkTemp文件夹),遍历解压后的文件夹,取出所有dex文件,用1步中的加密方法对所有dex文件进行加密,并替换原本没加密的dex。
*注:Entrance.dex在aarTemp内,没被加密
7、将aarTemp中的dex文件,复制到apkTemp文件中,并将apkTemp压缩成apk文件。
8、对齐 & 签名(才能正常使用)
附上相关的代码
    public class Main {
        public static void main(String[] args) {
            //第四步:解压arr(包含加密解密工具和ProxyApplication.java)
            File aarFile = new File("core/build/outputs/aar/core-debug.aar");
            File aarTemp = new File("lib/temp");
            Zip.unZip(aarFile, aarTemp);
            // 生成classes.dex
            File classesJar = new File(aarTemp, "classes.jar");
            File classesDex = new File(aarTemp, "classes.dex");
            Process process = null;
            //dx --dex --output out.dex in.jar
            try {
                process = Runtime.getRuntime().exec("cmd /c  dx --dex --output " + classesDex.getAbsolutePath()
                        + " " + classesJar.getAbsolutePath());
                process.waitFor();
                if (process.exitValue() != 0) {
                    System.out.println("dex error");
                }
            } catch (IOException e) {
                e.printStackTrace();
            } catch (InterruptedException e) {
                e.printStackTrace();
            }
            //第六步:解压apk
            File apkFile = new File("app/build/outputs/apk/debug/app-debug.apk");
            File apkTemp = new File("lib/Apktemp");
            Zip.unZip(apkFile, apkTemp);
            ArrayList<File> dexFiles = new ArrayList<>();
            for (File file : apkTemp.listFiles()) {
                if (file.getName().endsWith("dex")) {
                    dexFiles.add(file);
                }
            }
            //加密apk里面的dex
            AES.init(AES.DEFAULT_PWD);
            for (File dexFile : dexFiles) {
                try {
                    byte[] bytes = Utils.getBytes(dexFile);

                    byte[] encrypt = AES.encrypt(bytes);
                    FileOutputStream fos = new FileOutputStream(new File(apkTemp,
                            "secret-" + dexFile.getName()));
                    fos.write(encrypt);
                    fos.flush();
                    fos.close();
                    dexFile.delete();
                } catch (Exception e) {
                    e.printStackTrace();
                }
            }
            classesDex.renameTo(new File("lib/Apktemp", "classes.dex"));
            File unSignedApk = new File("app/build/outputs/apk/debug/app-unsigned.apk");
            //第七步:把apkTemp压缩成unsightApk
            try {
                Zip.zip(apkTemp, unSignedApk);
            } catch (Exception e) {
                e.printStackTrace();
            }

            //第八步:对齐 签名
            File alignedApk = new File("app/build/outputs/apk/debug/app-unsigned-aligned.apk");
            try {
                process = Runtime.getRuntime().exec("cmd /c zipalign -v -p 4 " + unSignedApk.getAbsolutePath()
                        + " " + alignedApk.getAbsolutePath());

                process.waitFor();
                if (process.exitValue() != 0) {
                    System.out.println("zipalign error");
                }
            } catch (InterruptedException e) {
                e.printStackTrace();
            } catch (IOException e) {
                e.printStackTrace();
            }
            File signedApk=new File("app/build/outputs/apk/debug/app-signed-aligned.apk");
            File jks=new File("mykeystore.jks");
            try {
                process=Runtime.getRuntime().exec("cmd /c apksigner sign --ks "+jks.getAbsolutePath()
                        +" --ks-key-alias key0 --ks-pass pass:11111111 --key-pass pass:11111111 --out "
                        +signedApk.getAbsolutePath()+" "+alignedApk.getAbsolutePath());
                process.waitFor();
                if(process.exitValue()!=0){
                    System.out.println("sign error");
                }
            } catch (IOException e) {
                e.printStackTrace();
            } catch (InterruptedException e) {
                e.printStackTrace();
            }

            System.out.println("over ");
        }
    }
这里详细讲讲ProxyApplication:
探讨1:作为唯一没加密的dex文件内的ProxyApplication如何把加密的dex文件,加载到类加载器(ClassLoader)中?
ProxyApplication三部曲:
1.获得加密apk。
2.解压zip并解密dex文件。
3把新dex文件索引存在类加载器中。
上述过程中,涉及到把dex文件加载到类加载器中,下面简单理解下类加载机制。
前提:android的ClassLoader有两种类型系统类加载器和自定义加载器。
1)BootClassLoader:
安卓系统启动时候会使用BCL来预加载常用类。
2)DexClassLoader
加载dex文件和包含dex文件的压缩包
3)PathClassLoader
加载系统类和应用程序的类
4) InMemoryClassLoader:
androidO新增的,用于加载内存中的dex
·
·ClassLoader是一个抽象类,定义了classloader的主要功能。BootClassLoader是它的内部类
·SecureClassLoader不是ClassLoader的实现类,拓展了ClassLoader的权限方面的功能
·BaseDexClassLoader继承ClassLoader,但是是抽象类,PathClassLoader, DexClassLoader, InMemoryClassLoader都继承它,并各自实现类功能
·双亲委托模式
(讲人话:首先判断该类是否已经加载,如无,不是从自身查找,而是委托到父加载器中找是否有加载目的Class,若无依次向父类递归,直至最顶层ClassLoader类。如果找到了,就直接返回Class,若果没找到就继续依次向下子加载器findClass…)
优点:
1.避免重复加载
2.保护安全性。
(沙雕A建一个 类名为 android.view.View的自定义类,可能造成系统原本的View不可用。但其实还有一层保护,虚拟机把两个类名一致的且被同一个类加载器加载的类,虚拟机才会认为他们是同一个类)
来一个demo打印看看应用的类加载器是什么:

这里可以看到PathClassLoader作为加载器。
ClassLoader的加载过程:
ClassLoader.java
      protected Class<?> loadClass(String name, boolean resolve)
            throws ClassNotFoundException
        {
                // First, check if the class has already been loaded
            //找该类是否被加载过了
                Class<?> c = findLoadedClass(name);
                if (c == null) {
                    try {
                        //先判断父类是否存在
                        if (parent != null) {
                            c = parent.loadClass(name, false);
                        } else {
                            //如果不存在就在自层找
                            c = findBootstrapClassOrNull(name);
                        }
                    } catch (ClassNotFoundException e) {
                        // ClassNotFoundException thrown if class not found
                        // from the non-null parent class loader
                    }

                    if (c == null) {
                        // If still not found, then invoke findClass in order
                        // to find the class.
                        //在委托流程中没找到该类,就会执行该句
                        c = findClass(name);
                    }
                }
                //如果已加载就直接返回
                return c;
        }
BaseDexClassLoader.java
     @Override
        protected Class<?> findClass(String name) throws ClassNotFoundException {
            List<Throwable> suppressedExceptions = new ArrayList<Throwable>();
            //调用pathList的findClass
            Class c = pathList.findClass(name, suppressedExceptions);
            if (c == null) {
                ClassNotFoundException cnfe = new ClassNotFoundException(
                        "Didn't find class \"" + name + "\" on path: " + pathList);
                for (Throwable t : suppressedExceptions) {
                    cnfe.addSuppressed(t);
                }
                throw cnfe;
            }
            return c;
        }
先看看pathList是什么对象
     /**
         * Constructs an instance.
         *
         * dexFile must be an in-memory representation of a full dexFile.
         *
         * @param dexFiles the array of in-memory dex files containing classes.
         * @param parent the parent class loader
         *
         * @hide
         */
        public BaseDexClassLoader(ByteBuffer[] dexFiles, ClassLoader parent) {
            // TODO We should support giving this a library search path maybe.
            super(parent);
            //在构造器内初始化 是一个DexPathList对象
            this.pathList = new DexPathList(this, dexFiles);
        }
接下来看看DexPathList对象怎么存放已加载的class
     /**
         * Construct an instance.
         *
         * @param definingContext the context in which any as-yet unresolved
         * classes should be defined
         *
         * @param dexFiles the bytebuffers containing the dex files that we should load classes from.
         */
        public DexPathList(ClassLoader definingContext, ByteBuffer[] dexFiles) {
           ...
            this.definingContext = definingContext;
            // TODO It might be useful to let in-memory dex-paths have native libraries.
            this.nativeLibraryDirectories = Collections.emptyList();
            this.systemNativeLibraryDirectories =
                    splitPaths(System.getProperty("java.library.path"), true);
            this.nativeLibraryPathElements = makePathElements(this.systemNativeLibraryDirectories);

            ArrayList<IOException> suppressedExceptions = new ArrayList<IOException>();
            //把所有存进来的dex文件存储在dexElements对象
            this.dexElements = makeInMemoryDexElements(dexFiles, suppressedExceptions);
            if (suppressedExceptions.size() > 0) {
                this.dexElementsSuppressedExceptions =
                        suppressedExceptions.toArray(new IOException[suppressedExceptions.size()]);
            } else {
                dexElementsSuppressedExceptions = null;
            }
        }
接下来看看dexElements 是何方神圣!?
这是dexElements的对象声明
      /**
         * List of dex/resource (class path) elements.
         * Should be called pathElements, but the Facebook app uses reflection
         * to modify 'dexElements' (http://b/7726934).
         */
        private Element[] dexElements;
重点来了:
     /**
         * Element of the dex/resource path. Note: should be called DexElement, but apps reflect on
         * this.
         */
        /*package*/ static class Element {
            /**
             * A file denoting a zip file (in case of a resource jar or a dex jar), or a directory
             * (only when dexFile is null).
             */
            private final File path;

            private final DexFile dexFile;

            private ClassPathURLStreamHandler urlHandler;
            private boolean initialized;

            /**
             * Element encapsulates a dex file. This may be a plain dex file (in which case dexZipPath
             * should be null), or a jar (in which case dexZipPath should denote the zip file).
             */
            public Element(DexFile dexFile, File dexZipPath) {
                this.dexFile = dexFile;
                this.path = dexZipPath;
            }

            public Element(DexFile dexFile) {
                this.dexFile = dexFile;
                this.path = null;
            }

            public Element(File path) {
              this.path = path;
              this.dexFile = null;
            }
            ....
         }
从上面代码可以看到Element存放了dex文件的实例,和对应路径。
回来~从BaseDexClassLoader.findClass()->DexPathList.findClass()
就看看DexPathList.findClass()的实现内容
    public Class<?> findClass(String name, List<Throwable> suppressed) {
    //遍历dexElements,findClass()
            for (Element element : dexElements) {
            /
                Class<?> clazz = element.findClass(name, definingContext, suppressed);
                if (clazz != null) {
                    return clazz;
                }
            }

            if (dexElementsSuppressedExceptions != null) {
                suppressed.addAll(Arrays.asList(dexElementsSuppressedExceptions));
            }
            return null;
        }
看看element.findClass()
     public Class<?> findClass(String name, ClassLoader definingContext,
                    List<Throwable> suppressed) {
                return dexFile != null ? dexFile.loadClassBinaryName(name, definingContext, suppressed)
                        : null;
            }
dexFile.loadClassBinaryName()
      public Class loadClassBinaryName(String name, ClassLoader loader, List<Throwable> suppressed) {
            return defineClass(name, loader, mCookie, this, suppressed);
        }

        private static Class defineClass(String name, ClassLoader loader, Object cookie,
                                         DexFile dexFile, List<Throwable> suppressed) {
            Class result = null;
            try {

                //调用native
                result = defineClassNative(name, loader, cookie, dexFile);
            } catch (NoClassDefFoundError e) {
                if (suppressed != null) {
                    suppressed.add(e);
                }
            } catch (ClassNotFoundException e) {
                if (suppressed != null) {
                    suppressed.add(e);
                }
            }
            return result;
        }
native方法往下就不再分析。从这波代码分析,找到一个重要转折点dexElements(Element数组),每当找应用程序的类时,都会遍历这个数组,找到目的的dex文件,再得到目的Class。
回到加固
由此,我们把解密的dex文件通过反射合并到这个dexElements对象(Element数组)就完事。
如下图:
 上图对应以下代码:
public class ProxyApplication extends Application {
//定义好解密后的文件的存放路径
private String app_name;
private String app_version;
/**
* ActivityThread创建Application之后调用的第一个方法
* 可以在这个方法中进行解密,同时把dex交给android去加载
*/
@Override
protected void attachBaseContext(Context base) {
super.attachBaseContext(base);
//获取用户填入的metadata
getMetaData();
//得到当前加密了的APK文件
File apkFile=new File(getApplicationInfo().sourceDir);
//把apk解压 app_name+"_"+app_version目录中的内容需要root权限才能用
File versionDir = getDir(app_name+"_"+app_version,MODE_PRIVATE);
File appDir=new File(versionDir,"app");
File dexDir=new File(appDir,"dexDir");
Log.e("ProxyApplication", "attachBaseContext:first "+apkFile.getAbsolutePath() );
Log.e("ProxyApplication", "attachBaseContext:sec "+versionDir.getAbsolutePath() );
//得到我们需要加载的Dex文件
List<File> dexFiles=new ArrayList<>();
//进行解密(最好做MD5文件校验)
if(!dexDir.exists() || dexDir.list().length==0){
//把apk解压到appDir
Zip.unZip(apkFile,appDir);
//获取目录下所有的文件
File[] files=appDir.listFiles();
for (File file : files) {
String name=file.getName();
if(name.endsWith(".dex") && !TextUtils.equals(name,"classes.dex")){
try{
AES.init(AES.DEFAULT_PWD);
//读取文件内容
byte[] bytes=Utils.getBytes(file);
//解密
byte[] decrypt=AES.decrypt(bytes);
//写到指定的目录
FileOutputStream fos=new FileOutputStream(file);
fos.write(decrypt);
fos.flush();
fos.close();
dexFiles.add(file);
}catch (Exception e){
e.printStackTrace();
}
}
}
}else{
for (File file : dexDir.listFiles()) {
dexFiles.add(file);
}
}
try{
//2.把解密后的文件加载到系统
loadDex(dexFiles,versionDir);
}catch (Exception e){
e.printStackTrace();
}
}
private void loadDex(List<File> dexFiles, File versionDir) throws Exception{
//1.获取pathlist
Field pathListField = Utils.findField(getClassLoader(), "pathList");
Object pathList = pathListField.get(getClassLoader());
//2.获取数组dexElements
Field dexElementsField=Utils.findField(pathList,"dexElements");
Object[] dexElements=(Object[])dexElementsField.get(pathList);
//3.反射到初始化dexElements的方法
Method makeDexElements=Utils.findMethod(pathList,"makePathElements",List.class,File.class,List.class);
ArrayList<IOException> suppressedExceptions = new ArrayList<IOException>();
Object[] addElements=(Object[])makeDexElements.invoke(pathList,dexFiles,versionDir,suppressedExceptions);
//合并数组
Object[] newElements= (Object[])Array.newInstance(dexElements.getClass().getComponentType(),dexElements.length+addElements.length);
System.arraycopy(dexElements,0,newElements,0,dexElements.length);
System.arraycopy(addElements,0,newElements,dexElements.length,addElements.length);
//替换classloader中的element数组
dexElementsField.set(pathList,newElements);
}
private void getMetaData() {
try{
ApplicationInfo applicationInfo = getPackageManager().getApplicationInfo(
getPackageName(), PackageManager.GET_META_DATA);
Bundle metaData=applicationInfo.metaData;
if(null!=metaData){
if(metaData.containsKey("app_name")){
app_name=metaData.getString("app_name");
}
if(metaData.containsKey("app_version")){
app_version=metaData.getString("app_version");
}
}
}catch(Exception e){
e.printStackTrace();
}
}
}
```java
(tinker热修复共同点:加入新dex去dexElements)
**探讨2: 初次冷启动ProxyApplication进程时,已经将ProxyApplication作为入口,后续的冷启动如何更替为真正的MyApplication作为真正的应用入口?且ProxyApplication作为初次入口时,已经初始化了有关ProxyApplication的信息,怎么更换会真正的MyApplication?**
在这里前提需要粗略了解app冷启动的流程(以在launcher上点击启动app作为起点):
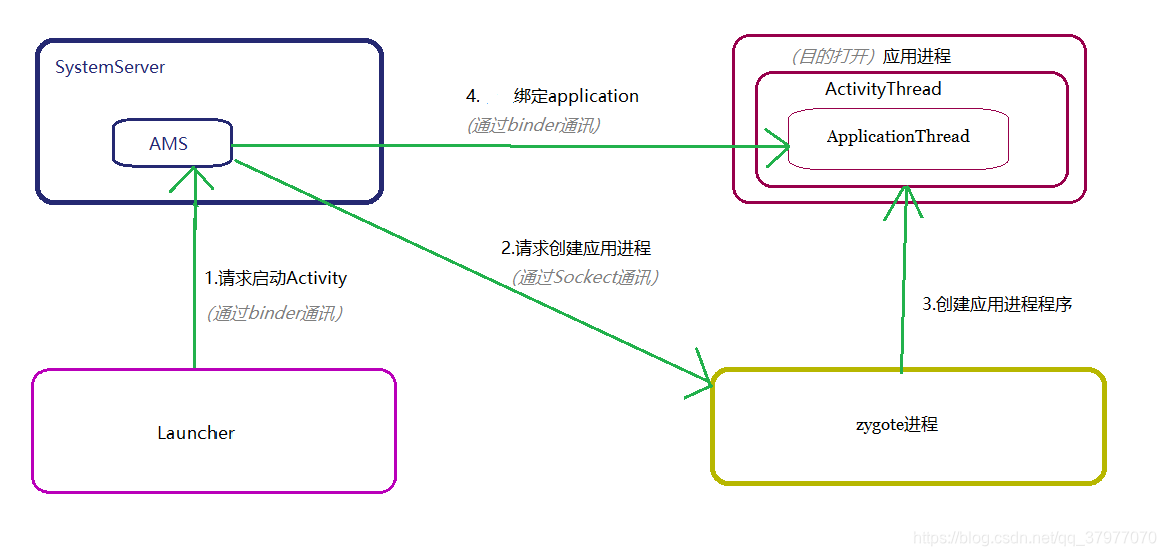
1. 首先launcher通过startActivityAsUser()请求打开activity,然后再ContextImpl里通过binder获取ActivityManager服务,调用到ActvityManagerService的startActivityAsUser()。
2. 然后AMS在启动应用进程前会进行一系列的判断。如,当前这个应用进程是否已启动,若不存在就,向Zygote启动新建进程。
3. zygote进程接收到新建进程请求后,
1)通过classLoader实例化ActivityThread对象,
2)binder线程池启动。
(_ams在判断相关打开进程前的涉及前提判断的过程和binder启动的过程复杂,且知识点较多,但与这里加固主题的重点逻辑无必要关联,就简单带过。_)
4. ActivityThread对象被初始化后,
1)开启主线程的looper循环,
2)请求ams进行绑定Application
回到加固主题的目标->在ProxyApplication初始化后,怎么将真正的MyApplication去替换ProxyApplication?
这里需要跟进源码,有两个主要目的
1.看看ProxyApplication是怎么初始化?
2.在初始化后,怎么作为对象在后续被进程所使用?
上源码!从ams调用ActivityThread绑定Application开始看
```java
private void handleBindApplication(AppBindData data) {
...
Application app;
final StrictMode.ThreadPolicy savedPolicy = StrictMode.allowThreadDiskWrites();
final StrictMode.ThreadPolicy writesAllowedPolicy = StrictMode.getThreadPolicy();
try {
// If the app is being launched for full backup or restore, bring it up in
// a restricted environment with the base application class.
//data.info是LoadedApk类型对象,LoadedApk这个类就是APK在内存中的表示,可以得到代码的ClassLoader,资料mDataDir,功能清单ApplicationInfo等信息
//通过LoadedApk的makeApplication()进行构建Application实例
app = data.info.makeApplication(data.restrictedBackupMode, null);
// Propagate autofill compat state
app.setAutofillCompatibilityEnabled(data.autofillCompatibilityEnabled);
//把构建出来的app赋值给mInitialApplication 。
//由此找到替换目标 TODO TARGET :
// ActivityThread.java -> mInitialApplication对象
mInitialApplication = app;
// don't bring up providers in restricted mode; they may depend on the
// app's custom Application class
if (!data.restrictedBackupMode) {
if (!ArrayUtils.isEmpty(data.providers)) {
//这里传入app->要跟进去这里看看怎样利用app。。
installContentProviders(app, data.providers);
// For process that contains content providers, we want to
// ensure that the JIT is enabled "at some point".
mH.sendEmptyMessageDelayed(H.ENABLE_JIT, 10*1000);
}
}
...
try {
//这里执行ProxyApplication的onCreat()
mInstrumentation.callApplicationOnCreate(app);
} catch (Exception e) {
if (!mInstrumentation.onException(app, e)) {
throw new RuntimeException(
"Unable to create application " + app.getClass().getName()
+ ": " + e.toString(), e);
}
}
...
}
接下来先看看LoadedApk的makeApplication(),做了什么
    public Application makeApplication(boolean forceDefaultAppClass,
                Instrumentation instrumentation) {
    ...
    		 Application app = null;
            //mApplicationInfo.className;得到声明文件中的Application标签的 Name 值
            String appClass = mApplicationInfo.className;
            if (forceDefaultAppClass || (appClass == null)) {
                appClass = "android.app.Application";
            }

            try {
                java.lang.ClassLoader cl = getClassLoader();
                if (!mPackageName.equals("android")) {
                    Trace.traceBegin(Trace.TRACE_TAG_ACTIVITY_MANAGER,
                            "initializeJavaContextClassLoader");
                    initializeJavaContextClassLoader();
                    Trace.traceEnd(Trace.TRACE_TAG_ACTIVITY_MANAGER);
                }
                //创建Context
                ContextImpl appContext = ContextImpl.createAppContext(mActivityThread, this);
                //Instrumentation是用于管理和执行activity声明周期的工具类
                //通过mActivityThread.mInstrumentation 创建application对象
                //创建出来的是app对象实质是ProxyApplication -->目的替换所有用到app对象(ProxyApplication)的字段
                app = mActivityThread.mInstrumentation.newApplication(
                        cl, appClass, appContext);
                //用了app去设置appContext.setOuterContext
                //找到替换目标 todo TARGET :
                // 替换ContextImpl的mOuterContext对象  >> ContextImpl.java ->mOuterContext对象
                appContext.setOuterContext(app);
    		} catch (Exception e) {
                if (!mActivityThread.mInstrumentation.onException(app, e)) {
                    Trace.traceEnd(Trace.TRACE_TAG_ACTIVITY_MANAGER);
                    throw new RuntimeException(
                        "Unable to instantiate application " + appClass
                        + ": " + e.toString(), e);
                }
            }
            //用了app加入mActivityThread.mAllApplications队列
            //找到替换目标 todo TARGET :
            //替换ActivityThread的mAllApplications队列 >>   ActivityThread ->mAllApplications
            mActivityThread.mAllApplications.add(app);
            //找到替换目标 todo TARGET :
            //替换LoadedApk的mApplication对象   >> LoadedApk ->mApplication
            mApplication = app;

    ...
    }
接下来先看看ActivityThread的installContentProviders(),传入application对象做了什么
    private void installContentProviders(
                Context context, List<ProviderInfo> providers) {
          ...
          //传入context到installProvider()
                ContentProviderHolder cph = installProvider(context, null, cpi,
                        false /*noisy*/, true /*noReleaseNeeded*/, true /*stable*/);
                if (cph != null) {
                    cph.noReleaseNeeded = true;
                    results.add(cph);
                }
            }
            ...
    }
installProvider()
    private ContentProviderHolder installProvider(context context,
                ContentProviderHolder holder, ProviderInfo info,
                boolean noisy, boolean noReleaseNeeded, boolean stable) {
    ...
     			Context c = null;
                ApplicationInfo ai = info.applicationInfo;
                //ai这个获取到还是ProxyApplication的资料
                //->如果context.getPackageName()
                //   获得到的不是ProxyApplication就可以改变c的赋值行为
                //这里可以进行重写context的getPackageName方法,
                //使输出PackageName为真正的MyApplication即可
                if (context.getPackageName().equals(ai.packageName)) {
                    c = context;
                } else if (mInitialApplication != null &&
                        mInitialApplication.getPackageName().equals(ai.packageName)) {
                    c = mInitialApplication;
                } else {
                    try {
                    //目的要进入这里进行构造c对象
                        c = context.createPackageContext(ai.packageName,
                                Context.CONTEXT_INCLUDE_CODE);
                    } catch (PackageManager.NameNotFoundException e) {
                        // Ignore
                    }
                }

    ...
    }
经过上述代码找到了四处需要替换的对象变量和一处重写方法。
整理:
- 新建一个真的的MyApplication对象,以用来替换ProxyApplication对象
- ActivityThread.java -> mInitialApplication对象
- ContextImpl.java ->mOuterContext对象
- ActivityThread的mAllApplications队列 >> ActivityThread ->mAllApplications
- LoadedApk的mApplication对象 >> LoadedApk ->mApplication
- context.getPackageName()重写
->如何新建MyApplication对象,这里可以模仿源码如何新建ProxyApplication对象步骤进行构造
新建Application对象在Instrumentation.java实现:
     public Application newApplication(ClassLoader cl, String className, Context context)
                throws InstantiationException, IllegalAccessException,
                ClassNotFoundException {
            Application app = getFactory(context.getPackageName())
                    .instantiateApplication(cl, className);
            app.attach(context);
            return app;
        }
跟进instantiateApplication(): AppComponentFactory.java
    public @NonNull Application instantiateApplication(@NonNull ClassLoader cl,
                @NonNull String className)
                throws InstantiationException, IllegalAccessException, ClassNotFoundException {
                //通过classLoader,获得类,然后进行newInstance
            return (Application) cl.loadClass(className).newInstance();
        }
所以我们可以类似方法获得Application对象
     //得到attachBaseContext(context) 传入的上下文 ContextImpl
            Context baseContext = getBaseContext();
            //创建用户真实的application (MyApplication)
            Class<?> delegateClass = Class.forName(app_name);
            realApplication = (Application) delegateClass.newInstance();
            //得到attach()方法
            Method attach = Application.class.getDeclaredMethod("attach", Context.class);
            attach.setAccessible(true);
            attach.invoke(realApplication, baseContext);
->关于对象替换可以通过反射进行实现。这里需要找到一个入口点,获取哪个对象进行着手?
在ProxyApplication.java中可以获得context对象,通过Context的实现类ContextImpl找到下列对象。

由此,通过context来作为入手进行反射。
附上ProxyApplication.java全代码,包含替换目标对象的代码
    public class ProxyApplication extends Application {

        //定义好解密后的文件的存放路径
        private String app_name;
        private String app_version;

        /**
         * ActivityThread创建Application之后调用的第一个方法
         * 可以在这个方法中进行解密,同时把dex交给android去加载
         */
        @Override
        protected void attachBaseContext(Context base) {
            super.attachBaseContext(base);
            //获取用户填入的metadata
            getMetaData();

            //得到当前加密了的APK文件
            File apkFile = new File(getApplicationInfo().sourceDir);

            //把apk解压   app_name+"_"+app_version目录中的内容需要boot权限才能用
            File versionDir = getDir(app_name + "_" + app_version, MODE_PRIVATE);
            File appDir = new File(versionDir, "app");
            File dexDir = new File(appDir, "dexDir");


            //得到我们需要加载的Dex文件
            List<File> dexFiles = new ArrayList<>();
            //进行解密(最好做MD5文件校验)
            if (!dexDir.exists() || dexDir.list().length == 0) {
                //把apk解压到appDir
                Zip.unZip(apkFile, appDir);
                //获取目录下所有的文件
                File[] files = appDir.listFiles();
                for (File file : files) {
                    String name = file.getName();
                    if (name.endsWith(".dex") && !TextUtils.equals(name, "classes.dex")) {
                        try {
                            AES.init(AES.DEFAULT_PWD);
                            //读取文件内容
                            byte[] bytes = Utils.getBytes(file);
                            //解密
                            byte[] decrypt = AES.decrypt(bytes);
                            //写到指定的目录
                            FileOutputStream fos = new FileOutputStream(file);
                            fos.write(decrypt);
                            fos.flush();
                            fos.close();
                            dexFiles.add(file);

                        } catch (Exception e) {
                            e.printStackTrace();
                        }
                    }
                }
            } else {
                for (File file : dexDir.listFiles()) {
                    dexFiles.add(file);
                }
            }

            try {
                //2.把解密后的文件加载到系统
                loadDex(dexFiles, versionDir);
            } catch (Exception e) {
                e.printStackTrace();
            }


        }

        private void loadDex(List<File> dexFiles, File versionDir) throws Exception {
            //1.获取pathlist
            Field pathListField = Utils.findField(getClassLoader(), "pathList");
            Object pathList = pathListField.get(getClassLoader());
            //2.获取数组dexElements
            Field dexElementsField = Utils.findField(pathList, "dexElements");
            Object[] dexElements = (Object[]) dexElementsField.get(pathList);
            //3.反射到初始化dexElements的方法
            Method makeDexElements = Utils.findMethod(pathList, "makePathElements", List.class, File.class, List.class);

            ArrayList<IOException> suppressedExceptions = new ArrayList<IOException>();
            Object[] addElements = (Object[]) makeDexElements.invoke(pathList, dexFiles, versionDir, suppressedExceptions);

            //合并数组
            Object[] newElements = (Object[]) Array.newInstance(dexElements.getClass().getComponentType(), dexElements.length + addElements.length);
            System.arraycopy(dexElements, 0, newElements, 0, dexElements.length);
            System.arraycopy(addElements, 0, newElements, dexElements.length, addElements.length);

            //替换classloader中的element数组
            dexElementsField.set(pathList, newElements);
        }

        private void getMetaData() {
            try {
                ApplicationInfo applicationInfo = getPackageManager().getApplicationInfo(
                        getPackageName(), PackageManager.GET_META_DATA);
                Bundle metaData = applicationInfo.metaData;
                if (null != metaData) {
                    if (metaData.containsKey("app_name")) {
                        app_name = metaData.getString("app_name");
                    }
                    if (metaData.containsKey("app_version")) {
                        app_version = metaData.getString("app_version");
                    }
                }

            } catch (Exception e) {
                e.printStackTrace();
            }
        }


        /**
         * 开始替换application
         */
        @Override
        public void onCreate() {
            Log.e("proxyApp", "onCreate: " + Log.getStackTraceString(new Throwable()));
            super.onCreate();
            try {
                bindRealApplicatin();
            } catch (Exception e) {
                e.printStackTrace();
            }
        }

        /**
         * 让代码走入if中的第三段中
         *
         * @return
         */
        @Override
        public String getPackageName() {
            if (!TextUtils.isEmpty(app_name)) {
                return "";
            }
            return super.getPackageName();
        }

        @Override
        public Context createPackageContext(String packageName, int flags) throws PackageManager.NameNotFoundException {
            if (TextUtils.isEmpty(app_name)) {
                return super.createPackageContext(packageName, flags);
            }
            try {
                bindRealApplicatin();
            } catch (Exception e) {
                e.printStackTrace();
            }
            return realApplication;

        }

        boolean isBindReal;
        Application realApplication;

        private void bindRealApplicatin() throws Exception {
            if (isBindReal) {
                return;
            }
            if (TextUtils.isEmpty(app_name)) {
                return;
            }
            //得到attachBaseContext(context) 传入的上下文 ContextImpl
            Context baseContext = getBaseContext();
            //创建用户真实的application (MyApplication)
            Class<?> delegateClass = Class.forName(app_name);
            realApplication = (Application) delegateClass.newInstance();
            //得到attach()方法
            Method attach = Application.class.getDeclaredMethod("attach", Context.class);
            attach.setAccessible(true);
            attach.invoke(realApplication, baseContext);

    //        ContextImpl---->mOuterContext(app)   通过Application的attachBaseContext回调参数获取
            Class<?> contextImplClass = Class.forName("android.app.ContextImpl");
            //获取mOuterContext属性
            Field mOuterContextField = contextImplClass.getDeclaredField("mOuterContext");
            mOuterContextField.setAccessible(true);
            mOuterContextField.set(baseContext, realApplication);

    //        ActivityThread--->mInitialApplication     ContextImpl的mMainThread属性
            Field mMainThreadField = contextImplClass.getDeclaredField("mMainThread");
            mMainThreadField.setAccessible(true);
            Object mMainThread = mMainThreadField.get(baseContext);

            Class<?> activityThreadClass = Class.forName("android.app.ActivityThread");
            Field mInitialApplicationField = activityThreadClass.getDeclaredField("mInitialApplication");
            mInitialApplicationField.setAccessible(true);
            mInitialApplicationField.set(mMainThread, realApplication);

    //        ActivityThread--->mAllApplications(ArrayList)       ContextImpl的mMainThread属性
            Field mAllApplicationsField = activityThreadClass.getDeclaredField("mAllApplications");
            mAllApplicationsField.setAccessible(true);
            ArrayList<Application> mAllApplications = (ArrayList<Application>) mAllApplicationsField.get(mMainThread);
            mAllApplications.remove(this);
            mAllApplications.add(realApplication);

    //        LoadedApk------->mApplication                      ContextImpl的mPackageInfo属性
            Field mPackageInfoField = contextImplClass.getDeclaredField("mPackageInfo");
            mPackageInfoField.setAccessible(true);
            Object mPackageInfo = mPackageInfoField.get(baseContext);

            Class<?> loadedApkClass = Class.forName("android.app.LoadedApk");
            Field mApplicationField = loadedApkClass.getDeclaredField("mApplication");
            mApplicationField.setAccessible(true);
            mApplicationField.set(mPackageInfo, realApplication);

            //修改ApplicationInfo className   LooadedApk
            Field mApplicationInfoField = loadedApkClass.getDeclaredField("mApplicationInfo");
            mApplicationInfoField.setAccessible(true);
            ApplicationInfo mApplicationInfo = (ApplicationInfo) mApplicationInfoField.get(mPackageInfo);
            mApplicationInfo.className = app_name;

            realApplication.onCreate();
            isBindReal = true;
        }
    }
验收:
可以在四大组件中调用getApplication() 、getApplicationContext() 打印出来看看ProxyApplication是否已经被替换成MyApplication。
例如:


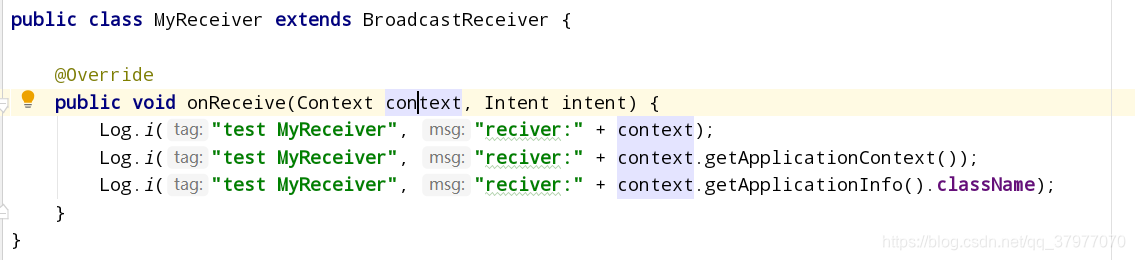
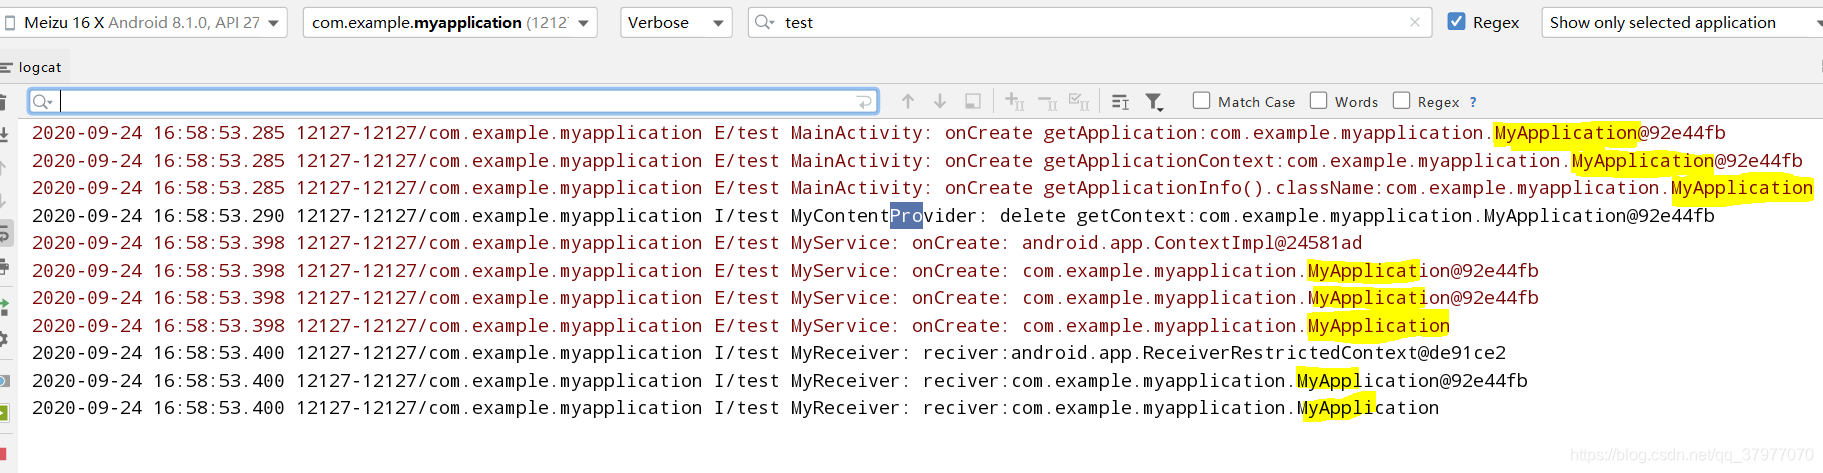
(*注:广播接收器onReceive(Context context, Intent intent),参数里的context,是ReceiverRestrictedContext类型继承ContextWrapper,不可用于registerReceiver和bindService,详细分析可看我的另外一篇博文:[framework]了解android的各种Context )
恭喜你,加固学习分享,终于看完了!再看一遍好吗, pleaseeeeeeee!!
转自:https://blog.csdn.net/qq_37977070/article/details/108495821

为开发者提供学习成长、分享交流、生态实践、资源工具等服务,帮助开发者快速成长。
更多推荐


 1
1 0
0- 0


 已为社区贡献3条内容

所有评论(0)