uniapp地图轨迹回放
uniapp地图轨迹回放欢迎使用Markdown编辑器你好! 这是你第一次使用 Markdown编辑器 所展示的欢迎页。如果你想学习如何使用Markdown编辑器, 可以仔细阅读这篇文章,了解一下Markdown的基本语法知识。新的改变我们对Markdown编辑器进行了一些功能拓展与语法支持,除了标准的Markdown编辑器功能,我们增加了如下几点新功能,帮助你用它写博客:全新的界面设计 ,将会带
·
uniapp地图轨迹回放
欢迎使用ay-contrail插件
最近有需求为:在地图上展示一些点的轨迹,按时间先后顺序回放。已实现任意多点的轨迹回放,整理插件代码如下:
1.ay-contrail插件
可去uniapp插件市场的地图轨迹插件页面下载.
属性
| 属性 | 类型 | 说明 |
|---|---|---|
| mapId | String | 地图id,默认mapId_contrail |
| points | Array | 轨迹数组 |
| longitude | Number 经度 | |
| latitude | Number 纬度 | |
| scale | Number | 缩放级别,取值范围为3-20,默认14 |
| longitude | Number | 当前位置经度 |
| latitude | Number | 当前位置纬度 |
| satellite | Boolean | 是否开启卫星图,默认开启 |
下面是插件的 代码片.
<template>
	<view>
		<map :id="mapId" :longitude="longitude" :latitude="latitude" :scale="scale" :markers="markers" :polyline="polyline"
		 :enable-satellite="satellite" show-location style="width: 100%; height: 100vh;"
		 @markertap="tapMarker"></map>
	</view>
</template>

<script>
	export default {
		components: {

		},
		props: {
			mapId: {
				type: String,
				default: 'mapId_contrail'
			},
			points: {
				type: Array,
				default () {
					return []
				}
			},
			scale: {
				type: Number,
				default: 14
			},
			latitude: {
				type: Number,
				default: 39.806466
			},
			longitude: {
				type: Number,
				default: 98.226473
			},
			//是否开启卫星图
			satellite: {
				type: Boolean,
				default: true
			},
		},
		data() {
			return {
				i: 0, // 用于循环
				markers: [], // 标记点集合
				polyline: [], // 坐标点集合
				mapCtx : {},
			}
		},
		mounted:function(){
			let that = this;
			that.mapCtx = uni.createMapContext(that.mapId,this); // 创建 map 上下文 MapContext 对象

		},
		watch: {
			points(e) {
				let that = this;
				if(that.points.length>0){
					that.setDateByPoints(that.points) ;
				}

			},
		},
		created: function() {
			let that = this;
			if(that.points.length>0){
				that.setDateByPoints(that.points) ;
			}
		},
		methods: {
			tapMarker(e){
				this.$emit('markertap', e);
			},
			setDateByPoints(points) {
				let that = this;

				// 标记点集合

				let markers = points;

				markers.map((value, index) => {
					markers[index].id = index + 1;
				});


				that.polyline = [{
					points: points,
					color: "#FF0000DD",
					width: 2
				}];
				that.markers = markers;


				this.translateMarker(markers);
			},
			// 平移marker,带动画
			translateMarker: function(markers) {
				let that = this;
				let markerId = markers[that.i].id ;

				let destination = {
					longitude: markers[that.i + 1].longitude,
					latitude: markers[that.i + 1].latitude
				};
				let getDistance = that.getDistance(markers[that.i].latitude, markers[that.i].longitude, markers[that.i + 1].latitude,
					markers[that.i + 1].longitude);
				let duration = getDistance * 2; // 根据距离计算平移的速度,看起来保持匀速

				this.mapCtx.translateMarker({
					markerId: markerId,
					destination: destination,
					autoRotate: true,
					rotate: 30,
					duration: duration,
					success(res) {
						that.i = that.i + 1;

						// 小于长度减1才执行
						if (that.i < markers.length - 1) {
							that.translateMarker(markers);
						}
					},
					fail(err) {
						console.log('fail', err)
					}
				})
			},
			// 计算两坐标点之间的距离
			getDistance: function(lat1, lng1, lat2, lng2) {
				let rad1 = lat1 * Math.PI / 180.0;
				let rad2 = lat2 * Math.PI / 180.0;
				let a = rad1 - rad2;
				let b = lng1 * Math.PI / 180.0 - lng2 * Math.PI / 180.0;
				let r = 6378137;
				return (r * 2 * Math.asin(Math.sqrt(Math.pow(Math.sin(a / 2), 2) + Math.cos(rad1) * Math.cos(rad2) * Math.pow(Math
					.sin(b / 2), 2)))).toFixed(0)

			},

		},
	}
</script>

<style>
</style>
此处需要注意,在组件中创建在mounted方法里面,并后面括号要加this
(若在页面中创建,在onReady方法,this也不是必须的)
2.引用插件
可去uniapp插件市场的地图轨迹插件页面,下载项目
项目结构如下:
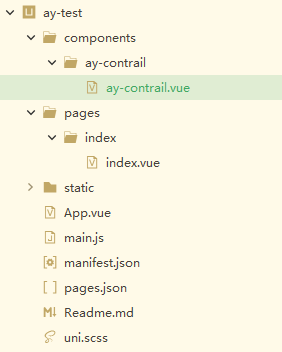
下面index.vue是引用插件的 代码片.
<template>
	<view>
		<aycontrail  :points="points" :latitude="latitude" :longitude="longitude" scale="12" :satellite="true"></aycontrail>

	</view>


</template>

<script>
	import aycontrail from '../components/ay-contrail/ay-contrail.vue';
	export default {
		components: {
			aycontrail,
		},


		computed: {

		},
		data() {
			return {

				points: [],
				latitude: 39.806466,
				longitude: 98.226473,
			};
		},
		// #ifdef MP-WEIXIN
		//微信小程序的分享
		onShareAppMessage: function(options) {

		},
		// #endif
		onReady: function() {

		},
		onLoad: function() {
			let that = this;
		},
		onShow: function() {
			let that = this;
			// 获取当前坐标
			uni.getLocation({
				type: 'wgs84',
				success: (res) => {
					let longitude = res.longitude ;
					let latitude = res.latitude ;
					// 坐标集合
					let points = [{
						longitude: longitude,
						latitude: latitude
					}, {
						longitude: longitude - 0.02,
						latitude: latitude + 0.02
					}, {
						longitude: longitude + 0.03,
						latitude: latitude + 0.03
					}, {
						longitude: longitude - 0.01,
						latitude: latitude + 0.02
					}, {
						longitude: longitude,
						latitude: latitude
					}];
					that.latitude = res.latitude;
					that.longitude = res.longitude;
					that.points = points;

				},
				fail:function(err){
					let longitude = that.longitude ;
					let latitude = that.latitude ;
					// 坐标集合
					let points = [{
						longitude: longitude,
						latitude: latitude
					}, {
						longitude: longitude - 0.02,
						latitude: latitude + 0.02
					}, {
						longitude: longitude + 0.03,
						latitude: latitude + 0.03
					}, {
						longitude: longitude - 0.01,
						latitude: latitude + 0.02
					}, {
						longitude: longitude,
						latitude: latitude
					}];
					that.points = points;
				}
			})


		},

		methods: {

		},
	}
</script>

<style lang="scss">

</style>
3.配置
微信小程序:
1.配置自己的微信小程序appid;
2.微信小程序后台:设置->第三方平台授权管理->腾讯位置服务;
3.腾讯位置服务也绑定微信小程序appid.
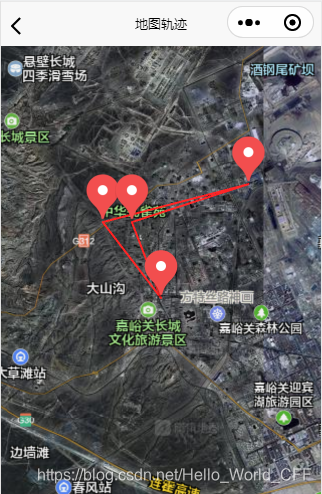
微信小程序预览效果

效果图
扫描公众号,了解更多实例分享:

参考

为开发者提供学习成长、分享交流、生态实践、资源工具等服务,帮助开发者快速成长。
更多推荐


 1
1 0
0- 0


 已为社区贡献7条内容

所有评论(0)