
CANoe教程:CAPL编程
CANoe教程 | CAPL编程 - 数据类型CAPL是一种类C语言,CAPL数据类型的定义很多C语言类似,但也有很多独特的地方。 CAPL数据类型包括基本类型、结构体、枚举、关联类型和对象类型。变量的数据类型决定了变量存储占用的空间。1 基本类型2 枚举枚举变量的定义和使用同C语言:enum State { State_Off = -1, State_On = 1 };如果枚举成员的值未定义,那
CANoe教程 | CAPL编程 - 数据类型
CAPL是一种类C语言,CAPL数据类型的定义很多C语言类似,但也有很多独特的地方。 CAPL数据类型包括基本类型、结构体、枚举、关联类型和对象类型。变量的数据类型决定了变量存储占用的空间。
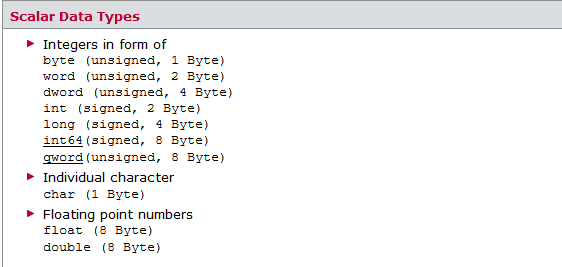
1 基本类型
2 枚举
枚举变量的定义和使用同C语言:
enum State { State_Off = -1, State_On = 1 };如果枚举成员的值未定义,那么第一个成员默认值为1,之后的成员按顺序依次加1.
枚举变量的定义和使用:
variables
{
  enum { Apple, Pear, Banana } fruit = Apple;
  enum Colors { Red, Green, Blue };
  enum Colors color;
}

enum Colors NextColor(enum Colors c)
{
  if (c == Blue) return Red;
  else return (enum Colors) (c + 1);
}
3 关联类型
CAPL支持一种类似Python字典和C++ Map的关联类型(Associative Fields),关联类型的元素是键值对(key value pairs)。 关联类型定义格式如下,左边是value类型,右边[ ]内是key类型:
int m[float];         // maps floats to ints
float x[int64];       // maps int64s to floats
char[30] s[ char[] ]  // maps strings (of unspecified length) to strings of length < 30
example 1:关联浮点型
float m[float];
m[4.1] = 5.5; //key is 4.1 (float)  and value is 5.5 (float)
m[5.3] = 6.6;
write ("4.1 is mapped to %2.2lf", m[4.1]);
write ("5.3 is mapped to %2.2lf", m[5.3]);
for (float mykey : m)
{
  write("%2.2lf is mapped to %2.2lf.", mykey, m[mykey]);
}
example 2:关联字符串
char[30] namen[char []];
strncpy(namen["Max"], "Mustermann", 30);
strncpy(namen["Vector"], "Informatik", 30);

for (char[] mykey : namen)
{
  write("%s is mapped to %s", mykey, namen[mykey]);
}
4 结构体
结构的定义和使用同C:
variables
{
  struct Point
  {
    int x;
    int y;
  };
  struct Point myPoint;
  struct Point allPoints[50];
}
on start
{
  myPoint.x = 7;
  myPoint.y = 2;

  allPoints[3].x = 1;
  allPoints[3].y = 5;
}
注意: CAPL中结构体默认按8字节对齐,可以在结构体定义前加_align来改变结构体对齐方式。
example:
struct Point {   // note: default _align(8)
byte x;          // offset 0, size 1
byte y;          // alignment 1, offset 1, size 1, padding before: 0
};               // size 2, alignment (of the struct) 1

struct LongPoint {   // note: default _align(8)
byte x;              // offset 0, size 1
qword y;             // alignment 8, offset 8, size 8, padding before: 7
};                   // size 16, alignment (of the struct) 8

_align(2) struct Point2 {
byte x;    // offset 0, size 1, (alignment 1)
qword y;   // alignment 2, offset 2, size 8, padding before: 1
};         // size 10, alignment (of the struct) 2

struct Points {   // note: _align(8) per default
struct Point p1;  // offset 0, size 2, (alignment 1)
byte x;           // alignment 1, offset 2, size 1, padding before: 0
struct Point2 p2; // alignment 2, offset 4, size 10, padding before: 1
};                // size 14, alignment (of the struct) 2
可以使用如下函数获取结构体大小(size)、对齐方式(alignment )和偏移量(offset )信息:

example:
struct Points {   // note: _align(8) per default
Point p1;         // offset 0, size 2, (alignment 1)
byte x;           // alignment 1, offset 2, size 1, padding before: 0
Point2 p2;        // alignment 2, offset 4, size 10, padding before: 1
};                // size 14, alignment (of the struct) 2

__size_of(struct Points);         // returns 14
__alignment_of(struct Points);    // returns 2
__offset_of(struct Points, p1);   // returns 0
__offset_of(struct Points, x);    // returns 2
__offset_of(struct Points, p2);   // returns 4
5 对象类型
除了以上介绍的基础数据类型,CAPL还提供了一些CANoe特有的对象类型来帮助用户快速完成仿真测试功能的开发。
CAN messages
CAPL提供了各种网络对应的报文类。本文以CAN message为例进行介绍。 报文变量定义格式:
message + message ID/message name + variable使用message关键字来声明一个报文变量,message后是message ID或CANoe工程导入DBC后的message name,然后是在CAPL程序中要使用的报文变量名。
message 0xA m1;                                //定义一个ID为0xA的报文变量m1
message 100x m2;                              //定义一个ID为100的扩展帧报文变量m2,ID后的x后缀表示这是一个扩展帧
message EngineData m3;                  //定义一个在DBC中message name为EngineData的报文变量m3
...
output(m1);
output(m2);
output(m3);
CAPL提供了一系列的选择器(Selectors)来设置或读取CAN message的属性,例如:
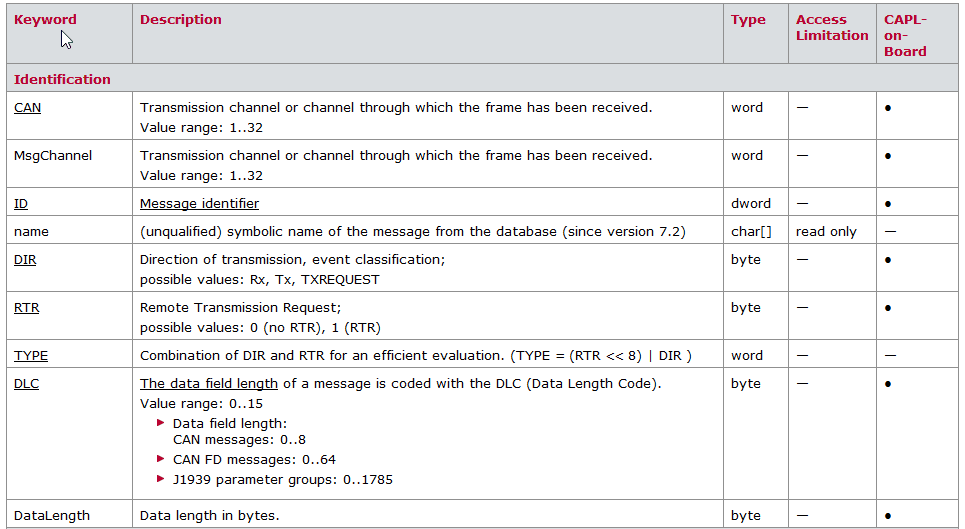
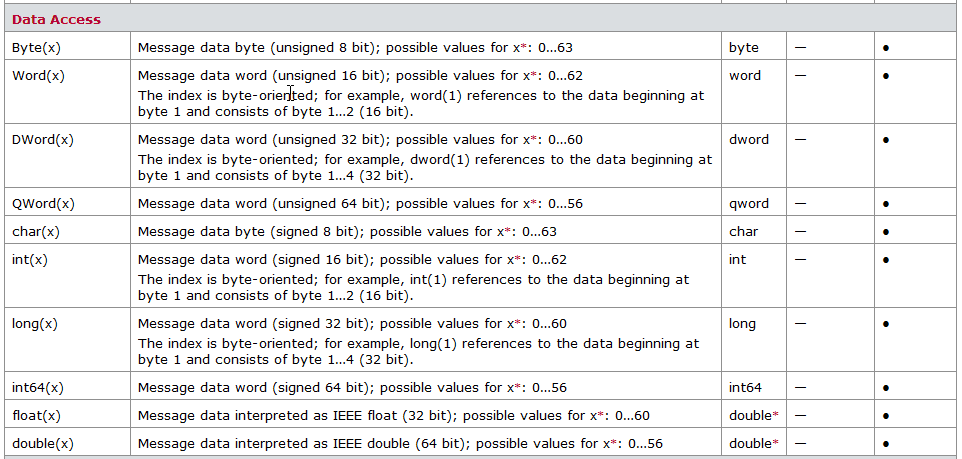
example:
message 0x100 msg;  //定义一个ID为0x100的message变量msg
msg.CAN = 1;        //将msg的通道设置为1
msg.DLC = 2;        //将msg的DLC设置为2
msg.BYTE(0) = 0xAA; //给msg报文数据段的第一个byte赋值为0xAA;
msg.BYTE(1) = 0xBB; //给msg报文数据段的第二个byte赋值为0xBB;
output(msg);       //将定义好的msg发送到总线中
6 定时器变量
CAPL提供两种定时器变量: timer:基于秒(s)的定时器 msTimer:基于毫秒(ms)的定时器 example:点击键盘'a'后以20ms为周期发送id为100的报文
msTimer myTimer;        //定义一个ms定时器myTimer
message 100 msg;
...
on key 'a' {
   setTimer(myTimer,20); //点击键盘'a'将定时器myTimer设置为20ms,并开始计时
}
...
on timer myTimer {       //响应定时器事件myTimer,将msg发送到总线,
   output(msg);
   setTimer(myTimer,20); //重新设置定时器myTimer为20ms
}
CANoe教程 | CAPL编程-运算符/流程控制
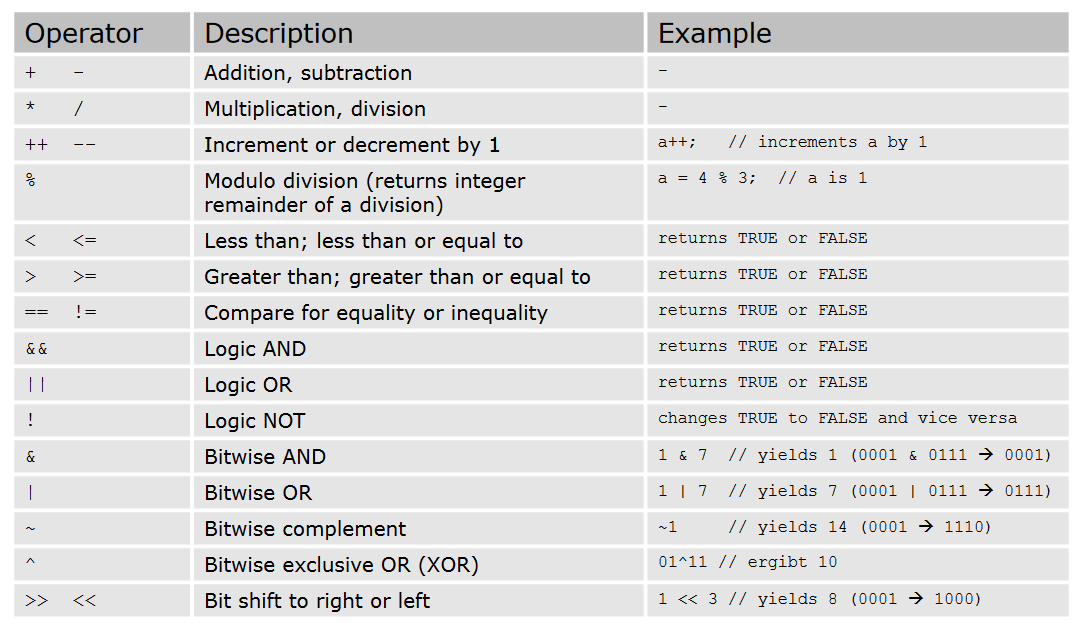
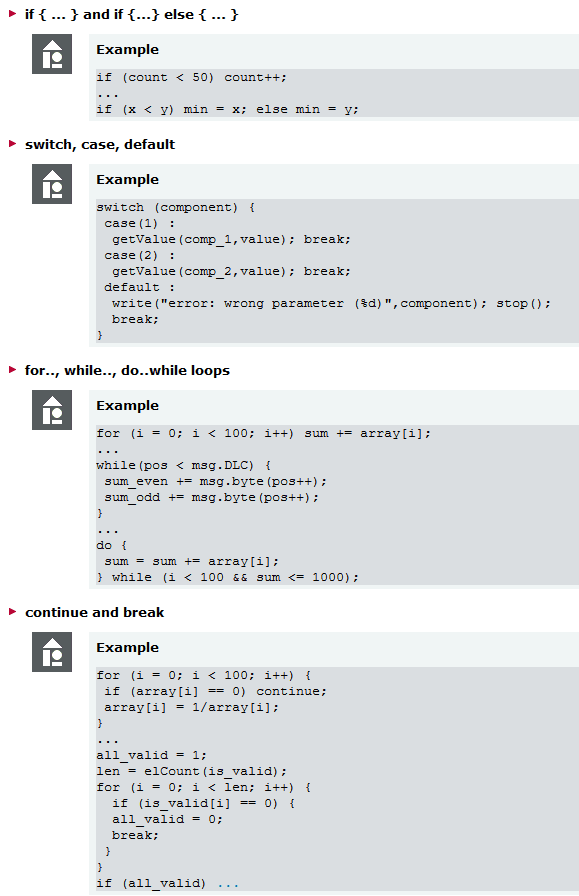
CAPL中算数运算符、逻辑运算符、位运算以及流程控制语句和C语言一致。
1 运算符
2 流程控制
CANoe教程 | CAPL编程 - 事件驱动
1 事件概述
CAPL是一种面向过程、由事件驱动的类C语言。
事件驱动针对于顺序执行,其区别如下:
顺序执行:顺序执行流程中,子例程或过程函数按照代码编写顺序逐句执行。
事件驱动:CAPL程序由事件驱动,工程运行过程中发生指定的事件时才会运行相应的事件处理函数。

顺序执行VS事件驱动
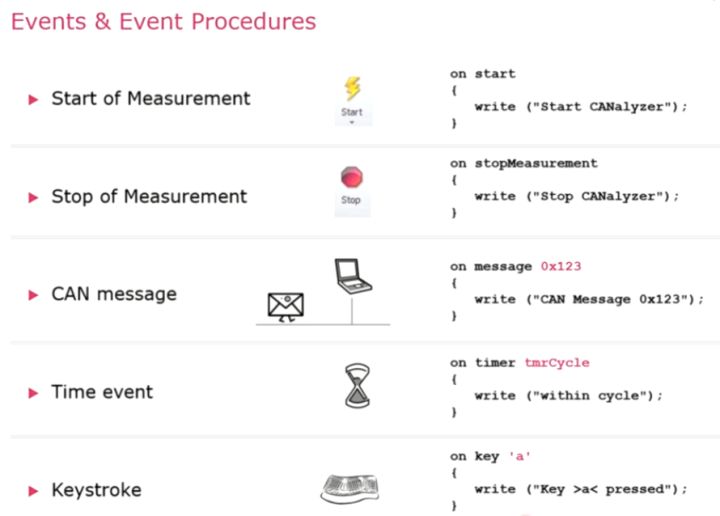
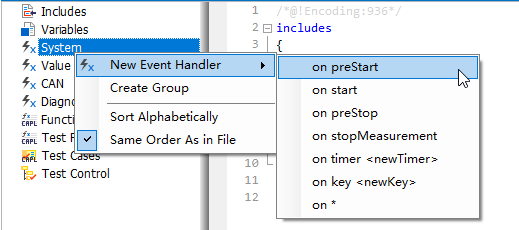
在CAPL中添加事件处理函数:

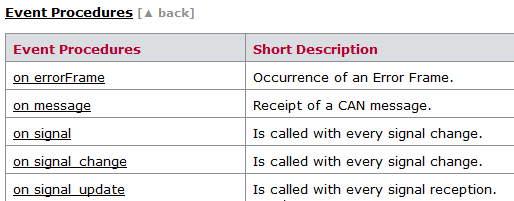
重要的事件处理函数:
事件总览: [3]
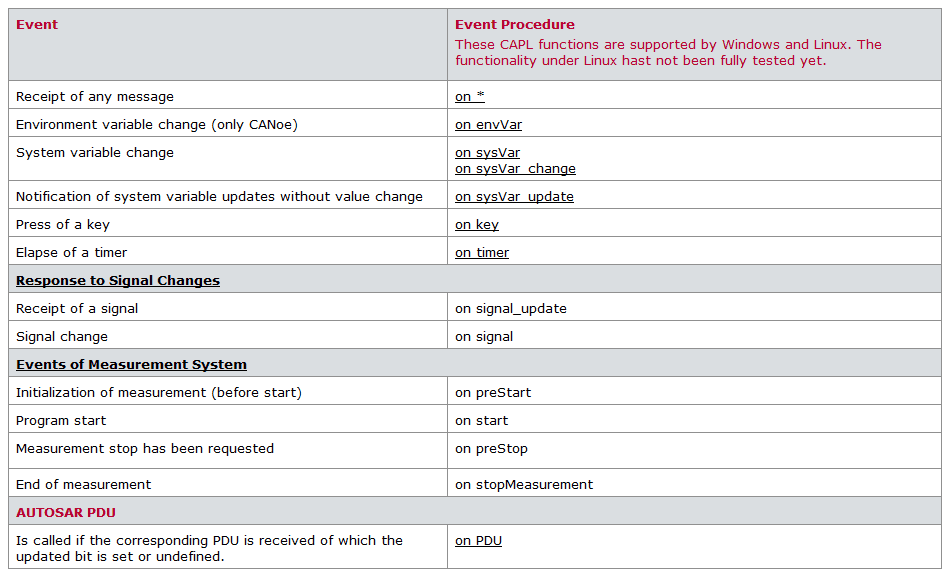
2 事件详解
事件起始关键字 on
on后加某种事件,工程运行时条件触发,则执行函数体内的语句。
关键字this
系统变量、环境变量或CAN报文事件中,可以用this关键字访问其指代的数据内容,如:
on envvar Switch {
// Declare a CAN message to be transmitteed
message Controller msg;

// Read out the value of the switch
// Assign to the signal Stop
msg.Stop = getvalue(this);
// Output the message on the bus
output(msg);
}
系统事件
系统事件主要用于处理CANoe测量系统的控制功能,主要有on start、on preStart、onstopMeasurement、on preStop、on key<newKey>以及on timer
系统事件Example:
//on preStart procedure
on preStart
{
write("Measurement started!");
msg_Count = 0;
}
//on start procedure
on start
{
write("start Node A");
setTimer(cycTimer,20);
CallAllOnEnvVar(); // CANoe only
}
//on preStop procedure
on preStop
{
message ShutdownReq m;
output(m);
DeferStop(1000);
}
//on stopMeasurement procedure
on stopMeasurement
{
write("Message 0x%x received: %d", msg.id, msg_Count);
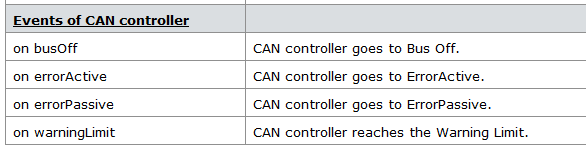
}CAN控制器事件
当CAN控制器或错误计数器状态变化时调用CAN控制器事件。
CAN控制器事件Example:
//on errorPassive procedure
on errorPassive {
   ...
   write("CAN Controller is in errorPassive state")
   write(" errorCountTX = %d", this.errorCountTX);
   write(" errorCountRX = %d", this.errorCountRX);
};

//on busOff procedure
on busOff
{
   int errRxCnt;
   int errTxCnt;
   int channel;
   double timestamp; // [seconds]

   timestamp = (double)timeNow() / (double)100000;
   channel = this.can;
   errRxCnt = this.errorCountRX;
   errTxCnt = this.errorCountTX;
   Write("Bus Off: time=%f channel=%d, errRxCnt=%d, errTxCnt=%d",
   timestamp, channel, errRxCnt, errTxCnt);

   resetCanEx(channel);
}
CAN报文/信号事件
CAN报文或信号变化时调用报文/信号事件。
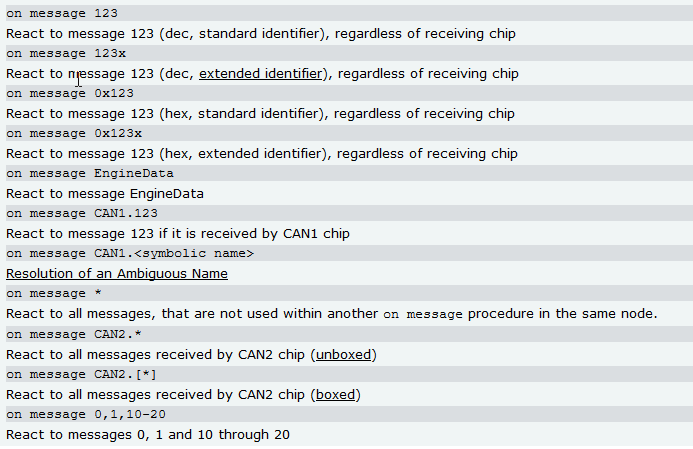
CAN报文/信号事件
报文事件:
信号事件:
on signal LightSwitch::OnOff
{
  v1 = this.raw;
  v2 = $LightSwitch::OnOff.raw;
}
定时器事件
定义好定时器变量后,由SetTimer函数设置定时器间隔并启动定时器。当定时器运行到设定的时间间隔时触发定时器事件,并执行on timer函数体中的程序。
msTimer myTimer;
message 100 msg;
...
on key 'a' {
   setTimer(myTimer,20);
}
...
on timer myTimer {
   output(msg);
}
键盘事件
通过定义键盘事件,用户可以在工程运行时通过点击键盘触发预先定义的行为。这在实际开发和测试时非常常用。比如用户可以在任意时刻向总线发送特定的消息、改变信号或系统变量的值或是启动停止测量。
系统变量/环境变量事件
系统变量和环境变量事件分别是对系统变量和环境变量发生变化时的响应。
系统变量事件:
on sysvar IO::DI_0
{
$Gateway::IOValue = @this;
}
环境变量事件
on envvar Switch {
// Declare a CAN message to be transmitteed
message Controller msg;

// Read out the value of the switch
// Assign to the signal Stop
msg.Stop = getvalue(this);
// Output the message on the bus
output(msg);
}
CANoe教程 | CAPL编程 - 实用CAPL代码片段
本文根据CAPL编程中经常遇到的案例场景整理简洁通用的代码片段。
1 周期消息发送
无论是Simulation Setup中的仿真节点还是Test Setup中的Test Module所关联的CAPL脚本在做仿真或测试时都经常需要向总线模拟发送周期消息。
点击键盘按键 'a' 后向总线发送周期为20ms的can 消息msg:
variables
{
    msTimer myTimer;
    message 100 msg;
}
on key 'a' {
    setTimer(myTimer,20);
}
on timer myTimer {
    output(msg);
    setTimer(myTimer,20);
}
2 应用报文Request/Response测试
ECU通常都有很多请求/应答式的功能,比如BCM可以接收用户点击车窗、雨刮、遮阳帘等车身相关硬件的控制按钮向总线发出的开关请求(Request),然后由BCM向总线发出响应消息,并控制车窗、雨刮、遮阳帘等做出相应的反馈动作(Response)。
下面以测试BCM雨刮开关功能为例进行Request/Response测试。
DBC定义:
| Signal Name | Message Name | Signal Value Description |
|---|---|---|
| WiperRequest | BCM_Request | Off : 0 On : 1 |
| WiperResponse | BCM_Response | Off : 0 On : 1 |
参考代码:
variables
{
    message BCM_Request  tBCM_Request;
    message BCM_Response tBCM_Response;
    int result   = 0;
    int waitTime = 1000;
}

void MainTest()
{
   TestModuleTitle ("Test BCM Features");
   TestModuleDescription ("Check all features in BCM.");

   TestGroupBegin("BCM Wiper Feature", "Check the perfomance of Wiper");
     Check_Wiper_Feature(0,0);   //测试雨刮关闭功能
     Check_Wiper_Feature(1,1);   //测试雨刮开启功能
   TestGroupEnd();
}
//Wiper Feature testcase
testcase Check_Wiper_Feature(int request, int response )
{
    tBCM_Request.WiperRequest.phys = request;
    output(tBCM_Request);
    //测试请求发出去后1000ms内是否收到BCM的响应信号。
    result = TestWaitForSignalMatch(BCM_Response::WiperResponse,response,waitTime);
    passResult(result,request,response);
}
void passResult(long result,int request,int response)
{
    switch(result){
        case  1: TestStepPass("1.0","Test Pass     - request : %d expect response : %d ",request,response);break;
        case  0: TestStepFail("1.0","Timeout       - request : %d expect response : %d ",request,response);break;
        case -1: TestStepFail("1.0","General error - request : %d expect response : %d ",request,response);break;
        case -2: TestStepFail("1.0","Signal is not valid");break;
        default:break;
    }
}
3 检测总线中周期报文的发送周期是否在给定范围内
TSL提供了两组函数用于测试周期报文:
一组使用相对时间因子,当周期小于 (aMinRelCycleTime * GenMsgCycleTime)或大于(aMaxRelCycleTime* GenMsgCycleTime)时产生事件。
函数原型:
dword ChkCreate_MsgRelCycleTimeViolation (Message aObservedMessage, double aMinRelCycleTime, double aMaxRelCycleTime, Callback aCallback);

dword ChkStart_MsgRelCycleTimeViolation (Message aObservedMessage, double aMinRelCycleTime, double aMaxRelCycleTime, Callback aCallback);
另一组使用绝对时间参数,当周期小于 aMinCycleTime 或大于 aMaxCycleTime 时产生事件。
dword ChkCreate_MsgAbsCycleTimeViolation (Message aObservedMessage, duration aMinCycleTime, duration aMaxCycleTime, char[] aCallback);

dword ChkStart_MsgAbsCycleTimeViolation (Message aObservedMessage, duration aMinCycleTime, duration aMaxCycleTime, char[] aCallback);
参考代码:
testcase CheckMsgEngineData()
{
  float aMinRelCycleTime = 0.9;
  float aMaxRelCycleTime = 1.1;

  // Information for test report.
  TestCaseTitle("TC 4", "Check cycle time of message EngineData");

  // checks the cycle time of the message
  gCycCheckId = ChkStart_MsgRelCycleTimeViolation (EngineData, aMinRelCycleTime , aMaxRelCycleTime );
  TestAddCondition(gCycCheckId);
  // sequence of different actions and waiting conditions
  TestWaitForTimeout(1000);
  TestRemoveCondition(gCycCheckId);
}
测试报告中设置的命令如下,请您自行查阅CANoe帮助文档,或者查找自带的模板。
TestModuleTitle ("Test BCM Features");\\测试报告标题。
   TestModuleDescription ("Check all features in BCM.");\\测试报告描述。
输出的测试报告如下图所示:
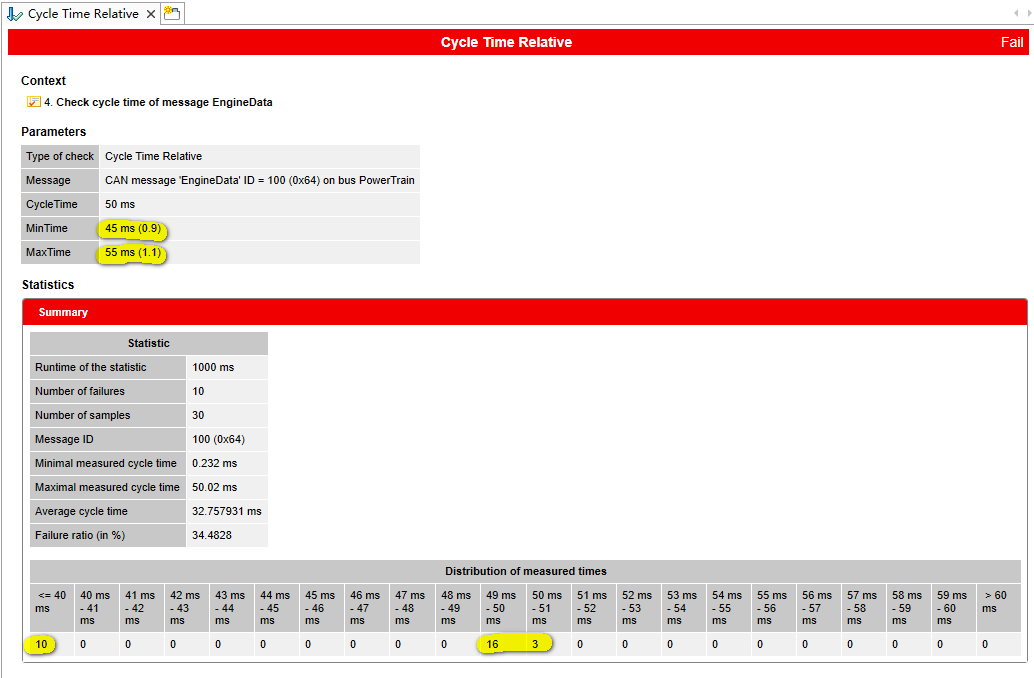
如上图所示,测试报告展示了错误事件产生的次数以及错误事件所处的事件范围。
4 统一诊断测试(UDS)
诊断测试经常需要进行切换session,22/2E读写等request/response式的操作,CANoe Demo工程UDSBasic.cfg中Simulation Setup窗口里的TestModule节点关联的CAPL脚本为我们提供了一个很好的参考模板:

参考代码:
/*@!Encoding:1252*/
// --------------------------------------------------
// Simple test module for automated tests.
// For the sake of simplicity, this example omits
// security access mechanisms, especially for the
// write services. In some cases, return parameters
// are not checked.
//
// CANoe 10.0 and higher
// --------------------------------------------------

includes
{
  // As this is a test module, neither including the CAPL callback interface nor adding
  // the corresponding transport protocol node layer DLL is necessary, because in this case,
  // the "built-in" diagnostic channel of CANoe can be used.
}

variables
{
  enum bool {true=1, false=0};

  const cAccessModeNumerical=0;
  const cAccessModePhysical=1;
  const cAccessModeCoded=2;

  const test_vehicle_Speed_kmh = 40.0;

  // This timeout is used just to force CANoe to continue, i.e. normally a TestWaitForDiag...
  // function will return much earlier due to diagnostic level timing!
  const cApplicationTimeoutMs = 5000;

  char gTestIdStr[10];    // Test step ID for test report
  word gTestCaseIndex=0;
  word gTestStepIndex=0;

  char gResultString[200]; // String for temporary test step result outputs
}

// Set and increment test step ID for test report
updateTestIdStr()
{
  snprintf(gTestIdStr, elcount(gTestIdStr), "%d.%d", gTestCaseIndex, gTestStepIndex);
}

setTestId(word tcIndex, word tsIndex)
{
  gTestCaseIndex=tcIndex;
  gTestStepIndex=tsIndex;
  updateTestIdStr();
}

incTestStepId()
{
  gTestStepIndex++;
  updateTestIdStr();
}

word SendRequestAndWaitForResponse(diagRequest *req, enum bool posResponseExpected)
{
  long ret;

  // Trigger sending the request
  if (0 > (ret=req.SendRequest())) {
    snprintf(gResultString, elcount(gResultString), "Trigger sending the request failed (Return code=%d)!", ret);
    testStepFail(gTestIdStr, gResultString);
    return 0;
  }
  testStepPass(gTestIdStr, "Trigger sending the request succeded.");

  incTestStepId();
  // Wait until the complete request has been sent, e.g. in case of long requests which spread over several messages (segmented message)
  if (1!=(ret=testWaitForDiagRequestSent(req, cApplicationTimeoutMs))){
    snprintf(gResultString, elcount(gResultString), "Failed to finish sending the request (Return code=%d)!", ret);
    testStepFail(gTestIdStr, gResultString);
    return 0;
  }
  testStepPass(gTestIdStr, "Request was sent successfully.");

  incTestStepId();
  // Wait until the complete response has been received, e.g. segmented messages might take some time for transmission
  if (1!=(ret=testWaitForDiagResponse(req, cApplicationTimeoutMs))) {
    snprintf(gResultString, elcount(gResultString), "Valid response missing or received too late (Return code=%d)!", ret);
    testStepFail(gTestIdStr, gResultString);
    return 0;
  }
  testStepPass(gTestIdStr, "Response received successfully.");

  incTestStepId();
  // Check whether the response was a positive response
  if (-1==(ret=diagGetLastResponseCode(req))) {
    if (!posResponseExpected) {
      snprintf(gResultString, elcount(gResultString), "Positive response received although negative response was expected!");
      testStepFail(gTestIdStr, gResultString);
      return 0;
    }
    testStepPass(gTestIdStr, "Positive Response received as expected.");
  }
  else if (ret>0) {
    if (posResponseExpected) {
      snprintf(gResultString, elcount(gResultString), "Negative response received (NRC=0x%02x) although positive response was expected!", ret);
      testStepFail(gTestIdStr, gResultString);
      return 0;
    }
    testStepPass(gTestIdStr, "Negative Response received as expected (NRC=%d).", ret);
  }
  return 1;
}

// Check whether writing the vehicle speed parameter is done correctly by reading its value after writing
testcase tcWriteAndReadVehicleSpeed()
{
  diagRequest Door.Variant_Coding_Write req_write;
  diagRequest Door.Variant_Coding_Read req_read;
  double ret;
  word testCaseIndex;

  setTestId(1,1);
  TestStep(gTestIdStr, "Writing variant coding");
  if (0>req_write.SetParameter(cAccessModePhysical, "Codingstring.VehicleSpeedToLockDoor", test_vehicle_Speed_kmh)) {
    testStepFail(gTestIdStr, "Could not set parameter 'VehicleSpeedToLockDoor' in write request!");
  }
  else {
    if (0>req_write.SetParameter("Codingstring.VehicleType", "Sedan")) {
      testStepFail(gTestIdStr, "Could not set parameter 'VehicleType' in write request!");
    }
    else {
      sendRequestAndWaitForResponse(req_write, true);
    }
  }
  incTestStepId();
  TestStep(gTestIdStr, "Reading variant coding");
  if (sendRequestAndWaitForResponse(req_read, true)) {
    incTestStepId();
    ret=req_read.GetRespParameter(cAccessModePhysical, "Codingstring.VehicleSpeedToLockDoor");
    if (test_vehicle_Speed_kmh == ret) {
      testStepPass(gTestIdStr, "VehicleSpeedToLockDoor read as expected!");
    }
    else {
      testStepFail(gTestIdStr, "Read VehicleSpeedToLockDoor value is wrong (value=%f)!", ret);
    }
  }
}

void MainTest ()
{
  tcWriteAndReadVehicleSpeed();
}
CANoe提供的Demo工程是学习CANoe最好的资源,熟悉以上示例代码已经能够帮助我们开发出大部分诊断测试case。

旨在为数千万中国开发者提供一个无缝且高效的云端环境,以支持学习、使用和贡献开源项目。
更多推荐


 75
75 0
0- 0


 已为社区贡献2条内容

所有评论(0)