
springmvc项目请求的css和js文件找不到_SpringBoot2.x入门到项目实战课程系列(第五章)
项目源码:https://github.com/wenMN1994/SpringBoot第5章 Spring Boot 的Web开发Web 开发是项目实战中至关重要的一部分,Web开发的核心内容主要包括嵌入的 Servlet 容器和SpringMVCWeb开发官方文档:https://docs.spring.io/spring-boot/docs/2.0.6.RELEASE/reference/h
项目源码:https://github.com/wenMN1994/SpringBoot
第5章 Spring Boot 的Web开发
- Web 开发是项目实战中至关重要的一部分,Web开发的核心内容主要包括嵌入的 Servlet 容器和SpringMVC
- Web开发官方文档:
- https://docs.spring.io/spring-boot/docs/2.0.6.RELEASE/reference/htmlsingle/#boot-features-spring-mvc
5.1 Web开发支持
- Spring Boot 为 Web 开发提供了 spring-boot-starter-web 启动器作为基本支持,为我们提供了嵌入的Tomcat 以及 Spring MVC 的依赖支持。(参考:pom.xml)
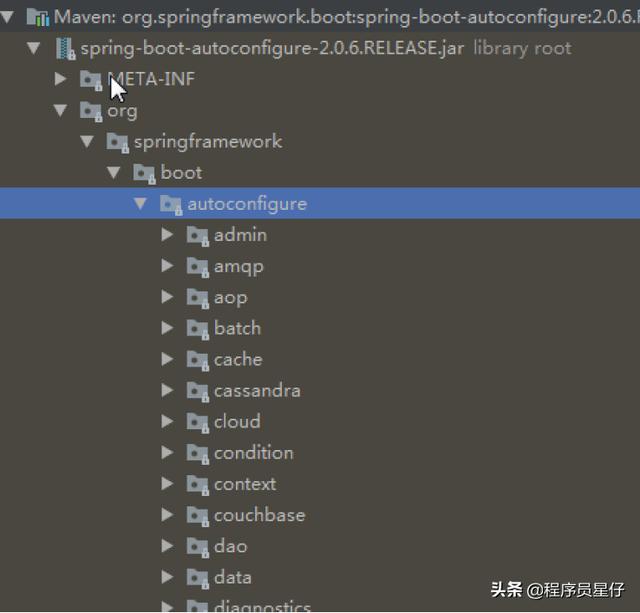
- 也提供了很多不同场景的自动配置类,让我们只需要在配置文件中指定少量的配置即可启动项目。自动配置类存储在 spring-boot-autoconfigure.jar 的 org.springframework.boot.autoconfigure 包下。
- 思考自动配置原理: 自动配置场景 SpringBoot 帮我们配置了什么?是否修改?能修改哪些配置?是否可以扩展?……
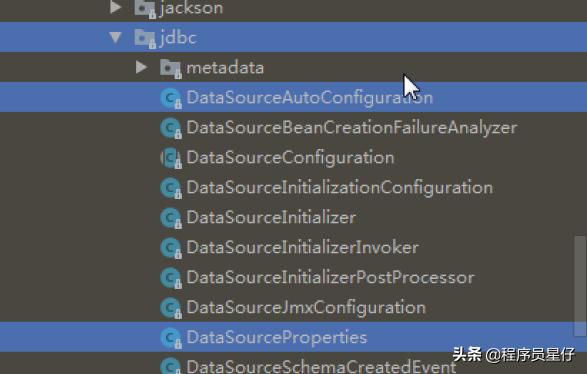
- 自动配置类举例:
- 文件名可以看出
- xxxxAutoConfiguration :向容器中添加自动配置组件
- xxxxProperties :使用自动配置类 来封装 配置文件的内容
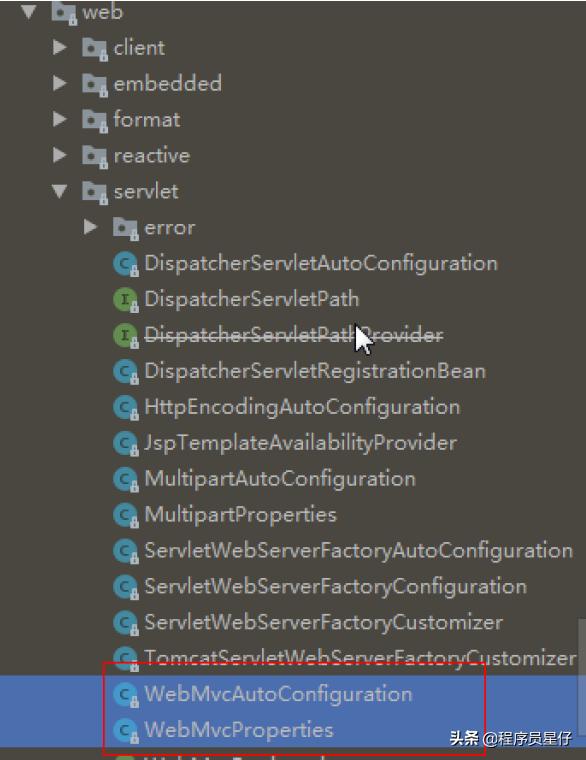
- SpringMVC配置 : WebMvcAutoConfiguration 和 WebMvcProperties
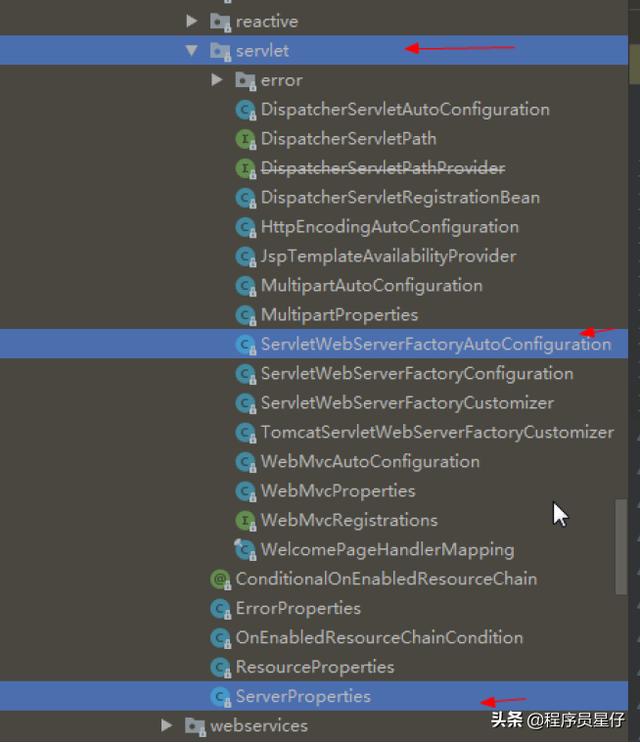
- 内嵌 Servlet 容器 : ServletWebServerFactoryAutoConfiguration 和 ServerProperties
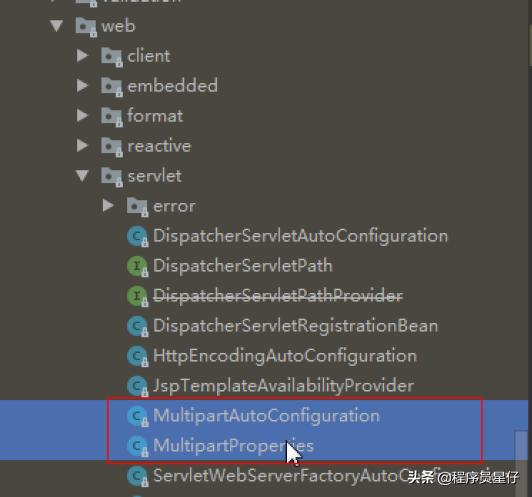
- 上传文件的属性 :MultipartAutoConfiguration 和 MultipartProperties
- JDBC : DataSourceAutoConfiguration 和 DataSourceProperties
5.2 静态资源的映射规则
- 对静态资源的映射规则, 可通过分析 WebMvcAutoConfiguration 自动配置类得到
5.2.1 webjars 资源映射
- 在 WebMvcAuotConfiguration.addResourceHandlers() 分析webjars 资源映射
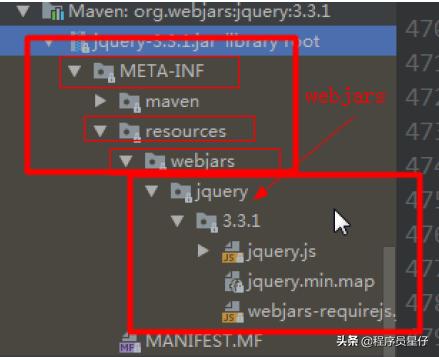
public void addResourceHandlers(ResourceHandlerRegistry registry) {if (!this.resourceProperties.isAddMappings()) {logger.debug("Default resource handling disabled");} else {Duration cachePeriod = this.resourceProperties.getCache().getPeriod();CacheControl cacheControl = this.resourceProperties.getCache().getCachecontrol().toHttpCacheControl();if (!registry.hasMappingForPattern("/webjars/**")) {//收到 /webjars/**请求后 ,会去classpath:/META-INF/resources/webjars/ 查找资源文件this.customizeResourceHandlerRegistration(registry.addResourceHandler(new String[]{"/webjars/**"}).addResourceLocations(new String[]{"classpath:/METAINF/resources/webjars/"}).setCachePeriod(this.getSeconds(cachePeriod)).setCacheControl(cacheControl));}String staticPathPattern = this.mvcProperties.getStaticPathPattern();if (!registry.hasMappingForPattern(staticPathPattern)) {this.customizeResourceHandlerRegistration(registry.addResourceHandler(new String[{staticPathPattern}).addResourceLocations(getResourceLocations(this.resourceProperties.getStaticLocations())).setCachePeriod(this.getSeconds(cachePeriod)).setCacheControl(cacheControl));}}1、所有 /webjars/** 请求,都去 classpath:/META-INF/resources/webjars/ 目录找对应资源文件
2、webjars:以jar包的方式引入静态资源;webjars官网: https://www.webjars.org/
3、在官网打开资源文件的依赖配置信息,然后粘贴到 pom.xml 中
org.webjarsjquery3.3.14、访问 localhost:8080/webjars/jquery/3.3.1/jquery.js 会在下面路径 中查找
5.2.2 其他静态资源映射
- 在 WebMvcAuotConfiguration.addResourceHandlers() 分析 访问其他资源映射
public void addResourceHandlers(ResourceHandlerRegistry registry) {if (!this.resourceProperties.isAddMappings()) {logger.debug("Default resource handling disabled");} else {Duration cachePeriod = this.resourceProperties.getCache().getPeriod();CacheControl cacheControl = this.resourceProperties.getCache().getCachecontrol().toHttpCacheControl();if (!registry.hasMappingForPattern("/webjars/**")) {this.customizeResourceHandlerRegistration(registry.addResourceHandler(new String[]{"/webjars/**"}).addResourceLocations(new String[]{"classpath:/METAINF/resources/webjars/"}).setCachePeriod(this.getSeconds(cachePeriod)).setCacheControl(cacheControl));}// 接收/**String staticPathPattern = this.mvcProperties.getStaticPathPattern();if (!registry.hasMappingForPattern(staticPathPattern)) {this.customizeResourceHandlerRegistration(registry.addResourceHandler(new String[{staticPathPattern}).addResourceLocations(getResourceLocations(this.resourceProperties.getStaticLocations())).setCachePeriod(this.getSeconds(cachePeriod)).setCacheControl(cacheControl));}}- staticPathPattern 处理其他访问的静态路径, 从 WebMVCProperties 构造器中获取到 /**
public WebMvcProperties() {this.localeResolver = WebMvcProperties.LocaleResolver.ACCEPT_HEADER;this.dispatchTraceRequest = false;this.dispatchOptionsRequest = true;this.ignoreDefaultModelOnRedirect = true;this.throwExceptionIfNoHandlerFound = false;this.logResolvedException = false;=======接收 /**请求this.staticPathPattern = "/**";this.async = new WebMvcProperties.Async();this.servlet = new WebMvcProperties.Servlet();this.view = new WebMvcProperties.View();this.contentnegotiation = new WebMvcProperties.Contentnegotiation();this.pathmatch = new WebMvcProperties.Pathmatch();}- ResourceProperties 根据请求查找资源文件, 从以下 四个路径 中 查找( 静态资源目录 )
@ConfigurationProperties(prefix = "spring.resources",ignoreUnknownFields = false)public class ResourceProperties {private static final String[] CLASSPATH_RESOURCE_LOCATIONS = new String[]{"classpath:/META-INF/resources/", "classpath:/resources/", "classpath:/static/","classpath:/public/"};private String[] staticLocations;private boolean addMappings;private final ResourceProperties.Chain chain;private final ResourceProperties.Cache cache;"classpath:/META-INF/resources/","classpath:/resources/","classpath:/static/","classpath:/public/"- 总结:
- 当接受到 /** 请求访问资源时, 会被映射到下面4个类路径下的静态资源目录中查找
classpath:/META-INF/resources/classpath:/resources/classpath:/static/classpath:/public/- 访问 localhost:8080/style.css 会在上面四个静态资源路径 中查找文件
5.2.3 欢迎页映射
- 在 WebMvcAuotConfiguration.welcomePageHandlerMapping() 分析 欢迎页映射
@Beanpublic WelcomePageHandlerMapping welcomePageHandlerMapping(ApplicationContext applicationContext) {return new WelcomePageHandlerMapping(new TemplateAvailabilityProviders(applicationContext), applicationContext=======查找欢迎页========, this.getWelcomePage(), this.mvcProperties.getStaticPathPattern());}- getWelcomePage() 方法获取 欢迎页面 可存储路径
private Optional getWelcomePage() {String[] locations ====2. 上面说的4个静态资源路径加上 "/" 路径getResourceLocations(=====1. 获取上面说的4个静态资源路径this.resourceProperties.getStaticLocations());==================================在上面路径下查找 index.html 页面return Arrays.stream(locations).map(this::getIndexHtml).filter(this::isReadable).findFirst();}// 上面获取的路径中查找 index.html 页面private Resource getIndexHtml(String location) {return this.resourceLoader.getResource(location + "index.html");}- 分析后, 会从 4个静态资源目录 + 根路径 / 中 查找 index.html 页面
classpath:/META-INF/resources/classpath:/resources/classpath:/static/classpath:/public//: 当前项目根路径下- 会在 静态资源目录下 与 根路径查找 (按该顺序) index.html页面; 收到 “/**” 请求映射
- 访问 localhost:8080/ 会在上面5个目录中查找 index.html 页面(因为/也属于 /** )
5.2.4 图标映射
- Spring Boot 会在静态资源目录下 与 根路径(按该顺序) 查找 faicon.ico 页面;
- 如果存在这样的文件,Spring Boot 会自动将其设置为应用图标。
classpath:/META-INF/resources/classpath:/resources/classpath:/static/classpath:/public//: 当前项目根路径下5.3 Thymeleaf 模板引擎
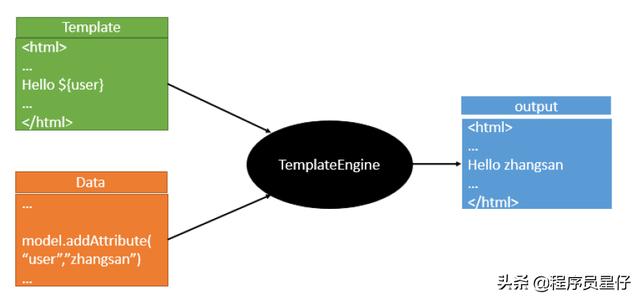
Spring Boot 官方不推荐使用JSP,因为内嵌的 Tomcat 、Jetty 容器不支持以 jar 形式运行 JSP。Spring Boot中提供了大量模板引擎,包含 Freemarker、Mastache、Thymeleaf 等。 而 Spring Boot 官方推荐使用Thymeleaf 作为模板引擎, 因为 Thymeleaf 提供了完美的 SpringMVC 的支持。
5.3.1 引入 Thymeleaf
- pom.xml 加入 Thymeleaf 启动器
org.springframework.bootspring-boot-starter-thymeleaf5.3.2 使用 Thymeleaf
- 模板文件放在哪里 ?
@ConfigurationProperties( prefix = "spring.thymeleaf" )public class ThymeleafProperties {private static final Charset DEFAULT_ENCODING;public static final String DEFAULT_PREFIX = "classpath:/classpath:/templates/";public static final String DEFAULT_SUFFIX = ".html";- 通过上面分析发现, 将 HTML 页面放到 classpath:/templates/ 目录下, Thymeleaf 就能自动渲染
@RequestMapping("/execute")public String execute(Map map) {map.put("name", "程序员星仔");// classpath:/templates/success.htmlreturn "success";}- 发送 http://localhost:8080/execute 后, 通过上面代码转到classpath:/templates/success.html
- 导入 Thymeleaf 的名称空间
- 在 html 页面加上以下名称空间, 使用 Thymeleaf 时就有语法提示。
- 演示 Thymeleaf 语法
hello成功
这里显示名字
5.3.3 Thymeleaf 语法
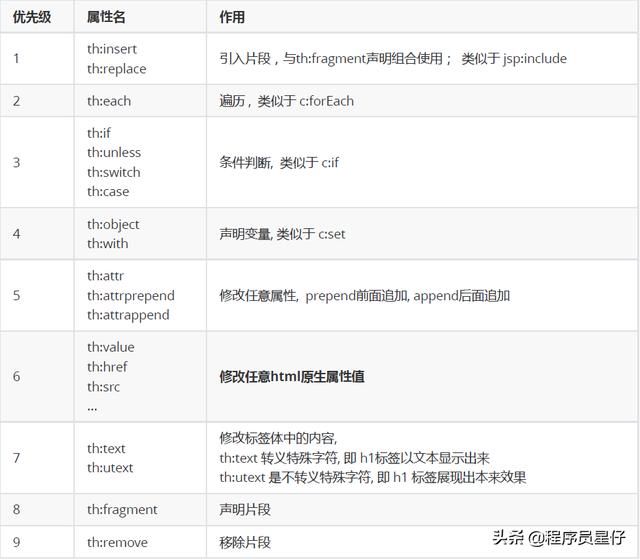
5.3.3.1 常用属性
- 参考 Thymeleaf 官方文档 10 Attribute Precedence
5.3.3.2 标准表达式语法
- 参考 Thymeleaf 官方文档 4 Standard Expression Syntax
一、Simple expressions(表达式语法)1. Variable Expressions(变量表达式): ${...} (参考: 4.2 Variables)1)、获取变量值;使用OGNL表达式;2)、获取对象的属性, 调用方法3)、使用内置的基本对象:#ctx : the context object.(当前上下文对象)#vars: the context variables.(当前上下文里的变量)#locale : the context locale. (当前上下文里的区域信息)下面是Web环境下的隐式对象#request : (only in Web Contexts) the HttpServletRequest object.#response : (only in Web Contexts) the HttpServletResponse object.#session : (only in Web Contexts) the HttpSession object.#servletContext : (only in Web Contexts) the ServletContext object.示例: ${session.foo} (用法参考: 18 Appendix A: Expression Basic Objects)4)、使用内置的工具对象:(用法参考: 19 Appendix B: Expression Utility Objects)#execInfo : information about the template being processed.#messages : methods for obtaining externalized messages inside variablesexpressions, in the same way as they would be obtained using #{…} syntax.#uris : methods for escaping parts of URLs/URIs#conversions : methods for executing the configured conversion service(if any).#dates : methods for java.util.Date objects: formatting, componentextraction, etc.#calendars : analogous to #dates , but for java.util.Calendarobjects.#numbers : methods for formatting numeric objects.#strings : methods for String objects: contains, startsWith,prepending/appending, etc.#objects : methods for objects in general.#bools : methods for boolean evaluation.#arrays : methods for arrays.#lists : methods for lists.#sets : methods for sets.#maps : methods for maps.#aggregates : methods for creating aggregates on arrays or collections.#ids : methods for dealing with id attributes that might be repeated(for example, as a result of an iteration).2. Selection Variable Expressions(选择表达式): *{...}(参考:4.3 Expressions on selections)1)、和${}在功能上是一样, 额外新增:配合 th:object 使用省得每次写${session.user.firstName}, 直接取出对象,然后写对象名即可
Name: Sebastian
Email: Saturn
3. Message Expressions(获取国际化内容): #{...} (参考:4.1 Messages)4. Link URL Expressions(定义URL): @{...} (参考:4.4 Link URLs)5. Fragment Expressions(片段引用表达式): ~{...} (参考:4.5 Fragments)
...
二、Literals(字面量) (参考: 4.6 Literals)1. Text literals: 'one text' , 'Another one!' ,…2. Number literals: 0 , 34 , 3.0 , 12.3 ,…3. Boolean literals: true , false4. Null literal: null5. Literal tokens: one , sometext , main ,…三、Text operations(文本操作) (参考: 4.7 Appending texts)1. String concatenation: +2. Literal substitutions: |The name is ${name}|四、Arithmetic operations(数学运算) (参考: 4.9 Arithmetic operations)1. Binary operators: + , - , * , / , %2. Minus sign (unary operator): -五、Boolean operations(布尔运算)1. Binary operators: and , or2. Boolean negation (unary operator): ! , not六、Comparisons and equality(比较运算) (参考: 4.10 Comparators and Equality)1. Comparators: > , < , >= , <= ( gt , lt , ge , le )2. Equality operators: == , != ( eq , ne )七、Conditional operators(条件表达式;三元运算符) (参考: 4.11 Conditional expressions)1. If-then: (if) ? (then)2. If-then-else: (if) ? (then) : (else)3. Default: (value) ?: (defaultvalue)八、Special tokens(特殊操作) (参考: 4.13 The No-Operation token)1. No-Operation: _
5.3.4 实例代码演示
5.3.4.1 声明&引入公共片段
这是th:fragment声明公共片段
这是id选择器声明公共片段
练习:将项目中的 公共模块抽取出来到 public.html 中
5.3.4.2 迭代th:each
- 常用迭代方式
- HelloController
@RequestMapping("/study")public String study(Map map, HttpServletRequest request) {List userList = new ArrayList<>();userList.add(new User("小星", 1));userList.add(new User("小李", 2));userList.add(new User("小张", 1));map.put("userList", userList);return "study";}- study.html
姓名程序员星仔
- 获取迭代状态
编号姓名总数偶数/奇数第一个元素最后一个元素0mengxuegu未知0
- 练习 : 供应商管理 查询页面
5.3.4.3 条件判断
- th:if 不仅判断返回为 true 的表达式,还判断一些特殊的表达式。
- 如果值不是Null, 以下情况均返回 true:
- 如果值是boolean类型并且值为true.
- 如果值是数值类型并且值不为0.
- 如果值是字符类型并且值不为空.
- 如果值是字符串并且内容不为 “false” , “off” 或者 “no” .
- 如果值不是上述类型也返回true.
- 如果值是NULL, 则返回false
下面加notth:if判断,如果此文字显示说明有值
th:unless判断,如果此文字显示说明有值
- th:unless 与 th:if 作用正好相反。
- th:swith th:case
@RequestMapping("/study")public String study(Map map, HttpServletRequest request) {List userList = new ArrayList<>();userList.add(new User("小星", 1));userList.add(new User("小李", 2));userList.add(new User("小张", 1));map.put("userList", userList);// 1女, 2男map.put("sex", 1);map.put("man", 2);return "study";}女
男
未知
5.3.4.4 显示标签体内容
- th:text 转义特殊字符, 即 h1标签以文本显示出来
- th:utext 不转义特殊字符, 即 h1 标签展现出本来效果
@RequestMapping("/study")public String study(Map map, HttpServletRequest request) {List userList = new ArrayList<>();userList.add(new User("小星", 1));userList.add(new User("小李", 2));userList.add(new User("小张", 1));map.put("userList", userList);// 1女, 2男map.put("sex", 1);map.put("man", 2);// th:text th:utextmap.put("desc", "欢迎来到程序员星仔
");return "study";}
- 补充:Thymeleaf 行内表达式双中括号: [[表达式]] (就是不在标签上使用属性,参考12 Inlining)
[[${desc}]]Hello, [[${desc}]] 。。。
5.3.4.5 th:object 直接取出对象
- 使用th:object 直接取出对象,然后写对象里的属性名即可获取属性值
@RequestMapping("/study")public String study(Map map, HttpServletRequest request) {List userList = new ArrayList<>();userList.add(new User("小星", 1));userList.add(new User("小李", 2));userList.add(new User("小张", 1));map.put("userList", userList);// 1女, 2男map.put("sex", 1);map.put("man", 2);// th:text th:utextmap.put("desc", "欢迎来到程序员星仔
");request.getSession().setAttribute("user", new User("小不点", 2));return "study";}
姓名:xxxx
性别:xxxx
5.4 SpringBoot 热部署
- 默认情况下, 在开发中我们修改一个项目文件后,想看到效果不得不重启应用,这会导致浪费大量时间 ,我们希望不重启应用的情况下,程序可以自动部署(热部署)。
- 如何能实现热部署?
1、关于模板引擎
- 在 Spring Boot 开发环境下禁用模板缓存
#开发环境下关闭thymeleaf模板缓存,thymeleaf默认是开启状态spring.thymeleaf.cache=false2、添加 Spring Boot Devtools 热部署依赖
org.springframework.bootspring-boot-devtools3、Intellij IEDA和Eclipse不同,Intellij IDEA必须做一些小调整:
- 在 Eclipse 中,修改文件后要手动进行保存,它就会自动编译,就触发热部署现象。
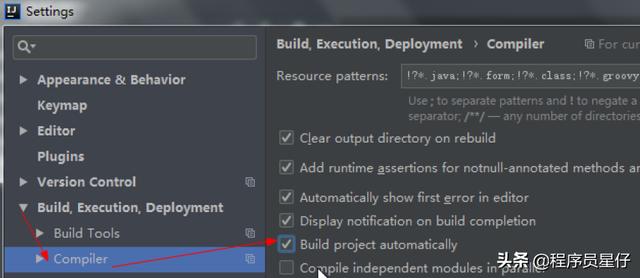
- 在Intellij IEDA 中,修改文件后都是自动保存,默认不会自动编译文件,需要手动编译按 Ctrl + F9 (推荐使用)或 Build -> Build Project ;或者进行以下设置才会自动编译(效果不明显)(File -> Settings -> Build, Execution, Deployment -> Compiler -> 勾选 Build project automatically)
5.5 分析 SpringMVC 自动配置
Spring Boot 为 Spring MVC 提供了适用于多数应用的自动配置功能( WebMvcAutoConfiguration)。在Spring默认基础上,自动配置添加了以下特性:
- 引入 ContentNegotiatingViewResolver 和 BeanNameViewResolver beans.
- 自动配置了视图解析器ViewResolver(根据方法返回值获取视图对象View,视图对象决定如何渲染?重定向Or 转发)
- ContentNegotiatingViewResolver : 组合所有的视图解析器的(通过源码可分析出)
public class ContentNegotiatingViewResolver//146public View resolveViewName(String viewName, Locale locale) throws Exception {RequestAttributes attrs = RequestContextHolder.getRequestAttributes();Assert.state(attrs instanceof ServletRequestAttributes, "No current ServletRequestAttributes");List requestedMediaTypes = this.getMediaTypes(((ServletRequestAttributes)attrs).getRequest());if (requestedMediaTypes != null) {//选择所有候选的视图对象List candidateViews = this.getCandidateViews(viewName, locale,requestedMediaTypes);//从候选中选择最合适的视图对象View bestView = this.getBestView(candidateViews, requestedMediaTypes,attrs);//存入所有视图解析器private List viewResolvers;107protected void initServletContext(ServletContext servletContext) {Collection matchingBeans = BeanFactoryUtils.beansOfTypeIncludingAncestors(//从容器中获取所有的视图解析器this.obtainApplicationContext(), ViewResolver.class).values();- 自定义视图解析器:可以@Bean向容器中添加一个我们自定义的视图解析器,即可被容器管理使用
@Beanpublic ViewResolver myViewResolver () {return new MyViewResolver();}private class MyViewResolver implements ViewResolver {@Overridepublic View resolveViewName(String s, Locale locale) throws Exception {return null;}}// DispatcherServlet.doDispatch 断点后,发送任意请求,可查看已被容器自动管理了- 自动注册 Converter , GenericConverter , and Formatter beans。
- Converter :转换器;如: 文本类型转换目标类型,true 转 boolean类
- GenericConverter :转换器,Spring内部在注册时,会将Converter先转换为GenericConverter之后,再统一对GenericConverter注册。
- Formatter : 格式化器; 如: 2017/12/17 格式化 Date类型
@Beanpublic FormattingConversionService mvcConversionService() {//传入日期格式, spring.mvc.date-format配置日期格式WebConversionService conversionService = new WebConversionService(this.mvcProperties.getDateFormat());this.addFormatters(conversionService);return conversionService;}//将格式化器添加容器中protected void addFormatters(FormatterRegistry registry) {this.configurers.addFormatters(registry);}- 对 HttpMessageConverters 的支持。
- SpringMVC 用它来转换Http请求和响应的;User _json User _xml
- 可以通过@Bean向容器中添加一个我们自定义HttpMessageConverters ,即可被容器管理使用
- 自动注册 MessageCodesResolver 。
- 定义错误代码生成规则
- 自动注册 ConfigurableWebBindingInitializer 。
- 初始化所有 Web数据绑定器 对象, 比如 请求数据 ——》JavaBean
- 对静态资源的支持,包括对 Webjars 的支持。
- 对静态首页 index.html 的支持。
- 对自定义Favicon 图标的支持。
如果想保留 Spring Boot MVC的特性,而且还想扩展新的功能(拦截器, 格式化器, 视图控制器等),你可以在你自定义的 WebMvcConfigurer 类上增加 @Configuration 注解。
如果你想全面控制SpringMVC(也就是不使用默认配置功能), 你在自定义的Web配置类上添加
@Configuration 和 @EnableWebMvc 注解。
5.6 扩展 SpringMVC 功能
- 扩展一个视图解析器功能
- 如果想保留 Spring Boot MVC的特性,而且还想扩展新的功能(拦截器, 格式化器, 视图控制器等),你可以在你自定义的 WebMvcConfigurer 类上增加 @Configuration 注解。
- 自定义配置类保留了所有的自动配置, 也能用我们扩展的功能
package com.dragon.springboot.config;....../*** @Auther: Dragon Wen*/@Configurationpublic class MySpringMvcConfigurer implements WebMvcConfigurer{@Overridepublic void addViewControllers(ViewControllerRegistry registry) {// super.addViewControllers(registry);//发送 /dragonwen 请求来到 success.htmlregistry.addViewController("/dragonwen").setViewName("success");}}package com.dragon.springboot.config;....../*** @Auther: Dragon Wen*/@Configurationpublic class MySpringMvcConfigurer implements WebMvcConfigurer{@Overridepublic void addViewControllers(ViewControllerRegistry registry) {// super.addViewControllers(registry);//发送 /mengxuegu 请求来到 success.htmlregistry.addViewController("/mengxuegu").setViewName("success");}}原理:
1、自定义WebMvcConfigurer自动配置时会导入;
导入EnableWebMvcConfiguration.class@Import({WebMvcAutoConfiguration.EnableWebMvcConfiguration.class})@EnableConfigurationProperties({WebMvcProperties.class, ResourceProperties.class})@Order(0)public static class WebMvcAutoConfigurationAdapter implements WebMvcConfigurer,ResourceLoaderAware {2、EnableWebMvcConfiguration 继承了 DelegatingWebMvcConfiguration
@Configurationpublic static class EnableWebMvcConfiguration extends DelegatingWebMvcConfiguration {3、分析 DelegatingWebMvcConfiguration , 会将所有web配置组件加到WebMvcConfigurerComposite中
@Configurationpublic class DelegatingWebMvcConfiguration extends WebMvcConfigurationSupport {//存储所有的mvc配置类组件private final WebMvcConfigurerComposite configurers =new WebMvcConfigurerComposite();@Autowired( required = false )public void setConfigurers(List configurers) {if (!CollectionUtils.isEmpty(configurers)) {this.configurers.addWebMvcConfigurers(configurers);/*一个参考实现;将所有的WebMvcConfigurer相关配置都来一起调用;public void addViewControllers(ViewControllerRegistry registry) {Iterator var2 = this.delegates.iterator();while(var2.hasNext()) {WebMvcConfigurer delegate = (WebMvcConfigurer)var2.next();delegate.addViewControllers(registry);}}*/}}4、保留原来的配置类,也添加了新的配置类,所有的WebMvcConfigurer都会一起起作用
5、效果:SpringMVC的自动配置和我们的扩展配置都会起作用;
5.7 全面控制 SpringMVC
如果你想全面控制SpringMVC(SpringBoot对SpringMVC的自动配置都废弃), 在自定义的Web配置类上添加@Configuration 和 @EnableWebMvc 注解。
/*** @Auther: Dragon Wen*/@EnableWebMvc@Configurationpublic class MySpringMvcConfigurer implements WebMvcConfigurer{@Overridepublic void addViewControllers(ViewControllerRegistry registry) {// super.addViewControllers(registry);//发送 /mengxuegu 请求来到 success.htmlregistry.addViewController("/dragonwen").setViewName("success");}}原理: 为什么添加 @EnableWebMvc 自动配置就失效了?
1、@EnableWebMvc 的核心
@Import(DelegatingWebMvcConfiguration.class)public @interface EnableWebMvc {2、先记住继承了WebMvcConfigurationSupport类
@Configurationpublic class DelegatingWebMvcConfiguration extends WebMvcConfigurationSupport {3、而在 WebMvcAutoConfiguration 上使用了@ConditionalOnMissingBean(WebMvcConfigurationSupport.class)
容器中没有这个组件的时候,这个自动配置类才生效
容器中没有这个组件的时候,这个自动配置类才生效@ConditionalOnMissingBean({WebMvcConfigurationSupport.class})@AutoConfigureOrder(-2147483638)@AutoConfigureAfter({DispatcherServletAutoConfiguration.class,ValidationAutoConfiguration.class})public class WebMvcAutoConfiguration {**而 @ConditionalOnMissingBean 表示的是没有WebMvcConfigurationSupport这个组件,****WebMvcAutoConfiguration自动配置类才会生效.**4、相反 @EnableWebMvc 将 WebMvcConfigurationSupport 组件导入进来, 使得
WebMvcAutoConfiguration就失效了
5、WebMvcConfigurationSupport 只是SpringMVC最基本的功能;
5.8 总结 SpringMVC 配置
- 在Spring Boot中自已配置组件的时候,先看容器中有没有公司自已配置的(@Bean、@Component),如果有就用公司自已配置的; 如果没有,才自动配置.
- 在Spring Boot中会有非常多的xxxConfigurer帮助我们进行扩展配置.
- 在Spring Boot中会有很多的xxxCustomizer帮助我们进行定制配置.
持续更新
上一篇:第4章 Spring Boot 日志配置
下一篇:第6章 项目实战-账单管理系统

瓜分20万奖金 获得内推名额 丰厚实物奖励 易参与易上手
更多推荐

 0
0 0
0- 0


 已为社区贡献2条内容

所有评论(0)