vuex mutations_Vuex源码解析
“ 为方便理解,本文中提及的store为Store的实例,promise为Promise的实例源码的大致实现流程如下图: 在正式阅读Vuex源码之前,我们先实现一个简易版的Vuex来帮助我们理解“ 本文源代码:href="https://github.com/wangkaiwd/vuex-implement/blob/master/src/myVuex/index.js">简易版Vuexhr

“ 为方便理解,本文中提及的store为Store的实例,promise为Promise的实例
源码的大致实现流程如下图:
在正式阅读Vuex源码之前,我们先实现一个简易版的Vuex来帮助我们理解
“ 本文源代码:
- href="https://github.com/wangkaiwd/vuex-implement/blob/master/src/myVuex/index.js">简易版Vuex
- href="https://github.com/wangkaiwd/vuex-source-study">注释版Vuex源码
Vuex使用
“
official documentation
核心配置项:
stategettersmutationsactions
使用步骤:
import App from './App.vue'
import Vue from 'vue'
// 1. import
import Vuex from 'vuex'
Vue.use(Vuex)
// 2. Vue.use
// 3. inject root Vue instance
const store = new Vuex.Store({
  state: {},
  getters: {},
  mutations: {},
  actions: {}
})
new Vue({
  el: '#app',
  store,
  render: (h) => h(App)
}
Vuex的install方法
Vuex的使用方式:
- 引入
Vuex Vue.use(Vuex)new Vuex.Store创建Vuex中Store的实例- 在
Vue根实例中作为配置项注入
Vue.use 方法的参数要求时一个函数或者具有install方法的对象,由上述的使用步骤1~3可以得出,Vuex会默认导出一个具有install方法以及Store类的对象,代码如下:
// myVuex/index.js
const install = (Vue) => {

};

class Store {
  constructor (options) {
    this.options = options;
  }
}

const Vuex = { install, Store };

export default Vuex;
步骤 4 中,我们将store注入到了Vue的根实例的选项中,组件中便可以这样使用:
// App.vue
<template>
  <div id="app">
    <h3>{{$store.state.age}}</h3>
  </div>
</template>
为了能让Vue的所有子组件都能通过$store来访问到store,进而方便的获取store的属性和方法,Vuex采用Vue.mixin将store在beforeCreate钩子中进行全局混入:
const install = (Vue) => {
  Vue.mixin({
    // 实例初始化后立即同步调用,在数据检测和事件/watcher设置之前
    beforeCreate () {
      const { store } = this.$options;
      if (store) {
        this.$store = store;
      } else { // 子组件在渲染的时候会获取父组件的 $store(组件会从上到下进行渲染)
        this.$store = this.$parent && this.$parent.$store;
      }
    }
  });
};
这样我们便能在所有的注入store配置的根组件及其所有子组件中使用$store
响应式的state
需要注意的是: 直接为Vue的实例添加属性,该属性是不具备响应性 的。
此时state虽然可以获取到,但是由于并没有提前在data中定义,所以并不是响应式的,即在state发生变化时,视图并不会随之更新。为了让state具有响应式,我们在Vuex内部创建了一个新的Vue实例,并将state作为实例的data中的属性,保持其响应性
class Store {
  constructor (options) {
    const { state} = options;
    // 执行Vue.use会执行install方法,会将全局的Vue赋值为Vue实例
    // 保证state具有响应性
    this._vm = new Vue({
      data: { state }
    });
  }

  // 属性会被定义在实例的原型上
  // this.state = this._vm.state
  // 每次都会获取到最新的this._vm.state
  get state () {
    return this._vm.state;
  }
}
Vuex与全局变量一个最大的局别在于:Vuex中store的state是响应式的,在state发生变化时可以保证视图有效更新
mutation同步更改state
接下来我们尝试更改store.state.age的值。
在Vuex中,我们不能直接修改store.state的值,而是必须要commit一个mutation,然后通过mutation来修改state。用法如下:
<template>
  <div id="app">
    <h3>{{$store.state.age}}</h3>
    <button @click="onAdd">add age</button>
  </div>
</template>

<script>
  export default {
    name: 'App',
    components: {},
    methods: {
      onAdd () {
        this.$store.commit('add', 1);
      }
    }
  };
</script>
// store/index.js
export default new Vuex.Store({
  // ...
  mutations: {
    add (state, payload) {
      state.age = state.age + payload;
    }
  }
  // ...
});
为了方便遍历对象,我们可以实现一个forEach方法:
// object iterate
const forEach = (obj, cb) => {
  Object.keys(obj).forEach((key) => {
    cb(key, obj[key], obj);
  });
};
要通过commit方法更新state,需要在Store类初始化的时候,先缓存所有的mutations,然后通过store的commit方法,传入对应的key来执行mutations中对应的函数,并且传入state以及commit调用时的参数payload,方便更新store的state:
class Store {
  constructor (options) {
    const { state, mutations } = options;
    // 执行Vue.use会执行install方法,会将全局的Vue赋值为Vue实例
    // 保证state具有响应性
    this._vm = new Vue({
      data: { state }
    });
    this.mutations = {};
    forEach(mutations, (key, mutation) => {
      this.mutations[key] = (payload) => {
        // this.state是不能被更改的
        // 但是这里我们将this._vm.state的地址赋值给了参数state,
        // 之后我们更改的是this._vm.state地址对应的堆内存,而该值是响应式的
        mutation(this.state, payload);
      };
    });
  }

  // 属性会被定义在实例的原型上
  // this.state = this._vm.state
  // 每次都会获取到最新的this._vm.state
  get state () {
    return this._vm.state;
  }

  // 通过commit来修改state
  commit (type, payload) {
    const mutation = this.mutations[type];
    if (mutation) {
      mutation(payload);
    }
  }
}
action处理异步任务
在Vuex中,异步更新state需要通过dispatch方法派发一个action,然后通过action执行commit来修改state:
<template>
  <div id="app">
    <h3>{{$store.state.age}}</h3>
    <button @click="onAsyncAdd"> async add age</button>
  </div>
</template>

<script>
  export default {
    name: 'App',
    components: {},
    methods: {
      onAsyncAdd () {
        this.$store.dispatch('asyncAdd', 1);
      }
    }
  };
</script>
export default new Vuex.Store({
  // ...
  mutations: {
    add (state, payload) {
      state.age = state.age + payload;
    }
  },
  actions: {
    // const { commit } = store;
    // this指向不一样
    // commit()
    // store.commit()
    asyncAdd ({ commit }, payload) {
      // 这里调用commit时,如果不提前指定this的话,this会指向undefined
      setTimeout(() => {
        commit('add', payload);
      }, 2000);
    }
  },
  // ...
});
Vuex中actions的实现与mutations类似,不过在mutation中解构出commit方法执行时需要我们指定this指向:
class Store {
  constructor (options) {
    // ...
    this.actions = {};
    forEach(actions, (key, action) => {
      this.actions[key] = (payload) => {
        // action中的第一个参数为Store的实例,可以通过commit来更改state
        // 也可以通过dispatch来派发另一个action
        action(this, payload);
      };
    });
    // 通过bind返回一个函数赋值为this.commit,该函数内部会通过call执行this.commit,
    // 并且会将返回函数的参数也传入this.commit
    // 等号右边 => Store.prototype.commit 原型方法
    // 等到左边 => store.commit 实例私有方法
    // this.commit = this.commit.bind(this);
  }

  // 通过commit来修改state
  commit = (type, payload) => {
    const mutation = this.mutations[type];
    if (mutation) {
      mutation(payload);
    }
  };

  dispatch (type, payload) {
    const action = this.actions[type];
    if (action) {
      action(payload);
    }
  }
}
Vuex中的getters
这里我们已经实现了state,mutations,actions,而有时候我们的state中的属性过于冗长、或需要计算出一些值,就需要用到getters:
<template>
  <div id="app">
    <h2>{{$store.getters.personalInfo}}</h2>
  </div>
</template>
export default new Vuex.Store({
  state: {
    age: 10,
    person: {
      profile: {
        job: 'developer',
        company: 'alipay',
        name: 'zs'
      },
    }
  },
  getters: {
    personalInfo (state) { // 获取个人信息
      const { profile } = state.person;
      return Object.keys(profile).reduce((prev, cur) => {
        return prev + `${cur}: ${profile[cur]}; `;
      }, '');
    }
  }
  // ...
});
getters的实现如下:
class Store {
  constructor() {
    // do something ...
    this.getters = {};
    forEach(getters, (getter, key) => {
      // 每次取值时都会调用get方法
      // 而computed方法只会在
      Object.defineProperty(this.getters, key, {
        get: () => {
          return getter(this.state);
        }
      });
    });
    // do something ...
  }
}
到这里我们已经实现了一个简易版的Vuex
- 通过
state来获取数据 - 通过
mutation同步更改state - 通过
action来处理异步行为。
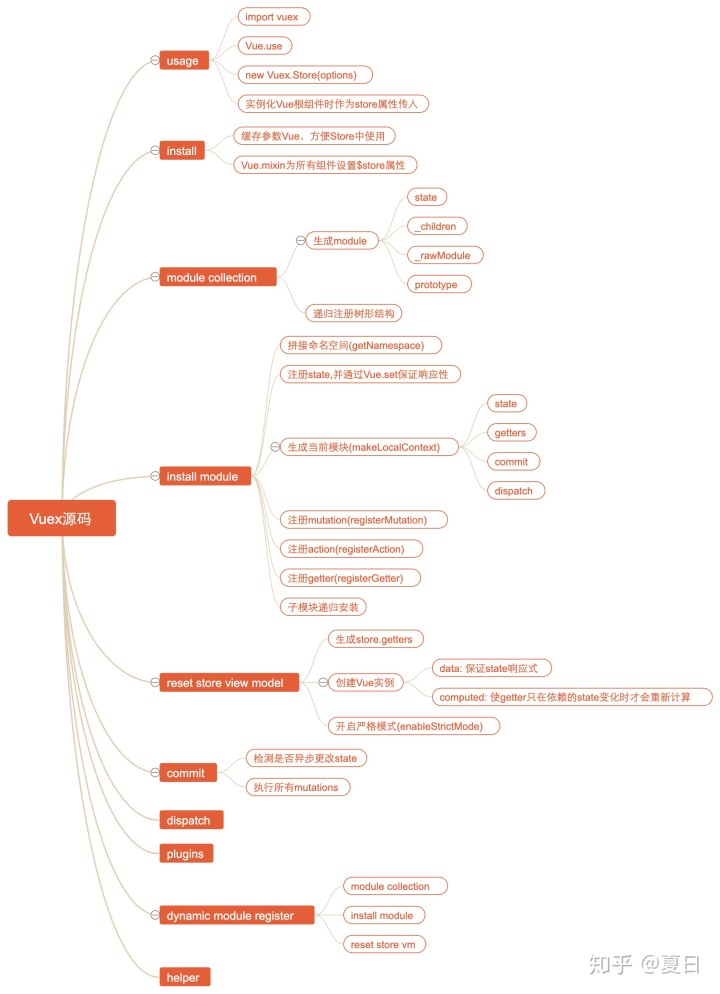
目前的代码只是源码的核心逻辑简化,接下来我们深入解读一下Vuex源码。
Vuex源码目录结构
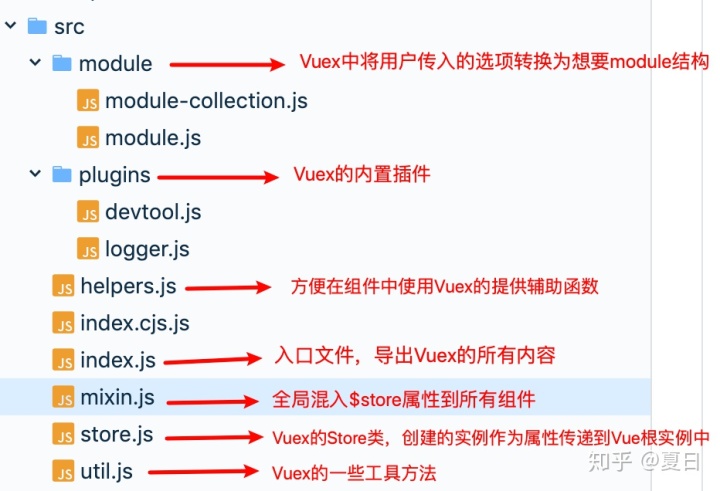
“ 下面我们只摘出源码中的核心代码进行解读,具体细节需要读者去源码中寻找
所有组件都可以访问$store
源码中的install方法与我们的实现基本上是相同的,代码如下:
// store.js
export function install (_Vue) {
  Vue = _Vue
  applyMixin(Vue)
}

// mixin
export default function applyMixin (Vue) {
  Vue.mixin({ beforeCreate: vuexInit })
  /**
   * Vuex init hook, injected into each instances init hooks list.
   */
  function vuexInit () {
    const options = this.$options
    // store injection
    // 自上而下将根实例中传入的VuexStore实例store注入到所有组件的实例上
    if (options.store) {
      this.$store = typeof options.store === 'function'
        ? options.store()
        : options.store
    } else if (options.parent && options.parent.$store) {
      this.$store = options.parent.$store
    }
  }
}
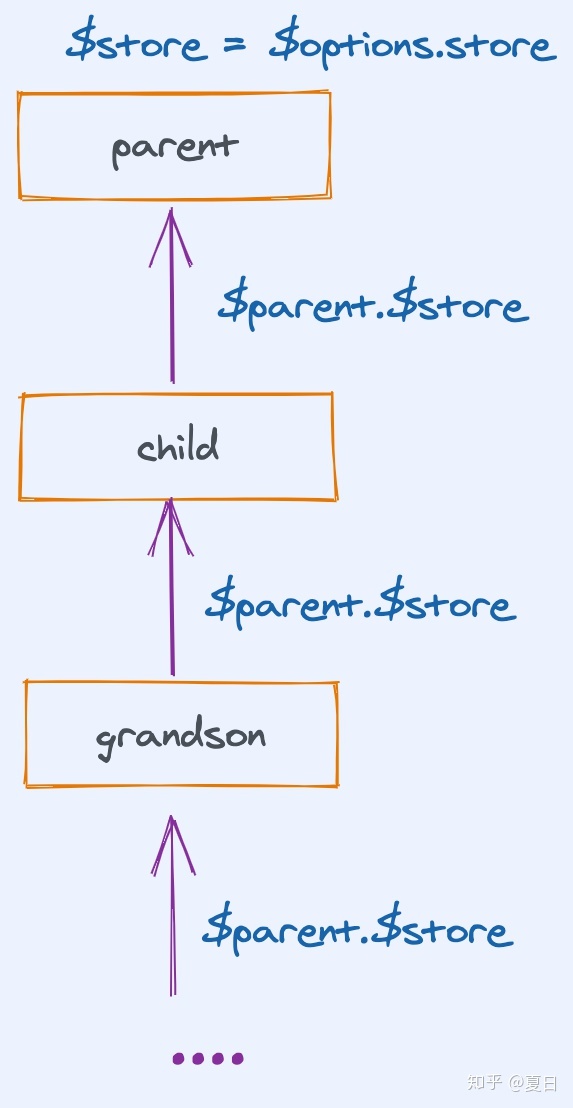
子组件在调用beforeCreate函数时,都会使用其父组件的$store属性作为自己的$store属性,而根实例会在实例化时我们手动传入store属性。这样使每个组件都拥有了$store属性
依赖收集
在Vuex中可以将state,actions,mutatoins等属性根据模块modules进行划分,方便代码的维护。当然这会生成一个递归的树形结构对象,下面我们看看Vuex如何优雅的处理递归树形结构数据。
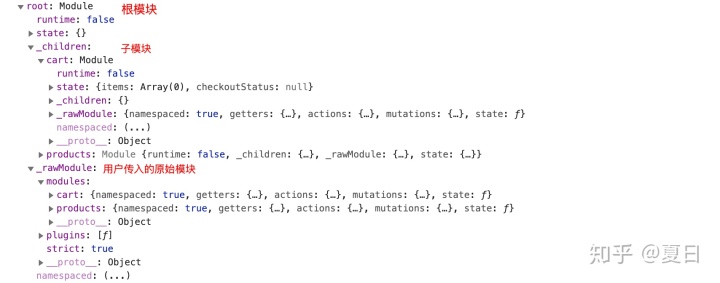
在Store拿到了用户传入的配置项之后,首先进行的操作是模块收集,其目的是将用户传入的配置项处理为更加方便的树形结构
用户传入:
处理之后:
// store.js
export class Store {
  constructor (options = {}) {
      // some code ...
      this._modules = new ModuleCollection(options);
      // some code ...
    }
}

// module-collection.js
export default class ModuleCollection {
  constructor (rawRootModule) {
    // register root module (Vuex.Store options)
    this.register([], rawRootModule, false)
  }

  register (path, rawModule, runtime = true) {
    // 格式化用户配置项,并为每个模块原型上添加一些公有方法,方便调用
    const newModule = new Module(rawModule, runtime);
    // 处理根模块
    if (path.length === 0) {
      this.root = newModule;
    } else { // 处理子模块
      // 通过path找到父模块
      const parent = this.get(path.slice(0, -1));
      // 将父模块的子模块赋值为当前遍历的模块,key为path的最后一项
      parent.addChild(path[path.length - 1], newModule);
      // parent._children[path[path.length-1]] = newModule
    }

    // register nested modules
    if (rawModule.modules) { // 递归处理子模块
      forEachValue(rawModule.modules, (rawChildModule, key) => {
        this.register(path.concat(key), rawChildModule, runtime);
      });
    }
  }
}
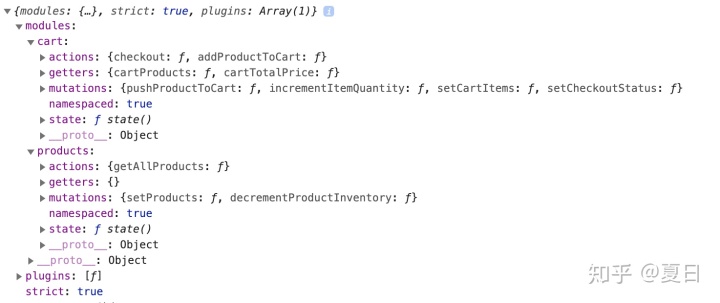
到这里我们将配置项处理为了比较方便的结构,并且每个模块也通过Module类提供了一些原型方法方便直接调用:
{ root:
  {
    state: {},
    _children:{},
    _rawModule: {},
    __proto__: {
      addChild: f,
      forEachMutation: f,
      forEachAction: f,
      ...
    }
  },
}
模块安装
通过模块收集将用户传入的选项处理为我们方便使用的树形结构后,需要为store实例添加用户要使用的state, getters, mutations, actions。
首先我们通过下图大概看一下Vuex整个安装模块的具体流程
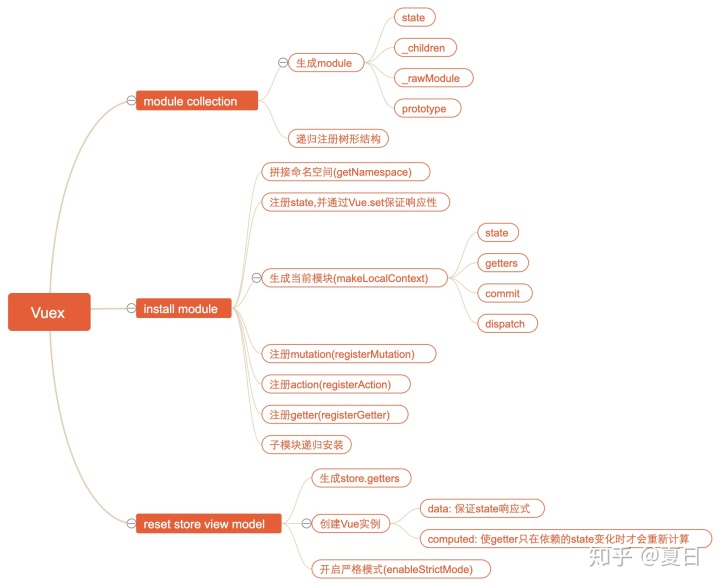
源码中通过installModule来递归的生成store实例需要的属性:
export class Store {
  constructor (options = {}) {
    // ...
    // 模块收集
    this._modules = new ModuleCollection(options);
    const state = this._modules.root.state;

    // init root module.
    // this also recursively registers all sub-modules
    // and collects all module getters inside this._wrappedGetters
    // 模块安装
    installModule(this, state, [], this._modules.root);
  }
}

function installModule (store, rootState, path, module, hot) {
  // 当path为空数组时,遍历的是根模块
  const isRoot = !path.length;
  // 根据path获取当前遍历模块的命名空间namespace
  const namespace = store._modules.getNamespace(path);
  // register in namespace map
  if (module.namespaced) {
    if (store._modulesNamespaceMap[namespace] && __DEV__) {
      console.error(`[vuex] duplicate namespace ${namespace} for the namespaced module ${path.join('/')}`);
    }
    // 在store上存储模块命名空间的映射,key为namespace,value为module
    // 每个模块都应该有自己单独的命名空间,方便检查命名空间是否重复并提醒用户
    store._modulesNamespaceMap[namespace] = module;
  }
  // set state
  if (!isRoot && !hot) {
    // 根据根state以及path找到对应的父state
    const parentState = getNestedState(rootState, path.slice(0, -1));
    // path的最后一项为当前处理的模块名
    const moduleName = path[path.length - 1];
    store._withCommit(() => {
      // 保证为state赋值时,值为响应式
      Vue.set(parentState, moduleName, module.state);
      // state => this._modules.root.state
      // store._vm = new Vue({
      //    data: {
      //        $$state: state
      //    }
      // })
      // store.state => store._vm._data.$$state
      // 所以store.state和state即this._modules.root.state指向同一片堆内存空间,堆内存的键值对发生变化时,会同步更新
    });
  }
  // 生成当前模块的state,getters,commit,dispatch
  // 方便之后在注册mutation,action,getter时使用当前模块的一些属性和方法:
  // 如在action中可以使用局部的commit,dispatch来调用当前模块的mutation和action
  const local = module.context = makeLocalContext(store, namespace, path);

  // 为store设置mutations
  module.forEachMutation((mutation, key) => {
    const namespacedType = namespace + key;
    registerMutation(store, namespacedType, mutation, local);
  });

  module.forEachAction((action, key) => {
    const type = action.root ? key : namespace + key;
    const handler = action.handler || action;
    registerAction(store, type, handler, local);
  });

  module.forEachGetter((getter, key) => {
    const namespacedType = namespace + key;
    registerGetter(store, namespacedType, getter, local);
  });

  module.forEachChild((child, key) => {
    installModule(store, rootState, path.concat(key), child, hot);
  });
}
installModule方法做了以下事情:
- 计算当前模块的命名空间
- 生成
this._module.root.state并具有响应式 - 注册
mutations - 注册
actions - 注册
getters - 继续递归注册
在执行完成installModule后,store大概结构如下:
const store = {
  "_mutations": {
    "cart/pushProductToCart": [
      function handler() {}
    ],
  },
  "_actions": {
    "cart/addProductToCart": [
      function handler() {}
    ],
  },
}
需要注意的是,此时并没有将state和getters关联到store中,真正将其关联的方法在resetStoreVM中:
function resetStoreVM (store, state, hot) {
  // bind store public getters
  store.getters = {};
  // reset local getters cache
  store._makeLocalGettersCache = Object.create(null);
  const wrappedGetters = store._wrappedGetters;
  const computed = {};
  forEachValue(wrappedGetters, (fn, key) => {
    // use computed to leverage its lazy-caching mechanism
    // direct inline function use will lead to closure preserving oldVm.
    // using partial to return function with only arguments preserved in closure environment.
    // 将getter放到计算属性中
    computed[key] = partial(fn, store);
    // store.getters中的属性从store中创建的 vue instance 中获取
    Object.defineProperty(store.getters, key, {
      get: () => store._vm[key],
      enumerable: true // for local getters
    });
  });

  // 通过创建Vue实例,然后将store.state定义在Vue的data中,保证state的响应性
  // 将getters放入到计算属性中,在从getters中取值时会从store._vm中获取
  store._vm = new Vue({
    data: {
      // 以_或者 $ 开头的属性,将不会被代理在Vue实例上,因为它们可能与Vue内部的属性和API方法发生冲突
      // 您必须像vm.$data._property一样访问它们
      $$state: state
    },
    computed
  });
  Vue.config.silent = silent;

  // enable strict mode for new vm
  if (store.strict) {
    // 启用严格模式,当通过mutation异步更改state时会报错
    enableStrictMode(store);
  }
}
在store中我们使用get语法来定义state:
class Store {
  // ...
  get state () {
    return this._vm._data.$$state;
  }
  // ...
}

const state = this._modules.root.state;

store._vm = new Vue({
  data: {
    // 以_或者 $ 开头的属性,将不会被代理在Vue实例上,因为它们可能与Vue内部的属性和API方法发生冲突
    // 您必须像vm.$data._property一样访问它们
    $$state: state
  },
  computed
});
这样我们获取store.state的值时,相当于从this._modules.root.state中获取值,通过Vue当中间层,实现了state的响应性,保证数据和视图的同步更新。
Store提供的方法
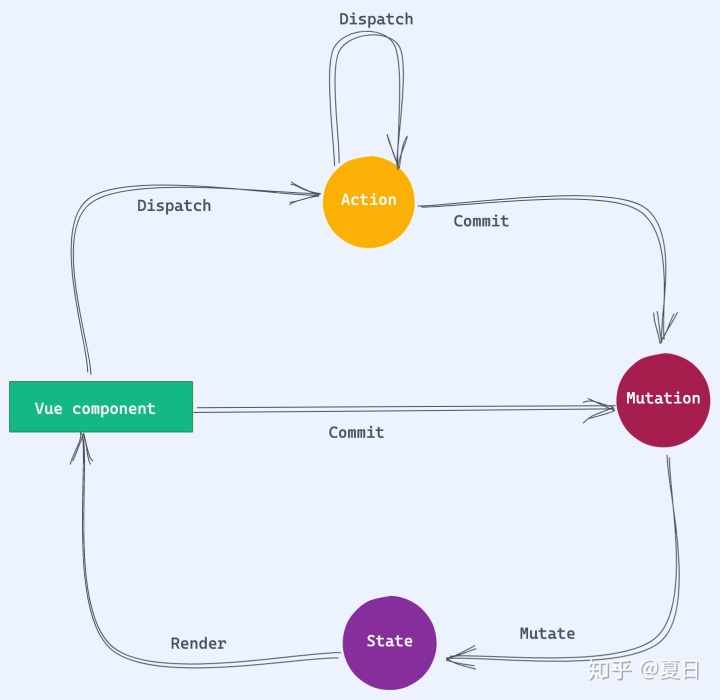
Store中提供的最常用的方法是commit和dispatch,分别用来提交mutation和派发action。它们与state和组件之间的关系如下:
commit
commit方法的主要逻辑是根据传入的type来执行对应的所有mutations中用户传入的函数
commit (_type, _payload, _options) {
  // check object-style commit
  const {
    type,
    payload,
    options
  } = unifyObjectStyle(_type, _payload, _options);

  // 插件调用subscribe方法是回调函数的参数
  const mutation = { type, payload };
  const entry = this._mutations[type];
  if (!entry) {
    if (__DEV__) {
      console.error(`[vuex] unknown mutation type: ${type}`);
    }
    return;
  }
  // 用_withCommit包裹来判断是否同步更改state
  this._withCommit(() => {
    // commit时调用mutation,参数为payload
    entry.forEach(function commitIterator (handler) {
      handler(payload);
    });
  });

  // 调用commit更改state时,调用所有插件中订阅的方法
  this._subscribers
    .slice() // shallow copy to prevent iterator invalidation if subscriber synchronously calls unsubscribe
    .forEach(sub => sub(mutation, this.state));
}
上述代码中,我们看到Vuex并没有直接执行mutations中的函数,而是通过将执行过程放入函数中,并作为参数传到了_withCommit方法中。下面我们看看_withCommit方法做了些什么
class Store {
  construtor() {
    // ... some code
    this._committing = false;
  }

  _withCommit (fn) {
    const committing = this._committing;
    this._committing = true;
    fn();
    this._committing = committing;
  }
}

// 启用严格模式
function enableStrictMode (store) {
  // 该操作是十分昂贵的,所以需要在生产环境禁用
  // 同步深度监听store中state的变化,当state改变没有通过mutation时,会抛出异常
  store._vm.$watch(function () { return this._data.$$state; }, () => {
    if (__DEV__) {
      assert(store._committing, `do not mutate vuex store state outside mutation handlers.`);
    }
  }, { deep: true, sync: true });
}
在开启严格模式后,store将会利用Vue提供的$watch方法深度同步监听this._data.$$state的变化,也就是在store的state发生变化时立即触发第二个参数对应的回调函数。
如果mutations会异步更改state,那么在异步更改state之前会先执行this._committing = false。此时assert(store.__committing)会由于断言失败,进行提示。当mutations同步更改state时,在state更改完成后,才会将this._committing更改为false,assert(store._committing)会一直断言成功,不会进行提示。
这样在用户通过mutation异步更改state就会在控制台报错。
dispatch
Vuex中通过Promise来处理异步的action。在注册action的时候,会将action的返回值强行转换为Promise实例,方便在dispatch时处理。
// 在注册action时,会将action的返回值通过Promise.resolve(res)处理成promise,并返回
function registerAction (store, type, handler, local) {
  const entry = store._actions[type] || (store._actions[type] = []);
  entry.push(function wrappedActionHandler (payload) {
    let res = handler.call(store, {
      // 当前模块的dispatch,会帮用户拼接命名空间。当传入第三个参数 { root: true },调用全局的dispatch
      dispatch: local.dispatch,
      // 当前模块的commit, 会帮用户拼接命名空间
      commit: local.commit,
      // 当前模块的getters, 会从命名空间中将当前的getter进行分离
      getters: local.getters,
      // 通过path获取到当前模块的state
      state: local.state,
      // 全局的getters
      rootGetters: store.getters,
      // 全局的state
      rootState: store.state
    }, payload);
    if (!isPromise(res)) {
      // 返回值不是Promise的话通过Promise.resolve转换为Promise
      res = Promise.resolve(res);
    }
    if (store._devtoolHook) {
      return res.catch(err => {
        store._devtoolHook.emit('vuex:error', err);
        throw err;
      });
    } else {
      return res;
    }
  });
}
dispatch的主要思路是执行所有的异步action(这里的异步action表示的是返回值为Promise实例的函数):
Promise.all处理同一type的多个action(没有设置命名空间)- 同一个
type只有一个action,直接获取action执行后的Promise实例
dispatch会返回一个新的Promise实例,该Promise实例拥有与action执行后返回的Promise实例相同的被解决的值value和被拒绝的原因reason
dispatch (_type, _payload) {
  // check object-style dispatch
  const {
    type,
    payload
  } = unifyObjectStyle(_type, _payload);

  const action = { type, payload };
  const entry = this._actions[type];
  // 执行所有的actions,actions中的函数会被处理成romise返回,当同一type有多个action时,通过Promise.all进行处理
  // 最终得到的result也是promise

  const result = entry.length > 1
    ? Promise.all(entry.map(handler => handler(payload)))
    : entry[0](payload);

  // 如果不用处理额外逻辑的话,可以直接将promise进行返回
  // return result;
  // 返回一个新的Promise,该Promise被解决的value是result的value,该Promise被拒绝的reason是result失败的reason
  return new Promise((resolve, reject) => {
    result.then(res => {
      // do something ...
      resolve(res);
    }, error => {
      // do something ...
      reject(error);
    });
  });
}
由于dispatch返回了一个Promise实例,所以我们可以通过调用它的.then方法来保证在dispatch派发的action的异步逻辑完成后做一些事情:
store.dispatch('type',payload)
.then(() => { // do someting on success},() => { // do something on failure})
动态注册模块
在Store被实例化之后,我们还可以通过registerModule来动态的为Store添加模块:
registerModule (path, rawModule, options = {}) {
  // path为字符串时将其处理为数组
  if (typeof path === 'string') path = [path];

  // 进行模块收集,根据path以及用户传入的选项
  // 根据path将其放到this._modules.root上
  this._modules.register(path, rawModule);
  // 将新加到this._modules.root上的模块通过path安装到store上
  installModule(this, this.state, path, this._modules.get(path), options.preserveState);
  // reset store to update getters...
  // 为store添加新注册的getters
  resetStoreVM(this, this.state);
}
模块动态注册与store首次处理用户传入的配置项的逻辑完全相同,只不过此时要指定path:
- 通过
this._modules.register进行模块收集,转换树形结构 - 将树形结构内容安装到
store中 - 通过
resetStoreVM将所有store.getters重新定义到Vue实例的computed属性中
此时,将会成功的为store重新注册一个新的模块,用户可以成功的访问它的state,并调用commit和dispatch方法来触发mutation和action
插件机制
Vuex中的插件会作为函数传入到plugins选项中:
const myPlugin = store => {
  // 在store被初始化的时候被调用
  store.subscribe((mutation, state) => {
    // 在每次执行mutation之后调用
    // mutation的格式为 `{ type, payload }`.
  })
}

const store = new Vuex.Store({
  // ...
  plugins: [myPlugin]
})
plugins值为数组,而数组中的每一项即为Vuex的插件。其本质上就是一个函数,只不过函数会接受一个参数,该参数为Store的实例,插件的编写者可以调用实例中的方法和属性。
下面我们通过编写一个简化版的logger插件来学习plugins的相关源码:
function logger (store) {
  let prevState = JSON.parse(JSON.stringify(store.state));
  // 每次修改state时分别打印之前记录前一次和下一次的state
  store.subscribe((mutation, state) => {
    console.log('prevState', prevState);
    const nextState = JSON.parse(JSON.stringify(state));
    console.log('nextState', nextState);
    prevState = nextState;
  });
}

const store = new Vuex.Store({
  // ...
  plugins: [logger]
})
我们整理一下源码中有关插件的代码:
class Store {
  constructor(options) {
    const {
      plugins = [], // 配置项中的插件选项,默认值为空对象
      strict = false
    } = options;

    this._subscribers = [];
    // 依次执行插件数组中的每个函数,参数为Store实例this,可以调用store的属性和方法
    plugins.forEach(plugin => plugin(this));
  }

  subscribe (fn, options) {
    return genericSubscribe(fn, this._subscribers, options);
  }

  commit (_type, _payload, _options) {
    // some code ...
    // 调用commit更改state时,调用所有插件中订阅的方法
    this._subscribers
      .slice() // shallow copy to prevent iterator invalidation if subscriber synchronously calls unsubscribe
      .forEach(sub => sub(mutation, this.state));
    // some code ...
  }
}

function genericSubscribe (fn, subs, options) {
  // 如果fn在subs中不存在,options中传入{ prepend: true }会将fn放到subs的第一项
  // 否则会将fn放入到subs中的最后一项
  if (subs.indexOf(fn) < 0) {
    options && options.prepend
      ? subs.unshift(fn)
      : subs.push(fn);
  }
  // 会返回取消订阅(unsubscribe)函数,将fn从subs中删除,这样在调用mutation的时候就不会触发fn
  return () => {
    const i = subs.indexOf(fn);
    if (i > -1) {
      subs.splice(i, 1);
    }
  };
}
在store的constructor中,会执行plugins中传入的每一个函数,并将store实例作为参数传入。
在插件中调用store.subscribe(fn)会为_subscribers数组添加fn到最后一项,并返回一个取消订阅函数,执行后会将fn从_subscribers中删除。
之后在调用store的commit方法时,会执行_subscribers数组中的所有方法,并传入参数mutation以及store.state,这样用户可以通过mutation拿到当前{ type , payload }以及调用commit方法更新后的store.state
到这里我们便实现了一个简单的logger插件,并且结合插件的具体实现理解了plugins相关的源码。
辅助函数
由于通过$store属性获取state以及调用mutation和action的代码比较冗余,Vuex为了简化用户在组件中使用state,getters,dispatch,commit,提供了一系列的辅助函数来帮我们少写一些代码:
// 从`vuex`中引入
import { mapState } from 'vuex'

export default {
  // ...
  computed: mapState({
    // arrow functions can make the code very succinct!
    count: state => state.count,

    // 与`state => state.count`的写法作用相同
    countAlias: 'count',

    // to access local state with `this`, a normal function must be used
    countPlusLocalState (state) {
      return state.count + this.localCount
    }
  }),
  mounted() {
    // 使用store中的state
    console.log(this.count);
    console.log(this.countPlusLocalState);
  }
}
这里以mapState为例,来看下Vuex中辅助函数的源码实现:
// 处理命名空间namespace和map的一些可能情况,并且在处理之后将namespace和map传递给回调函数fn
function normalizeNamespace (fn) {
  return (namespace, map) => {
    // 命名空间是选传的,如果命名空间不是字符串,那么说明只传了一个参数,将变量往后移,并且命名空间为''
    if (typeof namespace !== 'string') {
      map = namespace;
      namespace = '';
    } else if (namespace.charAt(namespace.length - 1) !== '/') {
      // 传入的命名空间如果没有/,帮用户补全
      namespace += '/';
    }
    // fn会通过命名空间以及map会返回一个对象,对象大概像这样:
    // res = {
    //   age() {
    //     // 当前命名空间的state中的age
    //     return state.age
    //   }
    // }
    return fn(namespace, map);
  };
}

// 将用户传入的map统一处理为[{key,val}]的格式
function normalizeMap (map) {
  // 不是数组或对象的话返回空数组
  if (!isValidMap(map)) {
    return [];
  }
  // 将数组和对象统一转换为数组
  // 数组: ['name','age'] => [{key:'name', val: 'name'}, {key:'age', val: 'age'}]
  // 对象: {a: 'name', b: 'age'} => [{key: 'a', val: 'name'}]
  return Array.isArray(map)
    ? map.map(key => ({ key, val: key }))
    : Object.keys(map).map(key => ({ key, val: map[key] }));
}

function getModuleByNamespace (store, helper, namespace) {
  // 在安装模块的时候将命名空间与模块进行了映射,在这里可以通过命名空间获取到模块
  const module = store._modulesNamespaceMap[namespace];
  return module;
}
function installModule (store, rootState, path, module, hot) {
  // some code ...
  // 根据path获取当前遍历模块的命名空间namespace
  const namespace = store._modules.getNamespace(path);

  // register in namespace map
  if (module.namespaced) {
    if (store._modulesNamespaceMap[namespace] && __DEV__) {
      console.error(`[vuex] duplicate namespace ${namespace} for the namespaced module ${path.join('/')}`);
    }
    // 在store上存储模块命名空间的映射,key为namespace,value为module
    // 每个模块都应该有自己单独的命名空间,方便检查命名空间是否重复并提醒用户
    // 也方便之后在辅助函数中通过命名空间来获取到其对应的模块
    store._modulesNamespaceMap[namespace] = module;
  }

  // 为module.context赋值,方便之后在辅助函数中从module通过context来获取当前模块的state,getters,dispatch,action
  const local = module.context = makeLocalContext(store, namespace, path);
  // some code ...
}


export const mapState = normalizeNamespace((namespace, states) => {
  const res = {};
  // [{key:'name', val: 'name'}, {key:'age', val: 'age'}]
  normalizeMap(states).forEach(({ key, val }) => {
    res[key] = function mappedState () {
      let state = this.$store.state;
      let getters = this.$store.getters;
      if (namespace) { // 如果传入了命名空间
        const module = getModuleByNamespace(this.$store, 'mapState', namespace);
        if (!module) {
          return;
        }
        // 当前命名空间模块的state
        state = module.context.state;
        // 当前命名空间模块的getters
        getters = module.context.getters;
      }
      return typeof val === 'function'
        ? val.call(this, state, getters)
        : state[val];
    };
  });
  // res = {
  //   age() {
  //     // 当前命名空间的state中的age
  //     return state.age
  //   }
  // }
  return res;
});
mapState的核心逻辑如下:
- 处理用户传入的
namespace和map,为namespace补充/,以及处理没有传入namespace的情况 - 通过序列化后的
namespace将map组合成Vue中计算属性支持的对象格式 - 将处理好的对象返回
我们可以将代码简化一下,使用伪代码来看一下mapState的实际流程:
function mapState(namesapce,map) {
  // 处理命名空间,并将map转换为Vue中computed支持的对象格式
  // ...
  return {
    age() {
      // 通过命名空间获取到对应模块的state,然后取到map中的属性返回
      // ...
      return state.age
    }
  }
}
mapState(['a','b'], ['age'])
结语
到这里,我们已经基本讲解完了Vuex的核心源码。当然源码中还有很多文中未提到的知识点,需要小伙伴们真正打开源码去探索,希望笔者的分享能对小伙伴们阅读源码有一些帮助和启发。

前往低代码交流专区
更多推荐

 0
0 0
0- 0


 已为社区贡献2条内容

所有评论(0)