
卷积神经网络 tensorflow_手把手教你使用TensorFlow搭建卷积神经网络(内附代码)...
新手小白,如有错误请及时指出。如果觉得写得好,不妨点个赞,欢迎大家来交流。MagaretJi/TensorFlowgithub.com学了这么长时间的TensorFlow框架,最大的感触就是一切代码只是工具,学会使用工具才是开启深度学习大门的第一步。今天的文章主要内容是介绍如何使用TensorFlow搭建一个卷积神经网络,我们以MNIST数据集为例搭建一个卷积神经网络识别手写数字。学了这么长时间

新手小白,如有错误请及时指出。如果觉得写得好,不妨点个赞,欢迎大家来交流。
MagaretJi/TensorFlowgithub.com
学了这么长时间的TensorFlow框架,最大的感触就是一切代码只是工具,学会使用工具才是开启深度学习大门的第一步。
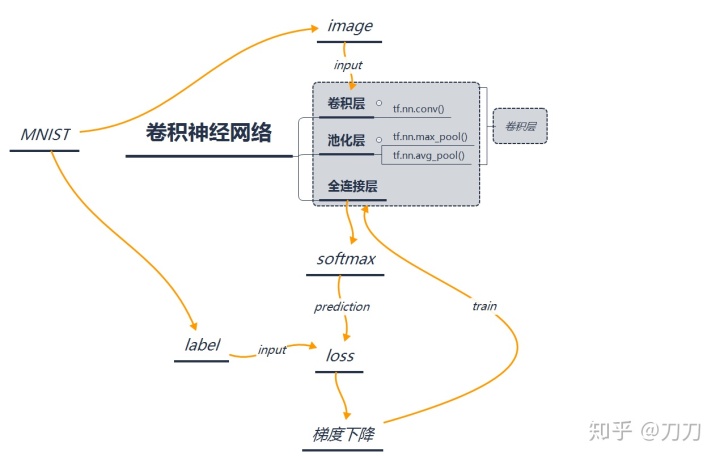
今天的文章主要内容是介绍如何使用TensorFlow搭建一个卷积神经网络,我们以MNIST数据集为例搭建一个卷积神经网络识别手写数字。学了这么长时间的TensorFlow框架,最大的感触就是一切代码只是工具,学会使用工具才是开启深度学习大门的第一步。
今天的文章主要内容是介绍如何使用TensorFlow搭建一个卷积神经网络,我们以MNIST数据集为例搭建一个卷积神经网络识别手写数字。
代码如下:
Step1 导入库
import tensorflow as tf
from tensorflow.examples.tutorials.mnist import input_data
Step2 两个占位符
with tf.name_scope('input'):
    x=tf.placeholder(tf.float32,shape=[None,784],name='x_input')
    y=tf.placeholder(tf.float32,shape=[None,10],name='y_input')
why shape=[None,784]?
这需要去研究MNIST数据集,我们了解到MNIST数据集是由60000张训练图片和10000张测试图片构成的。每张图片由28 * 28 *1(height *width *channel)个像素组成。
说明:
- 在创建占位符placeholder时,我们将三维数字转为一维数组即28 * 28 *1=784
- None:因为placeholder与feed_dict配合传入数据。我们不知道传入的batch大小为多少所以设置为None。
Step3 权重
def weight_variable(shape):
    initial=tf.truncated_normal(shape,stddev=0.1)#正态分布
    return tf.Variable(initial)
Step4 偏置
def Step5 创建卷积操作
def conv(x,W):
#x:[batch,in_height,in_width,in_channels]
#w:[height,width,in_channesl,out_channels]
#strides:strides[0]=strides[3]=1,strides[1]=x步长,strides[2]=y步长
#paddings:SAME,VALID

    return tf.nn.conv2d(x,W,strides=[1,1,1,1],padding='SAME')
说明:
tf.nn.conv2d(x,w,strides,paddings)
- x:图像数据
- w:权重
- strides:步长
- paddings:填充
Step6 创建池化操作
def max_pool_2x2(x):
    return tf.nn.max_pool(x,ksize=[1,2,2,1],strides=[1,2,2,1],padding='SAME')
说明:
tf.nn.max_pool(x,ksize,strides,paddings)
- x: 图像数据
- ksize: 池化矩阵窗口
- strides: 步长
- paddings: 填充
reshape 图像
x_image=tf.reshape(x,shape=[-1,28,28,1])why reshape?
- 之前设置的占位符大小为784,但是我们将图像传入卷积神经网络的时候需要四维的tensor,见tf.nn.conv(x,,,)x的第一维是batch size,第二维,三维,四维分别是height,width和channel。所以需要reshape成[-1,28,28,1],其中-1是batch size,1是channel。
Step6 创建第一个卷积层
with tf.name_scope('conv1'):
    conv1=conv(x_image,weight_variable([5,5,1,32]))#5*5的采样窗口,32个卷积核从一个平面提取特征
    bias1=bias_variable([32])#每个卷积核一个偏值
    relu1=tf.nn.relu(conv1+bias1)
    pool1=max_pool_2x2(relu1)
why weight_variable([5,5,1,32]?
- 5*5是卷积核的大小,1是输入channel,32为32个卷积核,即输出32个图像特征。
why bias_variable([32])?
- 每个卷积核需要一个偏置值,所以这边的卷积核个数是32,即偏置值的个数也为32。
Step7 创建第二个卷积层
with tf.name_scope('conv2'):
    conv2=conv(pool1,weight_variable([5,5,32,64]))
    bias2=bias_variable([64])
    relu2=tf.nn.relu(conv2+bias2)
    pool2=max_pool_2x2(relu2)
Step8 创建第一层全连接
with tf.name_scope('full_connect1'):
    pool2_flat=tf.reshape(pool2,[-1,7*7*64])
    W_fc1=weight_variable([7*7*64,1024])
    b_fc1=bias_variable([1024])
    fc1=tf.nn.relu(tf.matmul(pool2_flat,W_fc1)+b_fc1)
why weight_variable([7 * 7 * 64,1024])?
- 这里我们计算了前一层神经元的个数为7 * 7 * 64,设置后一层的个数是1024。
why tf.reshape(pool2,[-1,7 * 7 * 64])?
- -1即任意值也就是batch size,7 * 7 * 64将三维降到一维实现了全连接神经网络。
Step9 创建第二层全连接
with tf.name_scope('full_connect2'):
    W_fc2=weight_variable([1024,10])
    b_fc2=bias_variable([10])
    with tf.name_scope('prediction'):
        prediction=tf.nn.softmax(tf.matmul(fc1_dropout,W_fc2)+b_fc2,name='prediction')
这里就结束了我们的卷积神经网络的搭建。
Step10 Loss 梯度下降 准确率的定义
with tf.name_scope('loss'):
    cross_entropy=tf.reduce_mean(tf.nn.softmax_cross_entropy_with_logits(labels=y,logits=prediction))
    tf.summary.scalar('loss', cross_entropy)
with tf.name_scope('train_step'):
    train_step=tf.train.AdamOptimizer(1e-4).minimize(cross_entropy)
with tf.name_scope('correct_prediction'):
    correct_prediction=tf.equal(tf.argmax(prediction,1),tf.argmax(y,1))
with tf.name_scope('accuracy'):
    accuracy=tf.reduce_mean(tf.cast(correct_prediction,tf.float32))
    tf.summary.scalar('accuracy',accuracy)
Step11 训练前准备
mnist=input_data.read_data_sets('./MNIST',one_hot=True)
batch_size=100
n_batch=mnist.train.num_examples//batch_size
init=tf.global_variables_initializer()
Step 12 开始训练
with tf.Session()as sess:
    sess.run(init)
    writer=tf.summary.FileWriter('./logs',sess.graph)
    for epoch in range(50):
        for _ in range(n_batch):
            batch_xs,batch_ys=mnist.train.next_batch(batch_size)
            summary,_=sess.run([merge,train_step],feed_dict={x:batch_xs,y:batch_ys,keep_prob:1.0})

        writer.add_summary(summary,epoch)
        acc=sess.run(accuracy,feed_dict={x:mnist.test.images,y:mnist.test.labels,keep_prob:1.0})
        print('Iter'+str(epoch)+',accuracy'+str(acc))
总结

瓜分20万奖金 获得内推名额 丰厚实物奖励 易参与易上手
更多推荐

 1
1 0
0- 0


 已为社区贡献2条内容

所有评论(0)