ImageView和Glide的ScaleType
1 先看ImageView的ScaleType原始图像如下分为三大类, 分别是MATRIX, 需要与ImageView的setImageMatrix配合使用FIT家族, 分别有: FIT_XY,FIT_START,FIT_CENTER,FIT_ENDCENTER家族, 分别有CENTER,CENTER_CORP,CENTER_INSIDE依次介绍效果1.1 CENTER家族1.1.1 CENTER
1 先看ImageView的ScaleType
原始图像如下

分为三大类, 分别是
- MATRIX, 需要与ImageView的setImageMatrix配合使用
- FIT家族, 分别有: FIT_XY,FIT_START,FIT_CENTER,FIT_END
- CENTER家族, 分别有CENTER,CENTER_CORP,CENTER_INSIDE
依次介绍效果
1.1 CENTER家族
1.1.1 CENTER
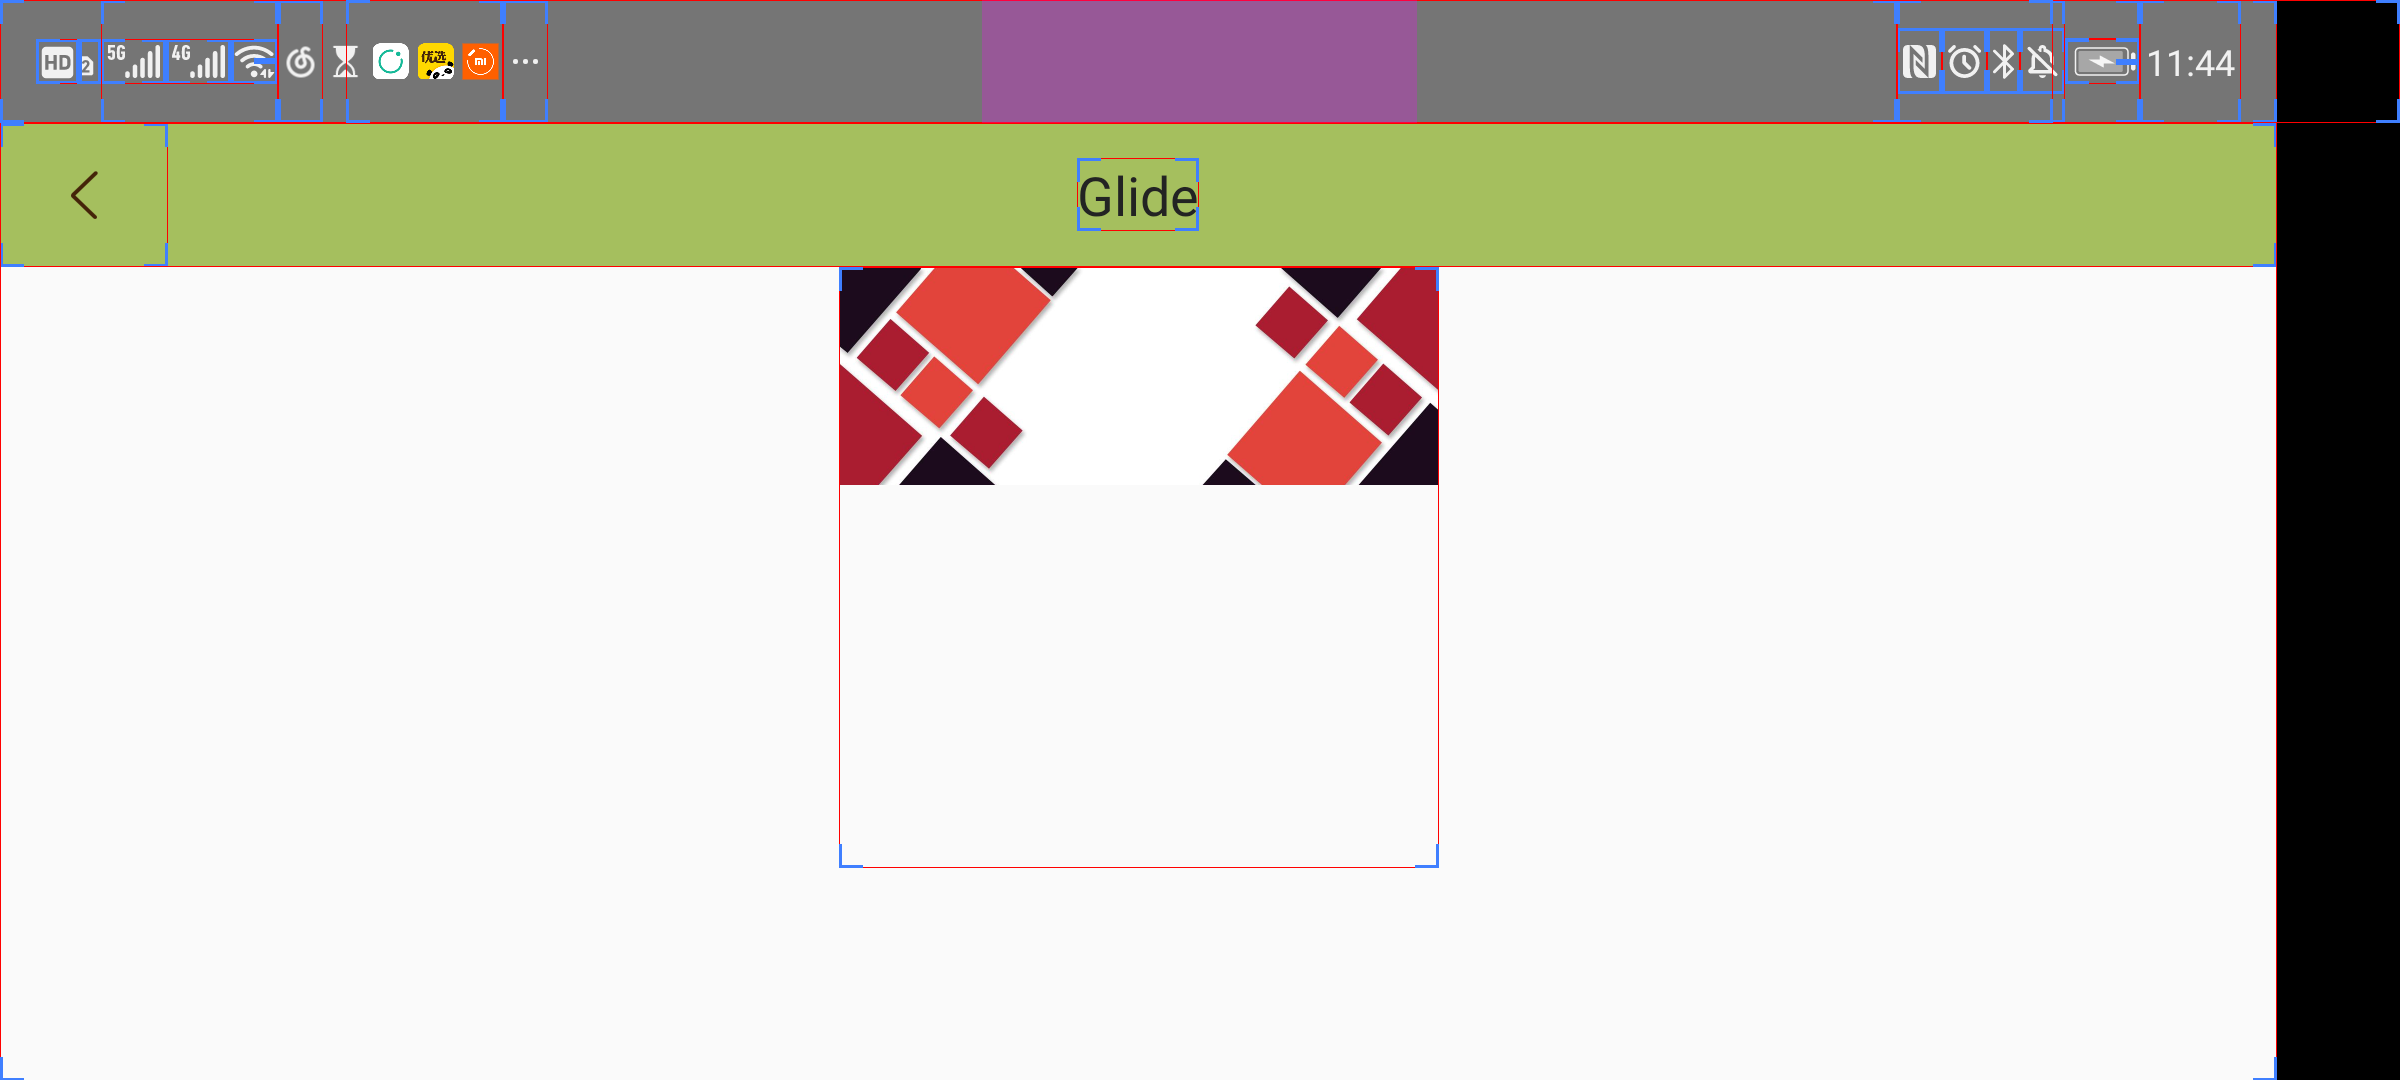
center是最老实的显示方式, 表示将Bitmap进行老老实实居中显示, 也不放大, 也不缩小. 控件比Bitmap大, Bitmap就留白显示; 控件比Bitmap小, 就裁剪.
<ImageView
    android:id="@+id/iv_1"
    android:scaleType="center"
    android:layout_height="200dp"
    android:layout_marginTop="20dp"
    android:layout_width="200dp"
    android:src="@drawable/scale_bg" />
效果

<ImageView
    android:id="@+id/iv_1"
    android:scaleType="center"
    android:layout_height="700dp"
    android:layout_marginTop="20dp"
    android:layout_width="200dp"
    android:src="@drawable/scale_bg" />

我们看Bitmap的原理也可以看到, 只是将图像屏蔽到了View的中间, 没有做任何的缩放动作
// Center bitmap in view, no scaling.
mDrawMatrix = mMatrix;
mDrawMatrix.setTranslate(Math.round((vwidth - dwidth) * 0.5f),
                        Math.round((vheight - dheight) * 0.5f));
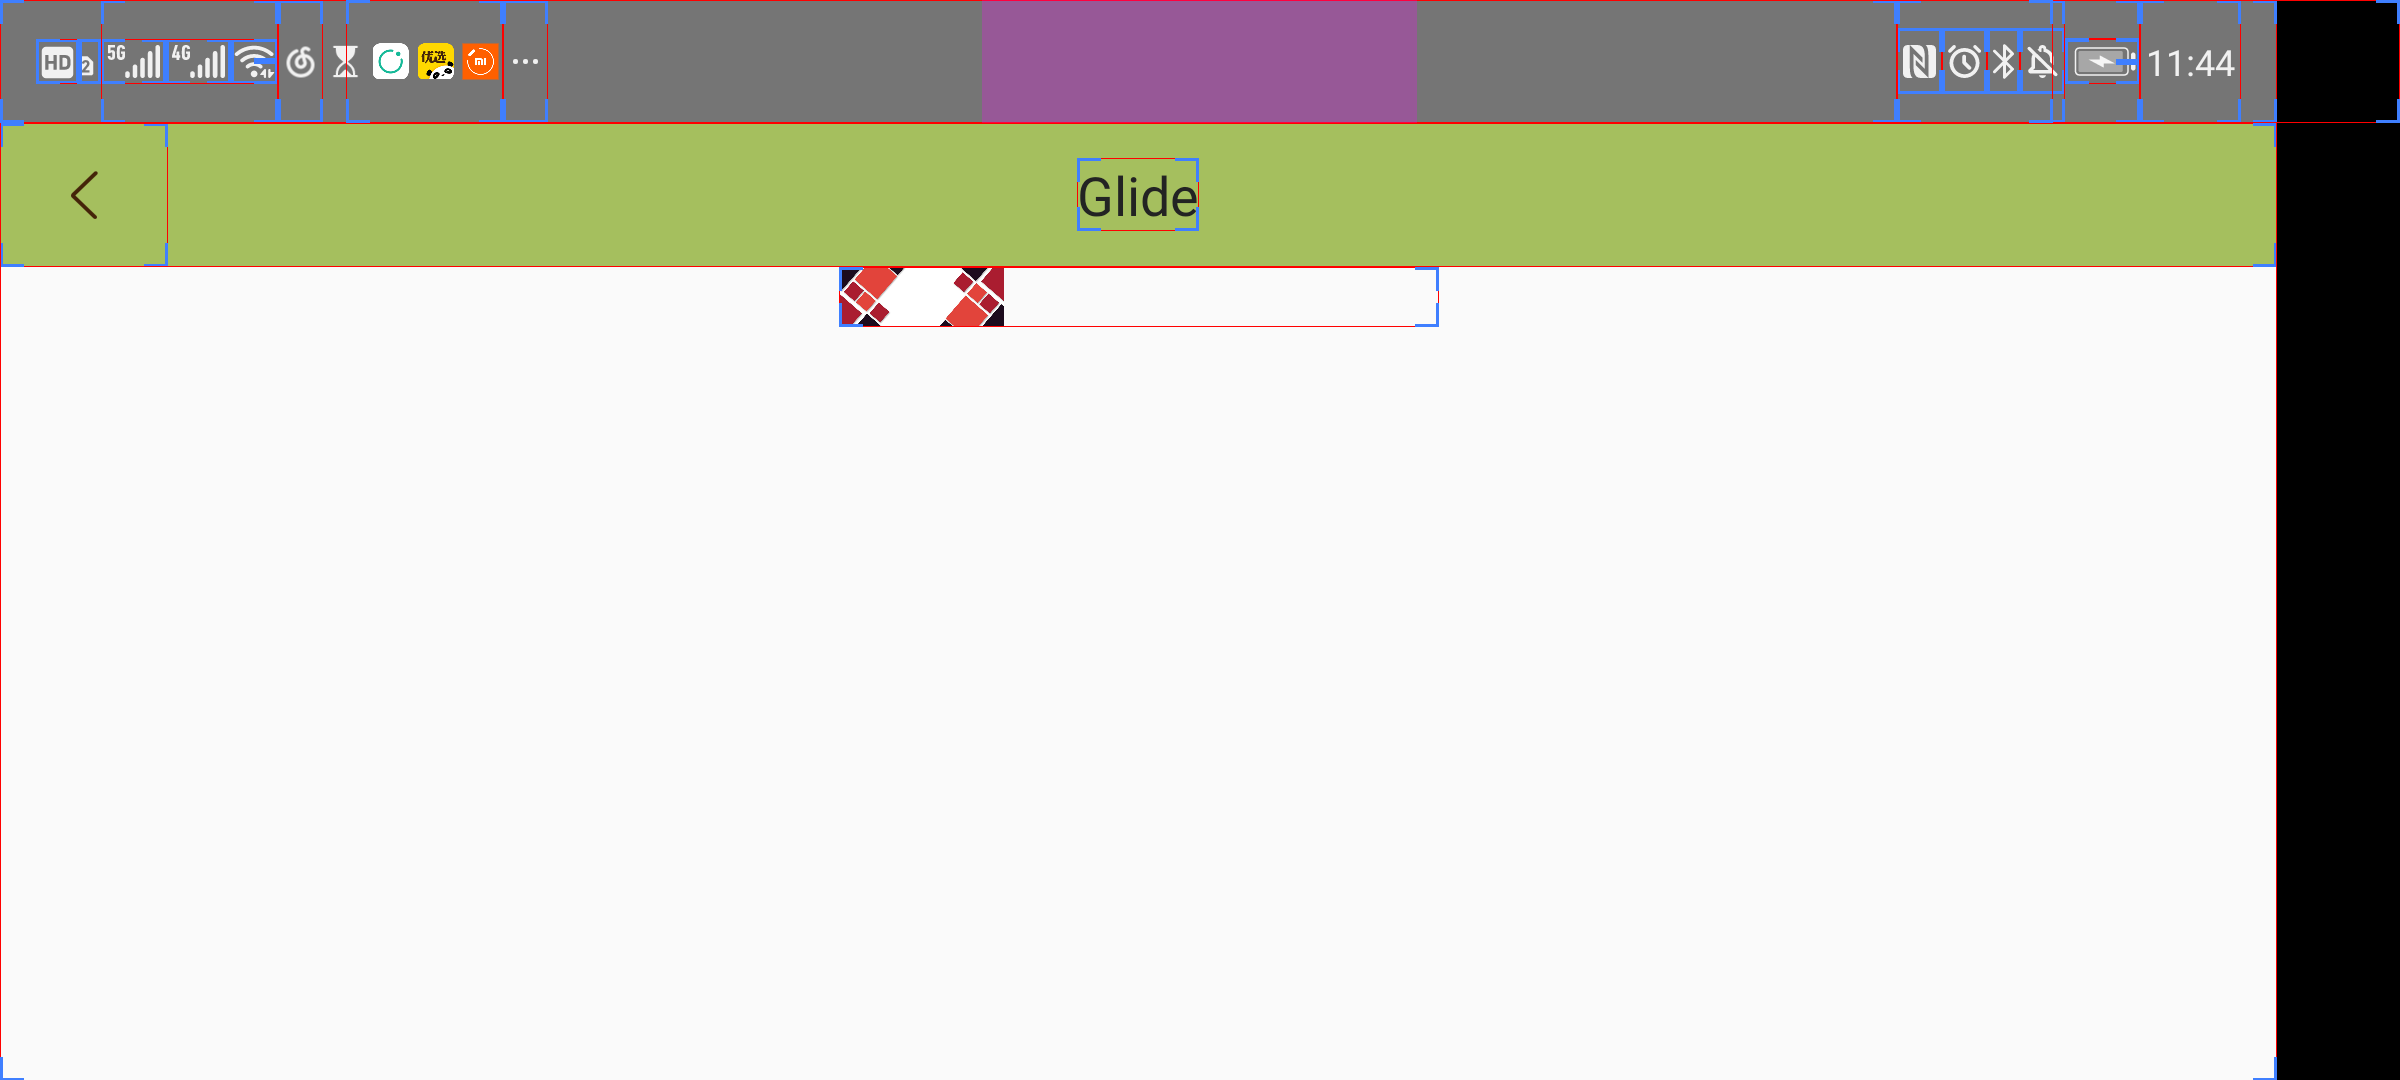
1.1.2 CENTER_CORP
center_corp, 是将图像从View中间开始长宽等比例放大\缩小, 直到View的所有区域都被覆盖掉. 此时必然有一个方向(长\宽)是显示完全的图像 然后很可能会有一个方向的图像被裁剪掉(除非图像和View的比例完全一样), 所以命名叫center_corp, corp有裁剪的意思
<ImageView
    android:id="@+id/iv_1"
    android:scaleType="centerCrop"
    android:layout_height="200dp"
    android:layout_width="100dp"
    android:src="@drawable/scale_bg" />
显示效果, 就看到x方向被裁剪了一部分

看下显示源码
mDrawMatrix = mMatrix;
float scale;
float dx = 0, dy = 0;
if (dwidth * vheight > vwidth * dheight) {
    scale = (float) vheight / (float) dheight;
    dx = (vwidth - dwidth * scale) * 0.5f;
} else {
    scale = (float) vwidth / (float) dwidth;
    dy = (vheight - dheight * scale) * 0.5f;
}
mDrawMatrix.setScale(scale, scale);
mDrawMatrix.postTranslate(Math.round(dx), Math.round(dy));
1.1.3 CENTER_INSIDE
center_inside是图像从View中心长宽等比例缩放, 直到Bitmap显示完全, 如果图像的大小本身就小于View的大小,那就不缩放了. 此时, View的部分区域可能会空白显示(除非View和Bitmap的长宽比例一致), 所以命名为CENTER_INSIDE. 图像一定在View的中间. center_inside是ImageView的默认显示
<ImageView
    android:id="@+id/iv_1"
    android:scaleType="centerInside"
    android:layout_height="200dp"
    android:layout_width="100dp"
    android:src="@drawable/scale_bg" />

看源码:
mDrawMatrix = mMatrix;
float scale;
float dx;
float dy;
if (dwidth <= vwidth && dheight <= vheight) {
    scale = 1.0f; //如果bitmap本身就小于View, 那么就不变化了, 此时和Center的效果一样
} else {
    scale = Math.min((float) vwidth / (float) dwidth,
    (float) vheight / (float) dheight);
}
dx = Math.round((vwidth - dwidth * scale) * 0.5f);
dy = Math.round((vheight - dheight * scale) * 0.5f);
mDrawMatrix.setScale(scale, scale);
mDrawMatrix.postTranslate(dx, dy);
1.2 FIT家族
1.2.1 FIT_XY
FIT_XY, 这个最好记忆. bitmap的x和y方向发生不等比例的缩放, 直到和View的显示完全一致.
<ImageView
    android:id="@+id/iv_1"
    android:scaleType="fixXY"
    android:layout_height="200dp"
    android:layout_width="200dp"
    android:src="@drawable/scale_bg" />

看源码
mDrawable.setBounds(0, 0, vwidth, vheight);
mDrawMatrix = null;
1.2.2 FIT_START
FIT_START就是将bitmap进行等比例缩放, 直到显示完全, 然后放在start位置
<ImageView
    android:id="@+id/iv_1"
    android:scaleType="fitStart"
    android:layout_height="200dp"
    android:layout_width="200dp"
    android:src="@drawable/scale_bg" />
<ImageView
    android:id="@+id/iv_1"
    android:scaleType="fitStart"
    android:layout_height="200dp"
    android:layout_width="20dp"
    android:src="@drawable/scale_bg" />
fitstart的形变计算似乎在native的层, 没有找到源码, 看下注解吧
Compute a scale that will maintain the original src aspect ratio, but will also ensure that src fits entirely inside dst. At least one axis (X or Y) will fit exactly. START aligns the result to the left and top edges of dst.
1.2.3 FIT_CENTER
明白FIT_START, 那fit_center就很好理解了. 将图像进行缩放, 直到有一个方向撑满view. 只要bitmap有任意一边比view大下, fit_center与center_inside效果一样. 注意默认效果是fitCenter
<ImageView
    android:id="@+id/iv_1"
    android:scaleType="fitCenter"
    android:layout_height="200dp"
    android:layout_width="20dp"
    android:src="@drawable/scale_bg" />

看一下注释吧:
Compute a scale that will maintain the original src aspect ratio, but will also ensure that src fits entirely inside dst. At least one axis (X or Y) will fit exactly. The result is centered inside dst.
1.2.4 FIT_END
与fit_start效果相反, 不再过多介绍了
1.3 MATRIX家族
他家族就他自己, 简单而言, 如果你觉得预制的都不能满足你, 那你自己来定义形变, 他需要与配合使用
- 如果设置了matrix, 但是没有设置imageMatrix. 那么图像就不做任何的变换, 从start的位置开始绘制, 效果如下
<ImageView
    android:id="@+id/iv_1"
    android:scaleType="matrix"
    android:layout_height="400dp"
    android:layout_width="200dp"
    android:src="@drawable/scale_bg" />

- 设置maxtrix
        val matrix = Matrix().apply {
            this.postScale(0.5f,2f) //x方向缩小一倍, y方向放到一倍
            this.postTranslate(20f,30f) //x方向平移20px, y方向平移30px
        }
        binding.iv1.imageMatrix = matrix
看下效果

2 Glide的ScaleType
我们会经常用Glide与ImageView配合使用. Glide的用法这里不多介绍了.这里讲一下他的ScaleType.
Glide中有三个预制的ScaleType, 分别是 centerInside fitCenter centerCorp
要注意的是, 我们先把ImageView的ScaleType置为center. 至于为什么, 下一章再说
2.1 centerInside
class GlideActivity : BaseActivity() {
    companion object {
        fun start(context: Context) {
            val i = Intent(context, GlideActivity::class.java)
            context.startActivity(i)
        }

        const val IMAGE_URL = "https://timgsa.baidu.com/timg?image&quality=80&size=b9999_10000&sec=1594445689385&di=f531a3c27f1b67d3a6516b73fb4c87a5&imgtype=0&src=http%3A%2F%2Fbpic.588ku.com%2Fback_pic%2F05%2F73%2F27%2F115bc5b65f1d43e.jpg"
        const val IMAGE_URL_V1 = "http://img1.lukou.com/static/p/upload/icon/home_portal_2.png"
    }

    private lateinit var binding: ActivityGlideBinding
    override fun onActivityCreate(savedInstanceState: Bundle?) {
        logcat("load glide")
        Glide.with(this)
            .load(IMAGE_URL_V1)
            .centerInside()
            .into(binding.iv1)
    }

    override fun initContentView() {
        binding = DataBindingUtil.setContentView(this, R.layout.activity_glide)
    }
}
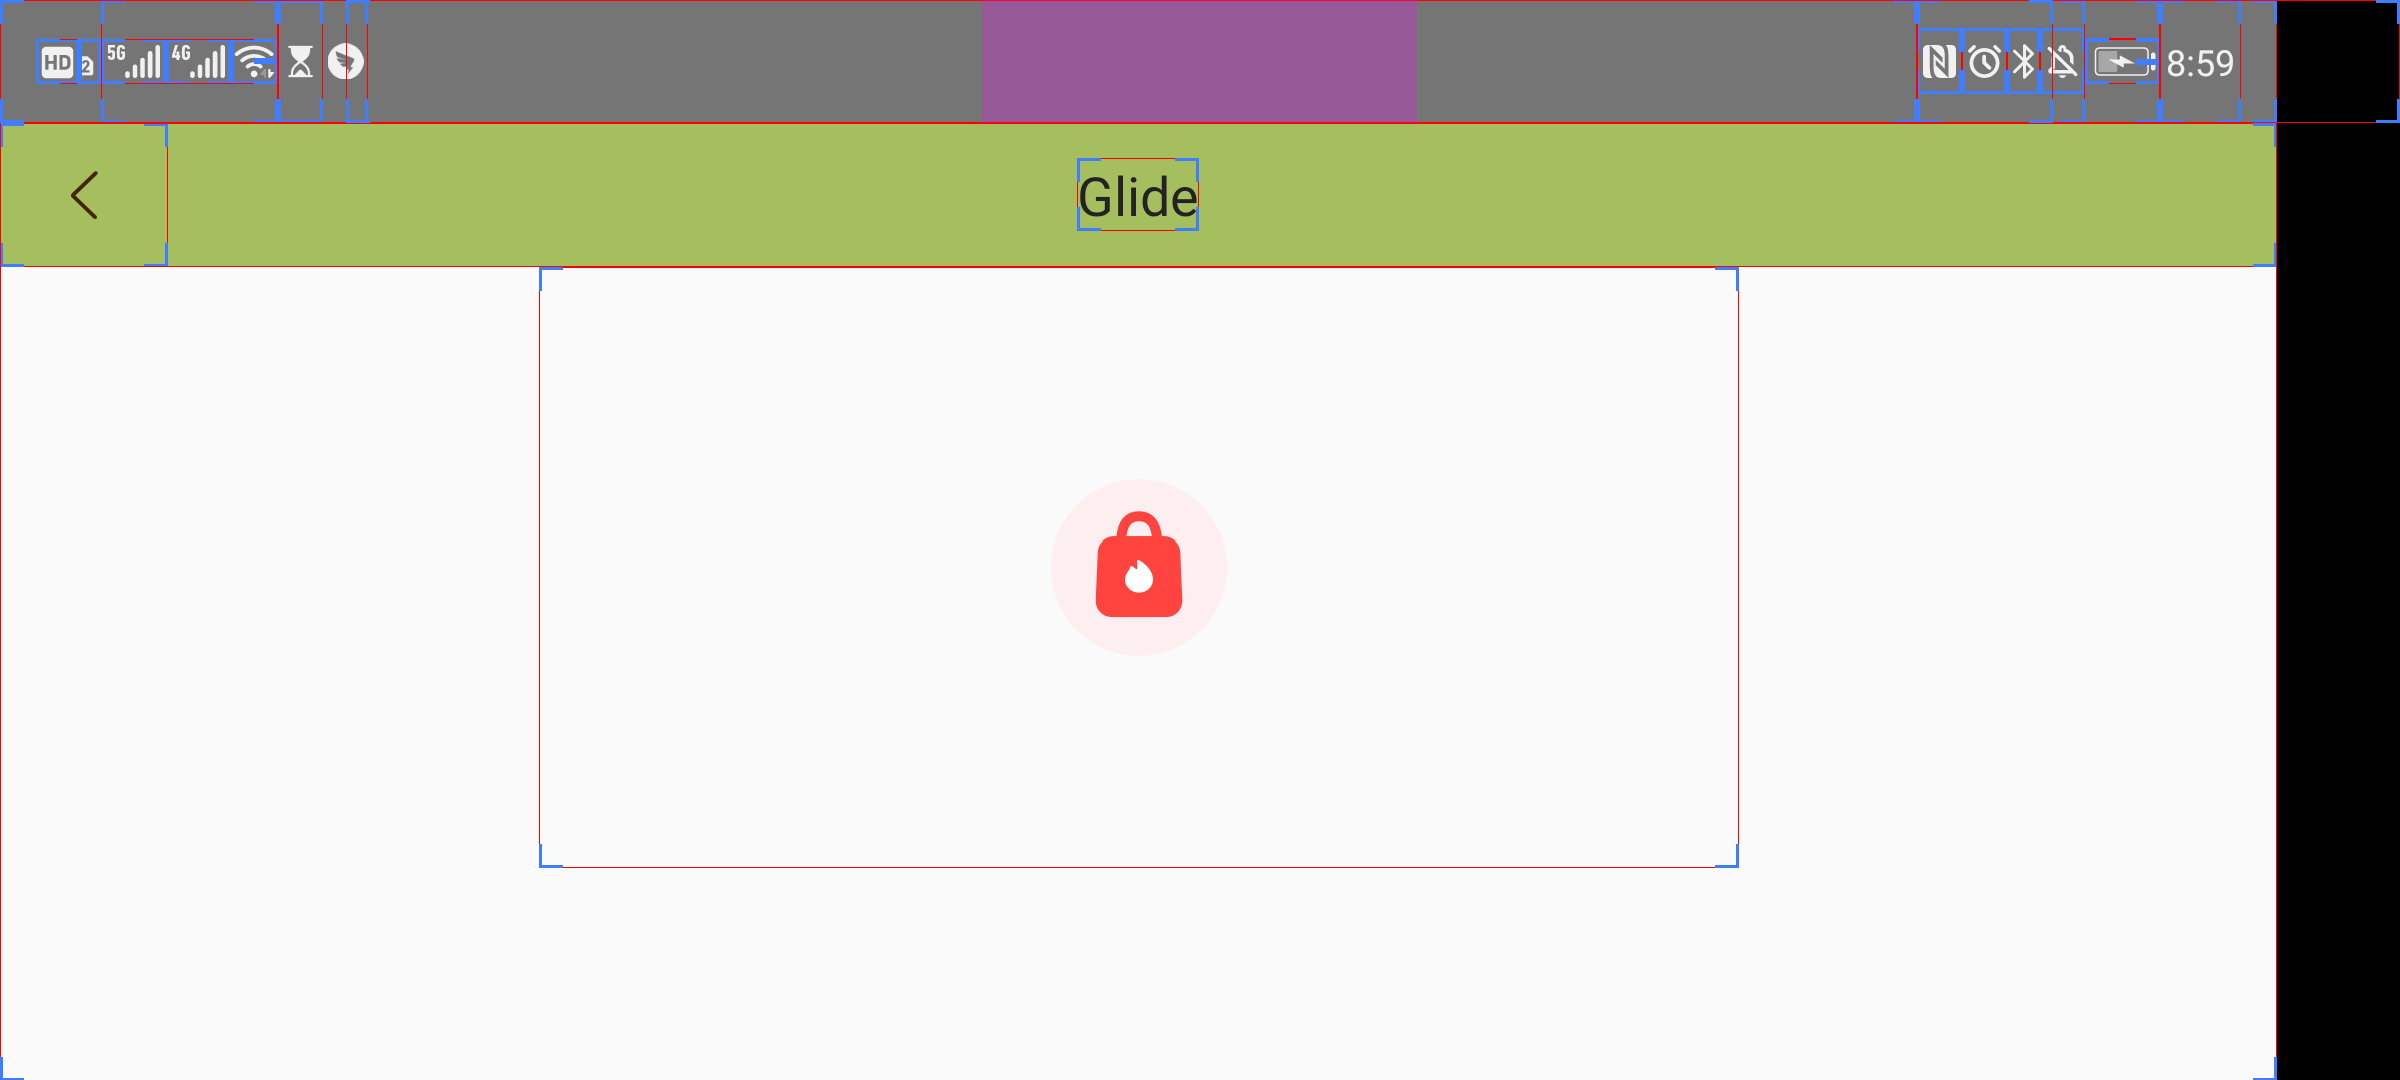
这个CenterInside显示用法与ImageView的一样, 如果bitmap的width和height都小于view, 则居中, 否则和fitCenter的效果一样, 看一下他的代码
  public static Bitmap centerInside(
      @NonNull BitmapPool pool, @NonNull Bitmap inBitmap, int width, int height) {
    if (inBitmap.getWidth() <= width && inBitmap.getHeight() <= height) {
      if (Log.isLoggable(TAG, Log.VERBOSE)) {
        Log.v(TAG, "requested target size larger or equal to input, returning input");
      }
      return inBitmap;
    } else {
      if (Log.isLoggable(TAG, Log.VERBOSE)) {
        Log.v(TAG, "requested target size too big for input, fit centering instead");
      }
      return fitCenter(pool, inBitmap, width, height);
    }
  }
效果
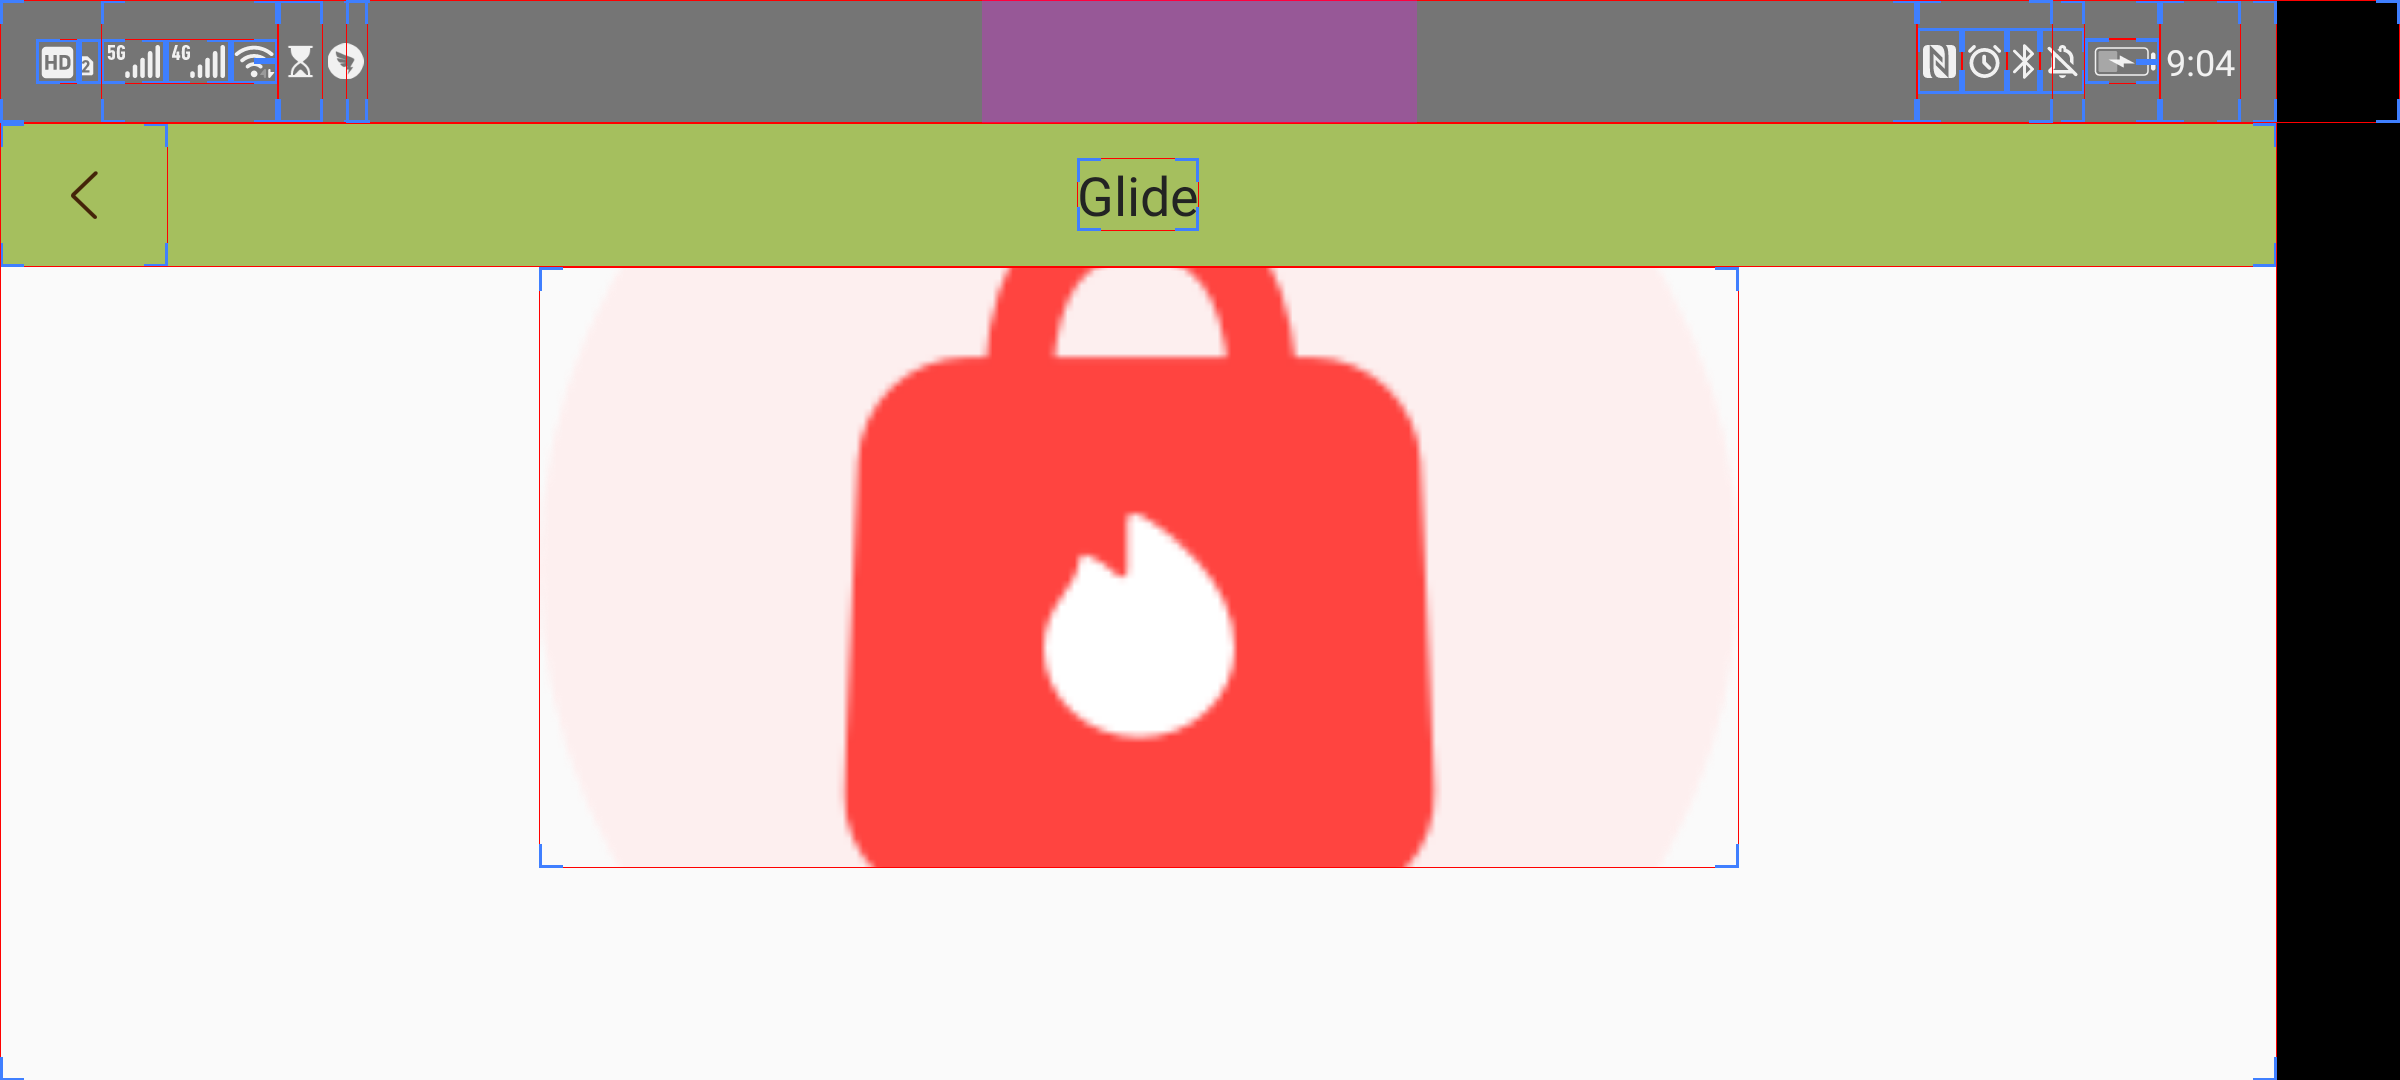
2.2 fitCenter
FitCenter的效果也与ImageView的fitcenter一样, 将width, height等比例缩放,直到有一个与view一样.
        Glide.with(this)
            .load(IMAGE_URL_V1)
            .fitCenter()
            .into(binding.iv1)
源代码:
  public static Bitmap fitCenter(
      @NonNull BitmapPool pool, @NonNull Bitmap inBitmap, int width, int height) {
    if (inBitmap.getWidth() == width && inBitmap.getHeight() == height) {
      if (Log.isLoggable(TAG, Log.VERBOSE)) {
        Log.v(TAG, "requested target size matches input, returning input");
      }
      return inBitmap;
    }
    final float widthPercentage = width / (float) inBitmap.getWidth();
    final float heightPercentage = height / (float) inBitmap.getHeight();
    final float minPercentage = Math.min(widthPercentage, heightPercentage);

    // Round here in case we've decoded exactly the image we want, but take the floor below to
    // avoid a line of garbage or blank pixels in images.
    int targetWidth = Math.round(minPercentage * inBitmap.getWidth());
    int targetHeight = Math.round(minPercentage * inBitmap.getHeight());

    if (inBitmap.getWidth() == targetWidth && inBitmap.getHeight() == targetHeight) {
      if (Log.isLoggable(TAG, Log.VERBOSE)) {
        Log.v(TAG, "adjusted target size matches input, returning input");
      }
      return inBitmap;
    }

    // Take the floor of the target width/height, not round. If the matrix
    // passed into drawBitmap rounds differently, we want to slightly
    // overdraw, not underdraw, to avoid artifacts from bitmap reuse.
    targetWidth = (int) (minPercentage * inBitmap.getWidth());
    targetHeight = (int) (minPercentage * inBitmap.getHeight());

    Bitmap.Config config = getNonNullConfig(inBitmap);
    Bitmap toReuse = pool.get(targetWidth, targetHeight, config);

    // We don't add or remove alpha, so keep the alpha setting of the Bitmap we were given.
    TransformationUtils.setAlpha(inBitmap, toReuse);

    Matrix matrix = new Matrix();
    matrix.setScale(minPercentage, minPercentage);
    applyMatrix(inBitmap, toReuse, matrix);

    return toReuse;
  }
效果

2.3 centerCorp
centerCorp也与ImageView一样, 将width与height等比例缩放, 直到view被铺满.
代码:
        Glide.with(this)
            .load(IMAGE_URL_V1)
            .centerCrop()
            .into(binding.iv1)
源代码
  public static Bitmap centerCrop(
      @NonNull BitmapPool pool, @NonNull Bitmap inBitmap, int width, int height) {
    if (inBitmap.getWidth() == width && inBitmap.getHeight() == height) {
      return inBitmap;
    }
    // From ImageView/Bitmap.createScaledBitmap.
    final float scale;
    final float dx;
    final float dy;
    Matrix m = new Matrix();
    if (inBitmap.getWidth() * height > width * inBitmap.getHeight()) {
      scale = (float) height / (float) inBitmap.getHeight();
      dx = (width - inBitmap.getWidth() * scale) * 0.5f;
      dy = 0;
    } else {
      scale = (float) width / (float) inBitmap.getWidth();
      dx = 0;
      dy = (height - inBitmap.getHeight() * scale) * 0.5f;
    }

    m.setScale(scale, scale);
    m.postTranslate((int) (dx + 0.5f), (int) (dy + 0.5f));

    Bitmap result = pool.get(width, height, getNonNullConfig(inBitmap));
    // We don't add or remove alpha, so keep the alpha setting of the Bitmap we were given.
    TransformationUtils.setAlpha(inBitmap, result);

    applyMatrix(inBitmap, result, m);
    return result;
  }
效果图
3 ImageView的ScaleType与Glide的scaleType混合使用
相信你的疑问来了, 这俩不冲突吗? 如果两个矛盾了, 到底哪个生效呢???
其实两个一点都不矛盾. 两个的角度不同
我们都知道, Glide除了会对原始图像做缓存之外, 还会对变换后的图像做缓存. 而Glide的各种缩放变换是针对Bitmap的. 而ImageView的缩放变换是对bitmap显示在Canvas的效果的.就像下图一样

所以这两个效果实际上是一个叠加的效果. 这也是为什么在第二章的时候, ImageView的scaleType选择了Center, 因为center是不会对ImageView做任何的缩放变化的, 只是将Image放在了View中间.
在实际使用过程中, 建议将ImageView的scaleType设置为Center, 这样只用考虑Glide的ScaleType生效的场景

CSDN联合极客时间,共同打造面向开发者的精品内容学习社区,助力成长!
更多推荐


 2
2 0
0- 0


 已为社区贡献1条内容

所有评论(0)