Netty(十一)源码解析 之 Channel 的 inBound 与 outBound 处理器
Channel 的 inBound 与 outBound 处理器1. 先了解一下相关核心类的APIChannelHandler:包含所有处理器的共性方法,主要是handlerAdded和handlerRemoved方法,一但当前处理器被添加成功或移除都会触发该回调方法。ChannelInboundHandler:包含的都是一些被动调用,监听的方法,数据流程是从外面,例如channelRead,管道
Channel 的 inBound 与 outBound 处理器
1. 先了解一下相关核心类的API
ChannelHandler、ChannelInbound/OutboundHandler
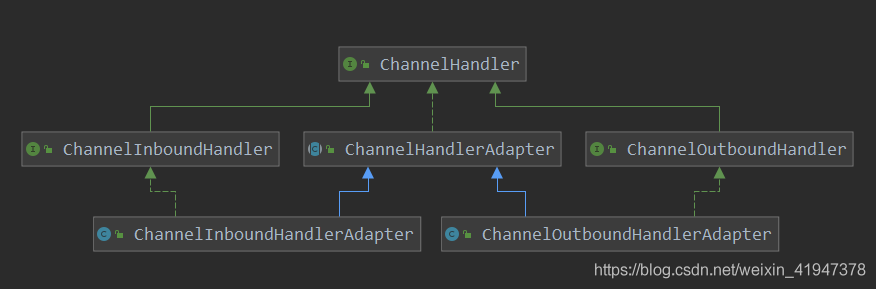
- ChannelHandler:包含所有处理器的共性方法,主要是handlerAdded和handlerRemoved方法,一但当前处理器被添加成功或移除都会触发该回调方法。
- ChannelInboundHandler:包含的都是一些
被动调用的方法,数据流向是从外面传进来的
例如channelRead,外面传数据来了,管道有数据了就会触发;channelActive,外面请求连接,管道被激活了就会触发… - ChannelOutboundHandler:包含的都是一些
主动调用的方法,数据流向是从内向外发的
例如bind,绑定端口;connect,连接;disconnect,断开连接;close关闭通道;write写数据…
ChannelInboundHandlerAdapter和ChannelOutboundHandlerAdapter在实现ChannelInboundHandler和ChannelOutboundHandler的时候,默认全部都是直接调用ChannelHandlerContext各种fireXXX方法,这些方法的含义都是触发下一个节点的处理器对应的方法的执行
// 简单看几个方法
public class ChannelInboundHandlerAdapter extends ChannelHandlerAdapter implements ChannelInboundHandler {

    @Skip
    @Override
    public void channelRegistered(ChannelHandlerContext ctx) throws Exception {
        ctx.fireChannelRegistered();
    }

    @Skip
    @Override
    public void channelUnregistered(ChannelHandlerContext ctx) throws Exception {
        ctx.fireChannelUnregistered();
    }
    ...
}
ChannelHandlerContext
我们看一下ChannelHandlerContext ,它代表的是ChannelPipline链上的节点:
/**
 * Enables a {@link ChannelHandler} to interact with its {@link ChannelPipeline}
 * and other handlers. Among other things a handler can notify the next {@link ChannelHandler} in the
 * {@link ChannelPipeline} as well as modify the {@link ChannelPipeline} it belongs to dynamically.
 * 可以使当前节点对象的{@link ChannelHandler}和它的{@link ChannelPipeline}以及其他处理器交互。
 * 除此之外,处理器可以通知{@link ChannelPipeline}中的下一个{@link ChannelHandler},并动态地
 * 修改它所属的{@link ChannelPipeline}。
 *
 * ...
 */
public interface ChannelHandlerContext extends AttributeMap, ChannelInboundInvoker, ChannelOutboundInvoker {
	//列了一些自己本身的方法,简单看名字就知道啥意思了,就不写注释了
    Channel channel();
    EventExecutor executor();
    String name();
    ChannelHandler handler();
    boolean isRemoved();
    //省略了一些重写父类AttributeMap,ChannelInboundInvoker,ChannelOutboundInvoker的方法
    //重写父类方法原因是返回值的类改为了自己
	...

    ChannelPipeline pipeline();
    //返回ByteBuf分配器
    ByteBufAllocator alloc();
    ...
}
继承了三个接口,先看AttributeMap
public interface AttributeMap {
	//获取指定key的属性值,就是我们通过bootstrap.attr设置的那些属性值
    <T> Attribute<T> attr(AttributeKey<T> key);
	//判断有没有这个属性值
    <T> boolean hasAttr(AttributeKey<T> key);
}
ChannelInboundInvoker:ChannelInbound调用者,包含的方法都是为了触发ChannelInbound处理器对应的方法
public interface ChannelInboundInvoker {

    ChannelInboundInvoker fireChannelRegistered();
    ChannelInboundInvoker fireChannelUnregistered();
    ChannelInboundInvoker fireChannelActive();
    ChannelInboundInvoker fireChannelInactive();
    ChannelInboundInvoker fireExceptionCaught(Throwable cause);
    ChannelInboundInvoker fireUserEventTriggered(Object event);
    ChannelInboundInvoker fireChannelRead(Object msg);
    ChannelInboundInvoker fireChannelReadComplete();
    ChannelInboundInvoker fireChannelWritabilityChanged();
}
ChannelOutboundInvoker :同理,可以触发ChannelOutbound处理器相关的方法
public interface ChannelOutboundInvoker {

    ChannelFuture bind(SocketAddress localAddress);
    ChannelFuture connect(SocketAddress remoteAddress);
    ChannelFuture connect(SocketAddress remoteAddress, SocketAddress localAddress);
    ChannelFuture disconnect();
    ChannelFuture close();
    ChannelFuture deregister();
    ChannelFuture bind(SocketAddress localAddress, ChannelPromise promise);
    ChannelFuture connect(SocketAddress remoteAddress, ChannelPromise promise);
    ChannelFuture connect(SocketAddress remoteAddress, SocketAddress localAddress, ChannelPromise promise);
    ChannelFuture disconnect(ChannelPromise promise);
    ChannelFuture close(ChannelPromise promise);
    ChannelFuture deregister(ChannelPromise promise);
    ChannelOutboundInvoker read();
    ChannelFuture write(Object msg);
    ChannelFuture write(Object msg, ChannelPromise promise);
	...
}
ChannelHandlerContext 实现了这两个接口,也就是说节点具有触发Inboud和outbound处理器相关方法的能力,同时也表明ChannelHandlerContext 既可以封装Inoud处理器,也可以封装Outbound处理器
ChannelPipeline
看下ChannelPipeline:
/**
 * A list of {@link ChannelHandler}s which handles or intercepts inbound events and outbound operations of a
 * {@link Channel}.  {@link ChannelPipeline} implements an advanced form of the
 * <a href="http://www.oracle.com/technetwork/java/interceptingfilter-142169.html">Intercepting Filter</a> pattern
 * to give a user full control over how an event is handled and how the {@link ChannelHandler}s in a pipeline
 * interact with each other.
 * 一组{@link ChannelHandler}的列表,用于处理或拦截{@link Channel}的入站事件和出站操作。
 * {@link ChannelPipeline}实现的一种高级形式的拦截过滤器模式让用户完全控制如何处理事件以及管道中的{@link ChannelHandler}如何相互交互。
 *
 * ...
 * <pre>
 *                                                 I/O Request
 *                                            via {@link Channel} or
 *                                        {@link ChannelHandlerContext}
 *                                                      |
 *  +---------------------------------------------------+---------------+
 *  |                           ChannelPipeline         |               |
 *  |                                                  \|/              |
 *  |    +---------------------+            +-----------+----------+    |
 *  |    | Inbound Handler  N  |            | Outbound Handler  1  |    |
 *  |    +----------+----------+            +-----------+----------+    |
 *  |              /|\                                  |               |
 *  |               |                                  \|/              |
 *  |    +----------+----------+            +-----------+----------+    |
 *  |    | Inbound Handler N-1 |            | Outbound Handler  2  |    |
 *  |    +----------+----------+            +-----------+----------+    |
 *  |              /|\                                  .               |
 *  |               .                                   .               |
 *  | ChannelHandlerContext.fireIN_EVT() ChannelHandlerContext.OUT_EVT()|
 *  |        [ method call]                       [method call]         |
 *  |               .                                   .               |
 *  |               .                                  \|/              |
 *  |    +----------+----------+            +-----------+----------+    |
 *  |    | Inbound Handler  2  |            | Outbound Handler M-1 |    |
 *  |    +----------+----------+            +-----------+----------+    |
 *  |              /|\                                  |               |
 *  |               |                                  \|/              |
 *  |    +----------+----------+            +-----------+----------+    |
 *  |    | Inbound Handler  1  |            | Outbound Handler  M  |    |
 *  |    +----------+----------+            +-----------+----------+    |
 *  |              /|\                                  |               |
 *  +---------------+-----------------------------------+---------------+
 *                  |                                  \|/
 *  +---------------+-----------------------------------+---------------+
 *  |               |                                   |               |
 *  |       [ Socket.read() ]                    [ Socket.write() ]     |
 *  |                                                                   |
 *  |  Netty Internal I/O Threads (Transport Implementation)            |
 *  +-------------------------------------------------------------------+
 *  ...
 */
public interface ChannelPipeline extends ChannelInboundInvoker, ChannelOutboundInvoker, Iterable<Entry<String, ChannelHandler>> {
	...
}
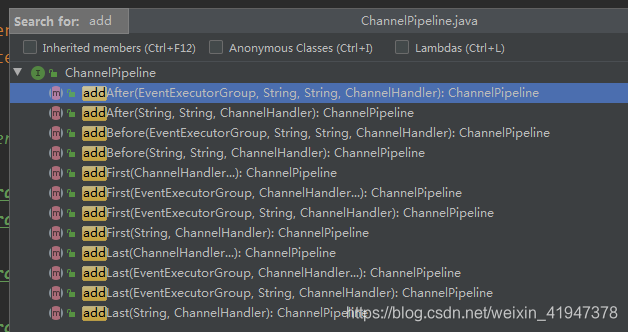
ChannelPipeline 中有各种add方法用来添加节点
除了继承ChannelInboundInvoker和ChannelOutboundInvoker,它还实现了Iterable接口,可以迭代pipline中的ChannelHandler
public class DefaultChannelPipeline implements ChannelPipeline {
	...
    //返回一个迭代器
    public final Iterator<Map.Entry<String, ChannelHandler>> iterator() {
        return toMap().entrySet().iterator();
    }
    //将ChannelPipeline 中的所有ChannelHandler转成一个map
    public final Map<String, ChannelHandler> toMap() {
        Map<String, ChannelHandler> map = new LinkedHashMap<String, ChannelHandler>();
        AbstractChannelHandlerContext ctx = head.next;
        for (;;) {
            if (ctx == tail) {
                return map;
            }
            // 节点名称是作为map的key出现的
            map.put(ctx.name(), ctx.handler());
            ctx = ctx.next;
        }
    }

	//发现pipline中的所有fire方法实现,调用都是从head头结点开始的!!
    @Override
    public final ChannelPipeline fireChannelActive() {
        AbstractChannelHandlerContext.invokeChannelActive(head);
        return this;
    }

    @Override
    public final ChannelPipeline fireChannelInactive() {
        AbstractChannelHandlerContext.invokeChannelInactive(head);
        return this;
    }

    @Override
    public final ChannelPipeline fireExceptionCaught(Throwable cause) {
        AbstractChannelHandlerContext.invokeExceptionCaught(head, cause);
        return this;
    }
	...
	//在看实现的ChannelOutboundInvoker里面的方法,都是从尾节点开始的!
	@Override
    public final ChannelFuture bind(SocketAddress localAddress) {
        return tail.bind(localAddress);
    }

    @Override
    public final ChannelFuture connect(SocketAddress remoteAddress) {
        return tail.connect(remoteAddress);
    }

    @Override
    public final ChannelFuture connect(SocketAddress remoteAddress, SocketAddress localAddress) {
        return tail.connect(remoteAddress, localAddress);
    }
    ...
}
发现pipline中的所有fire方法实现,如果实现的是ChannelInboundInvoker的方法,调用都是从head头结点开始的!!如果实现的是ChannelOutboundInvoker的方法,调用都是从tail尾结点开始的!!
其实也很好理解
- 如果数据是从外面传进来的,则按照从头节点到尾节点的顺序依次拦截处理
- 如果数据从内向外发出的,则按照尾节点到头节点的顺序依次拦截处理
接下来跟踪三个例子,看事件是如何在Inbound和Outbond处理器传递的
2. Inbound 事件的传递
(1) 创建工程 16-channelInboundHandler
复制 02-socket 工程,在其基础上进行修改:16-channelInboundHandler
(2) 删除类
将其客户端代码全部删除,再将服务端原来自定义的处理器类删除。
(3) 定义服务端处理器
在这里定义三个处理器。
public class ChannelInboundHandler1 extends ChannelInboundHandlerAdapter {

    @Override
    public void channelRead(ChannelHandlerContext ctx, Object msg)
            throws Exception {
        System.out.println("1111 " + msg);
        ctx.fireChannelRead(msg);
    }

    @Override
    public void channelActive(ChannelHandlerContext ctx) throws Exception {
        ctx.channel().pipeline().fireChannelRead("Hello World 1111");
    }

}
public class ChannelInboundHandler2 extends ChannelInboundHandlerAdapter {
    @Override
    public void channelRead(ChannelHandlerContext ctx, Object msg)
            throws Exception {
        System.out.println("2222 " + msg);
        ctx.fireChannelRead(msg);
    }

    @Override
    public void channelActive(ChannelHandlerContext ctx) throws Exception {
        ctx.channel().pipeline().fireChannelRead("Hello World 2222");
    }
}
public class ChannelInboundHandler3 extends ChannelInboundHandlerAdapter {
    @Override
    public void channelRead(ChannelHandlerContext ctx, Object msg)
            throws Exception {
        System.out.println("3333 " + msg);
        ctx.fireChannelRead(msg);
    }

    @Override
    public void channelActive(ChannelHandlerContext ctx) throws Exception {
        ctx.channel().pipeline().fireChannelRead("Hello World 3333");
    }
}
(4) 定义服务端启动类
public class SomeServer {
public static void main(String[] args) throws InterruptedException {
EventLoopGroup parentGroup = new NioEventLoopGroup();
EventLoopGroup childGroup = new NioEventLoopGroup();
try {
ServerBootstrap bootstrap = new ServerBootstrap();
bootstrap.group(parentGroup, childGroup)
.channel(NioServerSocketChannel.class)
.childHandler(new ChannelInitializer<SocketChannel>() {
@Override
protected void initChannel(SocketChannel ch) throws Exception {
ChannelPipeline pipeline = ch.pipeline();
pipeline.addLast(new ChannelInboundHandler1());
pipeline.addLast(new ChannelInboundHandler2());
pipeline.addLast(new ChannelInboundHandler3());
}
});
ChannelFuture future = bootstrap.bind(8888).sync();
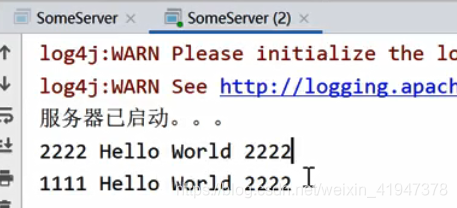
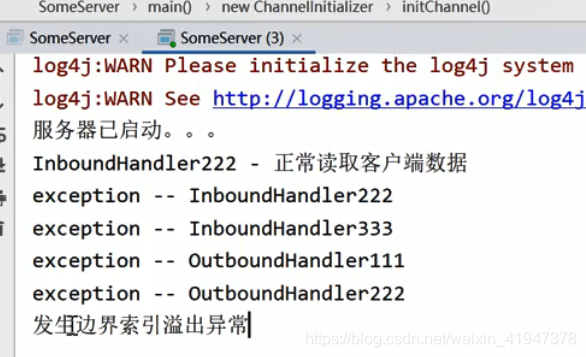
System.out.println("服务器已启动。。。");
future.channel().closeFuture().sync();
} finally {
parentGroup.shutdownGracefully();
childGroup.shutdownGracefully();
}
}
}
(5) 演示
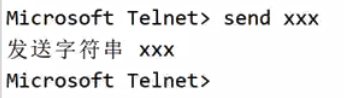
启动服务端后,用telnet命令进行访问:

服务端显示结果:
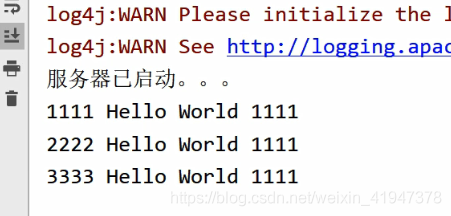
可以看出来执行链路是
ChannelInboundHandler1.channelActive -> ChannelInboundHandler1.channelRead -> ChannelInboundHandler2.channelRead ->ChannelInboundHandler3.channelRead
我们把处理器1,2,3顺序颠倒一下在测试:
pipeline.addLast(new ChannelInboundHandler2());
pipeline.addLast(new ChannelInboundHandler1());
pipeline.addLast(new ChannelInboundHandler3());
这次的结果是:
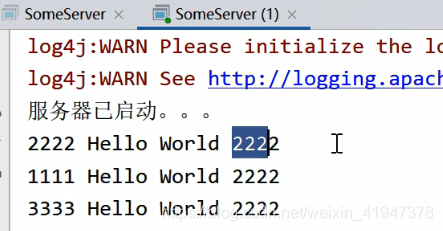
执行链路:ChannelInboundHandler2.channelActive -> ChannelInboundHandler2.channelRead -> ChannelInboundHandler1.channelRead ->ChannelInboundHandler3.channelRead
可以发现channelActive 方法只触发了一次,并且是第一个处理器,因为我们实现的3个处理器中channelActive里都是调用了pipeline.fireChannelRead方法,即channelActive拦截成功以后,后续节点的channelActive就不会在执行了,直接从pipline上第一个节点重新开始触发ChannelRead方法
如果我们把第一个处理器的channelActive方法注释掉呢?我们把处理器的顺序还原,1,2,3,并把处理器1和3的channelActive方法注释掉,再次演示:

执行链路:ChannelInboundHandler2.channelActive -> ChannelInboundHandler1.channelRead -> ChannelInboundHandler2.channelRead ->ChannelInboundHandler3.channelRead
虽然ChannelInboundHandler1处理器器排在第一个,但是它没有实现channelActive方法,所以执行到了第二个处理器的channelActive方法,第二个处理器channelActive里又调用了pipline.fireChannelRead方法,从pipline上第一个节点重新开始触发ChannelRead方法
(6) 源码分析:
其实主要分析就是这两行代码:
ctx.channel().pipeline().fireChannelRead("Hello World 2222");
ctx.fireChannelRead(msg);
之前介绍过ChannelPipeline和ChannelHandlerContext都实现了ChannelInboundInvoker接口,所以都具有触发Inboud处理器对应方法的功能,两者有啥区别?其实上面演示已经能看出来了,ChannelPipeline的fire方法,触发的方法是从pipline链上第一个节点开始的,而ChannelHandlerContext的fire方法,触发的方法是当前节点的下一个节点的(其实是下一个对应方法标记为允许执行的节点,之前有分析过标记逻辑)
源码分析,先从ctx.channel().pipeline().fireChannelRead开始:
public class ChannelInboundHandler2 extends ChannelInboundHandlerAdapter {
    @Override
    public void channelRead(ChannelHandlerContext ctx, Object msg)
            throws Exception {
        System.out.println("2222 " + msg);
        ctx.fireChannelRead(msg);
    }

    @Override
    public void channelActive(ChannelHandlerContext ctx) throws Exception {
        // 准备触发pipeline中第一个节点,即head节点的channelRead()方法
        ctx.channel().pipeline().fireChannelRead("Hello World 2222");
    }
}
public class DefaultChannelPipeline implements ChannelPipeline {
	...
    @Override
    public final ChannelPipeline fireChannelRead(Object msg) {
        // 准备触发head节点的channelRead()方法
        AbstractChannelHandlerContext.invokeChannelRead(head, msg);
        return this;
    }
    ...
}
abstract class AbstractChannelHandlerContext implements ChannelHandlerContext, ResourceLeakHint {
	...
    static void invokeChannelRead(final AbstractChannelHandlerContext next, Object msg) {
	    //注意此时,next就是head节点
        final Object m = next.pipeline.touch(ObjectUtil.checkNotNull(msg, "msg"), next);
        //获取节点执行器,希望通过执行器的线程执行
        //如果当前线程就是执行器的线程执行执行,否则封装成任务异步,让执行器线程执行
        EventExecutor executor = next.executor();
        if (executor.inEventLoop()) {
            // 准备触发当前next节点的channelRead()
            next.invokeChannelRead(m);
        } else {
            executor.execute(new Runnable() {
                @Override
                public void run() {
                    next.invokeChannelRead(m);
                }
            });
        }
    }
    ...
}
先看下final Object m = next.pipeline.touch(ObjectUtil.checkNotNull(msg, “msg”), next);干嘛的?
//io.netty.channel.DefaultChannelPipeline#touch
private final boolean touch = ResourceLeakDetector.isEnabled();

//io.netty.channel.DefaultChannelPipeline#touch
final Object touch(Object msg, AbstractChannelHandlerContext next) {
	//touch:如果资源泄漏检测启用,返回{@code true}。
    return touch ? ReferenceCountUtil.touch(msg, next) : msg;
}
//io.netty.util.ReferenceCountUtil#touch(T, java.lang.Object)
public static <T> T touch(T msg, Object hint) {
    if (msg instanceof ReferenceCounted) {
        return (T) ((ReferenceCounted) msg).touch(hint);
    }
    return msg;
}

//io.netty.util.ReferenceCounted#touch(java.lang.Object)方法注释:
/**
 * Records the current access location of this object with an additional arbitrary information
 * for debugging purposes.  If this object is determined to be leaked, the information
 * recorded by this operation will be provided to you via {@link ResourceLeakDetector}.
 * 记录此对象的当前访问位置以及用于调试的附加任意信息。如果确定该对象被泄露,
 * 此操作记录的信息将通过{@link ResourceLeakDetector}提供给您。
 */
ReferenceCounted touch(Object hint);
其实我们不用关注,这个东西应该是编码做调试的时候用的,开启以后,会向msg里面传一些信息,正常运行一般不会用,这个m就是原来的数据。
继续跟invokeChannelRead,这个是触发当前节点channelRead方法
abstract class AbstractChannelHandlerContext implements ChannelHandlerContext, ResourceLeakHint {
	...
    private void invokeChannelRead(Object msg) {
	    // 判断当前节点封装的处理器状态是否为已添加
        if (invokeHandler()) {
            try {
	            //已经添加了处理器,则直接调用处理器的channelRead方法
	            //注意此时是Head节点
                ((ChannelInboundHandler) handler()).channelRead(this, msg);
            } catch (Throwable t) {
                // 引发异常的处理
                notifyHandlerException(t);
            }
        } else {
            fireChannelRead(msg);
        }
    }
    //判断当前节点处理器状态,判断处理器是否已经添加了
    private boolean invokeHandler() {
        // Store in local variable to reduce volatile reads.
        int handlerState = this.handlerState;
        return handlerState == ADD_COMPLETE || (!ordered && handlerState == ADD_PENDING);
    }
    ...
}
注意此时是Head节点,我们跟Head节点的channelRead:
final class HeadContext extends AbstractChannelHandlerContext
        implements ChannelOutboundHandler, ChannelInboundHandler {

    private final Unsafe unsafe;

    HeadContext(DefaultChannelPipeline pipeline) {
        super(pipeline, null, HEAD_NAME, HeadContext.class);
        unsafe = pipeline.channel().unsafe();
        setAddComplete();
    }
	...

    // 这是head节点的channelRead()
    @Override
    public void channelRead(ChannelHandlerContext ctx, Object msg) {
        // 触发当前节点的下一个节点的channelRead()
        ctx.fireChannelRead(msg);
    }
	...
}

看到又回到了节点的AbstractChannelHandlerContext,之前invokeChannelRead(Object)是触发当前节点channelRead方法,而fireChannelRead是触发当前节点的下一个节点的channelRead方法
abstract class AbstractChannelHandlerContext implements ChannelHandlerContext, ResourceLeakHint {
	...
    @Override
    public ChannelHandlerContext fireChannelRead(final Object msg) {
        // findContextInbound(MASK_CHANNEL_READ)  从当前节点开始查看“包含mask所标识的方法的”节点
        // invokeChannelRead() 准备调用指定节点的channelRead()
        invokeChannelRead(findContextInbound(MASK_CHANNEL_READ), msg);
        return this;
    }
    private AbstractChannelHandlerContext findContextInbound(int mask) {
        // 从当前节点开始查看“包含mask所标识的方法的”节点
        AbstractChannelHandlerContext ctx = this;
        do {
	        // Nio的SELECTIONKEY也是这么玩的
            // 与运算,11得1,其他情况都是0
            // 0001 1101
            // 0000 0010
            // 0000 0000(结果)
            // 与预算为0,说明不包含
            // 0001 1101
            // 0000 0100
            // 0000 0100(结果)
            // 与预算不为0,说明不包含
            ctx = ctx.next;
        } while ((ctx.executionMask & mask) == 0);
        return ctx;
    }
    ...
}
findContextInbound方法的含义就是查找当前节点之后,“包含mask所标识的方法的”的第一个节点
看到执行invokeChannelRead,这个静态方法又回到我们之前跟DefaultChannelPipeline.fireChannelRead时,通过这个方法调用HeadContext节点的时候了,只不过这个时候next是我们的第一个处理器节点ChannelInboundHandler1:
abstract class AbstractChannelHandlerContext implements ChannelHandlerContext, ResourceLeakHint {
	...
    //准备调用指定节点的channelRead()
    static void invokeChannelRead(final AbstractChannelHandlerContext next, Object msg) {
	    //注意此时next就是我们的第一个处理器节点ChannelInboundHandler1,因为它实现了channelRead方法
        final Object m = next.pipeline.touch(ObjectUtil.checkNotNull(msg, "msg"), next);
        EventExecutor executor = next.executor();
        if (executor.inEventLoop()) {
            // 准备触发当前next节点的channelRead()
            next.invokeChannelRead(m);
        } else {
            executor.execute(new Runnable() {
                @Override
                public void run() {
                    next.invokeChannelRead(m);
                }
            });
        }
    }
    private void invokeChannelRead(Object msg) {
        if (invokeHandler()) {
            try {
	            //这个handler就是1号节点的处理器
                ((ChannelInboundHandler) handler()).channelRead(this, msg);
            } catch (Throwable t) {
                notifyHandlerException(t);
            }
        } else {
            fireChannelRead(msg);
        }
    }
    ...
}
我们追踪ChannelInboundHandler1 的channelRead方法:
public class ChannelInboundHandler1 extends ChannelInboundHandlerAdapter {

    @Override
    public void channelRead(ChannelHandlerContext ctx, Object msg)
            throws Exception {
        System.out.println("1111 " + msg);
        // 触发当前节点的下一个节点的channelRead()
        ctx.fireChannelRead(msg);
    }

    // 在一个channel的pipeline中,若有多个处理器都重写的channelActive()方法,
    // 则只有一个处理器的channelActive()会被触发,哪一个?只有第一个重写的channelActive()会执行
    // @Override
    // public void channelActive(ChannelHandlerContext ctx) throws Exception {
    //     pipeline的fireChannelRead()是触发head节点的channelRead()
    //     ctx.channel().pipeline().fireChannelRead("Hello World 1111");
    // }

}
看到这里逻辑就和Head节点一样了,只要执行ctx.fireChannelRead(msg),就会触发当前节点之后第一个实现channelRead()的方法的节点(实现标准是方法没有被@Skip标识,这个之前也讲过),后面就不跟了意思是一样的,这一次会找到二号节点,执行channelRead方法,然后再次调用ctx.fireChannelRead(msg),找到三号节点调用channelRead方法,最后到tail节点:
final class TailContext extends AbstractChannelHandlerContext implements ChannelInboundHandler {
    ...
    @Override
    public void channelRead(ChannelHandlerContext ctx, Object msg) {
        onUnhandledInboundMessage(msg);
    }
    ...
}
//TailContext 是DefaultChannelPipeline的内部类
//io.netty.channel.DefaultChannelPipeline#onUnhandledInboundMessage
protected void onUnhandledInboundMessage(Object msg) {
    try {
	    //日志:丢弃inbound的消息,该消息已经到达pipline的尾部,请检查pipline配置
	    //最后走到tail节点,让tail节点释放msg不推荐
        logger.debug(
                "Discarded inbound message {} that reached at the tail of the pipeline. " +
                        "Please check your pipeline configuration.", msg);
    } finally {
        // 释放msg
        ReferenceCountUtil.release(msg);
    }
}
//io.netty.util.ReferenceCountUtil#release(java.lang.Object)
public static boolean release(Object msg) {
    if (msg instanceof ReferenceCounted) {
        return ((ReferenceCounted) msg).release();
    }
    return false;
}
之前入门的时候讲过SimpleChannelInboundHandler,它和ChannelInboundHandlerAdapter区别就是:
- ChannelInboundHandlerAdapter:不会自动释放channelRead()中的msg,
除非执行ctx.fireChannelRead(msg)方法一直传到尾节点 - SimpleChannelInboundHandler:会自动释放channelRead()中的msg
public abstract class SimpleChannelInboundHandler<I> extends ChannelInboundHandlerAdapter {
	...
    @Override
    public void channelRead(ChannelHandlerContext ctx, Object msg) throws Exception {
        boolean release = true;
        try {
            if (acceptInboundMessage(msg)) {
                @SuppressWarnings("unchecked")
                I imsg = (I) msg;
                channelRead0(ctx, imsg);
            } else {
                release = false;
                ctx.fireChannelRead(msg);
            }
        } finally {
            if (autoRelease && release) {
	            //释放
                ReferenceCountUtil.release(msg);
            }
        }
    }
    ...
}
3. Outbound 事件的传递
(1) 创建工程 17-channelOutboundHandler
复制 16-channelInboundHandler 工程,在其基础上进行修改:17-channelOutboundHandler
(2) 删除类
删除之前的三个 ChannelInboundHandler 类。
(3) 定义服务端处理器
在这里定义三个处理器。
public class ChannelOutboundHandler1 extends ChannelOutboundHandlerAdapter {
    @Override
    public void write(ChannelHandlerContext ctx, Object msg, ChannelPromise promise)
            throws Exception {
        System.out.println("1111 " + msg);
        ctx.write(msg, promise);
    }
}
public class ChannelOutboundHandler2 extends ChannelOutboundHandlerAdapter {
    @Override
    public void write(ChannelHandlerContext ctx, Object msg, ChannelPromise promise)
            throws Exception {
        System.out.println("2222 " + msg);
        ctx.write(msg, promise);
    }
    @Override
    public void handlerAdded(ChannelHandlerContext ctx) throws Exception {
        ctx.executor().schedule(() -> {
            // 调用pipeline的write()
            ctx.channel().write("Hello World 2222");
        }, 1, TimeUnit.SECONDS);
    }
}
public class ChannelOutboundHandler3 extends ChannelOutboundHandlerAdapter {
    @Override
    public void write(ChannelHandlerContext ctx, Object msg, ChannelPromise promise)
            throws Exception {
        System.out.println("3333 " + msg);
        // 调用当前节点的下一个节点的write()
        ctx.write(msg, promise);
    }
}
(4) 修改服务端启动类
public class SomeServer {
    public static void main(String[] args) throws InterruptedException {
        EventLoopGroup parentGroup = new NioEventLoopGroup();
        EventLoopGroup childGroup = new NioEventLoopGroup();
        try {

            ServerBootstrap bootstrap = new ServerBootstrap();
            bootstrap.group(parentGroup, childGroup)
                    .channel(NioServerSocketChannel.class)
                    .childHandler(new ChannelInitializer<SocketChannel>() {

                        @Override
                        protected void initChannel(SocketChannel ch) throws Exception {

                            ChannelPipeline pipeline = ch.pipeline();
                            pipeline.addLast(new ChannelOutboundHandler1());
                            pipeline.addLast(new ChannelOutboundHandler2());
                            pipeline.addLast(new ChannelOutboundHandler3());
                        }
                    });

            ChannelFuture future = bootstrap.bind(8888).sync();
            System.out.println("服务器已启动。。。");
            future.channel().closeFuture().sync();
        } finally {
            parentGroup.shutdownGracefully();
            childGroup.shutdownGracefully();
        }
    }
}
(5) 演示

看到顺序是3,2,1,这就是Outbound和Inbound区别,Outbound是从tail节点开始的!
注意有个细节,在ChannelOutboundHandler2.handlerAdded方法里,我们添加的是一个定时任务!
public abstract class AbstractScheduledEventExecutor extends AbstractEventExecutor {
	...
    @Override
    public ScheduledFuture<?> schedule(Runnable command, long delay, TimeUnit unit) {
        ObjectUtil.checkNotNull(command, "command");
        ObjectUtil.checkNotNull(unit, "unit");
        if (delay < 0) {
            delay = 0;
        }
        validateScheduled0(delay, unit);

        // 将任务command封装为一个定时任务
        // schedule() 将定时任务添加到定时任务队列
        return schedule(new ScheduledFutureTask<Void>(
                this, command, null, ScheduledFutureTask.deadlineNanos(unit.toNanos(delay))));
    }
    <V> ScheduledFuture<V> schedule(final ScheduledFutureTask<V> task) {
        if (inEventLoop()) {
            // 将定时任务添加到定时任务队列
            // 至与添加完以后在哪执行的,之前已经分析过了
            scheduledTaskQueue().add(task);
        } else {
            execute(new Runnable() {
                @Override
                public void run() {
                    scheduledTaskQueue().add(task);
                }
            });
        }

        return task;
    }
    ...
}
为什么要加定时任务?如果不加,演示效果:
public class ChannelOutboundHandler2 extends ChannelOutboundHandlerAdapter {
    @Override
    public void write(ChannelHandlerContext ctx, Object msg, ChannelPromise promise)
            throws Exception {
        System.out.println("2222 " + msg);
        ctx.write(msg, promise);
    }
    @Override
    public void handlerAdded(ChannelHandlerContext ctx) throws Exception {
	    ctx.channel().write("Hello World 2222");
        //ctx.executor().schedule(() -> {
            // 调用pipeline的write()
       //     ctx.channel().write("Hello World 2222");
       // }, 1, TimeUnit.SECONDS);
    }
}
为什么没有处理器3呢?
主线程在添加处理器的时候,添加到第二个处理器以后,添加成功触发handlerAdded回调的时候,这些回调方法都是通过执行器的线程处理的,是两个线程,所以在触发handlerAdded写数据的时候,此时处理器3可能还没添加成功,所以就出现如上情况。
(6) 源码分析:
我们从ChannelOutboundHandler2 开始追踪:
public class ChannelOutboundHandler2 extends ChannelOutboundHandlerAdapter {
    @Override
    public void write(ChannelHandlerContext ctx, Object msg, ChannelPromise promise)
            throws Exception {
        System.out.println("2222 " + msg);
        ctx.write(msg, promise);
    }
    @Override
    public void handlerAdded(ChannelHandlerContext ctx) throws Exception {
	    //一旦ChannelOutboundHandler2 添加成功会触发该回调
	    //因为是定时任务,所以执行的时候已经延迟1秒,这个时候处理器3已经添加成功了
        ctx.executor().schedule(() -> {
            // 调用pipeline的write()
            ctx.channel().write("Hello World 2222");
        }, 1, TimeUnit.SECONDS);
    }
}
然后执行ctx.channel().write,注意这是Channel.write方法不是ChannelHandlerContext.write方法
public abstract class AbstractChannel extends DefaultAttributeMap implements Channel {
	...
    @Override
    public ChannelFuture write(Object msg) {
        // 调用tail节点的write()
        return pipeline.write(msg);
    }
    ...
}
继续看pipeline.write:
public class DefaultChannelPipeline implements ChannelPipeline {
	...
    @Override
    public final ChannelFuture write(Object msg) {
        // 调用tail节点的write()
        return tail.write(msg);
    }
    ...
}
看到调用的是tail节点的write,tail节点没有重写write方法,用的父类AbstractChannelHandlerContext 的write:
abstract class AbstractChannelHandlerContext implements ChannelHandlerContext, ResourceLeakHint {
	...
    // tail节点重写的write()
    @Override
    public ChannelFuture write(Object msg) {
        return write(msg, newPromise());
    }
    @Override
    public ChannelFuture write(final Object msg, final ChannelPromise promise) {
        write(msg, false, promise);

        return promise;
    }
    private void write(Object msg, boolean flush, ChannelPromise promise) {
        ObjectUtil.checkNotNull(msg, "msg");
        try {
            // 若promise失效,则释放msg
            if (isNotValidPromise(promise, true)) {
                ReferenceCountUtil.release(msg);
                // cancelled
                return;
            }
        } catch (RuntimeException e) {
            ReferenceCountUtil.release(msg);
            throw e;
        }

        // 从尾节点的顺序开始查找下一个节点
        // 如果flush是true,则(MASK_WRITE | MASK_FLUSH)或运算,就是writeAndFlush方法
        final AbstractChannelHandlerContext next = findContextOutbound(flush ?
                (MASK_WRITE | MASK_FLUSH) : MASK_WRITE);
        //之前有介绍过不说了,一般不用关注
        final Object m = pipeline.touch(msg, next);
        EventExecutor executor = next.executor();
        if (executor.inEventLoop()) {
            if (flush) {
	            //开启flush就是writeAndFlush
                next.invokeWriteAndFlush(m, promise);
            } else {
	            //我们的Demo应该走的是这里,注意此时next应该是节点3
                // 准备调用当前next节点的write()
                next.invokeWrite(m, promise);
            }
        } else {
            final AbstractWriteTask task;
            if (flush) {
                task = WriteAndFlushTask.newInstance(next, m, promise);
            }  else {
                task = WriteTask.newInstance(next, m, promise);
            }
            if (!safeExecute(executor, task, promise, m)) {
                // We failed to submit the AbstractWriteTask. We need to cancel it so we decrement the pending bytes
                // and put it back in the Recycler for re-use later.
                //
                // See https://github.com/netty/netty/issues/8343.
                task.cancel();
            }
        }
    }
    private AbstractChannelHandlerContext findContextOutbound(int mask) {
        // 从当前节点开始向前查找包含mask所指定方法的节点
        AbstractChannelHandlerContext ctx = this;
        do {
            ctx = ctx.prev;
        } while ((ctx.executionMask & mask) == 0);
        return ctx;
    }
    ...
}
继续跟invokeWrite:
abstract class AbstractChannelHandlerContext implements ChannelHandlerContext, ResourceLeakHint {
	...
    private void invokeWrite(Object msg, ChannelPromise promise) {
	    //invokeHandler判断处理器状态是否已经添加成功
        if (invokeHandler()) {
            invokeWrite0(msg, promise);
        } else {
            write(msg, promise);
        }
    }
    private void invokeWrite0(Object msg, ChannelPromise promise) {
        try {
	        //调用处理器的write方法,此时是3号节点的处理器
            ((ChannelOutboundHandler) handler()).write(this, msg, promise);
        } catch (Throwable t) {
            notifyOutboundHandlerException(t, promise);
        }
    }
    ...
}
public class ChannelOutboundHandler3 extends ChannelOutboundHandlerAdapter {
    @Override
    public void write(ChannelHandlerContext ctx, Object msg, ChannelPromise promise)
            throws Exception {
        System.out.println("3333 " + msg);
        // 调用当前节点的上一个节点的write()
        ctx.write(msg, promise);
    }
}
3号节点再次调用ChannelHandlerContext .write方法:
abstract class AbstractChannelHandlerContext implements ChannelHandlerContext, ResourceLeakHint {
	...
    @Override
    public ChannelFuture write(final Object msg, final ChannelPromise promise) {
        write(msg, false, promise);

        return promise;
    }
    ...
}
这里和tail节点执行write逻辑基本一样了,就不继续追踪了,一直会向上传递,最终会走到Head节点的write方法:
final class HeadContext extends AbstractChannelHandlerContext implements ChannelOutboundHandler, ChannelInboundHandler {
	...
    @Override
    public void write(ChannelHandlerContext ctx, Object msg, ChannelPromise promise) {
        // 调用底层unsafe的write(),完成真正的写操作
        unsafe.write(msg, promise);
    }
}
结论:InboudHandle传消息的时候是从Head节点开始往后传一直传到Tail,而OutboundHandle消息传递是从tail节点往前传,一直传到Head
4. 异常的传递与处理
(1) 创建工程 18-exceptionHandler
复制 16-channelInboundHandler 工程,在其基础上进行修改:18-exceptionHandler
(2) 修改 2 号 InboundHandler
在 2 号 InboundHandler 中产生异常。
public class ChannelInboundHandler2 extends ChannelInboundHandlerAdapter {
    @Override
    public void channelRead(ChannelHandlerContext ctx, Object msg)
            throws Exception {
        System.out.println("InboundHandler222 - 正常读取客户端数据");
        throw new ArrayIndexOutOfBoundsException("InboundHandler222 发生异常");
    }

    @Override
    public void exceptionCaught(ChannelHandlerContext ctx, Throwable cause)
            throws Exception {
        System.out.println("exception -- InboundHandler222");
        // 调用当前节点的下一个节点的exceptionCaught()
        ctx.fireExceptionCaught(cause);
    }
}
(3) 修改1号与3号 InboundHandler
public class ChannelInboundHandler1 extends ChannelInboundHandlerAdapter {
    @Override
    public void exceptionCaught(ChannelHandlerContext ctx, Throwable cause)
            throws Exception {
        System.out.println("exception -- InboundHandler111");
        ctx.fireExceptionCaught(cause);
    }
}
public class ChannelInboundHandler3 extends ChannelInboundHandlerAdapter {
    @Override
    public void exceptionCaught(ChannelHandlerContext ctx, Throwable cause)
            throws Exception {
        System.out.println("exception -- InboundHandler333");
        ctx.fireExceptionCaught(cause);
    }
}
(4) 添加两个 OutboundHandler
我们发现 ChannelOutboundHandlerAdapter 中的 exceptionCaught()方法已经过时,但我们在这里仅仅就是为了演示异常信息的传递方向,所以没有妨碍。
public class ChannelOutboundHandler1 extends ChannelOutboundHandlerAdapter {
    @Override
    public void exceptionCaught(ChannelHandlerContext ctx, Throwable cause)
            throws Exception {
        System.out.println("exception -- OutboundHandler111");
        ctx.fireExceptionCaught(cause);
    }
}
public class ChannelOutboundHandler2 extends ChannelOutboundHandlerAdapter {
    @Override
    public void exceptionCaught(ChannelHandlerContext ctx, Throwable cause)
            throws Exception {
        System.out.println("exception -- OutboundHandler222");
        ctx.fireExceptionCaught(cause);
    }
}
(5) 定义异常处理器
// 异常处理器
public class ExceptionCaughtHandler extends ChannelInboundHandlerAdapter {
    @Override
    public void exceptionCaught(ChannelHandlerContext ctx, Throwable cause)
            throws Exception {

        String msg = "发生异常";

        if (cause instanceof ArrayIndexOutOfBoundsException) {
            msg = "发生边界索引溢出异常";
        }

        System.out.println(msg);

        // 不再向下传递
        // ctx.fireExceptionCaught(cause);
    }
}
(6) 修改启动类
将异常处理器添加到 ChannelPipeline 的最后。
public class SomeServer {
    public static void main(String[] args) throws InterruptedException {
        EventLoopGroup parentGroup = new NioEventLoopGroup();
        EventLoopGroup childGroup = new NioEventLoopGroup();
        try {

            ServerBootstrap bootstrap = new ServerBootstrap();
            bootstrap.group(parentGroup, childGroup)
                    .channel(NioServerSocketChannel.class)
                    .childHandler(new ChannelInitializer<SocketChannel>() {

                        @Override
                        protected void initChannel(SocketChannel ch) throws Exception {

                            ChannelPipeline pipeline = ch.pipeline();
                            pipeline.addLast(new ChannelInboundHandler1());
                            pipeline.addLast(new ChannelInboundHandler2());  // 异常抛出
                            pipeline.addLast(new ChannelInboundHandler3());
                            pipeline.addLast(new ChannelOutboundHandler1());
                            pipeline.addLast(new ChannelOutboundHandler2());
                            pipeline.addLast(new ExceptionCaughtHandler());

                        }

                    });

            ChannelFuture future = bootstrap.bind(8888).sync();
            System.out.println("服务器已启动。。。");
            future.channel().closeFuture().sync();
        } finally {
            parentGroup.shutdownGracefully();
            childGroup.shutdownGracefully();
        }
    }
}
(7) 演示
ExceptionCaughtHandler先不添加时的效果:
服务端启动,向服务端发送一个消息

效果:
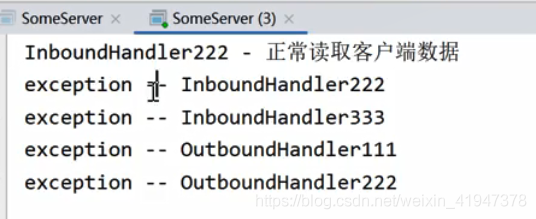
可以看出来调用链:
ChannelInboundHandler2.channelRead -> ChannelInboundHandler2.exceptionCaught -> ChannelInboundHandler3.exceptionCaught -> ChannelOutboundHandler1.exceptionCaught -> ChannelOutboundHandler2.exceptionCaught
也就是说异常在传递的时候是不分Inbound、Outbound,通通是从发生异常的节点往后传(实际上是先执行当前处理器的exceptionCaught方法,而我们实现是又调用了ctx.fireExceptionCaught(cause),才导致往后传的)
(8)源码分析:
我们从抛出异常的地方ChannelInboundHandler2.channelRead开始:
public class ChannelInboundHandler2 extends ChannelInboundHandlerAdapter {
    @Override
    public void channelRead(ChannelHandlerContext ctx, Object msg)
            throws Exception {
        System.out.println("InboundHandler222 - 正常读取客户端数据");
        throw new ArrayIndexOutOfBoundsException("InboundHandler222 发生异常");
    }
    ...
}
channelRead抛出异常,肯定有捕获的地方,是在AbstractChannelHandlerContext.invokeChannelRead执行处理器read方法的时候:
abstract class AbstractChannelHandlerContext implements ChannelHandlerContext, ResourceLeakHint {
	...
    private void invokeChannelRead(Object msg) {
        if (invokeHandler()) {  // 判断当前节点封装的处理器状态是否为已添加
            try {
                ((ChannelInboundHandler) handler()).channelRead(this, msg);
            } catch (Throwable t) {
                // 引发异常的处理
                notifyHandlerException(t);
            }
        } else {
            fireChannelRead(msg);
        }
    }
    private void notifyHandlerException(Throwable cause) {
        if (inExceptionCaught(cause)) {
            if (logger.isWarnEnabled()) {
                logger.warn(
                        "An exception was thrown by a user handler " +
                                "while handling an exceptionCaught event", cause);
            }
            return;
        }
        // 调用当前发生异常的节点的exceptionCaught()
        invokeExceptionCaught(cause);
    }
    private void invokeExceptionCaught(final Throwable cause) {
        if (invokeHandler()) {
            try {
	            //调用当前节点处理器的exceptionCaught,注意当前节点是ChannelInboundHandler2
                handler().exceptionCaught(this, cause);
            } catch (Throwable error) {
                if (logger.isDebugEnabled()) {
                    logger.debug(
                        "An exception {}" +
                        "was thrown by a user handler's exceptionCaught() " +
                        "method while handling the following exception:",
                        ThrowableUtil.stackTraceToString(error), cause);
                } else if (logger.isWarnEnabled()) {
                    logger.warn(
                        "An exception '{}' [enable DEBUG level for full stacktrace] " +
                        "was thrown by a user handler's exceptionCaught() " +
                        "method while handling the following exception:", error, cause);
                }
            }
        } else {
            fireExceptionCaught(cause);
        }
    }
	...
}
可以看出来会调用当前处理器的exceptionCaught方法,即ChannelInboundHandler2.exceptionCaught:
public class ChannelInboundHandler2 extends ChannelInboundHandlerAdapter {
	...
    @Override
    public void exceptionCaught(ChannelHandlerContext ctx, Throwable cause)
            throws Exception {
        System.out.println("exception -- InboundHandler222");
        // 调用当前节点的下一个节点的exceptionCaught()
        ctx.fireExceptionCaught(cause);
    }
}
abstract class AbstractChannelHandlerContext implements ChannelHandlerContext, ResourceLeakHint {
	...
    @Override
    public ChannelHandlerContext fireExceptionCaught(final Throwable cause) {
	    // findContextInbound之前讲Inbound消息传递讲过,实际上就是从当前节点的后面进行查询
	    // 此时会查询出ChannelInboundHandler3节点
        // 调用指定节点的exceptionCaught()
        invokeExceptionCaught(findContextInbound(MASK_EXCEPTION_CAUGHT), cause);
        return this;
    }
    //调用指定节点的exceptionCaught()
    static void invokeExceptionCaught(final AbstractChannelHandlerContext next, final Throwable cause) {
        ObjectUtil.checkNotNull(cause, "cause");
        EventExecutor executor = next.executor();
        if (executor.inEventLoop()) {
            // 调用当前next节点的exceptionCaught()
            // 此时next就是ChannelInboundHandler3节点
            next.invokeExceptionCaught(cause);
        } else {
            try {
                executor.execute(new Runnable() {
                    @Override
                    public void run() {
                        next.invokeExceptionCaught(cause);
                    }
                });
            } catch (Throwable t) {
                if (logger.isWarnEnabled()) {
                    logger.warn("Failed to submit an exceptionCaught() event.", t);
                    logger.warn("The exceptionCaught() event that was failed to submit was:", cause);
                }
            }
        }
    }
    ...
}
后面不跟了,逻辑基本一样,最终会执行到tail节点的exceptionCaught:
final class TailContext extends AbstractChannelHandlerContext implements ChannelInboundHandler {
	...
	@Override
    public void exceptionCaught(ChannelHandlerContext ctx, Throwable cause) {
        onUnhandledInboundException(cause);
    }
    protected void onUnhandledInboundException(Throwable cause) {
        try {
	        //警告:异常传递到pipline尾部,通常意味着最后一个处理器都没有处理这个异常
	        //不建议
            logger.warn(
                    "An exceptionCaught() event was fired, and it reached at the tail of the pipeline. " +
                            "It usually means the last handler in the pipeline did not handle the exception.",
                    cause);
        } finally {
            // 释放异常信息cause
            ReferenceCountUtil.release(cause);
        }
    }
	...
}
一般异常处理我们会再定义一个专门的异常处理器,放到pipline链的最后,即上面第五步,直接演示结果:

CSDN联合极客时间,共同打造面向开发者的精品内容学习社区,助力成长!
更多推荐


 1
1 0
0- 0


 已为社区贡献1条内容

所有评论(0)