pytorch加速下载——清华镜像源(conda或者pip版本)
pip使用清华镜像源临时使用pip install -i https://pypi.tuna.tsinghua.edu.cn/simple some-package把some-package替换为所需模块即可(还真有个模块叫some-package)如果报错,可能是因为pip版本不够(需≥10.0.0),先升级pip:pip install pip -U当然,升级pip本身也可以使用清华镜像源。安
一键AI生成摘要,助你高效阅读
问答
·
方法一:
1、查看自己电脑安装的cuda版本
打开终端(ctrl+alt+t)输入:
nvcc -V
2、打开终端,使用 conda 安装
安装前需要添加清华源,直接在终端或者创建的虚拟环境中输入相继运行下列五行命令:
# 添加清华源的pytorch
conda config --add channels https://mirrors.tuna.tsinghua.edu.cn/anaconda/pkgs/free/
conda config --add channels https://mirrors.tuna.tsinghua.edu.cn/anaconda/pkgs/main/
conda config --set show_channel_urls yes
conda config --add channels https://mirrors.tuna.tsinghua.edu.cn/anaconda/cloud/pytorch/

conda install pytorch torchvision cudatoolkit=10.0  # 删除安装命令最后的 -c pytorch,才会采用清华源安装。
3、安装完成后,测试torch和CUD
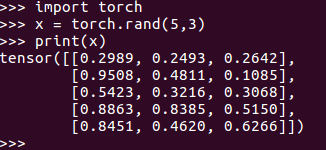
1)为了确保PyTorch安装正确,我们可以运行示例PyTorch代码来验证安装。这里我们将构造一个随机初始化的张量。
from __future__ import print_function
import torch
x = torch.rand(5, 3)
print(x)

# The output should be something similar to:
# tensor([[0.2989, 0.2493, 0.2642],
#         [0.9508, 0.4811, 0.1085],
#         [0.5423, 0.3216, 0.3068],
#         [0.8863, 0.8385, 0.5150],
#         [0.8451, 0.4620, 0.6266]])
如下图所示:

2)此外,要检查GPU驱动程序和CUDA是否能够被PyTorch启用和访问,需要运行以下命令以返回CUDA驱动程序是否已启用:
import torch
torch.cuda.is_available()

# the output is: True
如下图所示:

最后,大功告成!
方法二:
pip使用清华镜像源
临时使用
pip install -i https://pypi.tuna.tsinghua.edu.cn/simple some-package
把some-package替换为所需模块即可(还真有个模块叫some-package)
如果报错,可能是因为pip版本不够(需≥10.0.0),先升级pip:
pip install pip -U
当然,升级pip本身也可以使用清华镜像源。
安装pytorch
进入pytorch的官网,根据系统、python版本、cuda版本选择下载命令。
 添加上文所说的参数,然后记得去掉
 -f https://download.pytorch.org/whl/torch_stable.html,否则依然会很慢。即可通过清华镜像源高速下载pytorch,这里我下载的是pytorch1.3版本:
pip install torch===1.3.0 torchvision===0.4.1 -i https://pypi.tuna.tsinghua.edu.cn/simple
国内其他pip源:
清华:https://pypi.tuna.tsinghua.edu.cn/simple
中国科技大学 https://pypi.mirrors.ustc.edu.cn/simple/
华中理工大学:http://pypi.hustunique.com/
山东理工大学:http://pypi.sdutlinux.org/
豆瓣:http://pypi.douban.com/simple/
更多推荐
 已为社区贡献1条内容


所有评论(0)