
Ubuntu LLVM-CLang安装以及Helloworld pass
1.LLVM project安装参考https://github.com/llvm/llvm-project以及https://github.com/whjthu/llvm-examples1. Ubuntu版本为:Linux version 5.3.0-42-genericgcc version 7.4.0ubuntu~18.04.12. LLVM project源码下载Git...
1.LLVM project安装
参考https://github.com/llvm/llvm-project以及https://github.com/whjthu/llvm-examples
1. Ubuntu版本为:
Linux version 5.3.0-42-generic
gcc version 7.4.0
ubuntu~18.04.1
2. LLVM project源码下载
GitHub源码:https://github.com/llvm/llvm-project
使用git clone https://github.com/llvm/llvm-project.git进行下载
下载速度过慢的话可以使用码云,例如我的码云:
git clone https://gitee.com/jkkkl33/llvm-project.git
3.编译安装
下载完毕后cd llvm-project进入文件夹,新建build文件夹:
mkdir build
cd build
build
cmake -G <generator> [options] ../llvm
generator和options内容见GitHub页面,作者给出了一些常用选项。
如果想在Linux上安装release版本,则使用(此时在/llvm-project/build下):
cmake -DLLVM_ENABLE_PROJECTS=clang -G "Unix Makefiles" -DCMAKE_BUILD_TYPE=Release ../llvm/
若想安装带有libcxx 和libcxxabi的release版本,则使用
cmake -DLLVM_ENABLE_PROJECTS="clang;libcxx;libcxxabi" -G "Unix Makefiles" -DCMAKE_BUILD_TYPE=Release ../llvm/
个人推荐第二种,之前使用第一种时出现了cmake时找不到头文件的报错,查询无果,换成第二种之后正常(我是新手)。
之后
make -j2
sudo make install
由于我使用的时虚拟机,因此使用了-j2,各位可根据自己硬件条件修改,到此编译安装完成。
2. Hello pass
仅记录操作,无代码解析。
在~/llvm-project/llvm/lib/Transforms目录下建立文件夹function-pass,在function-pass文件夹下建立build、MyFunctionPass两个文件夹,创建CMakeLists.txt文件,修改文件内容如下:
cmake_minimum_required(VERSION 3.4)

find_package(LLVM REQUIRED CONFIG)
add_definitions(${LLVM_DEFINITIONS})
include_directories(${LLVM_INCLUDE_DIRS})
link_directories(${LLVM_LIBRARY_DIRS})
set(CMAKE_CXX_STANDARD 14)

add_subdirectory(MyFunctionPass)  # Use your pass name here.

在MyFunctionPass文件夹内创建MyFunctionPass.cpp、CMakeLists.txt两个文件,修改MyFunctionPass.cpp内容为:
#include "llvm/Pass.h"
#include "llvm/IR/Function.h"
#include "llvm/Support/raw_ostream.h"
#include "llvm/IR/LegacyPassManager.h"
#include "llvm/Transforms/IPO/PassManagerBuilder.h"

using namespace llvm;

namespace {
    class MyFunctionPass : public FunctionPass {
    public:
        static char ID;

        MyFunctionPass() : FunctionPass(ID) {}

        virtual bool runOnFunction(Function &F) {
            outs() << "Hello: ";
            outs().write_escaped(F.getName()) << "\n";
            return false;
        }
    };
}

char MyFunctionPass::ID = 0;

static RegisterPass<MyFunctionPass> X("myfunction", "My Function Pass");
static void registerPass(const PassManagerBuilder &,
                         legacy::PassManagerBase &PM) {
  PM.add(new MyFunctionPass());
}

static RegisterStandardPasses
    RegisterTheSpindlePass(PassManagerBuilder::EP_EarlyAsPossible, registerPass);
修改CMakeLists.txt内容为:
add_library(MyFunctionPass MODULE
    # List your source files here.
    MyFunctionPass.cpp
)

# Use C++11 to compile your pass (i.e., supply -std=c++11).
target_compile_features(MyFunctionPass PRIVATE cxx_range_for cxx_auto_type)

# LLVM is (typically) built with no C++ RTTI. We need to match that;
# otherwise, we'll get linker errors about missing RTTI data.
set_target_properties(MyFunctionPass PROPERTIES
    COMPILE_FLAGS "-fno-rtti"
)

# Get proper shared-library behavior (where symbols are not necessarily
# resolved when the shared library is linked) on OS X.
if(APPLE)
    set_target_properties(MyFunctionPass PROPERTIES
        LINK_FLAGS "-undefined dynamic_lookup"
    )
endif(APPLE)

build环节:
进入~/llvm-project/llvm/lib/Transforms/function-pass/build,执行
export LLVM_DIR=/path/to/llvm-build/lib/cmake/llvm
cmake ..
make
执行结果
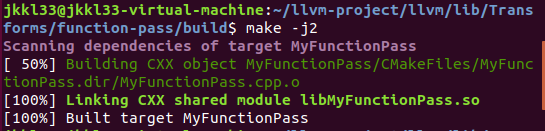
此时/function-pass/build/MyFunctionPass中会出现libMyFunctionPass.so
测试环节:
在build文件中新建待测试文件,例如我新建了test.c,内容如下:
void a(){}
void b(){
	a();a();
}
void c(){
	b();a();
}
void main(){
	a();c();
}
执行
clang -Xclang -load -Xclang MyFunctionPass/libMyFunctionPass.so test.c
结果为

到此pass结束

瓜分20万奖金 获得内推名额 丰厚实物奖励 易参与易上手
更多推荐

 0
0 0
0- 0


 已为社区贡献1条内容

所有评论(0)