
Spring Boot(7)--Uploading Files(Lambda,匿名内部类,上传文件 )
springboot的总官方学习文档本次本章对应的官方文档准备这次尝试自己新建一个项目,按照要求添加这两个依赖。新建一个文件夹storage(在demo里面新建的文件夹,其实就对应一个包)新建完发现下面没有出现我们新建的storage文件夹,F5刷新一下就出来了官网github提供的初始的项目就包含了storage包里面的文件,我是直接复制古来的,一个个新建太麻烦了新建个File...
准备
这次尝试自己新建一个项目,按照要求添加这两个依赖。

新建一个文件夹storage(在demo里面新建的文件夹,其实就对应一个包)

新建完发现下面没有出现我们新建的storage文件夹,F5刷新一下就出来了
官网github提供的初始的项目就包含了storage包里面的文件,我是直接复制古来的,一个个新建太麻烦了
新建个FileUploadController.java的控制类
然后FileUploadController.java写入对应的代码
然后新建一个网页的html

添加文件大小限制

记得在添加bean否则如下报错
APPLICATION FAILED TO START
Description:
Parameter 0 of constructor in com.example.demo.storage.FileSystemStorageService required a bean of type ‘com.example.demo.storage.StorageProperties’ that could not be found.
Action:
Consider defining a bean of type ‘com.example.demo.storage.StorageProperties’ in your configuration.
然后访问http://localhost:8080/ 网址就好了。

@EnableConfigurationProperties(StorageProperties.class)
以及
先说下面这段代码吧,再记录一下,希望每次理解都能更深入点
	@Bean
	public CommandLineRunner mingZiSuiBian(StorageService storageService) {
		return (args) -> {
			storageService.deleteAll();
			storageService.init();
		};//重写run方法
	}
Bean这个解释如下图

@Bean 表明一个产生bean的方法,并且这个方法会被Spring container管理。
官方给的在Spring XML 的示例如下:
@Bean
public MyBean myBean() {
// instantiate and configure MyBean obj
return obj;//最后还是返回了一个MyBean 对象 obj
}
所以
	@Bean
	public CommandLineRunner 名字随意啦(StorageService storageService) {
		return (args) -> {
			storageService.deleteAll();
			storageService.init();
		};//重写了run方法  ,并且返回了利用Lambda表达式实现实例化函数式接口的对象
	}
另外一种写法,不利用Lambda表达式,直接新建一个继承CommandLineRunner接口的类就行,并且再重载run函数。这种方法是之前常用的方法

@Component注释声明 MyStartupRunner1类作为CommandLineRunner接口的Component,会在spring bean初始化之后,SpringApplication run之前执行,可以控制在项目启动前初始化资源文件,比如初始化线程池,提前加载好加密证书等
作者:低调小熊猫
链接:https://www.jianshu.com/p/7e16f1b59ced
来源:简书
著作权归作者所有。商业转载请联系作者获得授权,非商业转载请注明出处。
还可以参考CommandLineRunner的使用,我直接赋到最后了
然后对于
@Autowired
private StorageService storageService; //StorageService 是一个接口

Autowired注释会自动注入这个接口的一个实现,在本次程序之中,只有FileSystemStorageService这一个实现

我们可以设置一个断点,然后debug,会发现运行到了FileSystemStorageService实现里面了

其中有个@Autowired的要注意

其中StorageProperties的代码如下图

关于这种用法,在官网中的介绍如下(网址) 中文翻译直接加粗了
3.5. Spring Beans and Dependency Injection
You are free to use any of the standard Spring Framework techniques to define your beans and their injected dependencies. For simplicity, we often find that using @ComponentScan (to find your beans) and using @Autowired (to do constructor injection) works well.
你能任意使用Spring框架技术的定义你的beans和这些beans的注入依赖。为了方便,我们通常使用@ComponentScan (来发现你的beans)并且使用@Autowired(来构建注入)
If you structure your code as suggested above (locating your application class in a root package), you can add @ComponentScan without any arguments. All of your application components (@Component, @Service, @Repository, @Controller etc.) are automatically registered as Spring Beans.
如果你像上面建议的方式(在你的根包的应用类中)构建你的代码,你能够添加@ComponentScan而不需要其他的声明。所有你的应用组件(@Component, @Service, @Repository, @Controller etc注释的类)是自动作为 Spring Beans注册。
The following example shows a @Service Bean that uses constructor injection to obtain a required RiskAssessor bean:
下面的例子,显示了一个 @Service Bean使用 构造注入 来获得一个需要的 RiskAssessor bean
package com.example.service;

import org.springframework.beans.factory.annotation.Autowired;
import org.springframework.stereotype.Service;

@Service
public class DatabaseAccountService implements AccountService {

    private final RiskAssessor riskAssessor;

    @Autowired
    public DatabaseAccountService(RiskAssessor riskAssessor) {
        this.riskAssessor = riskAssessor;
    }

    // ...

}
数据传输 请求和响应
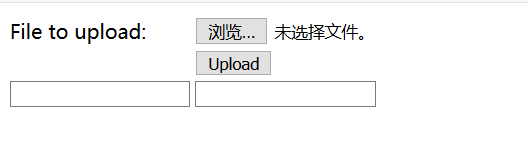
前端页面
	<div>
<!-- 			表单传送是post方式,编码方式是multipart/form-data  发送请求的网址 "/" -->
		<form method="POST" enctype="multipart/form-data" action="/">
			<table>
				<tr>
<!-- 					下面的td 就是个文字而已 -->
					<td>File to upload:</td>
<!-- 					文档输入的input标签 -->
					<td><input type="file" name="file" /></td>
				</tr>
				<tr>
					<td></td>
<!-- 					因为是一个form, 有一个type设置成submit 就是默认的提交按钮 -->
					<td><input type="submit" value="Upload" /></td>
				</tr>
				<tr>

					<td><input type="text" name="id" /></td>
					<td><input type="text" name="secret" /></td>
				</tr>
			</table>
		</form>
	</div>
显示前台界面如下
发送数据


在后面还有我们新加的两个input 参数

HTTP请求中通常会有遇到 Form Data和Request Payload 参数
这两种格式的区分是通过Content-Type进行区分的,
- 如果Content-Type为Content-Type:
application/x-www-form-urlencoded则浏览器传输给接口的格式方式为Form Data; - 如果Content-Type为Content-Type: application/json或者Content-Type:
multipart/form-data则浏览器传输给接口的格式方式为Request Payload。
后端
在后台的@Controller 类中,我们先用笨方法,直接使用HttpServletRequest 接口获取http请求的所有内容,debug一下,即下面的语句
public String handleFileUpload2(HttpServletRequest request)
debug 如下图,multipartFiles 这个属性保存 文件,multipartParameterNames这个属性保存 前台传递的参数

@PostMapping("/")
	public String handleFileUpload2(HttpServletRequest request) throws IOException {

		//获取参数的值
		System.out.println(request.getParameter("id"));

    	//如果想获取文件对象,那么需要吧接口request强制转化为
    	   //StandardMultipartHttpServletRequest类
		StandardMultipartHttpServletRequest get=(StandardMultipartHttpServletRequest)request;
		//然后根据key值 file  得到文件对象
		MultipartFile files=get.getMultiFileMap().getFirst("file");


		//打印请求头信息
		Enumeration<String> readInfo=request.getHeaderNames();
    	MultipartHttpServletRequest multiRequest=(MultipartHttpServletRequest)request;
    	while(readInfo.hasMoreElements()) {
    		String name=readInfo.nextElement();
    		String value=request.getHeader(name);

    		System.out.println(name+":"+value);
    	}


		//重新到了转到  http://localhost:8080/ 这个网址
		return "redirect:/";
	}
因为我们从get.getMultiFileMap() 中的 file 这个key 对应的value是 Linkedlist 所以需要的是getFirst 函数,返回value[0] 所存储的对象

然后关于request 的类型是RequestFacade 类,这里是Tomcat的门面模式
因为Tomcat中有很多不同组件,每个组件要相互通信,但是又不能将自己内部数据过多的暴露给其他组件。用门面模式隔离数据是个很好的方法。
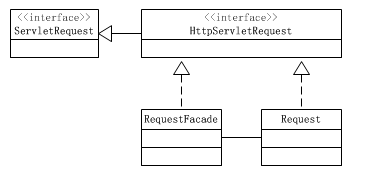
参考网址:https://www.cnblogs.com/ysd139856/p/12536933.html

好了,基本的说明就在这里了,那么上面那样通过一个HttpServletRequest request 接口来接受请求,并且一步步提取请求附加的数据太麻烦了。
我们可以直接通过@RequestParam(“key”) 直接来提取参数,比如上传文件的对象 对应的key是 file,直接 @RequestParam(“file”) MultipartFile file 就行了

下图就是SpringBoot官网知道的写法
public String handleFileUpload(@RequestParam("file") MultipartFile file,
			RedirectAttributes redirectAttributes) throws IOException {

		storageService.store(file);//保存文件
		redirectAttributes.addFlashAttribute("message",
				"You successfully uploaded " + file.getOriginalFilename() + "!");

		//重新到了转到  http://localhost:8080/ 这个网址
		return "redirect:/";
	}
然后说一下FileSystemStorageService这个类
关于@Service参考了下面网址Spring注解@Component、@Repository、@Service、@Controller区别
SpringMVC的四个基本注解annotation(控制层,业务层,持久层)–@Component,@Repository@Service,@Controller
spring三层示例controller层,service层示例,dao层示例,完全代码
spring 2.5 中除了提供 @Component 注释外,还定义了几个拥有特殊语义的注释,它们分别是:
@Repository、@Service 和 @Controller。
这 3 个注释分别和持久层、业务层和控制层(Web 层)相对应。
@Repository持久层组件,用于标注数据访问组件,即DAO组件
@Controller用于标注控制层组件(如struts中的action)
@Service 此注注解属于业务逻辑层
@Component泛指组件,是上面三个的老大哥,当组件不好归类的时候,我们可以使用这个注解进行标注。
示例:

1.  控制层
@Controller // 注释为controller
@RequestMapping("/login")
public class LoginAction {
//假如,有两个类来实现一个接口,会出现冲突的问题。写了参数,它就不冲突了,
 repository(value="a")。

 @Autowired
 @Qualifier("userService") //注释指定注入 Bean
 private IUserService userService;
 。。。。。。 其他略 。。。。。。
}
2.  业务逻辑层     对数据库返回的数据进行一系列操作,本次的例子就是把前端附带的图片保存到了本地
@Service("userService")
public class UserServiceImpl implements IUserService {
    @Autowired
    @Qualifier("userDao")
    private IUserDao userDao;
 。。。。。。 其他略 。。。。。。
}

3.  持久层 就是访问数据库的数据并返回

@Repository("userDao")
public class UserDaoImpl implements IUserDao {
 private static Logger logger = LoggerFactory.getLogger(UserDaoImpl.class);
 private DataSource dataSource;
    private JdbcTemplate template;

    @Autowired
    public UserDaoImpl(DataSource dataSource){
        this.dataSource= dataSource;
        template = new JdbcTemplate(this.dataSource);
    }
 。。。。。。 其他略 。。。。。。

}
关于@Service(student) 括号里面student是你自己定义的bean名字,Spring自动根据bean的类名实例化一个首写字母为小写的bean,例如Chinese实例化为chinese
这是的student是要实现的类的一个对象名而已,比如在一个Student实现类上加@Service(“student”),括号里面就是给实例化后的Student对象取个名字。这是在一个接口有多个实现类的情况下区分实现类的方式。
比如在service中 Student实现了Person接c口,在controller里面@Autowired Person时,假如这时Person还有另一个实现类User,为了确定实例化Student还是User, @Service括号里面的东西就有用了。
在@controller里面
@Autowired
@Qualifier(“student”)
private Person person;
这样就确定实例化了一个person指向一个Student对象
这篇写的够多了,关于thymeleaf网页下一个文章来学习吧
CommandLineRunner
1.两种实现方式
- 1.1继承CommandLineRunner接口
- 2.为什么要使用CommandLineRunner
springboot的 CommandLineRunner 接口主要用于实现应用初始化之后,去执行一段逻辑代码,并且在整个项目的声明周期中,执行一次,源码如下:
package org.springframework.boot;

public interface CommandLineRunner {
    void run(String... var1) throws Exception;
}
1.两种实现方式
1.1继承CommandLineRunner接口
和注解 @Componerent一起使用,如果涉及到多个,用@Order()注解去设置执行顺序
@Component
@Order(value = 1)
public class CLR1 implements CommandLineRunner{
public void run(String... strings) throws Exception {
     //do something
   }
}

@Component
@Order(value = 2)
public class CLR2 implements CommandLineRunner{
public void run(String... strings) throws Exception {
     //do something
   }
}
1.2 和@Bean连用,返回CommandLineRunner实例
@Bean   //initialize这个函数名无所谓
public CommandLineRunner initialize(SomeModel ModelInstance) {
    return (abc) -> {
        ModelInstance.dosomething(...)
    };
}
该方法需要放在有@Component/@SpringBootApplication注解的类上
abc为任意字符,SomeModel ModelInstance 为用Spring bean对象,controller中可用@Resource@Autowired接收

瓜分20万奖金 获得内推名额 丰厚实物奖励 易参与易上手
更多推荐

 0
0 0
0- 0


 已为社区贡献1条内容

所有评论(0)