
小程序map实现 marker、导航
marker. WXML<map class="map" longitude="{{longitude}}" latitude="{{latitude}}" markers="{{markers}}" include-points="{{markers}}" bindmarkertap="clickMarker" wx:if="{{true}}" show-location><..
一键AI生成摘要,助你高效阅读
问答
·
marker
. WXML
<map class="map" longitude="{{longitude}}" latitude="{{latitude}}" markers="{{markers}}" include-points="{{markers}}" bindmarkertap="clickMarker" wx:if="{{true}}" show-location></map>
1.获取本地数据
第一步,地图文件目录下创建假数据
falseData.js
module.exports = [
  {
    "name": "标记31",
    "lon": 120.087895,
    "id": "id1",
    "lat": 30.262847,
    "duoyu":"哈哈哈哈"
  },
  {
    "name": "标记2",
    "lon": 119.939362,
    "id": "id2",
    "lat": 30.261266,
    "duoyu": "哈哈哈哈2"
  },
  {
    "name": "标记3",
    "lon": 120.164398,
    "id": "id3",
    "lat": 30.186868,
    "duoyu": "哈哈哈哈3"
  }
]
第二步,js文件引入假数据
.js
let falseData = require('falseData')
第三步,将本地数据赋值给markers,具体实现如下:
let falseData = require('falseData')

Page({

  /**
   * 页面的初始数据
   */
  data: {
    latitude: 40.006103,
    longitude: 116.4965075,
    markers:[{
      id: 0,
      name:"no",
      iconPath: "../../images/ic_small.png",
      latitude: 23.099994,
      longitude: 113.324520,
      width: 50,
      height: 50
    }]

  },

  /**
   * 生命周期函数--监听页面加载
   */
  onLoad: function (options) {
    //授权定位
    this.locationAuth();
  },

  locationAuth:function(){
    wx.getSetting({
      success: (res) => {
        console.log(JSON.stringify(res))
        // res.authSetting['scope.userLocation'] == undefined    表示 初始化进入该页面
        // res.authSetting['scope.userLocation'] == false    表示 非初始化进入该页面,且未授权
        // res.authSetting['scope.userLocation'] == true    表示 地理位置授权
        if (res.authSetting['scope.userLocation'] != undefined && res.authSetting['scope.userLocation'] != true) {
          wx.showModal({
            title: '请求授权当前位置',
            content: '需要获取您的地理位置,请确认授权',
            success: function (res) {
              if (res.cancel) {
                wx.showToast({
                  title: '拒绝授权',
                  icon: 'none',
                  duration: 1000
                })
              } else if (res.confirm) {
                wx.openSetting({
                  success: function (dataAu) {
                    if (dataAu.authSetting["scope.userLocation"] == true) {
                      wx.showToast({
                        title: '授权成功',
                        icon: 'success',
                        duration: 1000
                      })
                      //再次授权,调用wx.getLocation的API
                      this.showMaps();
                    } else {
                      wx.showToast({
                        title: '授权失败',
                        icon: 'none',
                        duration: 1000
                      })
                    }
                  }
                })
              }
            }
          })
        } else if (res.authSetting['scope.userLocation'] == undefined) {
          //调用wx.getLocation的API
          this.showMaps();
        }
        else {
          //调用wx.getLocation的API
          this.showMaps();
        }
      }
    })
  },
  //定位
  showMaps:function(){
    var that = this;
    wx.showLoading({
      title: "定位中",
      mask: true
    })
    wx.getLocation({
      type: 'gcj02',
      altitude: true, //高精度定位  定位成功,更新定位结果
      success: (res) => {
        var latitude = res.latitude
        var longitude = res.longitude
        that.setData({
          latitude: latitude,
          longitude: longitude,
          hasMarkers: true,
          markers:this.getFalseDataLocations()
        })

      },
      // 定位失败回调
      fail: function () {
        wx.showToast({
          title: "定位失败le",

        })
      },
      complete: function () {
        //隐藏加载框
        wx.hideLoading()
      }
    })
  },
  //获取mark标记点本地假数据哦
  getFalseDataLocations(){
    let myMarker = [];
    for (let item of falseData){
      //创建标记点
       let singleMark = this.createMyMarker(item);
       myMarker.push(singleMark)
    }
    return myMarker;
  },
  //创建标记点
  createMyMarker(point){
    let mark = {
      id: point.id || 0,
      name: point.name || 0,
      iconPath: '../../images/center-location.png',
      latitude: point.lat || 0,
      longitude: point.lon || 0,
      width: 50,
      height: 50
    };
    return mark;

  },


})
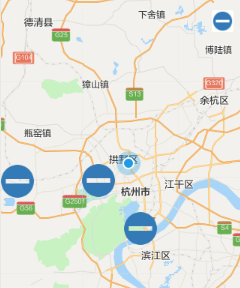
结果出来啦:
2. 获取网络数据
http请求把域名安全校验关掉。
定位成功后调用网络获取数据
//网络获取mark标记点
  getFalseDataLoca(){
    let myMarkers = [];
    let netMarkers = [];
    var that = this;
    wx.request({
      url: "请求地址",
      data: {},
      method: "GET",
      header: {
        'content-type': 'application/x-www-form-urlencoded', // 默认值
      },
      success: (res) => {
        console.log(res)
        netMarkers = res.data.data.station_list;

        for (let index in netMarkers) {
          let marker = {
            iconPath: '../../images/ic_small.png',
            id: index || '0',
            name: netMarkers[index].station_name || '',
            latitude: netMarkers[index].station_lat,
            longitude: netMarkers[index].station_lon,
            width: 25,
            height: 25
          }

          myMarkers.push(marker)
        }

        that.setData({
          markers: myMarkers,
        })
      }
    })
  }
备注:我曾经因为循环取数据时,将of写成 in了,然后弄了半小时才发现写错了,哈哈,仔细点就好了

3.marker点击
.wxml中map标签下添加
bindmarkertap="clickMarker"
.js中添加点击方法
clickMarker(e){
     console.log(e);
     console.log(e.markerId);
    wx.navigateTo({
      url: '../test/testDetail?testInfo=' + e.markerId + '&time=' + e.timeStamp,
    })
  }
导航
1、循环中传值经纬度
依靠data- **传值,然后方法里面取到
<view class='' wx:for="{{testList}}"....>

  <view class='' data-lat='{{item.station_lat}}' data-lon='{{item.station_lon}}' data-name='{{item.station_name}}' data-address='{{item.station_address}}' catchtap="navRoad">
      </view>

 </view>
//导航
navRoad(event) {
//console.log(event.currentTarget.dataset)
wx.getLocation({ //获取当前经纬度
type: 'wgs84', //返回可以用于wx.openLocation的经纬度,
success: function (res) {
wx.openLocation({ //使用微信内置地图查看位置。
latitude: event.currentTarget.dataset.lat, //要去的纬度-地址
longitude: event.currentTarget.dataset.lon, //要去的经度-地址
name: event.currentTarget.dataset.name,
address: event.currentTarget.dataset.address
})
}
})
},
2、变量中取值经纬度
3、marker中取值经纬度(没有实际接口,简写了)
点击获得markerId,根据markerId网络请求获取marker点详情信息,获得经纬度传值即可

旨在为数千万中国开发者提供一个无缝且高效的云端环境,以支持学习、使用和贡献开源项目。
更多推荐


 5
5 0
0- 0


 已为社区贡献1条内容

所有评论(0)