【Web前端笔记-基础】第十三课,Javascript的DOM和BOM基础部分
一:基础概念Web APIs 是W3C组织的标准。Web APIs 我们主要学DOM和BOM的部分Web APIs 是JS所独有的主要学习页面交互的功能需要使用JS基础部分作基础二:API和Web APIAPI:是指应用程序编程接口,是一些预定义的函数,目的是提供应用程序与开发人员于某软件或硬件得以访问一组历程的能力,而又无需访问源码或理解内部工作机制的细节。Web ...
一:基础概念
- Web APIs 是W3C组织的标准。
- Web APIs 我们主要学DOM和BOM的部分
- Web APIs 是JS所独有的
- 主要学习页面交互的功能
- 需要使用JS基础部分作基础
二:API和Web API
API:是指应用程序编程接口,是一些预定义的函数,目的是提供应用程序与开发人员于某软件或硬件得以访问一组历程的能力,而又无需访问源码或理解内部工作机制的细节。
Web API:是浏览器提供的一套操作浏览器功能和页面元素的API(BOM和DOM)。
三:DOM导读
1.什么是DOM?
文档对象模型,是W3C组织推荐的处理可扩展标记语言(HTML和XML)的标准编程接口。
W3C已经定义了一系列的DOM接口,通过这些DOM接口可以改变网页的内容,结构和样式。
2.DOM树(文档对象模型)

-
文档:一个页面就是一个文档,DOM使用document表示的
-
元素:页面中的所有标签都是元素,DOM中用element表示
-
节点:网页中所有内容都是节点,(标签,属性,文本,注释),用node表示。
-
DOM把以上所有内容都看作是对象。
四:获取元素
DOM在实际开发中用来操作元素,那如何操作呢?有以下几种方法:
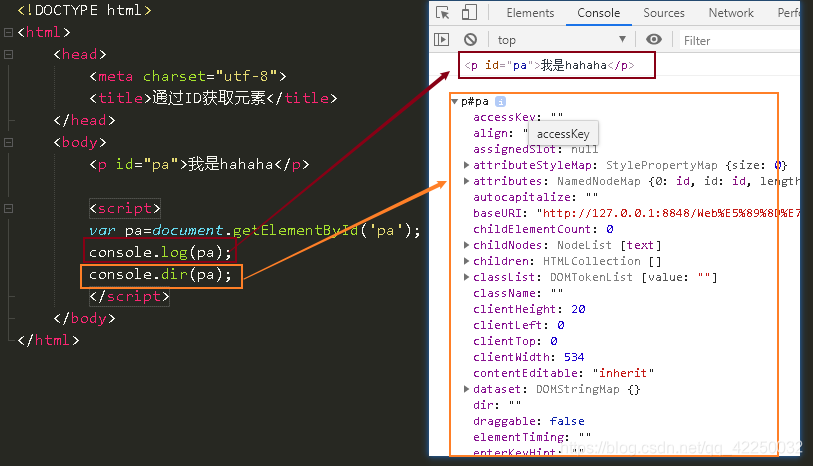
- 根据ID来获取
document.getElementById(id);
例子:
<!DOCTYPE html>
<html>
	<head>
		<meta charset="utf-8">
		<title>通过ID获取元素</title>
	</head>
	<body>
		<p id="pa">我是hahaha</p>

		<script>
		var pa=document.getElementById('pa');
		console.log(pa);
		//打印返回元素对象,有利于更好地查看里面的内容
		console.dir(pa);
		</script>
	</body>
</html>
效果:
- 根据标签名来获取
getElementByTagName('li');返回指定标签对象的合集
以伪数组的形式存储,即使只有一个li,返回的也是伪数组。
想要依次获取里面的内容,要进行遍历,得到的元素对象是动态的,如果页面中根本没有li元素,则返回空的个数为0的伪数组,里面的内容是undefined。
例子:
<!DOCTYPE html>
<html>
	<head>
		<meta charset="utf-8">
		<title>通过标签名获取元素</title>
	</head>
	<body>
		<ul>
		<li>我想要怒放的生命</li>
		<li>我想要怒放的生命</li>
		<li>我想要怒放的生命</li>
		<li>我想要怒放的生命</li>
		</ul>

		<script type="text/javascript">
			var lis=document.getElementsByTagName('li');
			console.log(lis);
		</script>
	</body>
</html>
效果:

例子(遍历):
<!DOCTYPE html>
<html>
	<head>
		<meta charset="utf-8">
		<title>通过标签名获取元素</title>
	</head>
	<body>
		<ul>
		<li>我想要怒放的生命1</li>
		<li>我想要怒放的生命2</li>
		<li>我想要怒放的生命3</li>
		<li>我想要怒放的生命4</li>
		</ul>

		<script type="text/javascript">
			var lis=document.getElementsByTagName('li');
			console.log(lis);
			for(var i=0;i<lis.length;i++)
			{
				console.log(lis[i]);
			}
		</script>
	</body>
</html>
效果:

- H5新增的方法来获取(IE9以上)
document.getElementsByClassName('类名')
document.querySelector(选择器) 返回选择器的第一个元素对象
document.querySelectorAll(选择器)返回指定选择器的所有对象
- 获取body和html
document.body
document.documentElement
四:事件基础
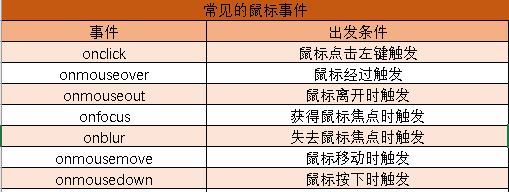
- 什么是事件?
Javascript是我们有能力创造动态页面,而事件是可以被Javascript检测到的行为,这些,可以简单的理解为触发响应机制。事件是由三个部分组成,事件源,事件类型,事件处理程序。事件源:事件被触发的对象,如按钮。事件类型:如何触发事件,如点击,鼠标经过,滑动轮,键盘按下。事件处理程序:通过一个函数赋值的方式来做。
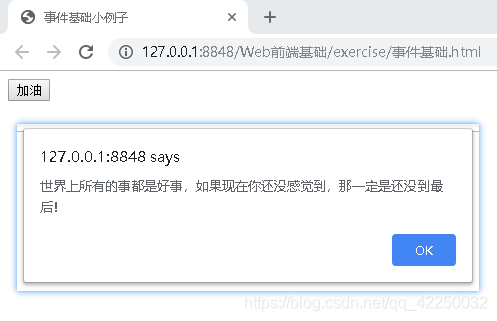
例子:
<!DOCTYPE html>
<html>
	<head>
		<meta charset="utf-8">
		<title>事件基础小例子</title>
	</head>
	<body>
		<button type="button" id="displ">加油</button>

		<script type="text/javascript">
			var displ=document.getElementById("displ");//获取事件源
			displ.onclick=function(){//注册事件,处理程序
				alert("世界上所有的事都是好事,如果现在你还没感觉到,那一定是还没到最后!");
			}
		</script>
	</body>
</html>
效果:
五:操作元素
1.修改元素的内容
element.innerText:从起始位置到终止位置的内容,但去除HTML标签,同时空格和换行也会去掉。
element.innerHTML:从起始位置到终止位置的内容,包括空格标签和空格换行。
例子:
<!DOCTYPE html>
<html>
	<head>
		<meta charset="utf-8">
		<title>显示当前系统时间</title>
		<style type="text/css">
			P{
				display: block;
				height: 20px;
				width: 273px;
				background-color: #FA8072;
			}
		</style>
	</head>
	<body>
		<button type="button">当前时间</button>
		<br />
		<p></p>
		<div>
		</div>

		<script type="text/javascript">
			//1.获取时间源
			var btn=document.querySelector("button");
			var timer=document.querySelector("p");
			//2.添加事件,处理程序
			btn.onclick=function(){
				timer.innerText=disTim();
			}
			function disTim(){

					var date=new Date();
					var yea=date.getFullYear();
					var mon=date.getMonth();
					var dayy=date.getDay();
					var dat=date.getDate();
					var hor=date.getHours();
					var mins=date.getMinutes();
					var sec=date.getSeconds();
					var zdat=["星期日","星期一","星期二","星期三","星期四","星期五","星期六"];
					var timers=yea+"年"+mon+"月"+dat+"日"+" "+zdat[dayy]+" "+hor+"时"+mins+"分"+sec+"秒";
					return timers;


			}
			var gp=document.querySelector("div");
			gp.innerText=disTim();
		</script>
	</body>
</html>
效果:

2.修改元素属性(以src举例)
一般元素属性的修改:
例子(分时问候):
<!DOCTYPE html>
<html>
	<head>
		<meta charset="utf-8">
		<title>问候语</title>
	</head>
	<body>
		<img src="../img/morning.png" />
		<script type="text/javascript">
			//1.获取事件源
			var grattings=document.querySelector("img");
			//注册事件,处理程序
			var dat= new Date();
			var hou=dat.getHours();
			console.log(hou);
			if(hou<12){
				grattings.src="../img/morning.png";
			}else if(hou<21){
				grattings.src="../img/afternoon.png";
			}else{
				grattings.src="../img/evening.png";
			}
		</script>
	</body>
</html>
效果:

表单元素属性的修改:
表单:type value checked selected disabled
修改:imput.value="被点击了";
禁用按钮:btn.disabled="true";另外,获取到的元素时对象,所以可以用this代替。这里的this指的是函数的调用者。
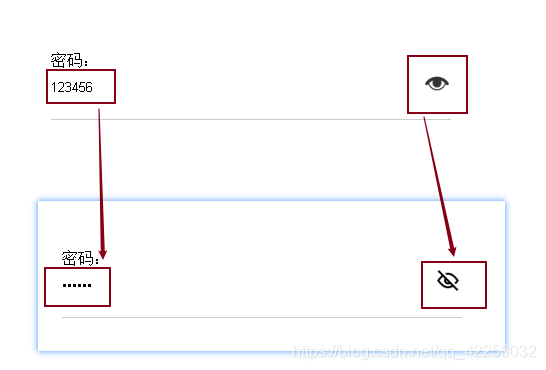
例子(显示密码案例):
<!DOCTYPE html>
<html>
	<head>
		<meta charset="utf-8">
		<title>显示密码</title>
		<style type="text/css">
			.box{
				width: 400px;
				border-bottom: 1px solid #ccc;
				margin: 100px auto;
				position: relative;
			}
			.box input{
				width: 370px;
				height: 30px;
				border: 0;
				outline: none;

			}
			.box img{
				width: 24px;
				position: absolute;
				top: 20px;
				right: 2px;
			}
		</style>
	</head>
	<body>
		<div class="box">
			<label>
				<img src="https://www.easyicon.net/api/resizeApi.php?id=1223056&size=128" >

			</label>
			密码:<input type="password" name="" id="" value="" />
			<p></p>

		</div>

		<script type="text/javascript">
			//1.获取事件源
			var eye=document.querySelector("img");
			var psw=document.querySelector("input");
			//2.注册事件,处理程序
			var flag=0;
			eye.onclick=function(){
				if(flag==0){
					psw.type="text";
					this.src="../img/openEye.png";
					flag=1;
				}else{
					psw.type="password";
					this.src="https://www.easyicon.net/api/resizeApi.php?id=1223056&size=128";
					flag=0;
				}
			}
		</script>
	</body>
</html>
效果:
3.修改样式属性
我们可以修改元素的大小,颜色,位置等样式
1.element.style 行内样式操作,采用驼峰命名法。
2.element.className 类名样式操作,适合于更改样式较多,或功能复杂的情况。
小案例(关闭二维码):
<!DOCTYPE html>
<html>
	<head>
		<meta charset="utf-8">
		<title>关闭二维码广告</title>
		<style type="text/css">
			.box{
				width: 150px;
				height: 150px;
				margin: 100px auto;
				position: relative;
			}
			.box img{

			}
			.box i{
				display: block;
				height: 10px;
				width: 10px;
				border: 1px solid #ccc;
				position: absolute;
				left: -3px;
				top: 0px;
				line-height: 10px;
				color: #ccc;
				cursor: pointer;
			}
		</style>
	</head>
	<body>
		<div class="box">
			<img src="https://www.easyicon.net/api/resizeApi.php?id=1124138&size=128" >
			<i>x</i>
		</div>

		<script type="text/javascript">
			//1.获取事件
			var la=document.querySelector("i");
			var box=document.querySelector(".box");
			//2.创建事件,处理程序
			la.onclick=function(){
				box.style.display="none";
			}

		</script>
	</body>
</html>
效果:

小案例:显示隐藏文本框中的内容
<!DOCTYPE html>
<html>
	<head>
		<meta charset="utf-8">
		<title>显示隐藏文本框中的内容</title>
		<style type="text/css">
			.box{
				width: 230px;
				height: 28px;
				/* border: 1px solid red; */
				margin: 100px auto;
			}
			.box input{
				color: #ccc;
			}
		</style>
	</head>
	<body>
		<div class="box">
			<input type="text" name="" id="" value="手机" />
			<button type="button">搜索</button>
		</div>

		<script type="text/javascript">
			//1.获取事件
			var teva=document.querySelector("input");
			//2.创建事件,处理程序
			teva.onfocus=function(){
				if(this.value=="手机"){
				this.value="";
				}
				this.style.color="#333";
			}
			teva.onblur=function(){
				if(this.value==""){
					this.value="手机";
					this.style.color="#ccc";
				}

			}
		</script>
	</body>
</html>
效果:

小案例:密码框验证事件
<!DOCTYPE html>
<html>
	<head>
		<meta charset="utf-8">
		<title>显示密码</title>
		<style type="text/css">
			.box{
				width: 400px;
				border-bottom: 1px solid #ccc;
				margin: 100px auto;
				position: relative;
			}
			.box input{
				width: 370px;
				height: 30px;
				border: 0;
				outline: none;

			}
			.box img{
				width: 24px;
				position: absolute;
				top: 20px;
				right: 2px;
			}
			.tipsYes{
				display:block;
				font-size: 16px;
				color: #999;
				width: 400px;
				background-image: url(https://www.easyicon.net/api/resizeApi.php?id=11966&size=16) ;
				background-repeat: no-repeat;
				padding-left: 18px;
				margin: -90px auto;
				/* border: 1px solid red; */
			}
			.tipsNO{
				display:block;
				font-size: 16px;
				color: #999;
				width: 400px;
				background-image: url(https://www.easyicon.net/api/resizeApi.php?id=500505&size=16) ;
				background-repeat: no-repeat;
				padding-left: 18px;
				margin: -90px auto;
				/* border: 1px solid red; */
			}
		</style>
	</head>
	<body>
		<div class="box">
			<label>
				<img src="https://www.easyicon.net/api/resizeApi.php?id=1223056&size=128" >

			</label>
			密码:<input type="password" name="" id="" value="" />


		</div>
		<div>
			<p class="tipsYes">请输入6-16位密码!</p>
		</div>
		<script type="text/javascript">
			//1.获取事件源
			var eye=document.querySelector("img");
			var psw=document.querySelector("input");
			var tips=document.querySelector("p");
			//2.注册事件,处理程序
			var flag=0;
			eye.onclick=function(){
				if(flag==0){
					psw.type="text";
					this.src="../img/openEye.png";
					flag=1;

				}else{
					psw.type="password";
					this.src="https://www.easyicon.net/api/resizeApi.php?id=1223056&size=128";
					flag=0;
				}
			}
			psw.onblur=function(){
				if(this.value.length<6||this.value.length>16)
				{
					tips.className="tipsNO";
					tips.innerText="您输入的密码错误,请重新输入!";
				}else{
					// 输入正确时,提示消失
					tips.style.display="none";
				}
			}
		</script>
	</body>
</html>
效果:


CSDN联合极客时间,共同打造面向开发者的精品内容学习社区,助力成长!
更多推荐


 0
0 0
0- 0


 已为社区贡献1条内容

所有评论(0)