

升级到PyTorch 2.0的技巧总结
PyTorch 2.0编译模式具有显著提高训练和推理速度的潜力,可以显著节省成本,但是模型实现这一潜力所需的工作量可能会有很大差异。许多公共模型只需要修改一行代码。而其他模型特别是那些包含非标准操作、动态形状和/或大量交错Python代码的模型,可能得不偿失甚至无法进行。但是现在开始修改模型是一个很好的选择,因为目前来看torch.compile对于PyTorch2来说是一个重要且持续的特性。作者
PyTorch 2.0 发布也有一段时间了,大家是不是已经开始用了呢? PyTorch 2.0 通过引入 torch.compile,可以显着提高训练和推理速度。 与 eagerly 模式相反,编译 API 将模型转换为中间计算图(FX graph),然后以某种方式将其编译为低级计算内核,这样可以提高运行速度。
对于PyTorch 2.0 而言,你看到的可能是:
“只是用 torch.compile 调用包装它们就可以提高运行速度”
但是其实有许多因素会干扰计算图编译和/或达到所需的性能改进。 所以需要调整模型和达到最佳性能可能需要重新设计项目或修改一些编码习惯。
在本文中,我们将演示这个新功能的使用,以及介绍在使用它时可能遇到的一些问题。 我们将分享在调整 torch.compile API 时遇到的问题的几个例子。这些例子并不全面,再实际运用是很可能会遇到此处未提及的问题,并且还要 torch.compile 仍在积极开发中,还有改进的空间。
Torch 编译背后有许多创新技术,包括 TorchDynamo、FX Graph、TorchInductor、Triton 等。 我们不会在这篇文章中深入探讨不同的组件,如果你对这些感兴趣,可以查看PyTorch 文档,里面介绍的非常详细。
TensorFlow 与 PyTorch 的两个不重要的对比
1、在过去,PyTorch 和 TensorFlow 之间有着明显的区别。 PyTorch 使用了 eager execution 模式,TensorFlow 使用了 graph 模式,大家都在各自发展。 但后来 TensorFlow 2 引入了eager execution作为默认执行模式,TensorFlow 变得有点像 PyTorch。 现在 PyTorch 也引入了自己的graph 模式解决方案,变得有点像 TensorFlow。 TensorFlow 与 PyTorch 的竞争仍在继续,但两者之间的差异正在慢慢消失。
2、人工智能开发是一个时髦的行业。 但是流行的 AI 模型、模型架构、学习算法、训练框架等随时间变化发展的。 就论文而言,几年前我们处理的大部分模型都是用 TensorFlow 编写的。 但是人们经常抱怨高级 model.fit API 限制了他们的开发灵活性,并且graph 模式使他们无法调试。 然后就有好多人转向了PyTorch,他们说,“PyTorch可以以任何想要的方式构建模型并轻松调试”。但是更灵活的的自定义操作会导致开发的复杂性,PyTorch Lightening等高级的API的出现就是复制了model.fit API的特性,然后同样的人又说还有人说“我们必须适应 PyTorch Lightening,我们必须用 torch.compile 加速我们的训练”。既要灵活,又要简单是不可能同时实现的。
正文开始
下面开始介绍关于如何使用PyTorch 2编译API的技巧集合,以及一些你可能面临的潜在问题。使模型适应PyTorch的graph 模式可能需要付出不小的努力。希望这篇文章能帮助你更好地评估这一努力,并决定采取这一步的最佳方式。
安装PyTorch2
从PyTorch安装文档来看,安装PyTorch 2似乎与安装任何其他PyTorch版本没有什么不同,但是在实践中,可能会遇到一些问题。首先,PyTorch 2.0(截至本文时)需要Python 3.8或更高版本。然后就是PyTorch 2包含以前版本中不存在的包依赖项(最明显的是PyTorch-triton,这是什么我也不知道,哈),需要注意可能会会引入新的冲突。
所以如果你对Docker熟悉,建议直接使用容器,这样会简单很多。
PyTorch2兼容性
PyTorch2的优点之一是它完全向后兼容,所以我们即使不使用torch.compile,仍然可以使用PyTorch 2.0并从其他新功能和增强中受益。最多就是享受不到速度的提升,但是不会有兼容性的问题。但是如果你想进一步提升速度,那么请往下看。
简单例子
让我们从一个简单的图像分类模型的例子开始。在下面的代码块中,我们使用timm Python包(版本0.6.12)构建一个基本的Vision Transformer (ViT)模型,并在一个假数据集上训练它500步(不是轮次)。这里定义了use_compile标志来控制是否执行模型编译(torch.compile),use_amp来控制是使用自动混合精度(AMP)还是全精度(FP)运行。
 importtime, os
 importtorch
 fromtorch.utils.dataimportDataset
 fromtimm.models.vision_transformerimportVisionTransformer

 use_amp=True# toggle to enable/disable amp
 use_compile=True# toggle to use eager/graph execution mode

 # use a fake dataset (random data)
 classFakeDataset(Dataset):
   def__len__(self):
     return1000000

   def__getitem__(self, index):
     rand_image=torch.randn([3, 224, 224], dtype=torch.float32)
     label=torch.tensor(data=[index%1000], dtype=torch.int64)
     returnrand_image, label

 deftrain():
   device=torch.cuda.current_device()
   dataset=FakeDataset()
   batch_size=64

   # define an image classification model with a ViT backbone
   model=VisionTransformer()

   ifuse_compile:
     model=torch.compile(model)

   model.to(device)

   optimizer=torch.optim.Adam(model.parameters())
   data_loader=torch.utils.data.DataLoader(dataset,
                           batch_size=batch_size, num_workers=4)
   loss_function=torch.nn.CrossEntropyLoss()

   t0=time.perf_counter()
   summ=0
   count=0

   foridx, (inputs, target) inenumerate(data_loader, start=1):
     inputs=inputs.to(device)
     targets=torch.squeeze(target.to(device), -1)

     optimizer.zero_grad()

     withtorch.cuda.amp.autocast(
       enabled=use_amp,
       dtype=torch.bfloat16
     ):
       outputs=model(inputs)
       loss=loss_function(outputs, targets)

     loss.backward()
     optimizer.step()

     batch_time=time.perf_counter() -t0

     ifidx>10:  # skip first few steps
       summ+=batch_time
       count+=1
     t0=time.perf_counter()
     ifidx>500:
       break

   print(f'average step time: {summ/count}')

 if__name__=='__main__':
   train()
在下表记录了比较性能结果。这些结果根据环境不同而有很大的变化,所以及供参考
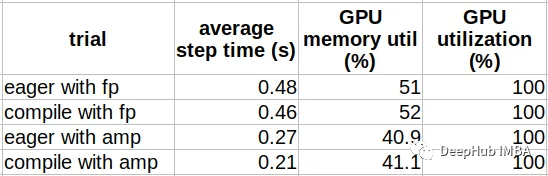
可以看到,使用AMP(28.6%)比使用FP(4.5%)时,模型编译带来的性能提升要明显得多。这是一个众所周知的差异。如果你还没有使用AMP进行训练,那么其实对于训练速度的提升是从FP过渡到AMP,所以先推荐你使用AMP。另外就是性能提升伴随着GPU内存利用率的非常轻微的增加。
当扩展到多个gpu时,由于在编译图上实现分布式训练的方式,比较性能可能会发生变化。具体细节看官方文档。
https://pytorch.org/get-started/pytorch-2.0/#distributed
高级选项
compile API包含许多用于控制graph创建的选项,能够针对特定模型对编译进行微调,并可能进一步提高性能。下面的代码块是官方的函数介绍:
 defcompile(model: Optional[Callable] =None, *,
             fullgraph: builtins.bool=False,
             dynamic: builtins.bool=False,
             backend: Union[str, Callable] ="inductor",
             mode: Union[str, None] =None,
             options: Optional[Dict[str, Union[str, builtins.int, builtins.bool]]] =None,
             disable: builtins.bool=False) ->Callable:
     """
     Optimizes given model/function using TorchDynamo and specified backend.

     Args:
        model (Callable): Module/function to optimize
        fullgraph (bool): Whether it is ok to break model into several subgraphs
        dynamic (bool): Use dynamic shape tracing
        backend (str or Callable): backend to be used
        mode (str): Can be either "default", "reduce-overhead" or "max-autotune"
        options (dict): A dictionary of options to pass to the backend.
        disable (bool): Turn torch.compile() into a no-op for testing
     """
mode 编译模式:允许您在最小化编译所需的开销(“reduce-overhead”)和最大化潜在的性能提升(“max-autotune”)之间进行选择。
下表比较了不同编译模式下编译上述ViT模型的结果。

可以看到编译模式的行为与命名的非常相似,“reduce-overhead”以额外的内存利用为代价减少了编译时间,“max-autotune”以高编译时间开销为代价获得了最佳性能。
backend 编译器后端:API使用哪个后端将中间表示(IR)计算图(FX graph)转换为低级内核操作。这个选项对于调试graph编译问题和更好地理解torch.compile的内部非常有用。在大多数情况下,默认的Inductor后端似乎能够提供最佳的训练性能结果。有很多后端列表,我们可以使用下面命令查看:
 fromtorchimport_dynamo
 print(_dynamo.list_backends())
我们测试使用nvprims-nvfuser后端,可以获得比eager模式13%的性能提升(与默认后端28.6%的性能提升相比)。具体区别还是要看Pytorch文档,我们这里就不细说了,因为文档都有。
fullgraph 强制单个图:这个参数是非常有用,可以确保没有任何不希望的图截断。
dynamic 动态形状:目前 2.0对具有动态形状的张量的编译支持在某种程度上是有限的。编译具有动态形状的模型的一个常见解决方案是重新编译,但会大大增加开销并大大降低训练速度。如果您的模型确实包含动态形状,将动态标志设置为True将带来更好的性能,特别是减少重新编译的次数。
都有什么是动态形状呢,最简单的就是时间序列或文本长度不同,如果不进行对齐操作的话序列长度不同就是动态的形状。
性能分析
PyTorch Profiler是用来分析PyTorch模型性能的关键工具之一,可以评估和分析图编译优化训练步骤的方式。在下面的代码块中,我们用profiler生成TensorBoard的结果,来查看训练的性能:
   out_path=os.path.join(os.environ.get('SM_MODEL_DIR','/tmp'),'profile')
   fromtorch.profilerimportprofile, ProfilerActivity
   withprofile(
           activities=[ProfilerActivity.CPU, ProfilerActivity.CUDA],
           schedule=torch.profiler.schedule(
             wait=20,
             warmup=5,
             active=10,
             repeat=1),
           on_trace_ready=torch.profiler.tensorboard_trace_handler(
                                                 dir_name=out_path)

   ) asp:
     foridx, (inputs, target) inenumerate(data_loader, start=1):
       inputs=inputs.to(device)
       targets=torch.squeeze(target.to(device), -1)
       optimizer.zero_grad()

       withtorch.cuda.amp.autocast(
         enabled=use_amp,
         dtype=torch.bfloat16
       ):
         outputs=model(inputs)
         loss=loss_function(outputs, targets)
       loss.backward()
       optimizer.step()
       p.step()
下图是从PyTorch Profiler生成的TensorBoard 中截取的。它提供了在上面编译模型试验的训练步骤中在GPU上运行的内核的详细信息。
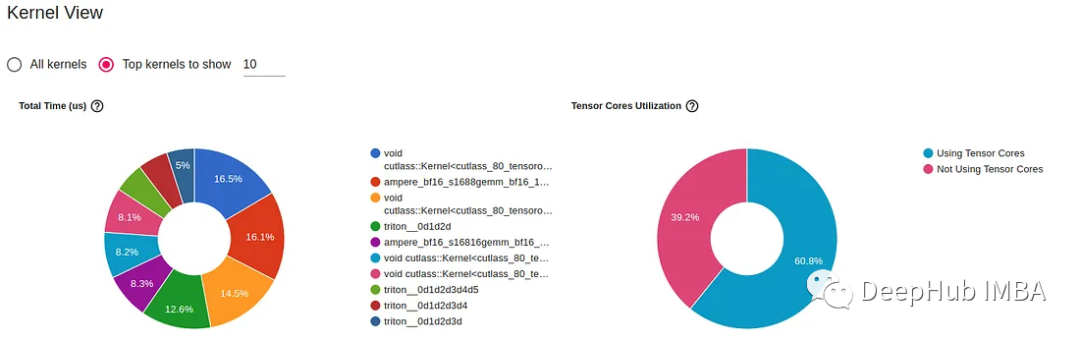
我们能够看到torch.compile 增加了GPU张量核心的利用率(从51%到60%),并且它引入了使用Triton开发的GPU内核。
调试模型编译问题
torch.compile 目前处于测试阶段,如果你遇到问题,并且幸运的话,会得到一个信息错误,我们可以直接搜索解决,或者问问chatgpt。 但是如果你不那么幸运,就需要自己寻找问题的根源。
这里解决编译问题的主要资源是 TorchDynamo 故障排除文档,其中包括调试工具列表并提供诊断错误的分步指南。 但是目前这些工具和技术似乎更多地针对 PyTorch 开发人员而不是 PyTorch 用户的。 它们也许可以帮助解决导致编译问题的根本问题,但是非常大的可能是它们实际上跟本没有任何帮助,那怎么办呢?
这里我们演示一个自行解决问题的过程,按照这样的思路,可以解决一些问题。
下面是一个简单的分布式模型,其中包括对 torch.distributed.all_reduce 的调用。 模型在 eager 模式下按预期运行,但在graph编译期间失败并出现“attribute error”(torch.classes.c10d.ProcessGroup does not have a field with name ‘shape’)。 我们需要将日志级别提高到 INFO,然后发现发现错误在计算的“第 3 步”中,即 TorchInductor。然后通过验证“eager”和“aot_eager”后端的编译是否成功, 最后创建一个最小的代码示例,使用 PyTorch Minifier 重现失败。
 importos, logging
 importtorch
 fromtorchimport_dynamo

 # enable debug prints
 torch._dynamo.config.log_level=logging.INFO
 torch._dynamo.config.verbose=True

 # uncomment to run minifier
 # torch._dynamo.config.repro_after="aot"

 defbuild_model():
   importtorch.nnasnn
   importtorch.nn.functionalasF

   classDumbNet(nn.Module):
     def__init__(self):
       super().__init__()
       self.conv1=nn.Conv2d(3, 6, 5)
       self.pool=nn.MaxPool2d(2, 2)
       self.fc1=nn.Linear(1176, 10)

     defforward(self, x):
       x=self.pool(F.relu(self.conv1(x)))
       x=torch.flatten(x, 1)
       x=self.fc1(x)
       withtorch.no_grad():
         sum_vals=torch.sum(x,0)
         # this is the problematic line of code
         torch.distributed.all_reduce(sum_vals)
       # add noise
       x=x+0.1*sum_vals
       returnx

   net=DumbNet()
   returnnet

 deftrain():
   os.environ['MASTER_ADDR'] =os.environ.get('MASTER_ADDR',
                                              'localhost')
   os.environ['MASTER_PORT'] =os.environ.get('MASTER_PORT',
                                              str(2222))
   torch.distributed.init_process_group('nccl', rank=0,
                                          world_size=1)
   torch.cuda.set_device(0)
   device=torch.cuda.current_device()

   model=build_model()

   model=torch.compile(model)

   # replace with this to verfiy that error is not in TorchDynamo
   # model = torch.compile(model, 'eager')
   # replace with this to verfiy that error is not in AOTAutograd
   # model = torch.compile(model, 'aot_eager')

   model.to(device)

   rand_image=torch.randn([4, 3, 32, 32], dtype=torch.float32).to(device)

   model(rand_image)

 if__name__=='__main__':
   train()
在这个的示例中,运行生成的 minifier_launcher.py 脚本会导致不同的属性错误(比如Repro’ object has no attribute ‘_tensor_constant0’),这个对于我们的演示没有太大帮助,我们暂时忽略他,这也说明了,torch.compile 还不完善,还需要更大的改进空间,或者说如果解决不要问题,那就别用了,至少“慢”要比不能用好,对吧(而且速度提升也有限)
常见的图截断问题
Pytorch eager 模式优势之一是能够将纯 Pythonic 代码与 PyTorch 操作交织在一起。 但是这种自由在使用 torch.compile 时受到很大限制。因为 Pythonic 操作导致 TorchDynamo 将计算图拆分为多个组件,从而阻碍了性能提升的潜力。 而我们代码优化的目标是尽可能减少此类图截断。 最简单的办法是用 fullgraph 标志编译模型。这杨可以提示删除导致图截断的任何代码,而且还会告诉我们如何最好地适应PyTorch2的开发习惯。 但是要运行分布式代码,则必须将他设为False,因为当前实现 GPU 之间通信的方式需要图拆分。 我们也可以使用 torch._dynamo.explain 序来分析图截断。
以下代码块演示了一个简单模型,在其前向传递中有四个潜在的图截断,但是这种在使用方式在典型的 PyTorch 模型中并不少见。
 importtorch
 fromtorchimport_dynamo
 importnumpyasnp

 defbuild_model():
   importtorch.nnasnn
   importtorch.nn.functionalasF

   classDumbNet(nn.Module):
     def__init__(self):
       super().__init__()
       self.conv1=nn.Conv2d(3, 6, 5)
       self.pool=nn.MaxPool2d(2, 2)
       self.fc1=nn.Linear(1176, 10)
       self.fc2=nn.Linear(10, 10)
       self.fc3=nn.Linear(10, 10)
       self.fc4=nn.Linear(10, 10)
       self.d= {}


     defforward(self, x):
       x=self.pool(F.relu(self.conv1(x)))
       x=torch.flatten(x, 1)
       asserttorch.all(x>=0) # graph break
       x=self.fc1(x)
       self.d['fc1-out'] =x.sum().item() # graph break
       x=self.fc2(x)
       forkinnp.arange(1): # graph break
         x=self.fc3(x)
       print(x)  # graph break
       x=self.fc4(x)
       returnx

   net=DumbNet()
   returnnet

 deftrain():
   model=build_model()
   rand_image=torch.randn([4, 3, 32, 32], dtype=torch.float32)
   explanation=torch._dynamo.explain(model, rand_image)
   print(explanation)

 if__name__=='__main__':
   train()
图截断不会导致编译失败(除非设置了fullgraph标志)。所以很有可能模型正在编译和运行,但实际上包含多个图截断,这会减慢它的速度。
训练问题故障排除
在目前来说,使用Pytorch2成功编译的模型就可以认为是一项值得庆祝的成就,但这并不能保证训练一定会成功。
在 GPU 上运行的低级内核在 eager 模式和graph模式之间会有所不同。某些高级操作可能会表现出不同的行为。 你可能会发现在eager 模式下运行的操作在graph 模式下会失败(例如torch.argmin)。 或者会发现计算中的数值差异会影响训练。
graph模式下的调试比 eager 模式下的调试困难得多。 在 eager 模式下,每一行代码都是独立执行的,我们可以在代码中的任意点放置断点获得前张量值。 而在graph 模式下,代码定义的模型在处理之前会经历多次转换,设置的断点可能不会被触发。
所以可以先使用eager 模式,模型跑通以后,再将torch.compile 分别应用于每个部分,或者通过插入打印和/或 Tensor.numpy 调用来生成图截断,这样我们可能会会成功触发代码中的断点。也就是说如果用torch.compile的话对于开发来说,要耗费更长的时间,所以训练和开发速度的取舍就要看你自己的选择了。
但是别忘了我们上面说的你的模型在添加了torch.compile后也不一定能正确运行,这又是一个无形的成本。
在图中包含损失函数
通过使用torch.compile调用包装PyTorch模型(或函数)来启用graph模式。但是损失函数不是编译调用的一部分,也不是生成图的一部分。所以损失函数是训练步骤中相对较小的一部分,如果使用eager 模式运行它不会产生太多开销。但是如果有一个计算量他别大的损失函数,也是可以通过将其包含在编译的计算图中来进一步提高性能的。
在下面的代码中,我们定义了一个损失函数,用于执行从大型ViT模型(具有24个ViT块)到较小的ViT模型(具有12个ViT块)的模型蒸馏。
 importtorch
 fromtimm.models.vision_transformerimportVisionTransformer

 classExpensiveLoss(torch.nn.Module):
   def__init__(self):
     super(ExpensiveLoss, self).__init__()
     self.expert_model=VisionTransformer(depth=24)
     iftorch.cuda.is_available():
       self.expert_model.to(torch.cuda.current_device())
     self.mse_loss=torch.nn.MSELoss()

   defforward(self, input, outputs):
     expert_output=self.expert_model(input)
     returnself.mse_loss(outputs, expert_output)
这是一个比CrossEntropyLoss计算量大得多的损失函数,这里又2种方法让他执行的更快,
1、loss函数封装在torch.compile调用中,如下所示:
 loss_function=ExpensiveLoss()
 compiled_loss=torch.compile(loss_function)
这个方法的缺点是损失函数的编译图与模型的编译图不相交,但是它的优点非常明显,就是简单。
2、创建一个包含模型和损失的包装器模型来将模型和损失一起编译,并将结果损失作为输出返回。
 importtime, os
 importtorch
 fromtorch.utils.dataimportDataset
 fromtorchimportnn
 fromtimm.models.vision_transformerimportVisionTransformer

 # use a fake dataset (random data)
 classFakeDataset(Dataset):
   def__len__(self):
     return1000000

   def__getitem__(self, index):
     rand_image=torch.randn([3, 224, 224], dtype=torch.float32)
     label=torch.tensor(data=[index%1000], dtype=torch.int64)
     returnrand_image, label

 # create a wrapper model for the ViT model and loss
 classSuperModel(torch.nn.Module):
   def__init__(self):
     super(SuperModel, self).__init__()
     self.model=VisionTransformer()
     self.expert_model=VisionTransformer(depth=24iftorch.cuda.is_available() else2)
     self.mse_loss=torch.nn.MSELoss()

   defforward(self, inputs):
     outputs=self.model(inputs)
     withtorch.no_grad():
       expert_output=self.expert_model(inputs)
     returnself.mse_loss(outputs, expert_output)

 # a loss that simply passes through the model output
 classPassthroughLoss(nn.Module):
   def__call__(self, model_output):
     returnmodel_output

 deftrain():
   device=torch.cuda.current_device()
   dataset=FakeDataset()
   batch_size=64

   # create and compile the model
   model=SuperModel()
   model=torch.compile(model)

   model.to(device)

   optimizer=torch.optim.Adam(model.parameters())
   data_loader=torch.utils.data.DataLoader(dataset,
                           batch_size=batch_size, num_workers=4)

   loss_function=PassthroughLoss()

   t0=time.perf_counter()
   summ=0
   count=0

   foridx, (inputs, target) inenumerate(data_loader, start=1):
     inputs=inputs.to(device)
     targets=torch.squeeze(target.to(device), -1)

     optimizer.zero_grad()

     withtorch.cuda.amp.autocast(
       enabled=True,
       dtype=torch.bfloat16
     ):
       outputs=model(inputs)
       loss=loss_function(outputs)

     loss.backward()
     optimizer.step()

     batch_time=time.perf_counter() -t0

     ifidx>10:  # skip first few steps
       summ+=batch_time
       count+=1
     t0=time.perf_counter()
     ifidx>500:
       break

   print(f'average step time: {summ/count}')

 if__name__=='__main__':
   train()
这种方法的缺点是,当在推理模式下运行模型时,需要从包装器模型中提取内部的实际模型。
这两种选项的性能提升幅度大致相同都是8%,也就是说,对loss进行编译也是优化的一个重要部分。
动态形状
官方也说了torch.compile对动态形状的模型的编译支持是有限的。compile API包含dynamic 参数,用于向编译器发出信号,但是这种方式对于性能提升帮助的程度是值得怀疑的。如果你正在尝试编译和优化动态图并面临问题,那么还是不要使用torch.compile,因为太麻烦了。
总结
PyTorch 2.0编译模式具有显著提高训练和推理速度的潜力,可以显著节省成本,但是模型实现这一潜力所需的工作量可能会有很大差异。许多公共模型只需要修改一行代码。而其他模型特别是那些包含非标准操作、动态形状和/或大量交错Python代码的模型,可能得不偿失甚至无法进行。但是现在开始修改模型是一个很好的选择,因为目前来看torch.compile对于PyTorch2来说是一个重要且持续的特性。
https://avoid.overfit.cn/post/dfea563957fc43a19f1aaf7733888031
作者:Chaim Rand

苏州本地的技术开发者社区,在这里可以交流本地的好吃好玩的,可以交流技术,可以交流招聘等等,没啥限制。
更多推荐
 0
0 0
0- 0


 已为社区贡献5条内容

所有评论(0)