SupaBase - New Way of setting Backend for Your Website
Supabase is a hosted platform which makes it very simple to get started without needing to manage any infrastructure.
In this blog we gonna get started with supabase offering Backend as a service which is a very source alternative of Firebase and there are going to be a ton of screenshots for reference ahead, so brace yourselves!!!
Getting Started with Supabase
Supabase is often described as an open source alternative to Google’s Firebase, which is a pretty good way to put it, for those who don't know what Firebase is, it is a collection of tools that helps developers to build projects more quickly by automatically handling a lot of behind-the-scenes work and wiring.
It comes with a desired number of features::
- A Dedicated database to provide.
- Auth and broad user management process.
- Storage provider
- Auto-generated API setup
We can get started into it in various setups but we will primarily deal with react in this blog. For the other languages you can get the target to the official page of Supabase software that's is check out
Working on React part
Let's build a simple user management app with react using supabase
Create a project
- Go to app.supabase.com.
- Click on "New Project".
- Enter your project details. Wait for the new database to launch.
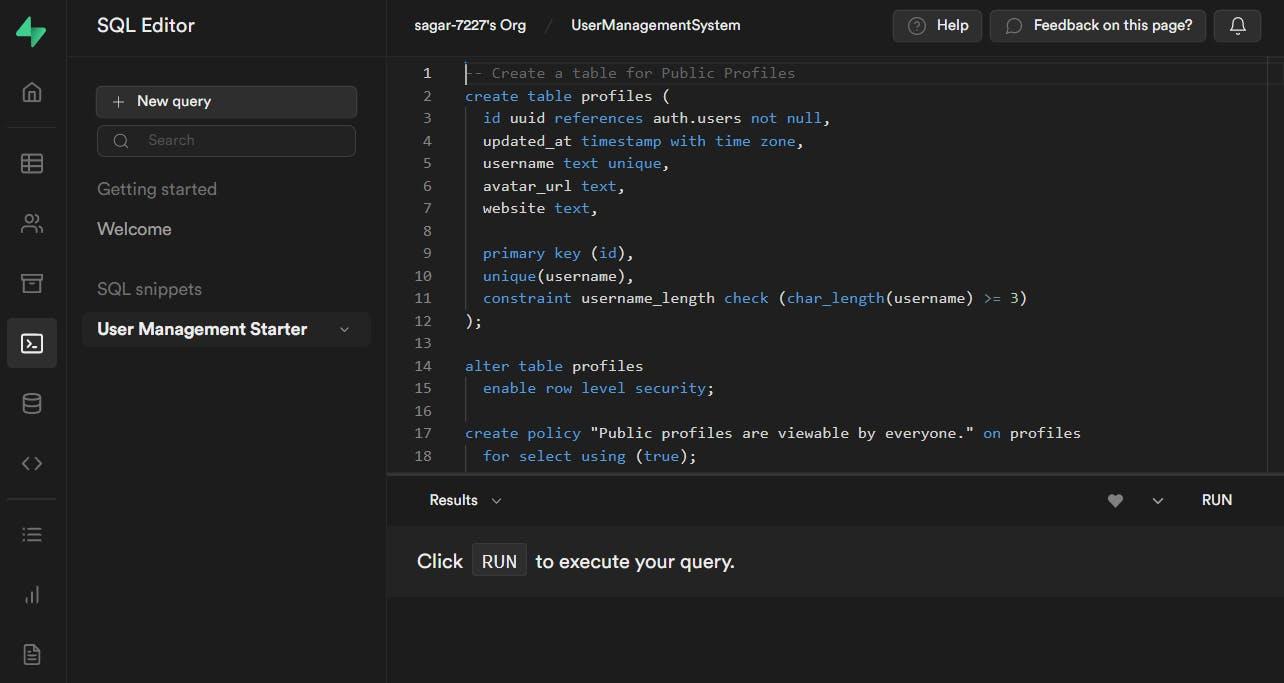
To set up the project and use in this project we used pre-defined user management starter template::
- Choose the Dashboard option.
- Go to the SQL Editor page in the Dashboard.
- Click User Management Starter.
- Click Run.
As you have created the database now the supabase creates an api for it to work on next part
To find the API key and URL to access the database and use it in the project follows that step :
- Go to the Settings page in the Dashboard.
- Click API in the sidebar.
- Find your API URL, anon, and service_role keys on this page.
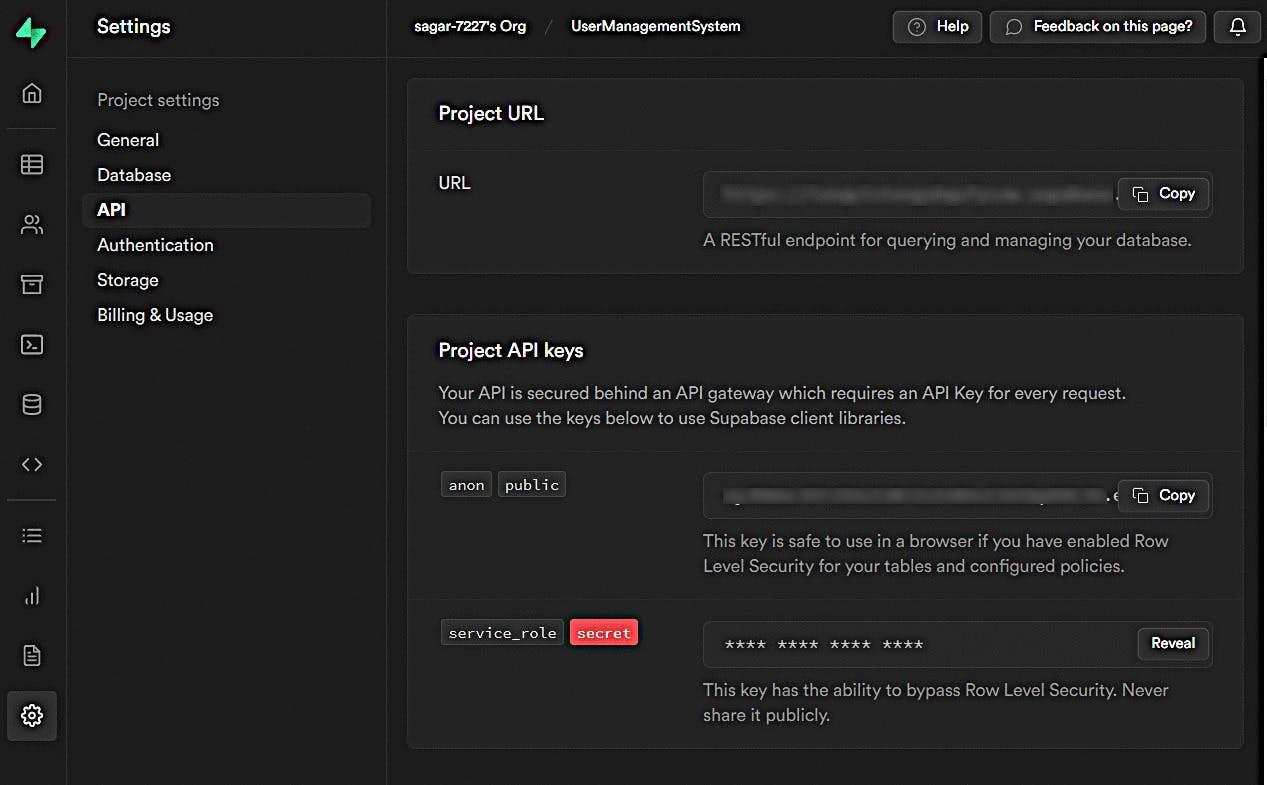
Service role to identify the service related to it and give the user public or private access to the API key.
As now we have all the useful settings and access parameters, now let's start the project
npx create-react-app supabase-react
cd supabase-react
Now we get to download the dependency of supabase using the following commands
npm install @supabase/supabase-js@rc
Let's store the variable used by supabase by creating a .env file and put all that in this
REACT_APP_SUPABASE_URL=YOUR_SUPABASE_URL
REACT_APP_SUPABASE_ANON_KEY=YOUR_SUPABASE_ANON_KEY
To set up the supabase client and use it in the browser we gonna create a helper file named src/supabaseClient.js, since row-level security is enabled.
import { createClient } from '@supabase/supabase-js'

const supabaseUrl = process.env.REACT_APP_SUPABASE_URL
const supabaseAnonKey = process.env.REACT_APP_SUPABASE_ANON_KEY

export const supabase = createClient(supabaseUrl, supabaseAnonKey)
You can update other properties like CSS and content based on your choice.
Set up the login component for login and sign up in src/Auth.js. It also provides the magic link features so that the user can sign by email without using the password
import { useState } from 'react'
import { supabase } from './supabaseClient'
import React from 'react';

export default function Auth() {
  const [loading, setLoading] = useState(false)
  const [email, setEmail] = useState('')

  const handleLogin = async (e) => {
    e.preventDefault()

    try {
      setLoading(true)
      const { error } = await supabase.auth.signInWithOtp({ email })
      if (error) throw error
      alert('Check your email for the login link!')
    } catch (error) {
      alert(error.error_description || error.message)
    } finally {
      setLoading(false)
    }
  }

  return (
    <div className="row flex-center flex">
      <div className="col-6 form-widget" aria-live="polite">
        <h1 className="header">Supabase + React</h1>
        <p className="description">
          Sign in via magic link with your email below
        </p>
        {loading ? (
          'Sending magic link...'
        ) : (
          <form onSubmit={handleLogin}>
            <label htmlFor="email">Email</label>
            <input
              id="email"
              className="inputField"
              type="email"
              placeholder="Your email"
              value={email}
              onChange={(e) => setEmail(e.target.value)}
            />
            <button className="button block" aria-live="polite">
              Send magic link
            </button>
          </form>
        )}
      </div>
    </div>
  )
}
Set up a page to edit the profile details and manage their accounts in src/Account.js
import { useState, useEffect } from 'react'
import { supabase } from './supabaseClient'
import React from 'react';

const Account = ({ session }) => {
  const [loading, setLoading] = useState(true)
  const [username, setUsername] = useState(null)
  const [website, setWebsite] = useState(null)
  const [avatar_url, setAvatarUrl] = useState(null)

  useEffect(() => {
    getProfile()
  }, [session])

  const getProfile = async () => {
    try {
      setLoading(true)
      const { user } = session

      let { data, error, status } = await supabase
        .from('profiles')
        .select(`username, website, avatar_url`)
        .eq('id', user.id)
        .single()

      if (error && status !== 406) {
        throw error
      }

      if (data) {
        setUsername(data.username)
        setWebsite(data.website)
        setAvatarUrl(data.avatar_url)
      }
    } catch (error) {
      alert(error.message)
    } finally {
      setLoading(false)
    }
  }

  const updateProfile = async (e) => {
    e.preventDefault()

    try {
      setLoading(true)
      const { user } = session

      const updates = {
        id: user.id,
        username,
        website,
        avatar_url,
        updated_at: new Date(),
      }

      let { error } = await supabase.from('profiles').upsert(updates)

      if (error) {
        throw error
      }
    } catch (error) {
      alert(error.message)
    } finally {
      setLoading(false)
    }
  }

  return (
    <div aria-live="polite">
      {loading ? (
        'Saving ...'
      ) : (
        <form onSubmit={updateProfile} className="form-widget">
          <div>Email: {session.user.email}</div>
          <div>
            <label htmlFor="username">Name</label>
            <input
              id="username"
              type="text"
              value={username || ''}
              onChange={(e) => setUsername(e.target.value)}
            />
          </div>
          <div>
            <label htmlFor="website">Website</label>
            <input
              id="website"
              type="url"
              value={website || ''}
              onChange={(e) => setWebsite(e.target.value)}
            />
          </div>
          <div>
            <button className="button primary block" disabled={loading}>
              Update profile
            </button>
          </div>
        </form>
      )}
      <button
        type="button"
        className="button block"
        onClick={() => supabase.auth.signOut()}
      >
        Sign Out
      </button>
    </div>
  )
}

export default Account
All the things are almost done. Now you have to update the App.js to implement the supabase component.
import './index.css'
import { useState, useEffect } from 'react'
import { supabase } from './supabaseClient'
import Auth from './Auth'
import Account from './Account'
import React from 'react';

export default function App() {
  const [session, setSession] = useState(null)

  useEffect(() => {
    supabase.auth.getSession().then(({ data: { session } }) => {
      setSession(session)
    })

    supabase.auth.onAuthStateChange((_event, session) => {
      setSession(session)
    })
  }, [])

  return (
    <div className="container" style={{ padding: '50px 0 100px 0' }}>
      {!session ? (
        <Auth />
      ) : (
        <Account key={session.user.id} session={session} />
      )}
    </div>
  )
}
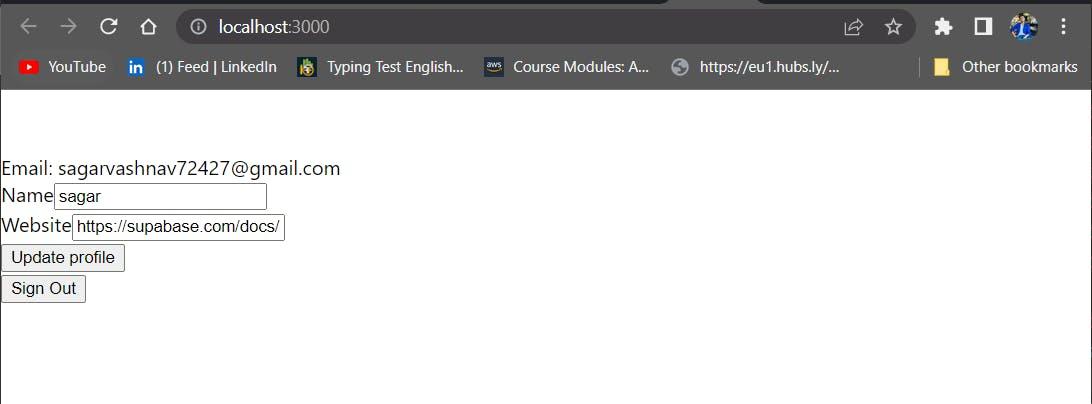
Now just start the application and it directed you to port 3000.
npm start
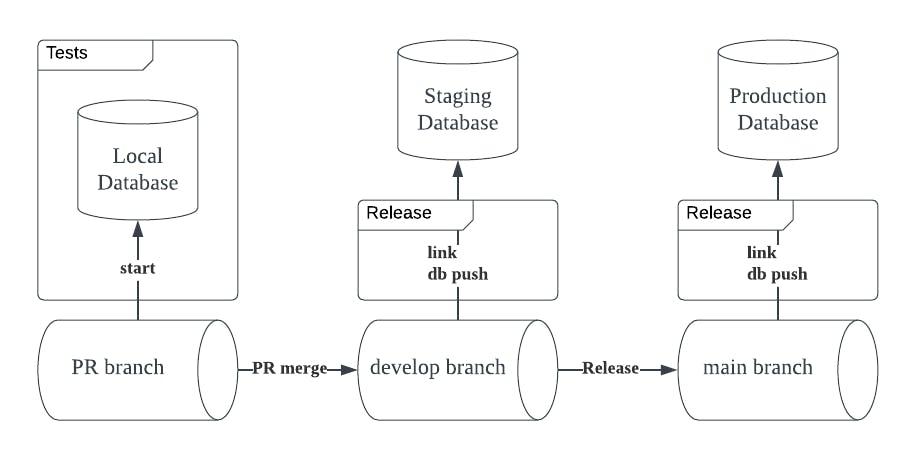
Working with CI/CD Workflows:
Before setup include of following points-
- Install the Supabase CLI
- Create a Supabase project
- Initialise a local Git repository
-
First create a migration.
-
Then deploy the migration and configure it with github actions.
Manual Migration
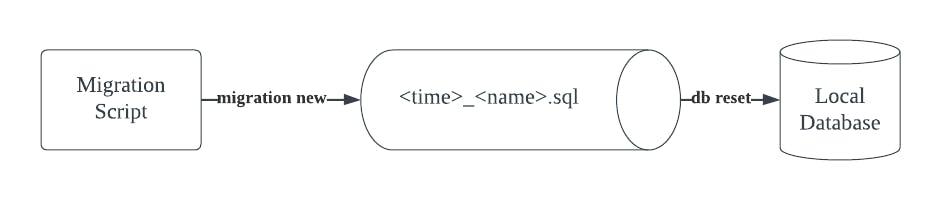
The first step is to create a new migration script. You can do this by running:
supabase migration new new_employee
You should see that a new file supabase/migrations/_new_employee.sql is created.
configure it with GitHub actions
The Supabase CLI requires a few environment variables to run in non-interactive mode.
SUPABASE_ACCESS_TOKEN is your personal access token SUPABASE_DB_PASSWORD is your project specific database password
We recommend adding these as encrypted secrets to your GitHub Action runners.
Creates the workflow files, we will be using for this guide: .github/workflows/production.yml
Commit these files to Git and push them to your main branch on GitHub. Make sure you’ve updated these environment variables to match your Supabase projects:
name: Deploy Migrations to Production

on:
  push:
    branches:
      - main
  workflow_dispatch:

jobs:
  deploy:
    runs-on: ubuntu-22.04

    env:
      SUPABASE_ACCESS_TOKEN: ${{ secrets.SUPABASE_ACCESS_TOKEN }}
      SUPABASE_DB_PASSWORD: ${{ secrets.PRODUCTION_DB_PASSWORD }}
      PRODUCTION_PROJECT_ID: lxequlvtengsbqufyszw

    steps:
      - uses: actions/checkout@v3

      - uses: supabase/setup-cli@v1
        with:
          version: 1.0.0

      - run: |
          supabase link --project-ref $PRODUCTION_PROJECT_ID
          supabase db push
Add these parameters to GitHub actions accordingly:
- SUPABASE_ACCESS_TOKEN
- PRODUCTION_PROJECT_ID
- PRODUCTION_DB_PASSWORD
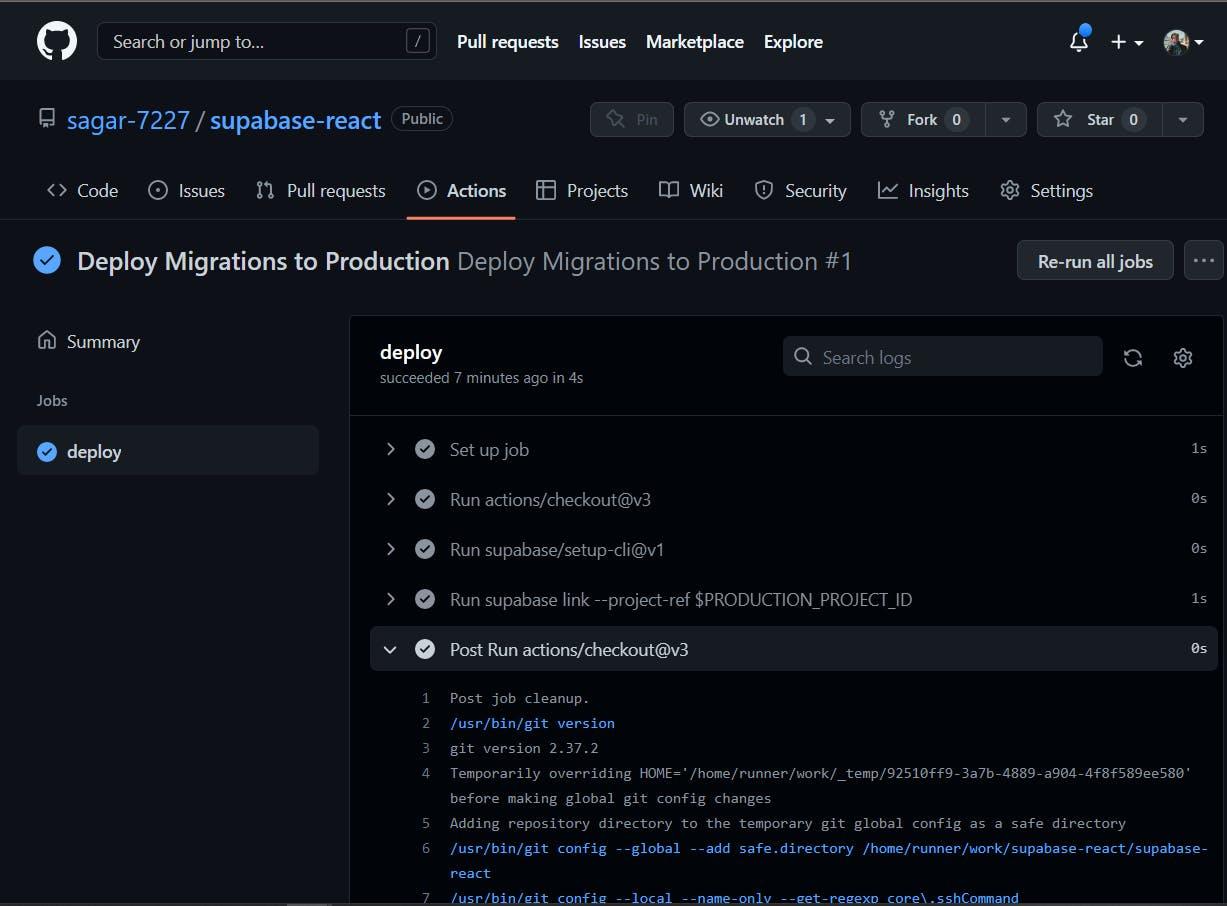
When configured correctly, your repository should have Deploy Migrations to Production workflows that trigger when new commits are pushed to the main branch.
Supabase provides the log explorer that allows the log tracing and debugging. It provides a logging interface for every product.
You can work with several types of integration for the project that includes vercel, appsmith, Auth0, and several others.

React社区为您提供最前沿的新闻资讯和知识内容
更多推荐
 0
0 0
0- 0


 已为社区贡献29247条内容

所有评论(0)