展开 Reacts Core;全局访问 JSX.IntrinsicElement 道具(不需要导入)
更新 -- 2022 年 4 月 1 日
从写这篇文章中表达我的想法的行为引发了更多的想法,这些想法围绕着把它变成一个官方的 npm 包。unwrap-react第一次迭代发布于3月28日;一到两打迭代之后,该包具有对纯 js 用户的完全支持和对打字稿用户的出色支持。在这里查看!在接下来的几周内,将有第二部分概述在各种情况下使用该软件包的细节,但GitHub或官方 npm 站点上的自述文件本身提供了一个良好的开端!
[ ](https://res.cloudinary.com/practicaldev/image/fetch/s--jVTFLDUV--/c_limit%2Cf_auto%2Cfl_progressive%2Cq_auto%2Cw_880/https:// /dev-to-uploads.s3.amazonaws.com/uploads/articles/3nbr1g18sgmhr5tjb20z.png)
它是如何开始的
在当前的Next + Headless WordPress build中使用表单时,我发现自己想要尽可能少地访问<input />或<button />或<a />等的道具。这导致了许多尝试和错误尝试拼凑一个直观、全面、全局可消耗的解决方案(来自当前工作版本的智能感知与<main />一起使用——如下图所示):
[ ](https://res.cloudinary.com/practicaldev/image/fetch/s--x8s1rzoW--/c_limit%2Cf_auto%2Cfl_progressive%2Cq_auto%2Cw_880/https://dev -to-uploads.s3.amazonaws.com/uploads/articles/6fkc3nhzb2l7aeqeskot.png)
也就是说,正如人们所预料的那样,在当前单一的“一刀切”解决方案之前有许多部分解决方案。
定义目标
在我看来,理想的解决方案有两个:(1)全局可重用性,与项目无关,坚持原生(React 命名空间)类型定义使用; (2) 拼凑一些即使是最“cowabunga”的纯 js 开发人员也可能落后的东西——_而不_随时损害类型安全。
[ ](https://res.cloudinary.com/practicaldev/image/fetch/s--c7Ov9iqw--/c_limit%2Cf_auto%2Cfl_progressive%2Cq_auto %2Cw_880/https://dev-to-uploads.s3.amazonaws.com/uploads/articles/wbdstez7xgehfzzce1t8.png)
第一阶段 -- 泛型 u003d <3
如果您的目标涉及解决更大的、项目范围的、与类型相关的目标,那么泛型可能已经是您武器库中不可或缺的一部分。但是,如果您之前没有使用过泛型,那么您很幸运!这篇文章的其余部分处理严重依赖泛型属性的类型。你可以说这是一种 typeof 获得的品味,从你的第一个通用表达“点击”的那一刻起就在你身上生长。
[ ](https://res.cloudinary.com/practicaldev/image/fetch/s--amC2gjPe--/c_limit%2Cf_auto%2Cfl_progressive%2Cq_66%2Cw_880/https:// /dev-to-uploads.s3.amazonaws.com/uploads/articles/8knc3qq5fo2m8rwwdv1t.gif)
泛型——简要介绍
如果您已经熟悉使用泛型,请随时跳到下一节。如果没有,让我们直接潜入!
一个简单的通用启动器 - 解包承诺
// disambiguation: see line 1482 of node_modules/typescript/lib/lib.es5.d.ts for info on Promise vs PromiseLike
export type UnwrapPromise<T> = T extends
  | PromiseLike<infer U>
  | Promise<infer U>
  ? U
  : T;
进入全屏模式 退出全屏模式
您可能会问自己“_什么时候_这种类型到底有用吗?_如何_有用?_为什么_有用?在_什么_上下文中它最有用?”这是需要考虑的好问题。审查是一件美好的事情。
为了解决您可能会或可能不会问自己的这些假设性问题,UnwrapPromise<T>类型在_推断异步函数的返回类型(承诺)时非常有用
想想在类型的上下文中返回数据的种子文件 -在实践中通常表现为一个 1,000+ 行的异步函数。静态输入听起来像是一种皇家痛苦,对吧?正确的。这绝对是——但它可以用几行干净的泛型代码来解决——让我们使用上面的简单泛型作为基石来解决这个问题(来自另一个最近项目的代码片段链接在这里和上面这段中):
export async function seed<T extends import("@prisma/client").PrismaClient>(
  prisma: T
) {
// line 5 -- lots of data mimicry unfolds below
// ...
// line 1067 -- the main event
 const seedUser = async () => {
    return await prisma.user.create({
      data: {
       // schema.prisma models/types seeded here
      },
      include: {
        sessions: true,
        accounts: true,
        profile: true,
        entries: true,
        _count: true,
        comments: true
      }
    });
  };
  return seedUser();
} // line 1,193 -- let's unwrap this sizeable beast

// similar to the type we defined previously
type UnwrapPromise<T> = T extends Promise<infer U> ? U : T;

// use built-in ReturnType<T> inside of UnwrapPromise<T>
type SeedInferred = UnwrapPromise<ReturnType<typeof seed>>;

// enhance precision by extending Record<keyof U, infer U>

type SeedPropsInferred<U> = UnwrapPromise<
  typeof seed extends Record<keyof U, infer U>
    ? Record<keyof U, U>
    : UnwrapPromise<typeof seed>
>;
进入全屏模式 退出全屏模式
我们刚刚定义的三个泛型中有两个是下面main函数的组成部分。当在终端中执行yarn seed脚本时,后一个函数会调用冗长的种子函数。这会提示seed函数触发,为新用户生成准随机数据,最终由 MongoDB Atlas 为相关的特定 repo 持久化。
无论如何,让我们看看seed的返回类型是如何通过SeedInferred类型推断出来的,它让我们知道成功数据的确切形状:
绕回来,这种类型
type SeedInferred = UnwrapPromise<ReturnType<typeof seed>>;
进入全屏模式 退出全屏模式
提取以下定义
[ ](https://res.cloudinary.com/practicaldev/image/fetch/s--6efkNW24--/c_limit%2Cf_auto%2Cfl_progressive%2Cq_auto%2Cw_880/https ://dev-to-uploads.s3.amazonaws.com/uploads/articles/8fx4zry8mjwwaj7p1ekg.png)
同样,“深化”泛型——SeedPropsInferred——提取目标异步函数seed使用的类型。
SeedPropsInferred<U>型
type SeedPropsInferred<U> = UnwrapPromise<
  typeof seed extends Record<keyof U, infer U>
    ? Record<keyof U, U>
    : UnwrapPromise<typeof seed>
>;
进入全屏模式 退出全屏模式
为 asyncseed函数中使用的 props 提取以下定义:
type SeedPropsInferred<U> = (<T extends PrismaClient<Prisma.PrismaClientOptions, never, Prisma.RejectOnNotFound | Prisma.RejectPerOperation | undefined>>(prisma: T) => Promise<...> extends Record<...> ? Record<...> : <T extends PrismaClient<Prisma.PrismaClientOptions, never, Prisma.RejectOnNotFound | Prisma.RejectPerOperation | undefined>>(prisma: T) => Promise<...>) extends Promise<...> ? U : <T extends PrismaClient<Prisma.PrismaClientOptions, never, Prisma.RejectOnNotFound | Prisma.RejectPerOperation | undefined>>(prisma: T) => Promise<...> extends Record<...> ? Record<...> : <T extends PrismaClient<Prisma.PrismaClientOptions, never, Prisma.RejectOnNotFound | Prisma.RejectPerOperation | undefined>>(prisma: T) => Promise<...>
进入全屏模式 退出全屏模式
在键入main函数时,SeedInferred和SeedPropsInferred都很实用——最少的努力,最大的结果。泛型很强大,权衡是为类型安全代码库带来额外的复杂性/抽象,并且编写的代码行数要少得多
async function main() {
  const prisma = await import("../server/Context/prisma");
  try {
    await prisma.default
      .$connect()
      .then(() => console.log("[seeding]: db connection opened"));
    const s: SeedPropsInferred<{
      props: typeof prisma;
    }> = async (): Promise<SeedInferred> =>
      await seed(prisma.default).then(data => {
        console.log(
          JSON.stringify(
            `[seeding]: success 🎉 created ${data.role} with id ${data.id} and email ${data.email}`,
            null,
            2
          )
        );
        return data;
      });
    return await s(prisma.default);
  } catch (err) {
    console.error(err);
    process.exitCode = 1;
  } finally {
    return await prisma.default
      .$disconnect()
      .then(() => console.log(`[seeding]: db connection closed`));
  }
}

main();
进入全屏模式 退出全屏模式
根据 TS Intellisense,种子调用函数 main 具有以下形状:
function main(): Promise<void | (User & {
    profile: Profile | null;
    accounts: Account[];
    sessions: Session[];
    entries: Entry[];
    comments: Comment[];
    _count: Prisma.UserCountOutputType;
})>
进入全屏模式 退出全屏模式
也就是说,在理解类型推断的上下文中,以下代码段可以说是最重要的:
    const s: SeedPropsInferred<{
      props: typeof prisma;
    }> = async (): Promise<SeedInferred> =>
      await seed(prisma.default).then(data => {
        console.log(
          JSON.stringify(
            `[seeding]: success 🎉 created ${data.role} with id ${data.id} and email ${data.email}`,
            null,
            2
          )
        );
        return data;
      });
    return await s(prisma.default);
进入全屏模式 退出全屏模式
为什么?好吧,我们知道seed函数将prisma: PrismaClient作为道具,所以只有它的返回类型才会成为一个谜。那,并且假设main实例化函数返回的成功值反映了seed函数返回的值是合理的(确实如此)。有了上述逻辑,智能感知就不会错过任何一个节拍,并完美地推断出返回数据的形状。
为了说明这确实按预期工作,这里是执行yarn seed脚本的 cli 输出:
dopamine_driven@LAPTOP-2IH011V4:~/personal/port/next-prisma/next-prisma$ yarn seed
yarn run v1.22.18
$ ts-node src/seeds/seed.ts
[seeding]: db connection opened
"[seeding]: success 🎉 created USER with id 623d0997f9677901309ee6f8 and email kattie.gislason@gmail.com
[seeding]: db connection closed
Done in 5.36s.
进入全屏模式 退出全屏模式
这个条目现在存在于 MongoDB 上——不需要 Mongo 驱动程序或运行服务器——只需一个简单的yarn seed即可在 MongoDB Atlas 中生成数据。顺便说一句,如果选择使用云服务进行本地开发,最好有两个独立的数据库
[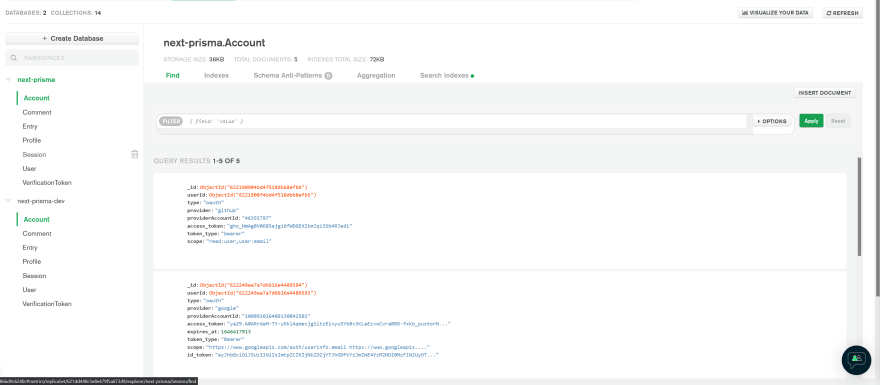 ](https://res.cloudinary.com/practicaldev/image/fetch/s--OnzG7RfP--/c_limit%2Cf_auto%2Cfl_progressive%2Cq_auto%2Cw_880/https://dev -to-uploads.s3.amazonaws.com/uploads/articles/7y1uo0ufmoch0seftxcw.png)
在检查dev数据库中的User集合后,我们可以看到我们最近创建的具有电子邮件kattie.gislason@gmail.com的用户的种子数据
    _id: 623d0997f9677901309ee6f8
    imageMeta:
        - id:"623d0997f9677901309ee700"
        - uploadedAt: 2022-03-25T00:15:19.475+00:00
        - fileLastModified: 2022-03-18T18:59:20.314+00:00
        - quality: 100
        - filename: "Katties-fresh-avatar"
        - src: "https://dev-to-uploads.s3.amazonaws.com/uploads/articles/g4apn65eo8acy..."
        - srcSet: ""
        - filetype: "GIF"
        - size: "0.25MB"
        - width: 125
        - height: 125
        - caption: "Voluptatem nisi hic beatae accusantium."
        - description: "Nihil vel aliquid dignissimos quam expedita. Dolore recusandae eum dig..."
        - title: "Kattie Gislason's Avatar"
        - ariaLabel: "Accessibility label"
        - destination: "AVATAR"
    name: "Kattie Gislason"
    email: "kattie.gislason@gmail.com"
    username: "Kattie_Gislason"
    image: "https://dev-to-uploads.s3.amazonaws.com/uploads/articles/g4apn65eo8acy..."
    role: "USER"
    status: "OFFLINE"
    createdAt: 2022-03-25T00:15:19.476+00:00
    updatedAt: 2022-03-25T00:15:19.477+00:00
    email_verified: 2022-03-25T00:15:19.477+00:00
进入全屏模式 退出全屏模式
好的。现在,回到 React+JSX 来阅读本文的其余部分 →

第二阶段:解开单个 JSX.IntrinsicElement
首先,让我们找到<input />JSX.IntrinsicElement 的类型定义:
declare global {
    namespace JSX {
        // some interesting generic usage happening here

        interface IntrinsicElements {
            // other elements
            input: React.DetailedHTMLProps<React.InputHTMLAttributes<HTMLInputElement>, HTMLInputElement>;
            // more elements
        }
    }
}
进入全屏模式 退出全屏模式
declare global { namespace JSX {} }被有意包含在上述类型定义中,因为重要的是要考虑类型来自哪里,它们可以去哪里,以及我们如何使用泛型来实现各种期望的结果。
在完成这项任务时,我使用的第一种方法是本地化、剪切、模仿 + 映射方法:
export type UnwrapInputProps<
  T extends keyof DetailedHTMLProps<
    InputHTMLAttributes<HTMLInputElement>,
    HTMLInputElement
  >
> = {
  [P in T]?: DetailedHTMLProps<
    InputHTMLAttributes<HTMLInputElement>,
    HTMLInputElement
  >[P];
};
进入全屏模式 退出全屏模式
在上面的UnwrapInputProps类型定义中,T 扩展了官方输入 JSX.IntrinsicElement typedef 内部工作原理的精确副本的 key,我们在本阶段开始时查看。UnwrapInputProps<T>在实践中用于搭建自定义输入组件,如下所示:
export const InjectNameInput = ({
  ...props
}: UnwrapInputProps<
  | "className"
  | "type"
  | "name"
  | "autoComplete"
  | "id"
  | "required"
  | "value"
  | "onChange"
  | "placeholder"
>) => <input {...props} />;
进入全屏模式 退出全屏模式
在检查智能感知后,它很快变得很清楚......
[ ](https://res.cloudinary.com/practicaldev/image/fetch/s--mzms8yYw--/c_limit%2Cf_auto%2Cfl_progressive%2Cq_auto%2Cw_880 /https://dev-to-uploads.s3.amazonaws.com/uploads/articles/7a37nxb9xpb35xkq1dhr.png)
...就广泛采用而言,这几乎不是一种优化或理想的方法。为什么?它需要手动输入每个所需的道具类型,这可能会令人讨厌,而且维护起来也很乏味,尤其是在单个代码库中有多个开发人员的情况下。
看看InjectNameInput是怎么消耗的
            <InjectNameInput
              className={cn(
                `gform_${formIdRef.current}_gfield_nameinput_${
                  router.query.slug as string
                }`,
                placeholder.includes("Given Name")
                  ? "visible min-w-full"
                  : placeholder.includes("Surname")
                  ? "visible min-w-full"
                  : ""
              )}
              type='text'
              name={key}
              id={`input_${formIdRef.current}_${id}_${key}`}
              placeholder={placeholder}
              autoComplete={AUTOCOMPLETE_ATTRIBUTES[key]}
              value={nameValues?.[key] || ""}
              onChange={handleChange}
            />
进入全屏模式 退出全屏模式
接下来,我们的最后阶段,阶段 tres。虽然在通往当前工作解决方案的道路上还有其他有趣的中间体,但高度的嗜睡和在睡眠蔓延之前返回代码编辑器的愿望让我们明白了这一点。
如果您希望我更新这篇文章并扩展一两个额外的中间解决方案,这些解决方案是基于以前的方法和其中的优缺点,请在下面发表评论让我知道!
[ ](https://res.cloudinary.com/practicaldev/image/fetch/s--elrF4TPz--/c_limit%2Cf_auto%2Cfl_progressive%2Cq_66%2Cw_880/https://dev -to-uploads.s3.amazonaws.com/uploads/articles/o00varyeyy7h39n5kv4x.gif)
第三阶段 - .d.ts 文件的实用程序
首先,转到您的tsconfig.json文件以确保设置了以下标志 -"declaration": true
我当前 tsconfig.json 的内容(截至 2022-03-24)
{
  "compilerOptions": {
    "module": "esnext",
    "target": "ES2020",
    "lib": ["DOM", "DOM.Iterable", "ESNext"],
    "declaration": true,
    "strict": true,
    "pretty": true,
    "noImplicitAny": true,
    "strictNullChecks": true,
    "noImplicitThis": true,
    "alwaysStrict": true,
    "skipDefaultLibCheck": true,
    "moduleResolution": "Node",
    "sourceMap": true,
    "strictBindCallApply": true,
    "noStrictGenericChecks": false,
    "strictFunctionTypes": true,
    "noUnusedLocals": false,
    "noUnusedParameters": false,
    "jsx": "preserve",
    "downlevelIteration": true,
    "noImplicitReturns": true,
    "noFallthroughCasesInSwitch": true,
    "inlineSources": true,
    "experimentalDecorators": true,
    "strictPropertyInitialization": true,
    "baseUrl": "./",
    "allowJs": true,
    "sourceRoot": "./src",
    "checkJs": false,
    "skipLibCheck": true,
    "forceConsistentCasingInFileNames": true,
    "noEmit": true,
    "esModuleInterop": true,
    "resolveJsonModule": true,
    "allowSyntheticDefaultImports": true,
    "isolatedModules": true,
    "incremental": true,
    "paths": {
      "@/apollo/*": ["src/apollo/*"],
      "@/components/*": ["src/components/*"],
      "@/graphql/*": ["src/graphql/*"],
      "@/hooks/*": ["src/hooks/*"],
      "@/lib/*": ["src/lib/*"],
      "@/pages/*": ["src/pages/*"],
      "@/styles/*": ["src/styles/*"],
      "@/types/*": ["src/types/*"],
      "@/utils/*": ["src/utils/*"]
    }
  },
  "include": [
    "next-env.d.ts",
    "index.d.ts",
    "graphqls.d.ts",
    "src/**/*.ts",
    "src/**/*.d.ts",
    "src/**/*.graphqls.d.ts",
    "src/**/*.graphql.d.ts",
    "src/**/*.graphqls",
    "src/**/*.graphql",
    "src/**/*.tsx",
    "src/**/*.js",
    "src/**/*.gql"
  ],
  "exclude": ["node_modules"]
}
进入全屏模式 退出全屏模式
对,到好东西了。将declaration标志设置为 true,创建一个根index.d.ts文件。请务必在"include": []数组中 "include" tsconfig.json 文件底部的文件(以便 TS 检测到它)。
索引.d.ts
// Recursive Optional Mapping good-good
declare type RecursiveOptional<T> = {
  [P in keyof T]?: RecursiveOptional<T[P]>;
};

// Strip RecursiveOptional wrapper post-recursion for 1:1 alignment with core react typedefs
declare type OmitRecursiveOptionalWrapper<T> = T
extends RecursiveOptional<
  infer U
>
  ? U
  : T;

// strips the recursively conditional helper type for 1:1 alignment with Reacts internal definitions
declare const ReactRecursiveUnwrapped = ({
  jsxProps
}: {
  jsxProps: Partial<
    OmitRecursiveOptionalWrapper<
      RecursiveOptional<
        JSX.IntrinsicElements
      >
    >
  >;
}) => ({ ...jsxProps });

// TypeDef to use Globally
declare type ReactUnwrapped<
  T extends keyof ReturnType<typeof ReactRecursiveUnwrapped>
> = {
  [P in T]?: ReturnType<typeof ReactRecursiveUnwrapped>[P];
};
进入全屏模式 退出全屏模式
让我们分解一下:
-
OmitRecursiveOptionalWrapper和RecursiveOptional都是辅助类型。RecursiveOptional有条件地映射<T[P]>中的所有道具。 -
[P in keyof T]?:表示法表示映射的每个属性都由?:运算符设置为有条件的。如果改为[P in keyof T]-?:,则映射的每个属性都将被剥夺其条件状态并成为必需的。 -
如果您的目标是避免为任何给定的映射属性操作所需的状态和条件状态,只需完全省略问号
[P in keyof T]:。
在这种情况下,OmitRecursiveOptionalWrapper是RecursiveOptional的阳的阴。如何?为什么? Omitting Wrapper 去除了RecursiveOptionaltypedef 的转换(条件映射)输出类型,否则会与 React 的 typedef 发生冲突,从而导致错误。
OmitRecursiveOptionalWrapper<T>类型声明可能看起来很熟悉——回忆第一阶段UnwrapPromise<T>类型的配置:
declare type OmitRecursiveOptionalWrapper<T> = T
extends RecursiveOptional<
  infer U
>
  ? U
  : T;
进入全屏模式 退出全屏模式
上面 Omit Wrapper 中发生的事情的细分:
-
T 扩展任何 RecursiveOptional-Wrapped 属性 U 并推断其类型
-
如果 T 确实扩展或遇到这样的配置,它只返回内部属性 U 从而消除过程中的外部 RecursiveOptional 类型
-
否则,如果没有遇到 RecursiveOptional 包装类型,则简单返回 T
黄油面包
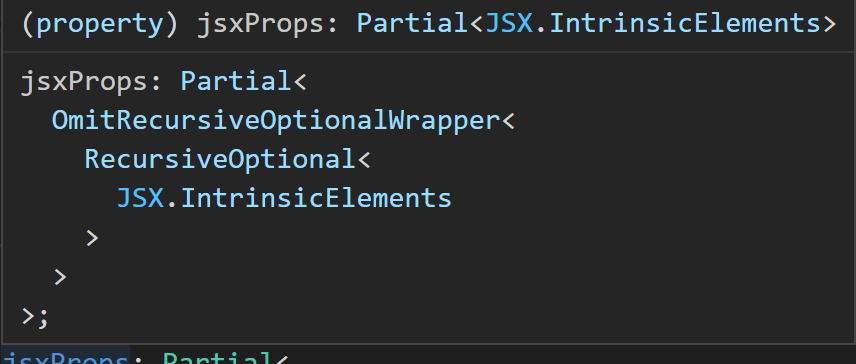
如果您已经做到了这一步,我表示感谢,愿泛型的力量与您同在。现在好东西——让我们检查剩下的两个有问题的声明。第一个,ReactRecursiveUnwrapped是一个 const,它返回Partial<JSX.IntrinsicElements>类型的解构/扩展jsxProps
// strips the recursively conditional helper type for 1:1 alignment with Reacts internal definitions
declare const ReactRecursiveUnwrapped = ({
  jsxProps
}: {
  jsxProps: Partial<
    OmitRecursiveOptionalWrapper<
      RecursiveOptional<
        JSX.IntrinsicElements
      >
    >
  >;
}) => ({ ...jsxProps });
进入全屏模式 退出全屏模式
让我们看一下这个 typedef 的智能感知:
[ ](https://res.cloudinary.com/practicaldev/image/fetch/s--SI7t1uFy--/c_limit%2Cf_auto%2Cfl_progressive%2Cq_auto%2Cw_880/https://dev -to-uploads.s3.amazonaws.com/uploads/articles/xhiac4atuw8cu97h404g.png)
- 但是等等——最初分配给
jsxProps类型的 typedef 更多......而且——回想一下这两种辅助类型的阴/阳动态。OmitRecursiveOptionalWrapper包装了RecursiveOptional包装器以有效地相互抵消 after 内部JSX.IntrinsicElements接口已经被RecursiveOptional包装器递归(和有条件地)映射出来!给我们留下了一个更友好的 typedef 来使用——Partial<JSX.IntrinsicElements>
[ ](https://res.cloudinary.com/practicaldev/image/fetch/s--rRDBSKBP--/c_limit%2Cf_auto%2Cfl_progressive%2Cq_66%2Cw_880/https://dev-to-uploads .s3.amazonaws.com/uploads/articles/qe5hwxt6ksrcv5mvp5a7.gif)
最后,让我们检查ReactUnwrapped<T extends keyof ReturnType<typeof ReactRecursiveUnwrapped>>类型,我们将在全局范围内使用 0 个需要导入
declare type ReactUnwrapped<
  T extends keyof ReturnType<typeof ReactRecursiveUnwrapped>
> = {
  [P in T]?: ReturnType<typeof ReactRecursiveUnwrapped>[P];
};
进入全屏模式 退出全屏模式
T的智能感知,它扩展了keyof ReturnType<typeof ReactRecursiveUnwrapped>——相当于keyof ReturnType<Partial<JSX.IntrinsicElements>>\——如下:
T extends "symbol" | "object" | "a" | "abbr" | "address" | "area" | "article" | "aside" | "audio" | "b" | "base" | "bdi" | "bdo" | "big" | "blockquote" | "body" | "br" | "button" | "canvas" | ... 155 more ... | "view">
进入全屏模式 退出全屏模式
声明的 constReactRecursiveUnwrapped的ReturnType<T>等价于 JSX-namespace-residingIntrinsicElements{}接口的定义
{
    a?: React.DetailedHTMLProps<React.AnchorHTMLAttributes<HTMLAnchorElement>, HTMLAnchorElement> | undefined;
    ... 173 more ...;
    view?: React.SVGProps<...> | undefined;
}
进入全屏模式 退出全屏模式
唯一明显的区别?递归可选映射,由ReactUnwrapped声明中的[P in T]?:指示,导致每个 JSX.IntrinsicElement 具有条件未定义的联合类型Type |undefined
最终,全局使用的类型具有以下一般形状:
type ReactUnwrapped<T extends "symbol" | "object" | "a" | "abbr" | "address" | "area" | "article" | "aside" | "audio" | "b" | "base" | "bdi" | "bdo" | "big" | "blockquote" | "body" | "br" | "button" | "canvas" | ... 155 more ... | "view"> = { [P in T]?: {
    a?: React.DetailedHTMLProps<React.AnchorHTMLAttributes<HTMLAnchorElement>, HTMLAnchorElement> | undefined;
    ... 173 more ...;
    view?: React.SVGProps<...> | undefined;
}[P] | undefined; }
进入全屏模式 退出全屏模式
由于这些类型是在根index.d.ts文件中声明的,因此它们可以自动用于全球消费,并且需要零导入。
回顾一下,这四个声明对我们的目的有直接的用途:
declare type RecursiveOptional<T> = {
  [P in keyof T]?: RecursiveOptional<T[P]>;
};

declare type OmitRecursiveOptionalWrapper<T> = T
extends RecursiveOptional<
  infer U
>
  ? U
  : T;

declare const ReactRecursiveUnwrapped = ({
  jsxProps
}: {
  jsxProps: Partial<
    OmitRecursiveOptionalWrapper<
      RecursiveOptional<
        JSX.IntrinsicElements
      >
    >
  >;
}) => ({ ...jsxProps });

declare type ReactUnwrapped<
  T extends keyof ReturnType<typeof ReactRecursiveUnwrapped>
> = {
  [P in T]?: ReturnType<typeof ReactRecursiveUnwrapped>[P];
};
进入全屏模式 退出全屏模式
在.tsx文件中消费ReactUnwrapped类型
Vercel 倾向于使用顶级Page组件来包装应用程序布局。此页面组件改编自 Vercel 的新@vercel/examples-ui包,其代码库可在此处找到
现在让我们注入一个<main />JSX.IntrinsicElement 及其所有本机属性,以便在代码库中的其他地方使用Page组件时有效地使它们可供使用,如下所示:
export const Page: FC<ReactUnwrapped<"main">> = ({ children, ...props }) => (
  <main
    {...props.main}
    className={cn(
      "w-full max-w-3xl mx-auto py-16",
      props.main?.className ?? ""
    )}>
    {children}
  </main>
);
进入全屏模式 退出全屏模式
值得一提
请注意children(又名ReactNode)是如何传递到 props 中的,由外部 React 功能组件类型包装器FC<ReactUnwrapped<"main">>提供。VFC或Void Functional Component在过去一年中变得越来越流行,被引用为比FC更好的实践,因为它不会自动在每次使用时注入 ReactNode (children)。但是,孩子被传递到这个全球重要的页面包装器中呢?这就是ReactUnwrapped<T>的用武之地!
使用ReactUnwrapped<"main">类型时,all<main />Intrinsic Elements 道具被注入_包括 children_。上面的 Page 组件可以改写如下:
export const Page: VFC<ReactUnwrapped<"main">> = ({ ...props }) => (
  <main
    {...props.main}
    className={cn(
      "w-full max-w-3xl mx-auto py-16",
      props.main?.className ?? ""
    )}>
    {props.main?.children ?? <></>}
  </main>
);
进入全屏模式 退出全屏模式
这适用于<div />、<svg />、<p />、<span />或几乎所有其他内在元素。使用全局ReactUnwrapped<T>助手,您可以将其固有的children道具重新用于被认为最合适的任何地方。
GitHub SVG
- 注入和使用 GitHub 图标的示例:
import type { VFC } from "react";

const GitHubIcon: VFC<ReactUnwrapped<"svg" | "path">> = ({ svg, path }) => (
  <svg
    {...svg}
    className={svg?.className ? svg.className : "h-6 w-6"}
    xmlns='http://www.w3.org/2000/svg'
    fill={svg?.fill ? svg.fill : "none"}
    viewBox='0 0 24 24'
    stroke={svg?.stroke ? svg.stroke : "currentColor"}>
    <path
      {...path}
      d='M12 0C5.374 0 0 5.373 0 12C0 17.302 3.438 21.8 8.207 23.387C8.806 23.498 9 23.126 9 22.81V20.576C5.662 21.302 4.967 19.16 4.967 19.16C4.421 17.773 3.634 17.404 3.634 17.404C2.545 16.659 3.717 16.675 3.717 16.675C4.922 16.759 5.556 17.912 5.556 17.912C6.626 19.746 8.363 19.216 9.048 18.909C9.155 18.134 9.466 17.604 9.81 17.305C7.145 17 4.343 15.971 4.343 11.374C4.343 10.063 4.812 8.993 5.579 8.153C5.455 7.85 5.044 6.629 5.696 4.977C5.696 4.977 6.704 4.655 8.997 6.207C9.954 5.941 10.98 5.808 12 5.803C13.02 5.808 14.047 5.941 15.006 6.207C17.297 4.655 18.303 4.977 18.303 4.977C18.956 6.63 18.545 7.851 18.421 8.153C19.191 8.993 19.656 10.064 19.656 11.374C19.656 15.983 16.849 16.998 14.177 17.295C14.607 17.667 15 18.397 15 19.517V22.81C15 23.129 15.192 23.504 15.801 23.386C20.566 21.797 24 17.3 24 12C24 5.373 18.627 0 12 0Z'
      fill={path?.fill ? path.fill : "currentColor"}
    />
    {svg?.children ? svg.children : <></>}
  </svg>
);

export default GitHubIcon;
进入全屏模式 退出全屏模式
消费
export const CustomDiv = ({ div }: ReactUnwrapped<"div">) => (
  <div {...div}>
    <GitHubIcon
      svg={{
        "aria-hidden": true,
        "aria-label": "GitHubIcon",
        onChange: e => {
          e.preventDefault();
          e.currentTarget.style.cssText.replace(
            "GitHubIcon",
            "Changing Text Underway"
          );
        }
      }}
      path={{
        name: "GitHubIconPath",
        onMouseOver: e => {
          e.preventDefault();
          // do things
        }
      }}
    />
    {div?.children}
  </div>
);
进入全屏模式 退出全屏模式
这就是现在的全部内容,我会定期回来回答问题/更新并完善这篇文章。感谢您一起阅读!您可以查看 github 存储库,该代码的大部分来自此处
PS——一天两次🎉
[ ](https://res.cloudinary.com/practicaldev/image/fetch/s--2LzsxdL1--/c_limit%2Cf_auto%2Cfl_progressive%2Cq_66%2Cw_880/https://dev -to-uploads.s3.amazonaws.com/uploads/articles/3nzwadhsyk0g4nfyd05y.gif)

React社区为您提供最前沿的新闻资讯和知识内容
更多推荐
 0
0 0
0- 0


 已为社区贡献7744条内容

所有评论(0)