MeshWatch - 最终回顾
自从我开始这个项目以来已经有大约两个星期了。我对结果非常满意。我的目标实现了,我有一个令我非常自豪的工作产品。
新工具
GitHub
https://github.com/datagod/meshwatch
我对 GitHub 并不陌生,但我想将它完全集成到我的开发过程中。
项目
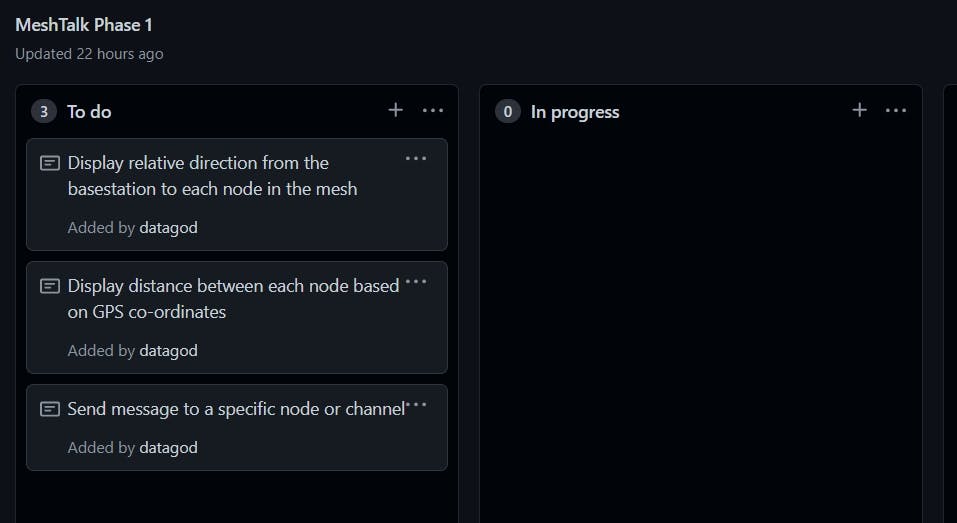
我在我的存储库中创建了一个项目并添加了一些任务。我通过这种方式完成了很多工作。我发现它既激励又有益。
错误/问题
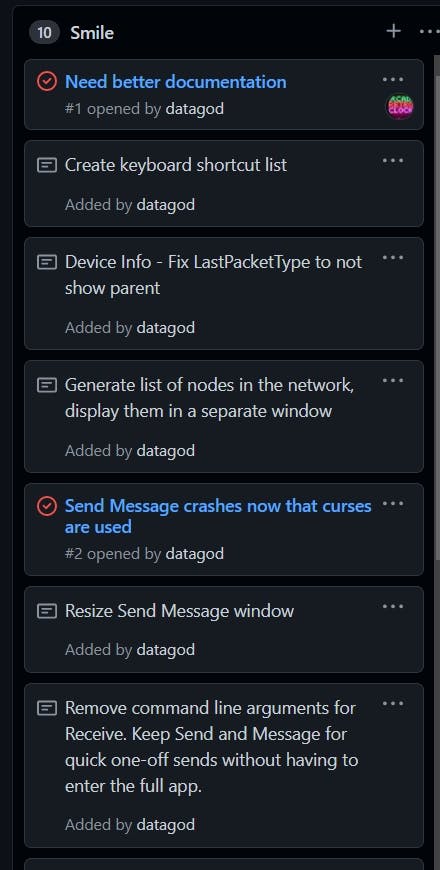
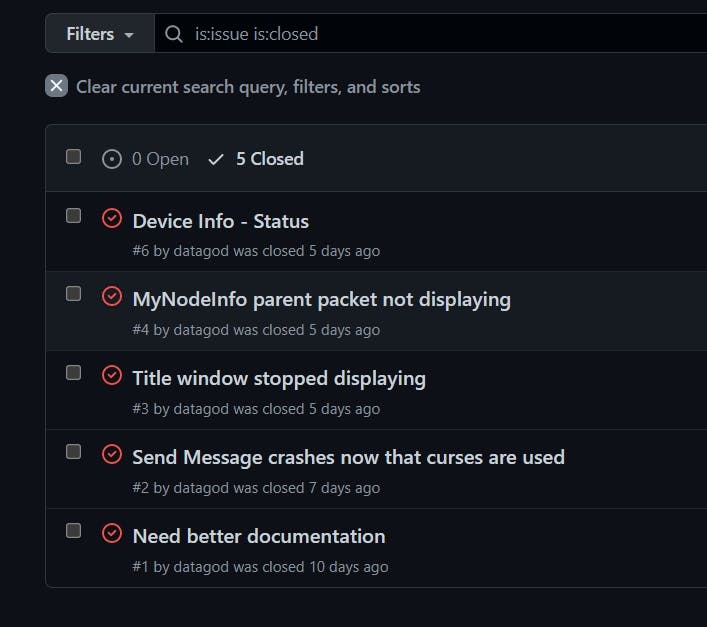
我打开和关闭了 5 个问题。一路上我修了很多。独自工作,我倾向于勇往直前,不费心记录每一个小问题。
Visual Studio 代码
![2021-09-26 18_54_04-meshwatch.py - pi [SSH_meshtasticPi.local] - Visual Studio Code.jpg](https://cdn.hashnode.com/res/hashnode/image/upload/v1632696894152/hT8xX3HxB.jpeg?auto=compress,format&format=webp)
我收到了关于 Visual Studio 代码的很好的介绍,包括:
-
熟悉新的编辑平台
-
自定义配色方案以匹配我的习惯
-
探索 VSC 插件市场
-
在远程系统上编辑文件(树莓派)
-
直接从编辑平台推送/拉取/提交GitHub仓库
-
从 Windows 10 调试 python 脚本,在树莓派上运行
那天我使用了 Visual Studio 1.0 和之后的几个版本。我最后一次关注它是 Visual Studio 2012,那是我正在从事的商业智能项目。
当我第一次听说 Visual Studio Code 时,我想:哦,太好了,又是一个来自 Microsoft 的巨大过时软件。我避免使用它是因为我对当前的工作流程非常满意:
-
使用Notepad++编辑一个python文件
-
FTP 文件到树莓派
-
使用 Kitty 终端程序 SSH 到 Pi 并运行程序
-
将 Pi 连接到 LCD 以查看调试输出
-
当天完成后,使用 GitHub 桌面应用程序检查对 GitHub 的所有更改
现在我可以在 VCS 中完成所有这些工作,并且也可以运行调试器。再次成为酷孩子中的一员感觉很好。
![2021-09-26 19_03_56-meshwatch.py - pi [SSH_meshtasticPi.local] - Visual Studio Code.jpg](https://cdn.hashnode.com/res/hashnode/image/upload/v1632697527353/gLHlmbD06.jpeg?auto=compress,format&format=webp)
代码审查
我想花时间浏览一下我写的python代码。我创建的许多函数在本系列的前几篇文章中没有介绍。现在是时候完成这一切,看看我们能找到什么有趣的宝石。
包含的模块/库
MeshWatch 依赖于其他模块中包含的函数来运行。在程序的顶部,我们使用 import 函数向 python 解释器表明我们将使用外部函数。
我使用常规的,例如时间、系统、操作系统、数学。我还包括在运行之前需要单独安装的特殊模块。 meshtastic 模块位于GitHub
#Final Version
import meshtastic
import time
from datetime import datetime
import traceback
from meshtastic.mesh_pb2 import _HARDWAREMODEL
from meshtastic.node import Node
from pubsub import pub
import argparse
import collections
import sys
import os
import math

#to help with debugging
import inspect

#For capturing keypresses and drawing text boxes
import curses
from curses import wrapper
from curses.textpad import Textbox, rectangle

#for capturing ctl-c
from signal import signal, SIGINT
from sys import exit
解析参数
这个项目开始时有几个命令行参数,但后来被修改为只有两个。本节介绍如何解析这些参数。
NAME = 'MeshWatch'
DESCRIPTION = "Send and recieve messages to a MeshTastic device"
DEBUG = False

parser = argparse.ArgumentParser(description=DESCRIPTION)
parser.add_argument('-s', '--send',    type=str,   nargs='?', help="send a text message")
parser.add_argument('-t', '--time',    type=int, nargs='?', help="seconds to listen before exiting",default = 36000)
args = parser.parse_args()

#This will now be the default behaviour
#parser.add_argument('-r', '--receive', action='store_true',   help="recieve and display messages")


#process arguments and assign values to local variables
if(args.send):
  SendMessage = True
  TheMessage = args.send
else:
  SendMessage = False
在我之前创建的名为GPSProbe的项目中,我对从命令行运行的基于文本的窗口进行了大量试验。我喜欢在精益构建上运行我的项目,并且只在依赖高级图形时安装完整的桌面环境。
我使用了一个名为 curses 的库,它可以追溯到 1980 年代美好的愚蠢终端时代。这是一组反直觉且繁琐的函数,所以为了让我自己的生活更轻松,我创建了一个名为 TextWindow 的类。这个类有几个功能可以让你快速
-
定义窗口的尺寸
-
画边框
-
画个标题
-
写文本行
-
清除内容
-
滚动内容
## Classes and Function
class TextWindow(object):
  def __init__(self,name, rows,columns,y1,x1,y2,x2,ShowBorder,BorderColor,TitleColor):
    self.name              = name
    self.rows              = rows
    self.columns           = columns
    self.y1                = y1
    self.x1                = x1
    self.y2                = y2
    self.x2                = x2
    self.ShowBorder        = ShowBorder
    self.BorderColor       = BorderColor #pre defined text colors 1-7
    self.TextWindow        = curses.newwin(self.rows,self.columns,self.y1,self.x1)
    self.CurrentRow        = 1
    self.StartColumn       = 1
    self.DisplayRows       = self.rows    #we will modify this later, based on if we show borders or not
    self.DisplayColumns    = self.columns #we will modify this later, based on if we show borders or not
    self.PreviousLineText  = ""
    self.PreviousLineRow   = 0
    self.PreviousLineColor = 2
    self.Title             = ""
    self.TitleColor        = TitleColor

    #If we are showing border, we only print inside the lines
    if (self.ShowBorder  == 'Y'):
      self.CurrentRow     = 1
      self.StartColumn    = 1
      self.DisplayRows    = self.rows -2 #we don't want to print over the border
      self.DisplayColumns = self.columns -2 #we don't want to print over the border
      self.TextWindow.attron(curses.color_pair(BorderColor))
      self.TextWindow.border()
      self.TextWindow.attroff(curses.color_pair(BorderColor))
      self.TextWindow.refresh()

    else:
      self.CurrentRow   = 0
      self.StartColumn  = 0
这是一个功能,可让您一次将一行写入窗口。每一行都将被添加到窗口中,如果它到达底部,则下一行将被写入顶部。这是层叠式打印。不是每个人都喜欢这个,但它有它的用途。
def ScrollPrint(self,PrintLine,Color=2,TimeStamp=False,BoldLine=True):
    #print(PrintLine)
    #for now the string is printed in the window and the current row is incremented
    #when the counter reaches the end of the window, we will wrap around to the top
    #we don't print on the window border
    #make sure to pad the new string with spaces to overwrite any old text

    current_time = datetime.now().strftime("%H:%M:%S")

    if (TimeStamp):
      PrintLine =   current_time + ": {}".format(PrintLine)

    #expand tabs to X spaces, pad the string with space
    PrintLine = PrintLine.expandtabs(4)

    #adjust strings
    #Get a part of the big string that will fit in the window
    PrintableString = ''
    RemainingString = ''
    PrintableString = PrintLine[0:self.DisplayColumns]
    RemainingString = PrintLine[self.DisplayColumns+1:]

    #Pad1.PadPrint("PrintLine:{}".format(PrintLine),2,TimeStamp=True)
    #Pad1.PadPrint("Printable:{}".format(PrintableString),2,TimeStamp=True)
    #Pad1.PadPrint("Remaining:{}".format(RemainingString),2,TimeStamp=True)


    try:

      while (len(PrintableString) > 0):

        #padd with spaces
        PrintableString = PrintableString.ljust(self.DisplayColumns,' ')

        #if (self.rows == 1):
        #  #if you print on the last character of a window you get an error
        #  PrintableString = PrintableString[0:-2]
        #  self.TextWindow.addstr(0,0,PrintableString)
        #else:


        #unbold Previous line
        self.TextWindow.attron(curses.color_pair(self.PreviousLineColor))
        self.TextWindow.addstr(self.PreviousLineRow,self.StartColumn,self.PreviousLineText)
        self.TextWindow.attroff(curses.color_pair(self.PreviousLineColor))


        if (BoldLine == True):
          #A_NORMAL        Normal display (no highlight)
          #A_STANDOUT      Best highlighting mode of the terminal
          #A_UNDERLINE     Underlining
          #A_REVERSE       Reverse video
          #A_BLINK         Blinking
          #A_DIM           Half bright
          #A_BOLD          Extra bright or bold
          #A_PROTECT       Protected mode
          #A_INVIS         Invisible or blank mode
          #A_ALTCHARSET    Alternate character set
          #A_CHARTEXT      Bit-mask to extract a character
          #COLOR_PAIR(n)   Color-pair number n

          #print new line in bold
          self.TextWindow.attron(curses.color_pair(Color))
          self.TextWindow.addstr(self.CurrentRow,self.StartColumn,PrintableString,curses.A_BOLD)
          self.TextWindow.attroff(curses.color_pair(Color))
        else:
          #print new line in Regular
          self.TextWindow.attron(curses.color_pair(Color))
          self.TextWindow.addstr(self.CurrentRow,self.StartColumn,PrintableString)
          self.TextWindow.attroff(curses.color_pair(Color))

        self.PreviousLineText  = PrintableString
        self.PreviousLineColor = Color
        self.PreviousLineRow   = self.CurrentRow
        self.CurrentRow        = self.CurrentRow + 1


        #Adjust strings
        PrintableString = RemainingString[0:self.DisplayColumns]
        RemainingString = RemainingString[self.DisplayColumns:]


      if (self.CurrentRow > (self.DisplayRows)):
        if (self.ShowBorder == 'Y'):
          self.CurrentRow = 1
        else:
          self.CurrentRow = 0


      #erase to end of line
      #self.TextWindow.clrtoeol()
      self.TextWindow.refresh()

    except Exception as ErrorMessage:
      TraceMessage = traceback.format_exc()
      AdditionalInfo = "PrintLine: {}".format(PrintLine)

      ErrorHandler(ErrorMessage,TraceMessage,AdditionalInfo)
此功能显示您如何清除窗口。您使用 erase() 删除内容,然后打开颜色,绘制边框,关闭颜色,显示标题。
随后的 refresh() 将重绘屏幕,显示最近所做的所有更改。
  def Clear(self):
    self.TextWindow.erase()
    self.TextWindow.attron(curses.color_pair(self.BorderColor))
    self.TextWindow.border()
    self.TextWindow.attroff(curses.color_pair(self.BorderColor))
    self.DisplayTitle()

    #self.TextWindow.refresh()
    if (self.ShowBorder  == 'Y'):
      self.CurrentRow    = 1
      self.StartColumn   = 1
    else:
      self.CurrentRow   = 0
      self.StartColumn  = 0
我创建的另一个类称为 TextPad。这充当虚拟记事本。垫可以是您想要的任何尺寸,并且一个窗口将在您的屏幕上显示垫的一部分。您甚至可以启用键盘进行编辑,以便接受和显示来自用户的输入。
class TextPad(object):
  #use this as a virtual notepad
  #write a large amount of data to it, then display a section of it on the screen
  #to have a border, use another window with a border
  def __init__(self,name, rows,columns,y1,x1,y2,x2,ShowBorder,BorderColor):
    self.name              = name
    self.rows              = rows
    self.columns           = columns
    self.y1                = y1 #These are coordinates for the window corners on the screen
    self.x1                = x1 #These are coordinates for the window corners on the screen
    self.y2                = y2 #These are coordinates for the window corners on the screen
    self.x2                = x2 #These are coordinates for the window corners on the screen
    self.ShowBorder        = ShowBorder
    self.BorderColor       = BorderColor #pre defined text colors 1-7
    self.TextPad           = curses.newpad(self.rows,self.columns)
    self.PreviousLineColor = 2

  def PadPrint(self,PrintLine,Color=2,TimeStamp=False):
    #print to the pad
    try:
      self.TextPad.idlok(1)
      self.TextPad.scrollok(1)

      current_time = datetime.now().strftime("%H:%M:%S")
      if (TimeStamp):
        PrintLine = current_time + ": " + PrintLine

      #expand tabs to X spaces, pad the string with space then truncate
      PrintLine = PrintLine.expandtabs(4)
      PrintLine = PrintLine.ljust(self.columns,' ')

      self.TextPad.attron(curses.color_pair(Color))
      self.TextPad.addstr(PrintLine)
      self.TextPad.attroff(curses.color_pair(Color))

      #We will refresh afer a series of calls instead of every update
      self.TextPad.refresh(0,0,self.y1,self.x1,self.y1 + self.rows,self.x1 + self.columns)

    except Exception as ErrorMessage:
      time.sleep(2)
      TraceMessage = traceback.format_exc()
      AdditionalInfo = "PrintLine: " + PrintLine
      ErrorHandler(ErrorMessage,TraceMessage,AdditionalInfo)


  def Clear(self):
    try:
      self.TextPad.erase()
      #self.TextPad.noutrefresh(0,0,self.y1,self.x1,self.y1 + self.rows,self.x1 + self.columns)
      self.TextPad.refresh(0,0,self.y1,self.x1,self.y1 + self.rows,self.x1 + self.columns)
    except Exception as ErrorMessage:
      TraceMessage = traceback.format_exc()
      AdditionalInfo = "erasing textpad"
      ErrorHandler(ErrorMessage,TraceMessage,AdditionalInfo)
错误处理
自 1993 年以来,我一直在我的程序中使用错误处理。我加入了一家世界范围内的咨询公司(其中一家大型咨询公司)的一个大型项目,他们向我们所有人介绍了错误捕获和处理。我有大量为 SQL Server 编写的错误处理程序,并且我有一个在 Python 中使用的稍微缩小的版本。
此函数接受几个参数(在错误发生时生成),并在显示错误输出之前执行任何必要的操作以使屏幕恢复到有用状态。这是通过调用 FinalCleanup() 来完成的。
def ErrorHandler(ErrorMessage,TraceMessage,AdditionalInfo):
  CallingFunction =  inspect.stack()[1][3]
  FinalCleanup(stdscr)
  print("")
  print("")
  print("--------------------------------------------------------------")
  print("ERROR - Function (",CallingFunction, ") has encountered an error. ")
  print(ErrorMessage)
  print("")
  print("")
  print("TRACE")
  print(TraceMessage)
  print("")
  print("")
  if (AdditionalInfo != ""):
    print("Additonal info:",AdditionalInfo)
    print("")
    print("")
  print("--------------------------------------------------------------")
  print("")
  print("")
  time.sleep(1)
  sys.exit('Good by for now...')


def FinalCleanup(stdscr):
  stdscr.keypad(0)
  curses.echo()
  curses.nocbreak()
  curses.curs_set(1)
  curses.endwin()
调用错误处理程序的示例:
  def PadPrint(self,PrintLine,Color=2,TimeStamp=False):
    #print to the pad

    try:

      self.TextPad.idlok(1)
      self.TextPad.scrollok(1)

      current_time = datetime.now().strftime("%H:%M:%S")
      if (TimeStamp):
        PrintLine = current_time + ": " + PrintLine

      #expand tabs to X spaces, pad the string with space then truncate
      PrintLine = PrintLine.expandtabs(4)
      PrintLine = PrintLine.ljust(self.columns,' ')

      self.TextPad.attron(curses.color_pair(Color))
      self.TextPad.addstr(PrintLine)
      self.TextPad.attroff(curses.color_pair(Color))

      #We will refresh after a series of calls instead of every update
      self.TextPad.refresh(0,0,self.y1,self.x1,self.y1 + self.rows,self.x1 + self.columns)

    except Exception as ErrorMessage:
      time.sleep(2)
      TraceMessage = traceback.format_exc()
      AdditionalInfo = "PrintLine: " + PrintLine
      ErrorHandler(ErrorMessage,TraceMessage,AdditionalInfo)
如果 TRY 和 EXCEPT 之间发生任何错误,代码将被执行以收集信息并将其传递给 ErrorHandler()。
制作窗户
像我的许多项目一样,没有规范。只有我对我想做的一些有趣的事情有一个大致的了解。我知道我想要一个橱窗展示,我只是不确定它们需要多少个窗户或什么形状。
#NOTE: When making changes, be very careful.  Each Window's position is relative to the other ones on the same
  #horizontal level.  Change one setting at a time and see how it looks on your screen

  #Window1 Coordinates (info window)
  Window1Height = 12
  Window1Length = 40
  Window1x1 = 0
  Window1y1 = 1
  Window1x2 = Window1x1 + Window1Length
  Window1y2 = Window1y1 + Window1Height


  #Window2 Coordinates (small debug window)
  Window2Height = 12
  Window2Length = 40
  Window2x1 = Window1x2 + 1
  Window2y1 = 1
  Window2x2 = Window2x1 + Window2Length
  Window2y2 = Window2y1 + Window2Height

  #Window3 Coordinates (Messages)
  Window3Height = 12
  Window3Length = 104
  Window3x1 = Window2x2 + 1
  Window3y1 = 1
  Window3x2 = Window3x1 + Window3Length
  Window3y2 = Window3y1 + Window3Height
为了据称使我自己的事情变得更简单,我将每个窗口的坐标基于前一个窗口的 Y、X(诅咒是向后的!)坐标。
这样我就可以改变一个窗口的水平尺寸,而不必计算其他窗口的 YX。只要我不超出范围,窗口就会以新的大小绘制。
如您所见,它变得相当复杂,尤其是在添加了第 6 个窗口之后。
#SendMessage Window
  #This window will be used to display the border
  #and title and will surround the input window
  SendMessageWindowHeight = 6
  SendMessageWindowLength = 44
  SendMessageWindowx1 = Window5x2 + 1
  SendMessageWindowy1 = HelpWindowy1 + HelpWindowHeight
  SendMessageWindowx2 = SendMessageWindowx1 + SendMessageWindowLength
  SendMessageWindowy2 = SendMessageWindowy1 + SendMessageWindowHeight

  #InputMessage Window
  #This window will be used get the text to be sent
  InputMessageWindowHeight = SendMessageWindowHeight -2
  InputMessageWindowLength = SendMessageWindowLength -2
  InputMessageWindowx1 = Window5x2 + 2
  InputMessageWindowy1 = HelpWindowy1 + HelpWindowHeight +1
  InputMessageWindowx2 = InputMessageWindowx1 + InputMessageWindowLength -2
  InputMessageWindowy2 = InputMessageWindowy1 + InputMessageWindowHeight -2
绘制窗户
现在我们已经配置了所有类并预先计算了大小,我们可以继续创建窗口本身。
    #--------------------------------------
    # Draw Screen                        --
    #--------------------------------------

    # Create windows
                              # name,  rows,      columns,   y1,    x1,    y2,    x2,ShowBorder,BorderColor,TitleColor):
    TitleWindow   = TextWindow('TitleWindow',1,50,0,0,0,50,'N',0,0)
    StatusWindow  = TextWindow('StatusWindow',1,50,0,51,0,100,'N',0,0)
    StatusWindow2 = TextWindow('StatusWindow2',1,30,0,101,0,130,'N',0,0)
    Window1       = TextWindow('Window1',Window1Height,Window1Length,Window1y1,Window1x1,Window1y2,Window1x2,'Y',2,2)
    Window2       = TextWindow('Window2',Window2Height,Window2Length,Window2y1,Window2x1,Window2y2,Window2x2,'Y',2,2)
    Window3       = TextWindow('Window3',Window3Height,Window3Length,Window3y1,Window3x1,Window3y2,Window3x2,'Y',3,3)
    Window4       = TextWindow('Window4',Window4Height,Window4Length,Window4y1,Window4x1,Window4y2,Window4x2,'Y',5,5)
    Window5       = TextWindow('Window5',Window5Height,Window5Length,Window5y1,Window5x1,Window5y2,Window5x2,'Y',6,6)
    HelpWindow    = TextWindow('HelpWindow',HelpWindowHeight,HelpWindowLength,HelpWindowy1,HelpWindowx1,HelpWindowy2,HelpWindowx2,'Y',7,7)
    SendMessageWindow  = TextWindow('SendMessageWindow',SendMessageWindowHeight,SendMessageWindowLength,SendMessageWindowy1,SendMessageWindowx1,SendMessageWindowy2,SendMessageWindowx2,'Y',7,7)
    InputMessageWindow = TextWindow('InputMessageWindow',InputMessageWindowHeight,InputMessageWindowLength,InputMessageWindowy1,InputMessageWindowx1,InputMessageWindowy2,InputMessageWindowx2,'N',7,7)
    Pad1               = TextPad('Pad1', Pad1Lines,Pad1Columns,Pad1y1,Pad1x1,Pad1y2,Pad1x2,'N',5)
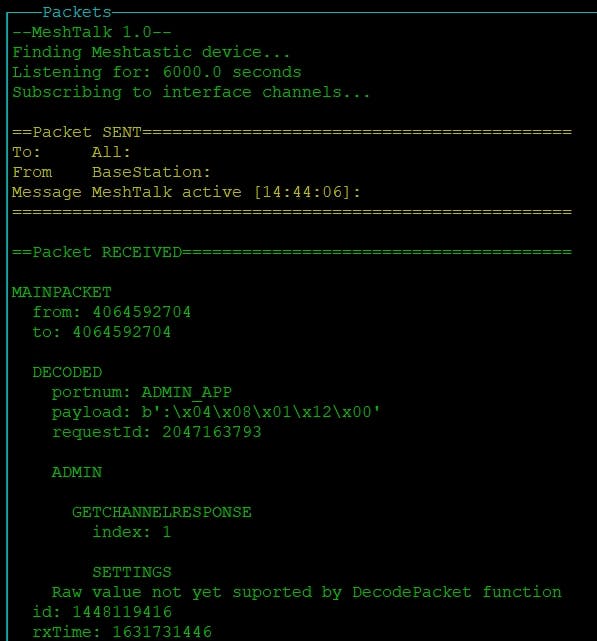
解码包
Meshtastic 设备通过发送数据包与其他设备进行通信。当 python 拦截这些数据包时,它们是字典(键值对)的形式。
键值对中的每个值本身可以是另一个数据包/字典。这让我的解码一开始相当令人沮丧,因为我的代码一直在崩溃。我不知道结构,所以我构建了一个递归函数,它将接收一个数据包并解析它。如果找到另一个数据包,它也会解析它。
def DecodePacket(PacketParent,Packet,Filler,FillerChar,PrintSleep=0):
  global DeviceStatus
  global DeviceName
  global DevicePort
  global PacketsReceived
  global PacketsSent
  global LastPacketType
  global HardwareModel
  global DeviceID
  global BatteryLevl


  #This is a recursive funtion that will decode a packet (get key/value pairs from a dictionary )
  #if the value is itself a dictionary, recurse
  Window2.ScrollPrint("DecodePacket",2,TimeStamp=True)
  #Filler = ('-' *  len(inspect.stack(0)))

  #used to indent packets
  if (PacketParent.upper() != 'MAINPACKET'):
    Filler = Filler + FillerChar

  Window4.ScrollPrint("{}".format(PacketParent).upper(),2)


  #adjust the input to slow down the output for that cool retro feel
  if (PrintSleep > 0):
    time.sleep(PrintSleep)


  #if the packet is a dictionary, decode it
  if isinstance(Packet, collections.abc.Mapping):


    for Key in Packet.keys():
      Value = Packet.get(Key)

      if (PrintSleep > 0):
        time.sleep(PrintSleep)


      #Pad1.PadPrint("{} - {}".format(PacketParent,Key),2)

      #if the value paired with this key is another dictionary, keep digging
      if isinstance(Value, collections.abc.Mapping):

        #Print the name/type of the packet
        Window4.ScrollPrint(" ",2)
        #Window4.ScrollPrint("{}".format(Key).upper(),2)
        LastPacketType = Key.upper()

        DecodePacket("{}/{}".format(PacketParent,Key).upper(),Value,Filler,FillerChar,PrintSleep=PrintSleep)


      else:

        if(Key == 'longName'):
          DeviceName = Value
          UpdateStatusWindow(NewDeviceName=DeviceName,Color=2)

        elif(Key == 'portnum'):
          DevicePort = Value
          UpdateStatusWindow(NewDevicePort=DevicePort,Color=2)

        elif(Key == 'hwModel'):
          HardwareModel = Value
          UpdateStatusWindow(NewHardwareModel=HardwareModel,Color=2)

        elif(Key == 'macaddr'):
          MacAddress = Value
          UpdateStatusWindow(NewMacAddress=MacAddress,Color=2)

        elif(Key == 'id' and PacketParent == 'MYNODE/USER'):
          DeviceID = Value
          UpdateStatusWindow(NewDeviceID=DeviceID,Color=2)

        elif(Key == 'batteryLevel'):
          BatteryLevel = Value
          UpdateStatusWindow(NewBatteryLevel=BatteryLevel,Color=2)

        #Print KEY if not RAW (gotta decode those further, or ignore)
        if(Key == 'raw'):
          Window4.ScrollPrint("{}  RAW value not yet suported by DecodePacket function".format(Filler),2)
        else:
          Window4.ScrollPrint("  {}{}: {}".format(Filler,Key,Value),2)


  else:
    Window2.ScrollPrint("Warning: Not a packet!",5,TimeStamp=True)

  #Window4.ScrollPrint("{}END PACKET: {} ".format(Filler,PacketParent.upper()),2)
在上面的代码中,您可以看到 DecodePacket() 将检查每个值,如果它发现该值是另一个数据包/字典,它将调用 DecodePacket 并带有要解析的 that 数据包。
在此图像中,您可以看到输出是交错的。每个缩进都来自正在解码的嵌入数据包。结果比我想象的要好。最后我采用了不同的格式,因为缩进有点难看。
接收数据包
此函数取自 Meshtastic 文档中的示例。我对其进行了一些调整,添加了一些方便的显示线。
def onReceive(packet, interface): # called when a packet arrives
    global PacketsReceived
    global PacketsSent

    PacketsReceived = PacketsReceived + 1


    Window2.ScrollPrint("onReceive",2,TimeStamp=True)
    Window4.ScrollPrint(" ",2)
    Window4.ScrollPrint("==Packet RECEIVED=================================================",2)

    Decoded  = packet.get('decoded')
    Message  = Decoded.get('text')
    To       = packet.get('to')
    From     = packet.get('from')

    #Even better method, use this recursively to decode all the packets of packets
    DecodePacket('MainPacket',packet,Filler='',FillerChar='',PrintSleep=PrintSleep)

    if(Message):
      Window3.ScrollPrint("From: {} - {}".format(From,Message),2,TimeStamp=True)
    Window4.ScrollPrint("=================================================================",2)
    Window4.ScrollPrint(" ",2)
类似的函数用于检测连接是否丢失,或者节点是否更新。
def onConnectionLost(interface, topic=pub.AUTO_TOPIC): # called when we (re)connect to the radio
    Window2.ScrollPrint('onConnectionLost',2,TimeStamp=True)
    UpdateStatusWindow(NewDeviceStatus = "DISCONNECTED",Color=1)


def onNodeUpdated(interface, topic=pub.AUTO_TOPIC): # called when we (re)connect to the radio
    Window2.ScrollPrint('onNodeUpdated',2,TimeStamp=True)
    Window1.WindowPrint(1,4,'UPDATE RECEIVED',1,TimeStamp=True)
    Window4.ScrollPrint("",2)
键盘输入
诅咒不仅仅是绘制文本窗口。它还处理键盘输入。下面的函数演示了 curses 如何轮询键盘的键,确定按下了哪个键,然后调用指定的函数。
def PollKeyboard():
  global stdscr
  global Window2
  global interface

  #Window2.ScrollPrint("PollKeyboard",2,TimeStamp=True)
  ReturnChar = ""
  c = ""
  #curses.filter()
  curses.noecho()

  try:
    c = chr(stdscr.getch())
  except Exception as ErrorMessage:
    c=""


  #Look for digits (ascii 48-57 == digits 0-9)
  if (c >= '0' and c <= '9'):
    #print ("Digit detected")
    #StatusWindow.ScrollPrint("Digit Detected",2)
    ReturnChar = (c)

  if (c != ""):
    #print ("----------------")
    #print ("Key Pressed: ",Key)
    #print ("----------------")
    OutputLine = "Key Pressed: " + c
    #Window2.ScrollPrint(OutputLine,4)
    ProcessKeypress(c)
  return ReturnChar


def ProcessKeypress(Key):
  global stdscr
  global StatusWindow
  global Window2
  global Window4
  global interface
  global PauseOutput
  global PrintSleep
  global OldPrintSleep
  count  = 0

  OutputLine = "KEYPRESS: [" + str(Key) + "]"
  Window2.ScrollPrint (OutputLine,5)
  # c = clear screen
  # i = get node info
  # n = show all nodes in mesh
  # p = pause
  # q = quit
  # r = reboot
  # s = Send message


  if (Key == "p" or Key == " "):
    PauseOutput = not (PauseOutput)
    if (PauseOutput == True):
      Window2.ScrollPrint("Pausing output",2)
      StatusWindow.WindowPrint(0,0,"** Output SLOW - press SPACE again to cancel **",1)
      PrintSleep = PrintSleep * 3

    else:
      Window2.ScrollPrint("Resuming output",2)
      StatusWindow.WindowPrint(0,0," ",3)
      PrintSleep = OldPrintSleep
      #StatusWindow.ScrollPrint("",2)

  #elif (Key == "i"):
  #  IPAddress = ShowIPAddress()
  #  ar.ShowScrollingBanner2(IPAddress,0,225,0,3,0.03)


  elif (Key == "i"):
    Window4.Clear()
    GetMyNodeInfo(interface)

  elif (Key == "n"):
    Pad1.Clear()
    DisplayNodes(interface)

  elif (Key == "q"):
    FinalCleanup(stdscr)
    exit()

  elif (Key == "c"):
    ClearAllWindows()

  elif (Key == "r"):
    Window2.ScrollPrint('** REBOOTING **',1)

    FinalCleanup(stdscr)
    os.execl(sys.executable, sys.executable, *sys.argv)

  elif (Key == "s"):
    SendMessagePacket(interface)
发送消息
您可以按 S 键发送消息。执行此操作时,将调用 SendMessagePacket() 函数。一个诅咒文本窗口被激活,允许您键入您的消息。完成后按 CTL-G。 Enter 将简单地添加自动剥离的换行符。
def SendMessagePacket(interface, Message=''):
    Window2.ScrollPrint("SendMessagePacket",2)
    TheMessage=''


    InputMessageWindow.TextWindow.move(0,0)
    #Change color temporarily
    SendMessageWindow.TextWindow.attron(curses.color_pair(2))
    SendMessageWindow.TextWindow.border()
    SendMessageWindow.TitleColor = 2
    SendMessageWindow.Title = 'Press CTL-G to send'
    SendMessageWindow.DisplayTitle()

    SendMessageWindow.TextWindow.attroff(curses.color_pair(2))

    SendMessageWindow.TextWindow.refresh()

    #Show cursor

    curses.curs_set(True)
    # Let the user edit until Ctrl-G is struck.

    InputMessageWindow.TextWindow.erase()
    InputMessageBox.edit()
    curses.curs_set(False)


    # Get resulting contents

    TheMessage = InputMessageBox.gather().replace("\n", " ")

    #remove last character which seems to be interfering with line printing
    TheMessage = TheMessage[0:-1]

    #Send the message to the device
    interface.sendText(TheMessage)


    Window4.ScrollPrint(" ",2)
    Window4.ScrollPrint("==Packet SENT===========================================",3)
    Window4.ScrollPrint("To:      All:",3)
    Window4.ScrollPrint("From:    BaseStation",3)
    Window4.ScrollPrint("Message: {}".format(TheMessage),3)
    Window4.ScrollPrint("========================================================",3)
    Window4.ScrollPrint(" ",2)

    SendMessageWindow.Clear()
    SendMessageWindow.TitleColor = 2
    SendMessageWindow.Title = 'Press S to send a message'
    SendMessageWindow.DisplayTitle()

        Window3.ScrollPrint("To: All - {}".format(TheMessage),2,TimeStamp=True)
获取节点信息
本例中的节点是通过 USB 电缆连接到 Raspberry Pi 的 Meshtastic 设备。获取一些很酷的信息只需要一个快速的函数调用。
def GetMyNodeInfo(interface):

    Window4.ScrollPrint(" ",2)
    Window4.ScrollPrint("==MyNodeInfo===================================",3)
    TheNode = interface.getMyNodeInfo()
    DecodePacket('MYNODE',TheNode,'','',PrintSleep =PrintSleep)
    Window4.ScrollPrint("===============================================",3)
    Window4.ScrollPrint(" ",2)

获取所有节点的信息
获取所有节点的信息需要一些循环。这次我决定寻找特定的键/值对,而不是使用暴力递归来解码数据包。到目前为止,我对 Meshtastic 如何组织数据有了更好的理解,因此确定要使用的正确命令非常简单。
def DisplayNodes(interface):
Pad1.Clear()
Pad1.PadPrint("--NODES IN MESH------------",3)
try:
# interface.nodes.values() will return a dictionary
for node in (interface.nodes.values()):
Pad1.PadPrint("NAME: {}".format(node['user']['longName']),3)
Pad1.PadPrint("NODE: {}".format(node['num']),3)
Pad1.PadPrint("ID: {}".format(node['user']['id']),3)
Pad1.PadPrint("MAC: {}".format(node['user']['macaddr']),3)
if 'position' in node.keys():
#used to calculate XY for tile servers
if 'latitude' in node['position']:
Lat = node['position']['latitude']
Lon = node['position']['longitude']
xtile,ytile = deg2num(Lat,Lon,10)
Pad1.PadPrint("Tile: {}/{}".format(xtile,ytile),3)
Pad1.PadPrint("LAT: {}".format(node['position']['latitude']),3)
if 'longitude' in node['position']:
Pad1.PadPrint("LONG: {}".format(node['position']['longitude']),3)
if 'batteryLevel' in node['position']:
Pad1.PadPrint("Battery Level found",3)
Battery = node['position']['batteryLevel']
Pad1.PadPrint("Battery: {}".format(Battery),3)
if 'lastHeard' in node.keys():
LastHeardDatetime = time.strftime('%Y-%m-%d %H:%M:%S', time.localtime(node['lastHeard']))
Pad1.PadPrint("LastHeard: {}".format(LastHeardDatetime),3)
time.sleep(PrintSleep)
Pad1.PadPrint("",3)
except Exception as ErrorMessage:
TraceMessage = traceback.format_exc()
AdditionalInfo = "Processing node info"
ErrorHandler(ErrorMessage,TraceMessage,AdditionalInfo)
Pad1.PadPrint("---------------------------",3)
~~~

## Main Function
Curses requires you to wrap your main section in a function, and call that after initializing curses.
#----------------------------------------
主要(序言--
#----------------------------------------
#如果检测到 SIGINT 或 CTL-C,运行 SIGINT_handler 以正常退出 signal(SIGINT, SIGINT_handler)
#仅当我们在 main 中时才执行 if name\u003du003d'main': try:
  # Initialize curses
  stdscr=curses.initscr()
  # Turn off echoing of keys, and enter cbreak mode,
  # where no buffering is performed on keyboard input
  curses.noecho()
  curses.cbreak()
  curses.curs_set(0)

  # In keypad mode, escape sequences for special keys
  # (like the cursor keys) will be interpreted and
  # a special value like curses.KEY_LEFT will be returned
  stdscr.keypad(1)

  main(stdscr)                    # Enter the main loop

  # Set everything back to normal
  FinalCleanup(stdscr)
除了作为错误消息的异常:
  # In event of error, restore terminal to sane state.
  TraceMessage = traceback.format_exc()
  AdditionalInfo = "Main pre-amble"
  ErrorHandler(ErrorMessage,TraceMessage,AdditionalInfo)
The main code is pretty standard fare. Open some windows, connect to the device, set up some listeners.
CreateTextWindows()

interface = meshtastic.SerialInterface()

#Get node info for connected device
Window4.ScrollPrint("Requesting device info",2)
GetMyNodeInfo(interface)

#subscribe to connection and receive channels
pub.subscribe(onConnectionEstablished, "meshtastic.connection.established")
pub.subscribe(onConnectionLost,        "meshtastic.connection.lost")
pub.subscribe(onNodeUpdated,           "meshtastic.node.updated")

#Check for message to be sent (command line option)
if(SendMessage):
   interface.sendText(TheMessage)

   #Go into listening mode
Window4.ScrollPrint("Listening for: {} seconds".format(TimeToSleep),2)
Window4.ScrollPrint("Subscribing to interface channels...",2)
pub.subscribe(onReceive, "meshtastic.receive")


while (1==1):
  GoToSleep(5)

interface.close()
Window4.ScrollPrint("--End of Line------------",2)
Window4.ScrollPrint("",2)
```
感谢您与我一起冒险。非常感谢 HashNode 激励我重新开始写作。

Python社区为您提供最前沿的新闻资讯和知识内容
更多推荐

 0
0 0
0- 0


 已为社区贡献126448条内容

所有评论(0)