
将 Ghost 博客迁移到另一个实例⛵
上下文
上周,我正在使用的Ghost实例开始出现异常行为。我无法上传新图片,一段时间后,由于504 Gateway Timeout... 😭 我完全无法访问该网站
由于我仅将 Ghost 用作后端(我正在使用Eleventy构建我的网站),因此我没有惊慌,因为我可以简单地从静态版本重新创建每个帖子。这需要一点时间,但这是可能的。 ⏱️
不幸的是,有一个问题:未发布的帖子(草稿或预定的)不会生成。Ghost Content API不会返回它们,所以我有点担心它们,因为我通常会保留 3 或 4 个帖子准备发布。所以如果网站不回来,我会永远失去他们......😟
幸运的是,我去睡觉了,第二天,网站又回来了。呸! 😌
我快速导出我的内容以保存它,但整个事件让我思考......也许是时候通过自托管它来完全拥有我的 Ghost 实例了。 🦚
指南
本指南是对 Ghost 官方文档的补充:如何将数据从 Ghost 迁移到 Ghost和Ghost 中的导入和导出:访问您的内容和数据 - FAQ。
先决条件
对于以下指南,我假设:
-
你有一个版本Node.js支持顶级等待(如_16.1.0_)
-
你已经配置了一个新的 Ghost 实例
-
您是 Ghost 实例的所有者
-
您可以通过 SSH 直接访问新 Ghost 实例的托管服务器
第一步——下载数据
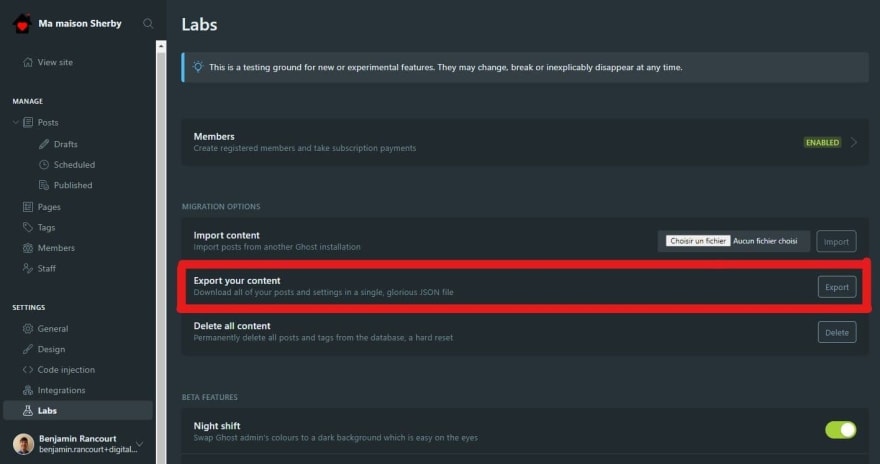
如果您是 Ghost 实例的所有者,您应该可以访问“Labs”菜单,您可以在其中找到一个按钮来导出您的 bloc 内容。单击它,瞧,您的整个站点都有一个 JSON 文件。 🤗
[ ](https://res.cloudinary.com/practicaldev/image/fetch/s--bShVOP51--/c_limit%2Cf_auto%2Cfl_progressive%2Cq_auto%2Cw_880/ https://www.benjaminrancourt.ca/images/export-content-ghost-3.jpg)
Ghost 3.42 中实验室视图中的 Export 按钮。
如果您使用的是最新的 Ghost 版本(当前为 4.5),则 Labs 选项菜单不再位于主菜单中,它现在隐藏在 Settings (⚙️) 选项菜单中!
不幸的是,该按钮仅导出数据,图像尚未导出......如果图像已作为绝对 URL(使用https://)插入到数据中,如果您想删除您的以前的 Ghost 实例...🥴
由于图像是公开的,因此您可以直接从 Web 下载它们,而您可以将它们的 URL 从绝对地址更改为相对地址(例如/content/images)。 😉
第二步——下载图片
如果您查看导出文件的数据,您可能会看到您的图像像我一样托管在另一台服务器上。就我而言,所有图像都在https://digitalpress.fra1.cdn.digitaloceanspaces.com/rec0035/下提供。
为了找到图像的所有 URL,我创建了以下 Node.js 脚本,将它们提取出来并将它们下载到我的计算机上。
import escapeStringRegExp from 'escape-string-regexp'
import fetch from 'node-fetch';
import fs from 'fs/promises';
import path from 'path'

// Configuration
const oldServerURL = "https://digitalpress.fra1.cdn.digitaloceanspaces.com/rec0035/"
const newServerURL = '/content/images/'
const oldGhostContentFile = 'ma-maison-sherby.ghost.2021-05-15-17-33-42.json'
const newGhostContentFile = oldGhostContentFile.replace('.json', '-output.json')
const imageDirectory = 'images/'

// Regexes
const filenameRegex = /(.*?\.(?:avif|ico|gif|jpe?g|png))/
const serverURLRegex = new RegExp(escapeStringRegExp(oldServerURL), 'gi')
const imageRegex = new RegExp(serverURLRegex.source + filenameRegex.source, 'gi')

// Utility functions
const stringify = object => JSON.stringify(object)
const parse = object => JSON.parse(object)
const returnBoolean = bool => () => bool

// Utility filesystem functions
const fileExists = async filePath => await fs.access(filePath, fs.F_OK)
.then(returnBoolean(true))
.catch(returnBoolean(false))

console.log(`Loading the Ghost content into memory...`)
const content = await fs.readFile(oldGhostContentFile, 'utf8')

const extractInformationsFromImageMatch = match => ({
  absoluteURL: match[0],
  directory: imageDirectory + path.dirname(match[1]),
  fileName: path.basename(match[1]),
  filePath: imageDirectory + match[1],
})

console.log(`Finding all unique images...`)
let images = [...content.matchAll(imageRegex)].map(extractInformationsFromImageMatch);
images = new Set(images.map(stringify))
images = Array.from(images).map(parse)

console.log(`${images.length} images found!`)

// Download an image inside a match object
const download = async (matchObject) => {
  // Check if we have already download the image on our disk
  const skipDownload = await fileExists(matchObject.filePath)
  if (skipDownload) {
    return
  }

  console.log(`Downloading ${matchObject.filePath}...`)

  // Download the image
  const response = await fetch(matchObject.absoluteURL);

  // Check if everything is ok
  if (!response.ok) {
    throw new Error(`Unexpected response ${response.statusText}`);
  }

  // Transform the response to buffer
  const buffer = await response.buffer();

  // Make sure the directory of the file exists and create it otherwise
  await fs.mkdir(matchObject.directory, {recursive: true})

  // Write the image on disk
  await fs.writeFile(matchObject.filePath, buffer)

  console.log(`Download finished for ${matchObject.filePath}!`)
}

console.log(`Downloading all images found...`)
for (let i = 0; i < images.length; ++i) {
  await download(images[i])
}

// Replace all occurrences of the old server to the new one
const newContent = content.replaceAll(serverURLRegex, newServerURL)

// Write the output inside a new file that can be imported
await fs.writeFile(newGhostContentFile, newContent)
进入全屏模式 退出全屏模式
download.mjs文件,用于下载所有图像并创建一个新的 JSON 文件。
{
  "dependencies": {
    "escape-string-regexp": "^5.0.0",
    "node-fetch": "^2.6.1"
  }
}
进入全屏模式 退出全屏模式
package.json文件,只有两个依赖项。
调整文件顶部的四个配置变量后,您可以简单地使用node download.mjs命令运行脚本,并且图像通常应该下载到images文件夹中。
如果您仔细阅读了我的脚本,您可能还会看到我的脚本创建了一个新文件,该文件的内容与导出的数据几乎相同,但具有相对图像 URL。 😮
第三步——上传图片
请放心,这一步没有上一步复杂。 😅
就我而言,因为我可以直接访问我的新 Ghost 实例的服务器,所以我能够使用以下命令通过 SSH 连接将图像上传到正确的位置:
scp -r images IP_ADDRESS:/var/opt/ghost/mamaisonsherby
进入全屏模式 退出全屏模式
使用scp(安全副本)将images目录下的所有内容上传到我的远程服务器。
最后一步——导入内容
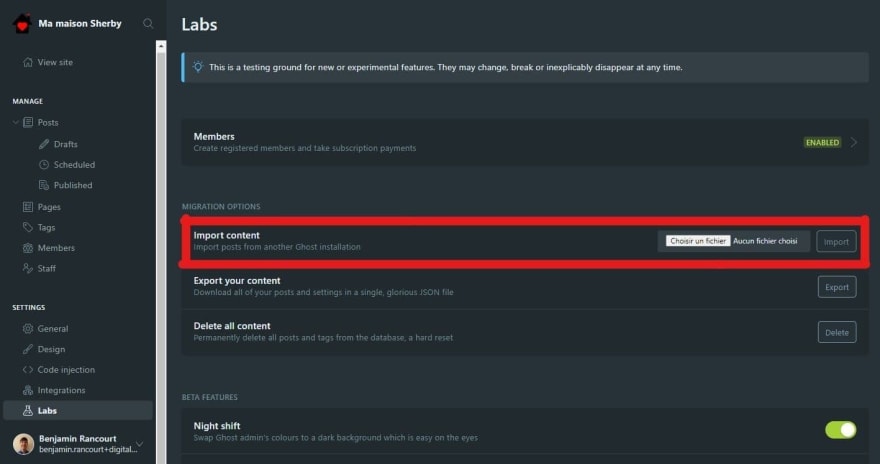
我们现在可以使用Import content按钮在Settings→Labs中导入在步骤 2 中生成的新内容文件。
[ ](https://res.cloudinary.com/practicaldev/image/fetch/s--0JTnjJI__--/c_limit%2Cf_auto%2Cfl_progressive%2Cq_auto%2Cw_880/ https://www.benjaminrancourt.ca/images/import-content-ghost-3.jpg)
Ghost 3.42 中实验室视图中的 Import 按钮。
如果您有任何问题,您可以随时单击 Export 按钮下方的 Delete 按钮来重新启动程序并更正您的数据。该按钮将删除所有帖子和标签。 😈
如果一切顺利,您应该会看到如下所示的确认消息。就我而言,有一些警告,但它们只是次要的。
[ ](https://res.cloudinary.com/practicaldev/image/fetch/s--7_OTxlXK--/c_limit%2Cf_auto%2Cfl_progressive%2Cq_auto%2Cw_880/https ://www.benjaminrancourt.ca/images/ghost-4-5-successful-import.jpg)
成功导入消息的示例,带有轻微警告。
验证步骤
什么?还有一步吗?是的,如果您不关心最终结果,这只是可选的。所以也许,在这种情况下这是强制性的......🤔
我建议您检查所有网页(帖子、标签、作者和页面),看看是否缺少图像。
而且,与往常一样,您还可以更新站点的全局 CSS (Settings→Code injection→Site header),以直观地标记需要更多注意的图像。
img[src*="digitaloceanspaces"] {
  border: 5px dashed darkred;
}
进入全屏模式 退出全屏模式
为我以前服务器上的所有图像添加红色边框的 CSS 代码。
结论
不是每天都移动 Ghost 实例,但下次需要它时,路径就会被清除。 🌾
更多推荐


 0
0 0
0- 0


 已为社区贡献12493条内容

所有评论(0)