React Native模拟APP启动介绍页
学了一段RN了,想自己做个东西练练手。于是准备做一个App启动的展示页,可以左右滑动切换,并且底部有当前页提示,效果图如下:1)组件层级关系总体来说就是分三块:一个View组件作为父容器,包裹一ViewPagerAndroid 组件和用View模拟的一个页面切换展示组件。1)首先是头部引用ViewPagerAndroid组件,代码为:/*左右翻页组件*/<Vie
学了一段RN了,想自己做个东西练练手。于是准备做一个App启动的展示页,可以左右滑动切换,并且底部有当前页提示,效果图如下:

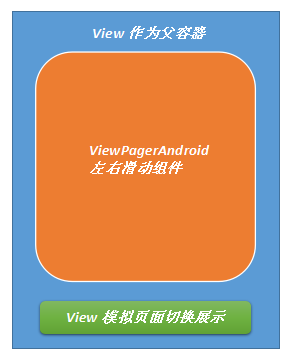
1)组件层级关系

总体来说就是分三块:一个View组件作为父容器,包裹一ViewPagerAndroid 组件和用View模拟的一个页面切换展示组件。
2)首先是头部引用ViewPagerAndroid组件,代码为:
/*左右翻页组件*/
 <ViewPagerAndroid
     style={styles.container}
     //绑定事件,引用时要在函数末尾加bind(this)
     onPageSelected={this.onPageSelected.bind(this)}
     //初始化页面为第一个页面,从0开始
     initialpage={0}>
     <View style={styles.container}>
         <Image source={require('../../res/img/p1.jpg')} style={styles.image}></Image>
         <Text style={styles.welcome}>
             医生叫我进行光合作用{'\n'}
             不要熬夜了
         </Text>
     </View>
     <View style={styles.container}>
         <Image source={require('../../res/img/p2.jpg')} style={styles.image}></Image>
         <Text style={styles.welcome}>
             人生不断向前的秘诀{'\n'}
             就是忘记从那里来 记得到哪里去
         </Text>
     </View>
     <View style={styles.container}>
         <Image source={require('../../res/img/p3.jpg')} style={styles.image}></Image>
         <Text style={styles.welcome}>
             人生路虽漫长{'\n'}
             但是关键的就那几步
         </Text>
     </View>
     <View style={styles.container}>
         <Image source={require('../../res/img/p1.jpg')} style={styles.image}></Image>
         <Text style={styles.welcome}>
             欢迎使用原点APP
         </Text>
     </View>
</ViewPagerAndroid>此组件使用起来很简单,就是ViewPagerAndroid里面包裹几个View组件,里面View的个数就是切换页面的数量。用到的属性有两个initialpage和onPageSelected。Initialpage就是定义初始化页面,initialpage={0}就是初始化页面为第一个页面,从0开始;onPageSelected监听页面滑动,e.nativeEvent.position代表当前页面的索引值。使用时注意,绑定事件时末尾要加上bind(this),否则会报错。
3)用View模拟页面切换提示效果,代码为:
Code1:
//监听页面变化
onPageSelected=function(e) {
    //默认从0开始,0是第一页
    this.setState({page: e.nativeEvent.position});
    console.log('CurrentPage: '+e.nativeEvent.position);
    ToastAndroid.show('CurrentPage: '+e.nativeEvent.position, ToastAndroid.SHORT);
}/*模拟页面选中*/
<View style={styles.slider}>
<View style={styles.ol}>
<View style={page==0?styles.currt:styles.li}></View>
<View style={page==1?styles.currt:styles.li}></View>
<View style={page==2?styles.currt:styles.li}></View>
<View style={page==3?styles.currt:styles.li}></View>
</View>
</View>本部分代码从里往外讲吧,里面4个View模式的是四个小圆点的效果。当前页面显示时通过调用Code1方法修改page的值,然后通过三目运算符判断切换显示样式,效果为原点拉长为椭圆形。
4)代码样式:
const styles = StyleSheet.create({
    bg: {
        flex: 1,
        backgroundColor:'#CCFF66',
    },
    container: {
        flex: 1,
        justifyContent: 'space-around',
        alignItems: 'center',
    },
    image: {
        width:300,
        height:300,
        borderRadius:150,
    },
    welcome: {
        fontSize: 16,
        textAlign: 'center',
    },
    slider: {
        justifyContent: 'center',
        alignItems: 'center',
    },
    ol: {
        backgroundColor:'rgba(0,0,0,0.3)',
        height:20,
        width:80,
        justifyContent:'space-around',
        alignItems: 'center',
        flexDirection:'row',
        borderRadius:10,
        margin:20,
    },
    li: {
        backgroundColor:'rgba(255,255,255,1.0)',
        height:10,
        width:10,
        borderRadius:5,
    },
    currt: {
        backgroundColor:'rgba(255,255,255,1.0)',
        height:10,
        width:15,
        borderRadius:5,
    },
});
简单做个介绍,当然布局采用的四Flex布局,使用圆形效果注意两点即可:
1、宽高相等;2、borderRadius是高度(宽度)的一半。
5)项目完整代码:
/**
* Created by linyufeng on 2016/8/27.
*/
import React, { Component } from 'react';
import {
AppRegistry,
StyleSheet,
Text,
View,
ViewPagerAndroid,
Image,
ToastAndroid,
}from 'react-native';
class HelloWorld extends Component {
constructor(props) {
super(props);
this.state = {
page: 0,
}
}
//监听页面变化
onPageSelected=function(e) {
//默认从0开始,0是第一页
this.setState({page: e.nativeEvent.position});
console.log('CurrentPage: '+e.nativeEvent.position);
ToastAndroid.show('CurrentPage: '+e.nativeEvent.position, ToastAndroid.SHORT);
}
render() {
let page = this.state.page;
return (
![]()
医生叫我进行光合作用{'\n'}
不要熬夜了
![]()
人生不断向前的秘诀{'\n'}
就是忘记从那里来 记得到哪里去
![]()
人生路虽漫长{'\n'}
但是关键的就那几步
![]()
欢迎使用原点APP
);
}
}
const styles = StyleSheet.create({
bg: {
flex: 1,
backgroundColor:'#CCFF66',
},
container: {
flex: 1,
justifyContent: 'space-around',
alignItems: 'center',
},
image: {
width:300,
height:300,
borderRadius:150,
},
welcome: {
fontSize: 16,
textAlign: 'center',
},
slider: {
justifyContent: 'center',
alignItems: 'center',
},
ol: {
backgroundColor:'rgba(0,0,0,0.3)',
height:20,
width:80,
justifyContent:'space-around',
alignItems: 'center',
flexDirection:'row',
borderRadius:10,
margin:20,
},
li: {
backgroundColor:'rgba(255,255,255,1.0)',
height:10,
width:10,
borderRadius:5,
},
currt: {
backgroundColor:'rgba(255,255,255,1.0)',
height:10,
width:15,
borderRadius:5,
},
});
AppRegistry.registerComponent('HelloWorld', () => HelloWorld);
拷贝代码请修改组件名HelloWorld为自己项目的名字,否则会报错。
更多推荐
 已为社区贡献1条内容


所有评论(0)