

A detailed guide to setup Spring Boot Developer Tools, including the scenario of running the application with Docker.

Overview
I’ll start with a story, with which many can relate. With the docker license change last year, it was time to look for an alternative to Docker Desktop for local development. In the end, after analysing many tools, we settled on minikube + Docker CLI. But, it was not a smooth transition. The services were taking a comparatively long time to get up and running which was affecting our productivity. In addition, let’s say we were testing a feature locally in our spring boot service, and we wanted to monitor the effect of a small code change. We had to stop the service and start it from scratch and it was very time-consuming. It came to a point where we avoided starting our service till we did a considerable amount of development, which is not a good practice in the agile world.
This is where Developer Tools, provided by Spring, made the development phase a bit easier by bringing a fast feedback loop for code changes.
With devtools, the server gets automatically restarted, very efficiently in much less time when a change is made in the code.
After seeing how it enriched our overall productivity and development experience, we adopted this tool into all of our services and now we don’t have to wait much longer to see minor changes in action.

In this writing, I’ll be sharing how to configure Spring Boot Developer Tools in a spring boot application with Gradle configurations. It’ll probably work with maven with some equivalent substitutes. Along with this, I’ll also go over things to keep in mind when a containerization framework is being used to up the service in a container.
Basic Setup
To start with devtools, you first need to add its dependency.
NOTE: Spring by default disables devtools when running a fully packaged application (JAR/WAR) as you don’t want this feature running on any environment except dev like int, train or prod. However, it is recommended to specify the dependency as developmentOnly so that it is not transitively applied to other projects that use your project. developmentOnly configuration states that the library is on the runtime classpath for the DEV profile.
To verify that the service is up with devtools on its classpath, you’ll see in the application logs that the main thread is replaced by the restartedMain thread.

How does this tool work?
You might wonder why do you need to know how this tool works behind the scenes? Since setting up this tool specific to the development environment of your project might not be a straightforward smooth process, having a good understanding of how this tool works under the hood will help you in troubleshooting issues you might face while configuring this tool.
To achieve auto restart, devtools uses two classloaders. Classloader is a part of Java Runtime Environment (JRE) that loads classes into Java Virtual Machine (JVM) dynamically that is into memory when they are required by the application.
The two classloaders are:
- Base classloader: It contains classes that do not change like Spring Boot JARs or third-party libraries.
- Restart classloader: It contains classes of the project containing
@SpringBootApplicationthat is files of your application which are expected to change in your dev cycle.
Devtools listens for changes in your application files. If it finds any change, then it discards the existing restart classloader and creates a new one. Because of this, it is much faster than a full restart as only the classes of your application have to be reloaded and the base classloader is already available.
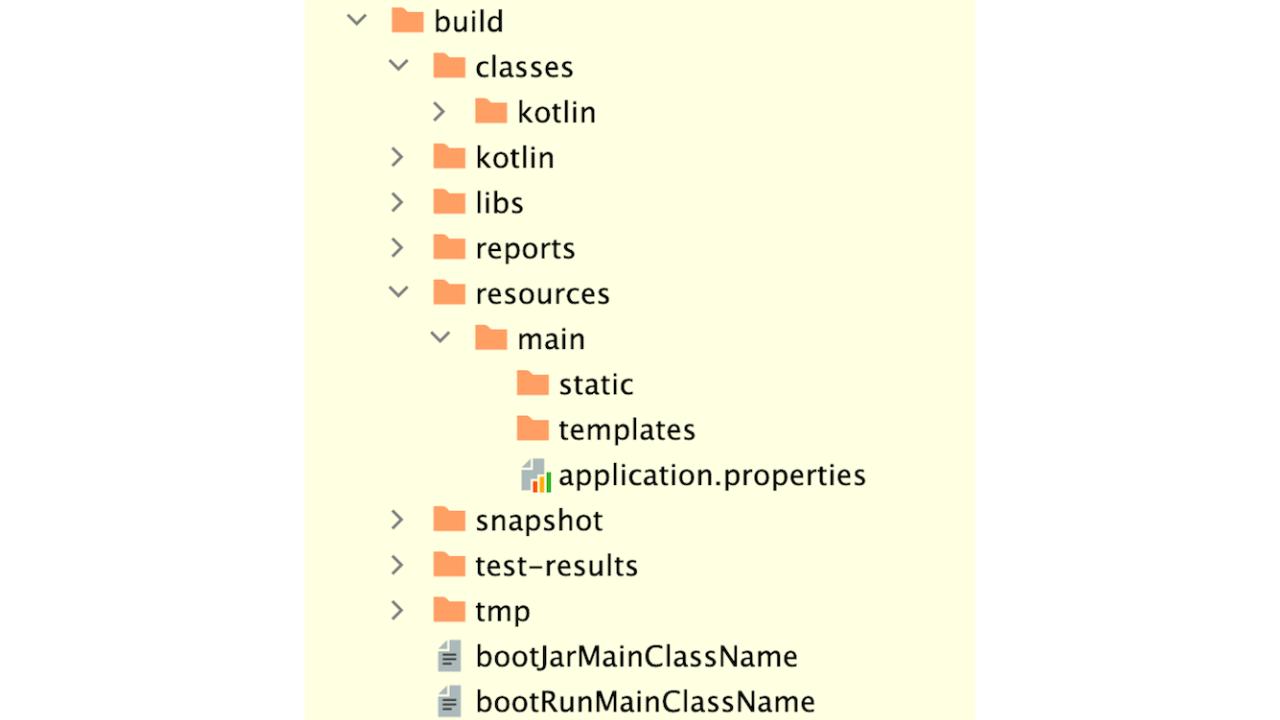
For devtools to know that a file has changed, any entry on the classpath that points to a directory is monitored for changes. Therefore, you need to compile the code after the changes have been made. For example, if the project is Kotlin based, you can do this by running the Gradle compileKotlin task which takes src/main/kotlin as its input. With this, the changed classes will be compiled into the folder /build/classes, which is on the classpath of the running Spring Boot app and hence, devtools will pick up the change.
Devtools with Docker
You need to keep a few things in mind when using a containerisation framework like Docker for the local development setup of the service.
As mentioned previously, since devtools does not work when you run a packaged application, it becomes important that while writing your docker-compose file for local, you run the application through the Gradle bootRun task and not by assembling an executable jar file and running it.
Second, since the service having devtools on its classpath runs in the container, it will be listening for changes in code present inside the container and not the code present on your local system. So, even if you make any change in the code and run the compileKotlin task locally, these updations will not be reflected in the code and /build/classes directory of the container. To solve this, in the docker-compose file, you need to bind mount your service repository. Because, with bind mounts, change in local is reflected in container & vice versa.
In the above example, consider a multi-module project “demo” where the root directory contains a sub-module “backend” which is a spring boot application. You are bind mounting this backend repository that is mounting files of this backend directory to a directory in the container and running the command bootRun to start the service.
Continuous Build with Gradle
You can leverage the continuous build feature of Gradle to eliminate the step of compilation by the developer after every set of changes.
To enable this, you need to supply -t or — continuous command-line option with your Gradle task. This option automatically re-executes the requested task when the task input changes.
./gradlew -t compileKotlin
In addition, you can run this compilation task in the background in a subshell which can be achieved by adding “&” at the end of the command.
./gradlew -t compileKotlin &
You can easily include this command into your local setup run script. So that every time you up the service locally, and if it finds any changes in the project class files, then it will automatically run the compilation task in the background.
In the script section, responsible for shutting down the service container, you can explicitly use the following command to make sure that this background process of compilation is terminated once the service is shut down.
pkill -P $$
pkill command sends the SIGTERM signal to the specified process. Since the “$” variable holds the Process ID of the shell, it will terminate the current shell process and hence terminate its background processes as well.
Excluding Resources
For changes in files of some directories, devtools does not trigger a restart. You can customize these exclusions by overriding the property spring.devtools.restart.exclude in the application.properties file. Its default value includes paths like /META-INF/maven, /META-INF/resources, /resources, /static, /public, /templates.
For instance, if you want any change in the /resources/application.properties file to restart the server. This can be helpful in cases like when you want to test your changes with both states of a feature toggle that is on and off, within a few seconds.
To achieve this,
- For the changes to be picked up by devtools, you need the file present on the classpath to get updated.
So, instead of using the Gradle compileKotlin task, you’ll need to use the classes task. “classes” task is an aggregate of two separate tasks, compileKotlin and processResources. processResources task takes src/main/resources as its input and updates the directory /build/resources present on the classpath with the changes.
./gradlew -t classes &
- You’ll override this property with its default value, leaving out the path of /resources directory.
If you want to keep the defaults and add additional paths for exclusions, you can use the spring.devtools.restart.additional-exclude property instead.
Watching Additional Paths
If you want your application to restart when there are changes in files that are not present on the classpath, you can utilize the spring.devtools.restart.additional-paths property.
spring.devtools.restart.additional-paths=dev-config
The example above will make devtools monitor dev-config which is a directory under the project’s root for changes.
Configuring File System Watcher
Devtools periodically checks for class changes and once it finds a change, it waits for a preset amount of time before launching the restart to ensure there haven’t been any more changes.
If you find that some changes are not being reflected when devtools restart your application, consider increasing the poll-interval (Default value = 1s) and quit-period (Default value = 400ms) in the application.properties file to values that suit your development environment.
spring.devtools.restart.poll-interval=4sspring.devtools.restart.quiet-period=2s
In the example above, the monitored classpath directories will be polled for changes every 4 seconds with a waiting period of 2 seconds.
Disabling Restart
If you do not want to use the restart feature, you can use the following property.
spring.devtools.restart.enabled=false
By doing this, the restart classloader will still be initialised, but devtools will no longer listen for code changes.
Live Reload
Devtools also supports the functionality of Live Reload wherein a change in a resource can trigger a browser refresh.
How it works is devtools starts an embedded LiveReload server on a port with default value 35729. This server listens for changes and notifies the LiveReload browser extension. The browser extension receives the notification and invokes the browser to refresh the web page.
Though devtools is only for development and this feature can come in handy when having both backend and frontend code in place. However, opening a port has its own technical and security concerns, as does allowing a browser extension to read and update all of your data on websites.
By default, LiveReload is enabled but it can be disabled by setting the spring.devtools.livereload.enabled property to false.
spring.devtools.livereload.enabled=false
Feel free to explore this feature, if you find it adding value to your project structure.
Conclusion
Spring Boot DevTools is a great tool to make the development phase less time-consuming by reducing the time required to test your changes on the go. It comes with quite a lot of configurations, feel free to play around with them to find ones that best suit your project structure. I hope you take this blog as a catalyst to introduce this tool in your project services if you are not already using it. Believe me, your team will thank you 😛.
References
Developing with Spring Boot
You are free to use any of the standard Spring Framework techniques to define your beans and their injected…
docs.spring.io
Command-Line Interface
The command-line interface is one of the primary methods of interacting with Gradle. The following serves as a…
docs.gradle.org


 已为社区贡献35526条内容

所有评论(0)