
Ubuntu部署 Kubernetes1.23
资源列表
准备三台Ubuntu的服务器,配置好网络。
|
操作系统 |
配置 |
主机名 |
IP |
所需软件 |
|
Ubuntu 22.04 |
2C4G |
cjm-cyd |
192.168.111.30 |
Docker Ce、kube-apiserver、kube-controller-manager、kube-scheduler、kubelet、Etcd、kube-proxy |
|
Ubuntu 22.04 |
2C4G |
cyd-3 |
192.168.111.33 |
Docker CE、kubectl、kube-proxy、Flnnel |
|
Ubuntu 22.04 |
2C4G |
cyd-4 |
192.168.111.34 |
Docker CE、kubectl、kube-proxy、Flnnel |
基础环境
- 修改主机名
sudo hostnamectl set-hostname cjm-cyd
sudo hostnamectl set-hostname cyd-3
sudo hostnamectl set-hostname cyd-4
- 切换root用户
su -
- 绑定hosts解析
cat >> /etc/hosts << EOF
192.168.111.30 cjm-cyd
92.168.111.33 cyd-3
192.168.111.34 cyd-4
EOF
一、环境准备(三台主机都要执行)
- 在正式开始部署kubernetes集群之前,先要进行如下准备工作。基础环境相关配置操作,在三台主机上都需要执行。
1.1、安装常用软件
更新软件仓库
sudo apt update
安装常用软件
sudo apt install vim lrzsz unzip wget net-tools tree bash-completion telnet -y
1.2、关闭交换分区
- kubeadm不支持swap交换分区
临时关闭
swapoff -a
永久关闭
sed -i '/swap/s/^/#/' /etc/fstab
1.3、开启IPv4转发和内核优化
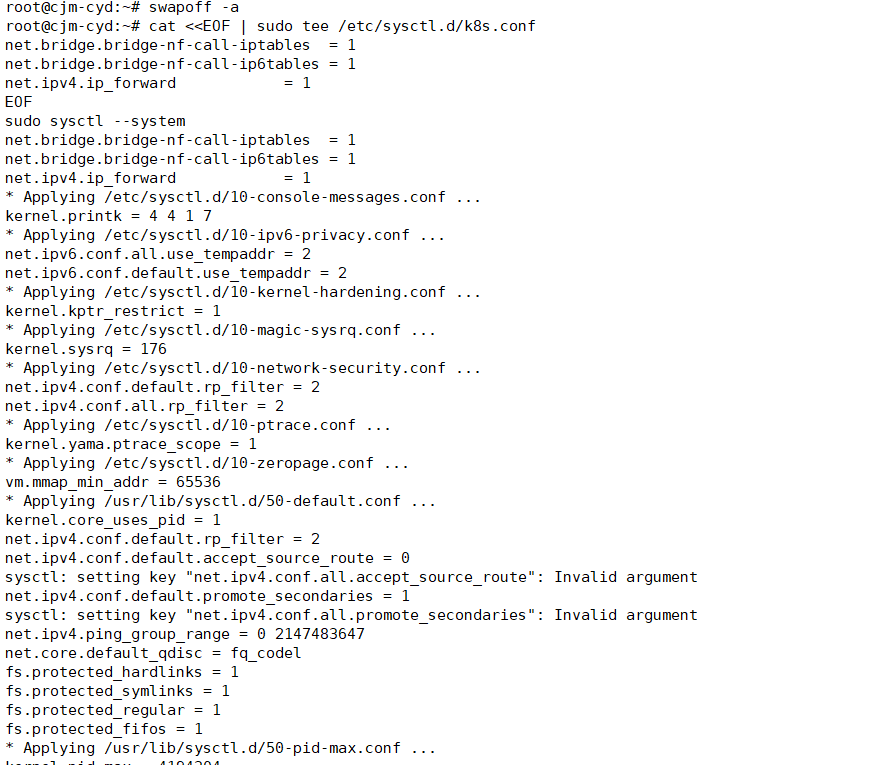
cat <<EOF | sudo tee /etc/sysctl.d/k8s.conf
net.bridge.bridge-nf-call-iptables = 1
net.bridge.bridge-nf-call-ip6tables = 1
net.ipv4.ip_forward = 1
EOF
sudo sysctl --system
1.4、时间同步
sudo apt -y install ntpdate ntpdate ntp.aliyun.com



二、安装Docker(三台主机都要执行)
- 所有节点都要操作
- 在Ubuntu系统中安装Docker时,官方推荐Ubuntu系统最好是64位,可以在终端执行uname -a命令查看当前系统是否位64位操作系统。
2.1、卸载残留Docker软件包
for pkg in docker.io docker-doc docker-compose docker-compose-v2 podman-docker containerd runc; do sudo apt-get remove $pkg; done
2.2、更新软件包
- 在终端中执行以下命令来更新Ubuntu软件包列表和已安装软件的版本升级
sudo apt update sudo apt upgrade
2.3、安装Docker依赖
- Docker在Ubuntu上依赖一些软件包,执行以下命令来安装这些依赖
apt-get -y install ca-certificates curl gnupg lsb-release
2.4、添加Docker官方GPG密钥
- 执行以下命令来添加Docker官方的GPG密钥
最终回显OK表示运行命令正确
curl -fsSL http://mirrors.aliyun.com/docker-ce/linux/ubuntu/gpg | sudo apt-key add -

2.5、添加Docker软件源
- 注意:该命令需要使用root权限
- 执行以下命令来添加Docker的软件源
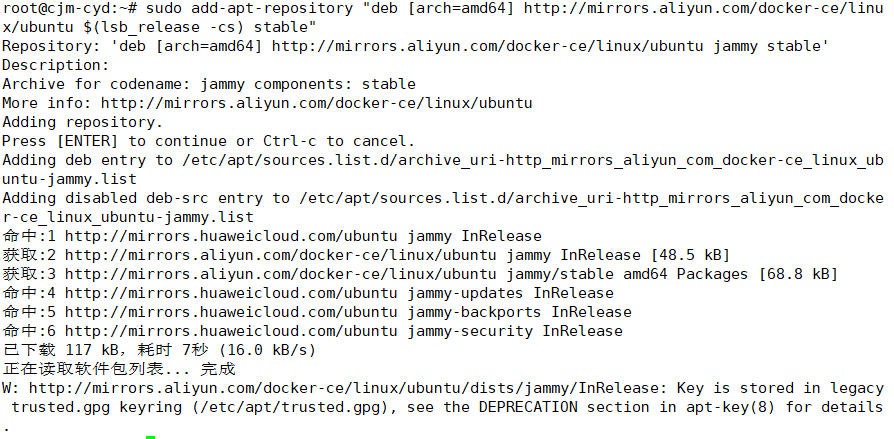
需要管理员交互式按一下回车键
sudo add-apt-repository "deb [arch=amd64] http://mirrors.aliyun.com/docker-ce/linux/ubuntu $(lsb_release -cs) stable"
2.6、安装Docker
- 执行以下命令安装Docker-20.10版本,新版本Docker和k8s-1.23不兼容
sudo apt install docker-ce=5:20.10.14~3-0~ubuntu-jammy docker-ce-cli=5:20.10.14~3-0~ubuntu-jammy containerd.io -y
2.7、配置用户组(可选)
- 默认情况下,只有root用户和Docker组的用户才能运行Docker命令。我们可以将当前用户添加到Docker组,以避免每次使用时都需要使用sudo。
- 注意:重新登录才能使更改生效
sudo usermod -aG docker $USER
2.8、安装工具
apt-get -y install apt-transport-https ca-certificates curl software-properties-common
2.9、开启Docker
systemctl start docker
systemctl enable docker

2.10、配置Docker加速器
vim /etc/docker/daemon.json
{
"registry-mirrors": [
   "https://0c105db5188026850f80c001def654a0.mirror.swr.myhuaweicloud.com",
   "https://5tqw56kt.mirror.aliyuncs.com",
   "https://docker.1panel.live",
   "http://mirrors.ustc.edu.cn",
   "http://mirror.azure.cn",
   "https://hub.rat.dev",
   "https://docker.chenby.cn",
   "https://docker.hpcloud.cloud",
   "https://docker.m.daocloud.io",
   "https://docker.unsee.tech",
   "https://dockerpull.org",
   "https://dockerhub.icu",
   "https://proxy.1panel.live",
   "https://docker.1panel.top",
   "https://docker.1ms.run",
   "https://docker.ketches.cn"
],
"insecure-registries": [
   "http://192.168.57.200:8099"
   ]
}

重启Docker
systemctl daemon-reload
systemctl restart docker
三、部署Kubernetes集群
- 准备好基础环境和Docker环境,下面就开始通过kubeadm来部署kubernetes集群
3.1、配置Kubernetes的APT源(三台主机都要执行)
- 这里使用aliyun的源
安装软件包
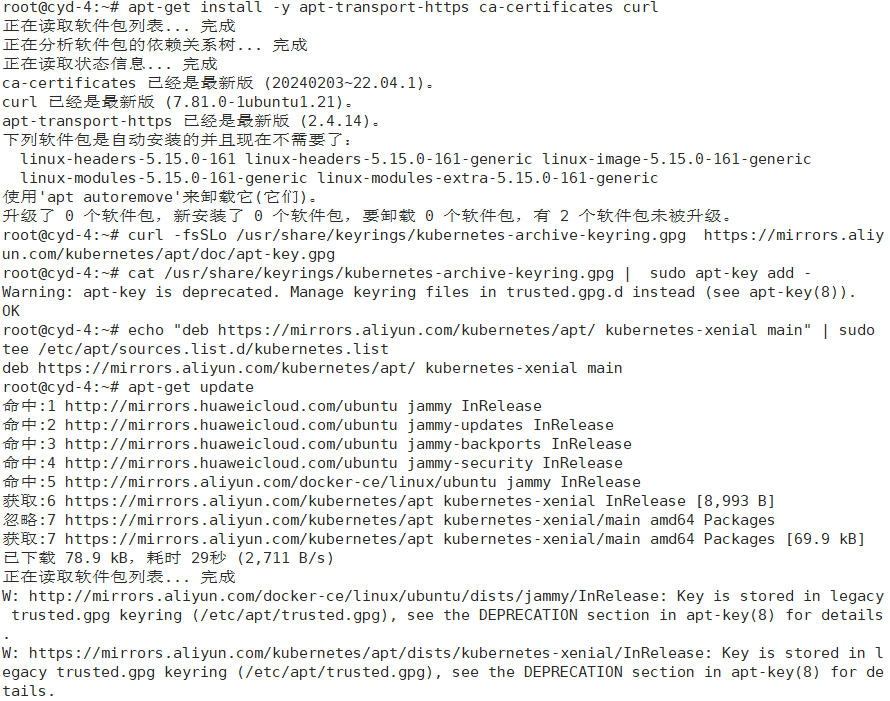
apt-get install -y apt-transport-https ca-certificates curl
下载Kubernetes GPG密钥
curl -fsSLo /usr/share/keyrings/kubernetes-archive-keyring.gpg  https://mirrors.aliyun.com/kubernetes/apt/doc/apt-key.gpg
将GPG密钥添加到APT的密钥管理中
cat /usr/share/keyrings/kubernetes-archive-keyring.gpg |  sudo apt-key add -
指定软件仓库位置
echo "deb https://mirrors.aliyun.com/kubernetes/apt/ kubernetes-xenial main" | sudo tee /etc/apt/sources.list.d/kubernetes.list
更新软件仓库
apt-get update
3.2、查看Kubernetes可用版本
apt-cache madison kubeadm
3.3、安装kubeadm管理工具三台主机都要执行
- kubectl:命令行管理工具、kubeadm:安装K8S集群工具、kubelet管理容器工具
安装1.23版本的Kubernetes,因为1.23以后Kubernetes就不再支持Docker做底层容器运行时
apt-get install -y kubelet=1.23.0-00 kubeadm=1.23.0-00 kubectl=1.23.0-00
锁定版本,防止自动升级
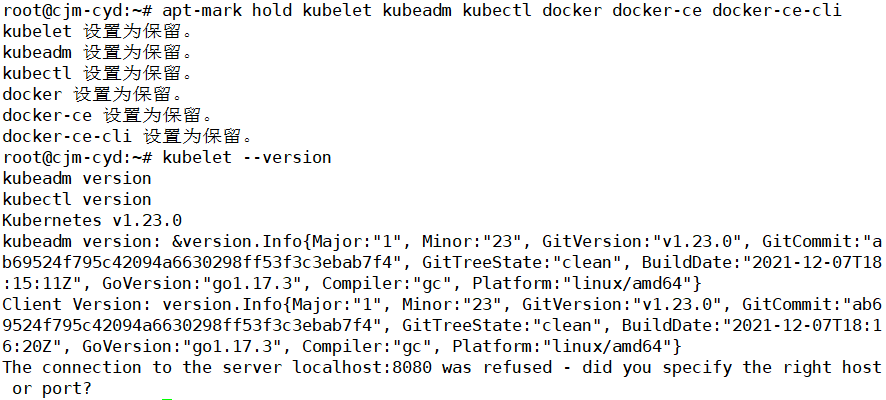
apt-mark hold kubelet kubeadm kubectl docker docker-ce docker-ce-cli
查看版本
kubelet --version
kubeadm version
kubectl version
3.4、设置Kubelet开机启动三台主机都要执行
systemctl enable kubelet
四、kubeadm初始化集群
4.1、cjm-cyd节点生成初始化配置文件
kubeadm config print init-defaults > init-config.yaml
4.2、cjm-cyd节点修改初始化配置文件
vim init-config.yaml
apiVersion: kubeadm.k8s.io/v1beta3
bootstrapTokens:
- groups:
  - system:bootstrappers:kubeadm:default-node-token
  token: abcdef.0123456789abcdef
  ttl: 24h0m0s
  usages:
  - signing
  - authentication
kind: InitConfiguration
localAPIEndpoint:
  advertiseAddress: 192.168.111.30  # master节点IP地址
  bindPort: 6443
nodeRegistration:
  criSocket: /var/run/dockershim.sock
  imagePullPolicy: IfNotPresent
  name: cjm-cyd   # 如果使用域名保证可以解析,或直接使用IP地址
  taints: null
---
apiServer:
  timeoutForControlPlane: 4m0s
apiVersion: kubeadm.k8s.io/v1beta3
certificatesDir: /etc/kubernetes/pki
clusterName: kubernetes
controllerManager: {}
dns: {}
etcd:
  local:
    dataDir: /var/lib/etcd
imageRepository: registry.aliyuncs.com/google_containers # 默认地址国内无法访问,修改为国内地址
kind: ClusterConfiguration
kubernetesVersion: 1.23.0   # 指定kubernetes部署的版本
networking:
  dnsDomain: cluster.local
  serviceSubnet: 10.96.0.0/12   # service资源的网段,集群内部的网络
  podSubnet: 10.244.0.0/16  # 新增加Pod资源网段,需要与下面的pod网络插件地址一致
scheduler: {}
4.3、cjm-cyd节点拉取所需镜像
选择下列一种方式安装
A.在教室局域网
局域网有打包好的镜像
wget http://192.168.57.200/Software/k8s-1.23.tar.xz
tar -xvf k8s-1.23.tar.xz
cd k8s-1.23/
批量导入镜像
for img in ls *.tar;do  docker load -i $img;done
docker images
REPOSITORY                                                        TAG       IMAGE ID       CREATED       SIZE
registry.aliyuncs.com/google_containers/kube-apiserver            v1.23.0   e6bf5ddd4098   2 years ago   135MB
registry.aliyuncs.com/google_containers/kube-proxy                v1.23.0   e03484a90585   2 years ago   112MB
registry.aliyuncs.com/google_containers/kube-controller-manager   v1.23.0   37c6aeb3663b   2 years ago   125MB
registry.aliyuncs.com/google_containers/kube-scheduler            v1.23.0   56c5af1d00b5   2 years ago   53.5MB
registry.aliyuncs.com/google_containers/etcd                      3.5.1-0   25f8c7f3da61   2 years ago   293MB
registry.aliyuncs.com/google_containers/coredns                   v1.8.6    a4ca41631cc7   2 years ago   46.8MB
hello-world                                                       latest    feb5d9fea6a5   2 years ago   13.3kB
registry.aliyuncs.com/google_containers/pause                     3.6       6270bb605e12   2 years ago   683kB
B.使用公网安装镜像
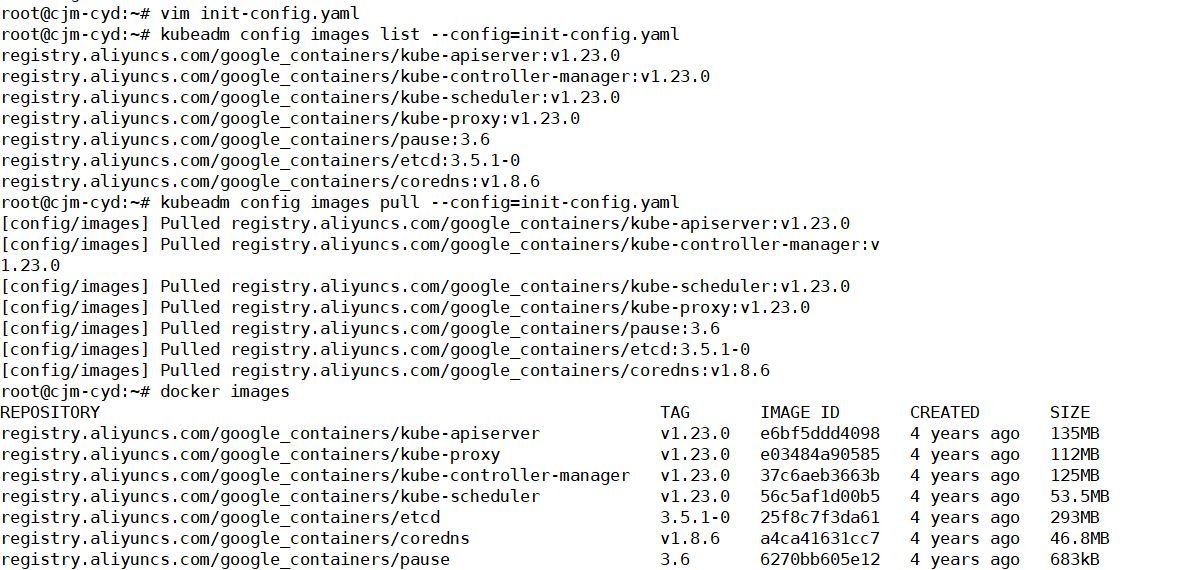
查看初始化需要的镜像
root@cjm-cyd:~# kubeadm config images list --config=init-config.yaml
registry.aliyuncs.com/google_containers/kube-apiserver:v1.23.0
registry.aliyuncs.com/google_containers/kube-controller-manager:v1.23.0
registry.aliyuncs.com/google_containers/kube-scheduler:v1.23.0
registry.aliyuncs.com/google_containers/kube-proxy:v1.23.0
registry.aliyuncs.com/google_containers/pause:3.6
registry.aliyuncs.com/google_containers/etcd:3.5.1-0
registry.aliyuncs.com/google_containers/coredns:v1.8.6
拉取所需镜像
root@cjm-cyd:~# kubeadm config images pull --config=init-config.yaml
[config/images] Pulled registry.aliyuncs.com/google_containers/kube-apiserver:v1.23.0
[config/images] Pulled registry.aliyuncs.com/google_containers/kube-controller-manager:v1.23.0
[config/images] Pulled registry.aliyuncs.com/google_containers/kube-scheduler:v1.23.0
[config/images] Pulled registry.aliyuncs.com/google_containers/kube-proxy:v1.23.0
[config/images] Pulled registry.aliyuncs.com/google_containers/pause:3.6
[config/images] Pulled registry.aliyuncs.com/google_containers/etcd:3.5.1-0
[config/images] Pulled registry.aliyuncs.com/google_containers/coredns:v1.8.6
查看拉取的镜像
root@cjm-cyd:~# docker images
REPOSITORY                                                        TAG       IMAGE ID       CREATED       SIZE
registry.aliyuncs.com/google_containers/kube-apiserver            v1.23.0   e6bf5ddd4098   4 years ago   135MB
registry.aliyuncs.com/google_containers/kube-proxy                v1.23.0   e03484a90585   4 years ago   112MB
registry.aliyuncs.com/google_containers/kube-controller-manager   v1.23.0   37c6aeb3663b   4 years ago   125MB
registry.aliyuncs.com/google_containers/kube-scheduler            v1.23.0   56c5af1d00b5   4 years ago   53.5MB
registry.aliyuncs.com/google_containers/etcd                      3.5.1-0   25f8c7f3da61   4 years ago   293MB
registry.aliyuncs.com/google_containers/coredns                   v1.8.6    a4ca41631cc7   4 years ago   46.8MB
registry.aliyuncs.com/google_containers/pause                     3.6       6270bb605e12   4 years ago   683kB
4.4、cjm-cyd初始化集群
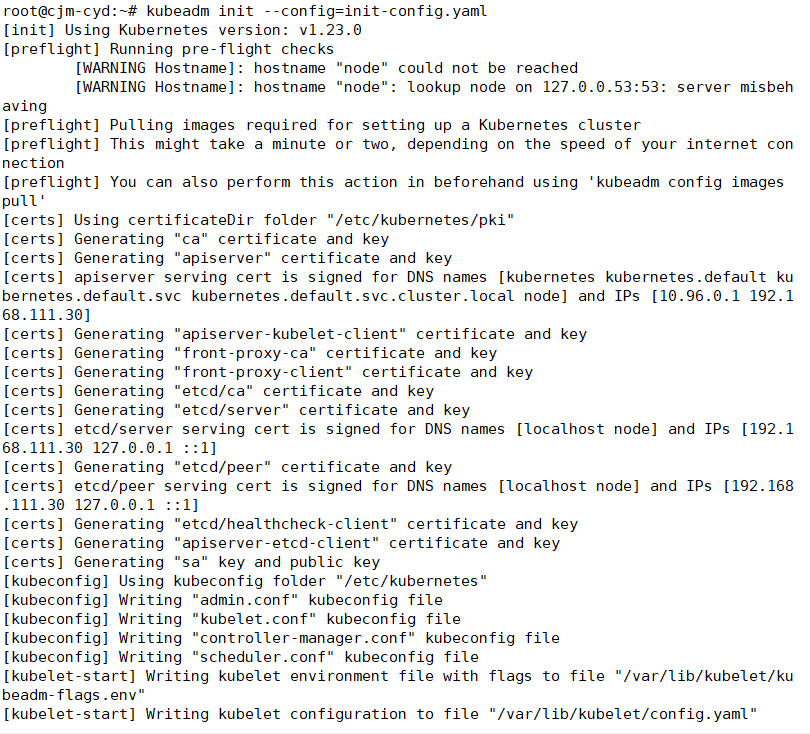
root@cjm-cyd:~# kubeadm init --config=init-config.yaml
[init] Using Kubernetes version: v1.23.0
[preflight] Running pre-flight checks
	[WARNING Hostname]: hostname "node" could not be reached
	[WARNING Hostname]: hostname "node": lookup node on 127.0.0.53:53: server misbehaving
[preflight] Pulling images required for setting up a Kubernetes cluster
[preflight] This might take a minute or two, depending on the speed of your internet connection
[preflight] You can also perform this action in beforehand using 'kubeadm config images pull'
[certs] Using certificateDir folder "/etc/kubernetes/pki"
[certs] Generating "ca" certificate and key
[certs] Generating "apiserver" certificate and key
[certs] apiserver serving cert is signed for DNS names [kubernetes kubernetes.default kubernetes.default.svc kubernetes.default.svc.cluster.local node] and IPs [10.96.0.1 192.168.111.30]
[certs] Generating "apiserver-kubelet-client" certificate and key
[certs] Generating "front-proxy-ca" certificate and key
[certs] Generating "front-proxy-client" certificate and key
[certs] Generating "etcd/ca" certificate and key
[certs] Generating "etcd/server" certificate and key
[certs] etcd/server serving cert is signed for DNS names [localhost node] and IPs [192.168.111.30 127.0.0.1 ::1]
[certs] Generating "etcd/peer" certificate and key
[certs] etcd/peer serving cert is signed for DNS names [localhost node] and IPs [192.168.111.30 127.0.0.1 ::1]
[certs] Generating "etcd/healthcheck-client" certificate and key
[certs] Generating "apiserver-etcd-client" certificate and key
[certs] Generating "sa" key and public key
[kubeconfig] Using kubeconfig folder "/etc/kubernetes"
[kubeconfig] Writing "admin.conf" kubeconfig file
[kubeconfig] Writing "kubelet.conf" kubeconfig file
[kubeconfig] Writing "controller-manager.conf" kubeconfig file
[kubeconfig] Writing "scheduler.conf" kubeconfig file
[kubelet-start] Writing kubelet environment file with flags to file "/var/lib/kubelet/kubeadm-flags.env"
[kubelet-start] Writing kubelet configuration to file "/var/lib/kubelet/config.yaml"
[kubelet-start] Starting the kubelet
[control-plane] Using manifest folder "/etc/kubernetes/manifests"
[control-plane] Creating static Pod manifest for "kube-apiserver"
[control-plane] Creating static Pod manifest for "kube-controller-manager"
[control-plane] Creating static Pod manifest for "kube-scheduler"
[etcd] Creating static Pod manifest for local etcd in "/etc/kubernetes/manifests"
[wait-control-plane] Waiting for the kubelet to boot up the control plane as static Pods from directory "/etc/kubernetes/manifests". This can take up to 4m0s
[apiclient] All control plane components are healthy after 12.008005 seconds
[upload-config] Storing the configuration used in ConfigMap "kubeadm-config" in the "kube-system" Namespace
[kubelet] Creating a ConfigMap "kubelet-config-1.23" in namespace kube-system with the configuration for the kubelets in the cluster
NOTE: The "kubelet-config-1.23" naming of the kubelet ConfigMap is deprecated. Once the UnversionedKubeletConfigMap feature gate graduates to Beta the default name will become just "kubelet-config". Kubeadm upgrade will handle this transition transparently.
[upload-certs] Skipping phase. Please see --upload-certs
[mark-control-plane] Marking the node node as control-plane by adding the labels: [node-role.kubernetes.io/master(deprecated) node-role.kubernetes.io/control-plane node.kubernetes.io/exclude-from-external-load-balancers]
[mark-control-plane] Marking the node node as control-plane by adding the taints [node-role.kubernetes.io/master:NoSchedule]
[bootstrap-token] Using token: abcdef.0123456789abcdef
[bootstrap-token] Configuring bootstrap tokens, cluster-info ConfigMap, RBAC Roles
[bootstrap-token] configured RBAC rules to allow Node Bootstrap tokens to get nodes
[bootstrap-token] configured RBAC rules to allow Node Bootstrap tokens to post CSRs in order for nodes to get long term certificate credentials
[bootstrap-token] configured RBAC rules to allow the csrapprover controller automatically approve CSRs from a Node Bootstrap Token
[bootstrap-token] configured RBAC rules to allow certificate rotation for all node client certificates in the cluster
[bootstrap-token] Creating the "cluster-info" ConfigMap in the "kube-public" namespace
[kubelet-finalize] Updating "/etc/kubernetes/kubelet.conf" to point to a rotatable kubelet client certificate and key
[addons] Applied essential addon: CoreDNS
[addons] Applied essential addon: kube-proxy

Your Kubernetes control-plane has initialized successfully!

To start using your cluster, you need to run the following as a regular user:

  mkdir -p $HOME/.kube
  sudo cp -i /etc/kubernetes/admin.conf $HOME/.kube/config
  sudo chown $(id -u):$(id -g) $HOME/.kube/config

Alternatively, if you are the root user, you can run:

  export KUBECONFIG=/etc/kubernetes/admin.conf

You should now deploy a pod network to the cluster.
Run "kubectl apply -f [podnetwork].yaml" with one of the options listed at:
  https://kubernetes.io/docs/concepts/cluster-administration/addons/

Then you can join any number of worker nodes by running the following on each as root:

kubeadm join 192.168.111.30:6443 --token abcdef.0123456789abcdef \
	--discovery-token-ca-cert-hash sha256:dac3330f9edf0943d35f6d7e52fdc2a67683be6ddb32f460a25ae7cb98252e4f
出现的问题:
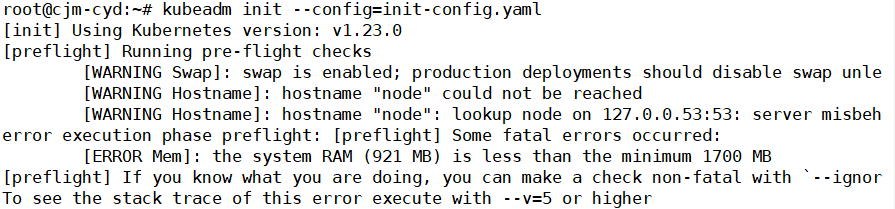
关闭当前节点,把内存调整到 2GB 及以上(推荐 2GB/4GB),重启节点后再执行 关闭当前节点,把内存调整到 2GB 及以上(推荐 2GB/4GB),重启节点后再执行
4.5、cjm-cyd节点复制k8s认证文件到用户的home目录
root@cjm-cyd:~# mkdir -p $HOME/.kube
root@cjm-cyd:~# sudo cp -i /etc/kubernetes/admin.conf $HOME/.kube/config
root@cjm-cyd:~# sudo chown $(id -u):$(id -g) $HOME/.kube/config

4.6、cyd-3、4节点加入集群
- 直接把cjm-cyd节点初始化之后的最后回显的token复制粘贴到从节点回车即可,无须做任何配置
cyd-3
root@cyd-3:~# kubeadm join 192.168.111.30:6443 --token abcdef.0123456789abcdef  --discovery-token-ca-cert-hash sha256:dac3330f9edf0943d35f6d7e52fdc2a67683be6ddb32f460a25ae7cb98252e4f
[preflight] Running pre-flight checks
[preflight] Reading configuration from the cluster...
[preflight] FYI: You can look at this config file with 'kubectl -n kube-system get cm kubeadm-config -o yaml'
W0208 20:41:03.751051    3851 utils.go:69] The recommended value for "resolvConf" in "KubeletConfiguration" is: /run/systemd/resolve/resolv.conf; the provided value is: /run/systemd/resolve/resolv.conf
[kubelet-start] Writing kubelet configuration to file "/var/lib/kubelet/config.yaml"
[kubelet-start] Writing kubelet environment file with flags to file "/var/lib/kubelet/kubeadm-flags.env"
[kubelet-start] Starting the kubelet
[kubelet-start] Waiting for the kubelet to perform the TLS Bootstrap...

This node has joined the cluster:
* Certificate signing request was sent to apiserver and a response was received.
* The Kubelet was informed of the new secure connection details.

Run 'kubectl get nodes' on the control-plane to see this node join the cluster.
cyd-4
root@cyd-4:~# kubeadm join 192.168.111.30:6443 --token abcdef.0123456789abcdef  --discovery-token-ca-cert-hash sha256:dac3330f9edf0943d35f6d7e52fdc2a67683be6ddb32f460a25ae7cb98252e4f
[preflight] Running pre-flight checks
[preflight] Reading configuration from the cluster...
[preflight] FYI: You can look at this config file with 'kubectl -n kube-system get cm kubeadm-config -o yaml'
W0208 20:41:01.074447    3193 utils.go:69] The recommended value for "resolvConf" in "KubeletConfiguration" is: /run/systemd/resolve/resolv.conf; the provided value is: /run/systemd/resolve/resolv.conf
[kubelet-start] Writing kubelet configuration to file "/var/lib/kubelet/config.yaml"
[kubelet-start] Writing kubelet environment file with flags to file "/var/lib/kubelet/kubeadm-flags.env"
[kubelet-start] Starting the kubelet
[kubelet-start] Waiting for the kubelet to perform the TLS Bootstrap...

This node has joined the cluster:
* Certificate signing request was sent to apiserver and a response was received.
* The Kubelet was informed of the new secure connection details.

Run 'kubectl get nodes' on the control-plane to see this node join the cluster.
4.7、在cjm-cyd主机查看节点状态
- 在初始化k8s-master时并没有网络相关的配置,所以无法跟node节点通信,因此状态都是“Not Ready”。但是通过kubeadm join加入的node节点已经在master上可以看到
root@cjm-cyd:~# kubectl get nodes
NAME    STATUS     ROLES                  AGE     VERSION
cyd-3   NotReady   <none>                 6m48s   v1.23.0
cyd-4   NotReady   <none>                 7m17s   v1.23.0
node    NotReady   control-plane,master   21m     v1.23.0

五、安装flannel网络插件
- flannel是一个轻量级的网络插件,基于虚拟网络的方式,使用了多种后端实现,如基于Overlay的VXLAN和基于Host-Gateway的方式。它创建了一个覆盖整个集群的群集网络,使得Pod可以跨节点通信
5.1、安装flannel网络插件master
- 可以使用的网络插件有很多,本次使用flannel
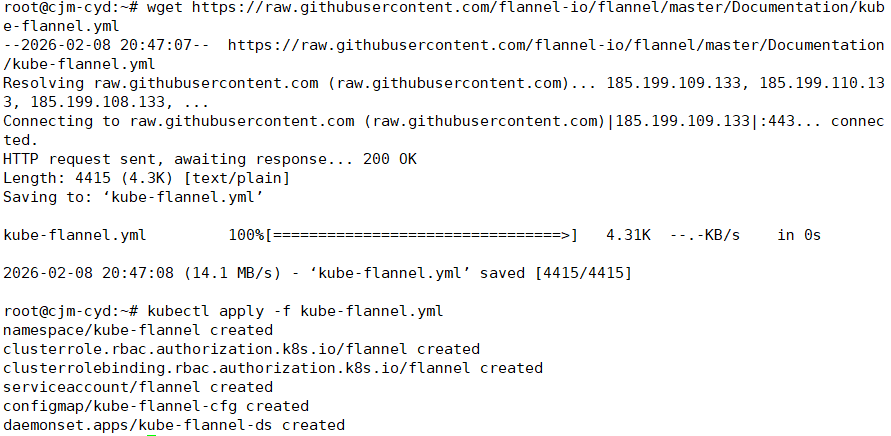
下载kube-flannel.yml文件
root@master:~# wget https://raw.githubusercontent.com/flannel-io/flannel/master/Documentation/kube-flannel.yml
如果下载失败也可以手动创建kube-flannel.yml文件
root@master:~# vim kube-flannel.yml
---
kind: Namespace
apiVersion: v1
metadata:
  name: kube-flannel
  labels:
  k8s-app: flannel
  pod-security.kubernetes.io/enforce: privileged
---
kind: ClusterRole
apiVersion: rbac.authorization.k8s.io/v1
metadata:
  labels:
    k8s-app: flannel
  name: flannel
rules:
- apiGroups:
  - ""
  resources:
  - pods
  verbs:
  - get
- apiGroups:
  - ""
  resources:
  - nodes
  verbs:
  - get
  - list
  - watch
- apiGroups:
  - ""
  resources:
  - nodes/status
  verbs:
  - patch
---
kind: ClusterRoleBinding
apiVersion: rbac.authorization.k8s.io/v1
metadata:
  labels:
    k8s-app: flannel
  name: flannel
roleRef:
  apiGroup: rbac.authorization.k8s.io
  kind: ClusterRole
  name: flannel
subjects:
- kind: ServiceAccount
  name: flannel
  namespace: kube-flannel
---
apiVersion: v1
kind: ServiceAccount
metadata:
  labels:
    k8s-app: flannel
  name: flannel
  namespace: kube-flannel
---
kind: ConfigMap
apiVersion: v1
metadata:
  name: kube-flannel-cfg
  namespace: kube-flannel
  labels:
    tier: node
    k8s-app: flannel
    app: flannel
data:
  cni-conf.json: |
  {
    "name": "cbr0",
    "cniVersion": "0.3.1",
    "plugins": [
      {
        "type": "flannel",
        "delegate": {
          "hairpinMode": true,
          "isDefaultGateway": true
        }
      },
      {
        "type": "portmap",
        "capabilities": {
          "portMappings": true
         }
       }
     ]
   }
net-conf.json: |
  {
    "Network": "10.244.0.0/16",
    "EnableNFTables": false,
    "Backend": {
      "Type": "vxlan"
    }
  }
---
apiVersion: apps/v1
kind: DaemonSet
metadata:
  name: kube-flannel-ds
  namespace: kube-flannel
  labels:
    tier: node
    app: flannel
    k8s-app: flannel
spec:
  selector:
    matchLabels:
      app: flannel
  template:
    metadata:
      labels:
        tier: node
        app: flannel
    spec:
      affinity:
        nodeAffinity:
          requiredDuringSchedulingIgnoredDuringExecution:
            nodeSelectorTerms:
            - matchExpressions:
              - key: kubernetes.io/os
                operator: In
                values:
                - linux
        hostNetwork: true
        priorityClassName: system-node-critical
        tolerations:
        - operator: Exists
          effect: NoSchedule
        serviceAccountName: flannel
        initContainers:
        - name: install-cni-plugin
        #image: docker.io/flannel/flannel-cni-plugin:v1.6.0-flannel1
        image: 192.168.57.200:8099/k8s-1.23/flannel-cni-plugin:v1.6.0-flannel1  # 使用局域网镜像
        command:
        - cp
        args:
        - -f
        - /flannel
        - /opt/cni/bin/flannel
        volumeMounts:
        - name: cni-plugin
          mountPath: /opt/cni/bin
        - name: install-cni
          #image: docker.io/flannel/flannel:v0.26.1
          image: 192.168.57.200:8099/k8s-1.23/flannel:v0.26.1  # 使用局域网镜像
          command:
          - cp
          args:
          - -f
          - /etc/kube-flannel/cni-conf.json
          - /etc/cni/net.d/10-flannel.conflist
          volumeMounts:
          - name: cni
            mountPath: /etc/cni/net.d
          - name: flannel-cfg
            mountPath: /etc/kube-flannel/
        containers:
        - name: kube-flannel
          #image: docker.io/flannel/flannel:v0.26.1
          image: 192.168.57.200:8099/k8s-1.23/flannel:v0.26.1  # 使用局域网镜像
          command:
          - /opt/bin/flanneld
          args:
          - --ip-masq
          - --kube-subnet-mgr
          resources:
            requests:
              cpu: "100m"
              memory: "50Mi"
          securityContext:
            privileged: false
            capabilities:
              add: ["NET_ADMIN", "NET_RAW"]
          env:
          - name: POD_NAME
            valueFrom:
              fieldRef:
                fieldPath: metadata.name
         - name: POD_NAMESPACE
           valueFrom:
             fieldRef:
               fieldPath: metadata.namespace
         - name: EVENT_QUEUE_DEPTH
           value: "5000"
         volumeMounts:
         - name: run
           mountPath: /run/flannel
         - name: flannel-cfg
           mountPath: /etc/kube-flannel/
         - name: xtables-lock
           mountPath: /run/xtables.lock
       volumes:
       - name: run
         hostPath:
         path: /run/flannel
       - name: cni-plugin
         hostPath:
         path: /opt/cni/bin
      - name: cni
        hostPath:
        path: /etc/cni/net.d
      - name: flannel-cfg
        configMap:
          name: kube-flannel-cfg
      - name: xtables-lock
        hostPath:
          path: /run/xtables.lock
          type: FileOrCreate
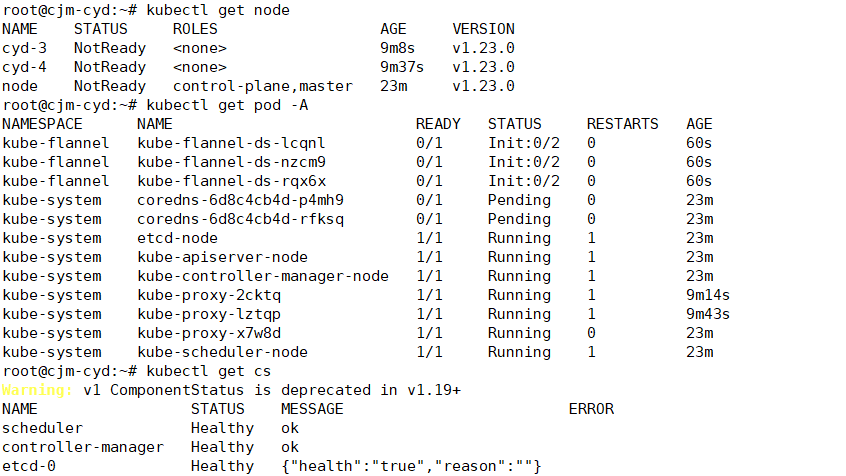
5.2、查看节点状态
查看Node节点状态
root@cjm-cyd:~# kubectl get node
NAME STATUS ROLES AGE VERSION
cyd-3 NotReady <none> 9m8s v1.23.0
cyd-4 NotReady <none> 9m37s v1.23.0
node NotReady control-plane,master 23m v1.23.0
查看所有Pod状态
root@cjm-cyd:~# kubectl get pod -A
NAMESPACE NAME READY STATUS RESTARTS AGE
kube-flannel kube-flannel-ds-lcqnl 0/1 Init:0/2 0 60s
kube-flannel kube-flannel-ds-nzcm9 0/1 Init:0/2 0 60s
kube-flannel kube-flannel-ds-rqx6x 0/1 Init:0/2 0 60s
kube-system coredns-6d8c4cb4d-p4mh9 0/1 Pending 0 23m
kube-system coredns-6d8c4cb4d-rfksq 0/1 Pending 0 23m
kube-system etcd-node 1/1 Running 1 23m kube-system
kube-apiserver-node 1/1 Running 1 23m kube-system
kube-controller-manager-node 1/1 Running 1 23m
kube-system kube-proxy-2cktq 1/1 Running 1 9m14s
kube-system kube-proxy-lztqp 1/1 Running 1 9m43s
kube-system kube-proxy-x7w8d 1/1 Running 0 23m
kube-system kube-scheduler-node 1/1 Running 1 23m
查看组件状态
root@cjm-cyd:~# kubectl get cs
Warning: v1 ComponentStatus is deprecated in v1.19+
NAME STATUS MESSAGE ERROR
scheduler Healthy ok
controller-manager Healthy
ok etcd-0 Healthy {"health":"true","reason":""}
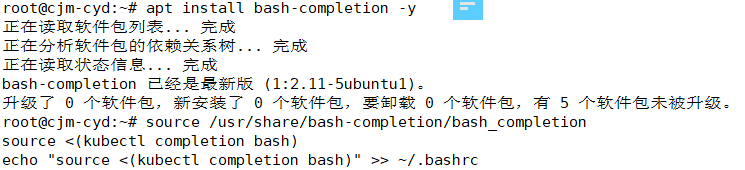
5.3、开启kubectl命令补全功能
apt install bash-completion -y
source /usr/share/bash-completion/bash_completion
source <(kubectl completion bash)
echo "source <(kubectl completion bash)" >> ~/.bashrc
六、安装KubePi
KubePi 是一个现代化的 K8s 面板。KubePi 允许管理员导入多个 Kubernetes 集群,并且通过权限控制,将不同 cluster、namespace 的权限分配给指定用户;允许开发人员管理 Kubernetes 集群中运行的应用程序并对其进行故障排查,供开发人员更好地处理 Kubernetes 集群中的复杂性。

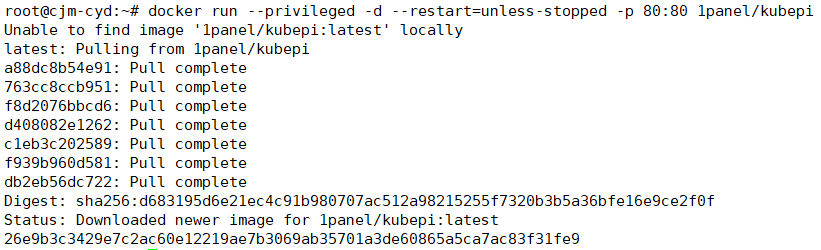
6.1快速开始
docker run --privileged -d --restart=unless-stopped -p 80:80 1panel/kubepi
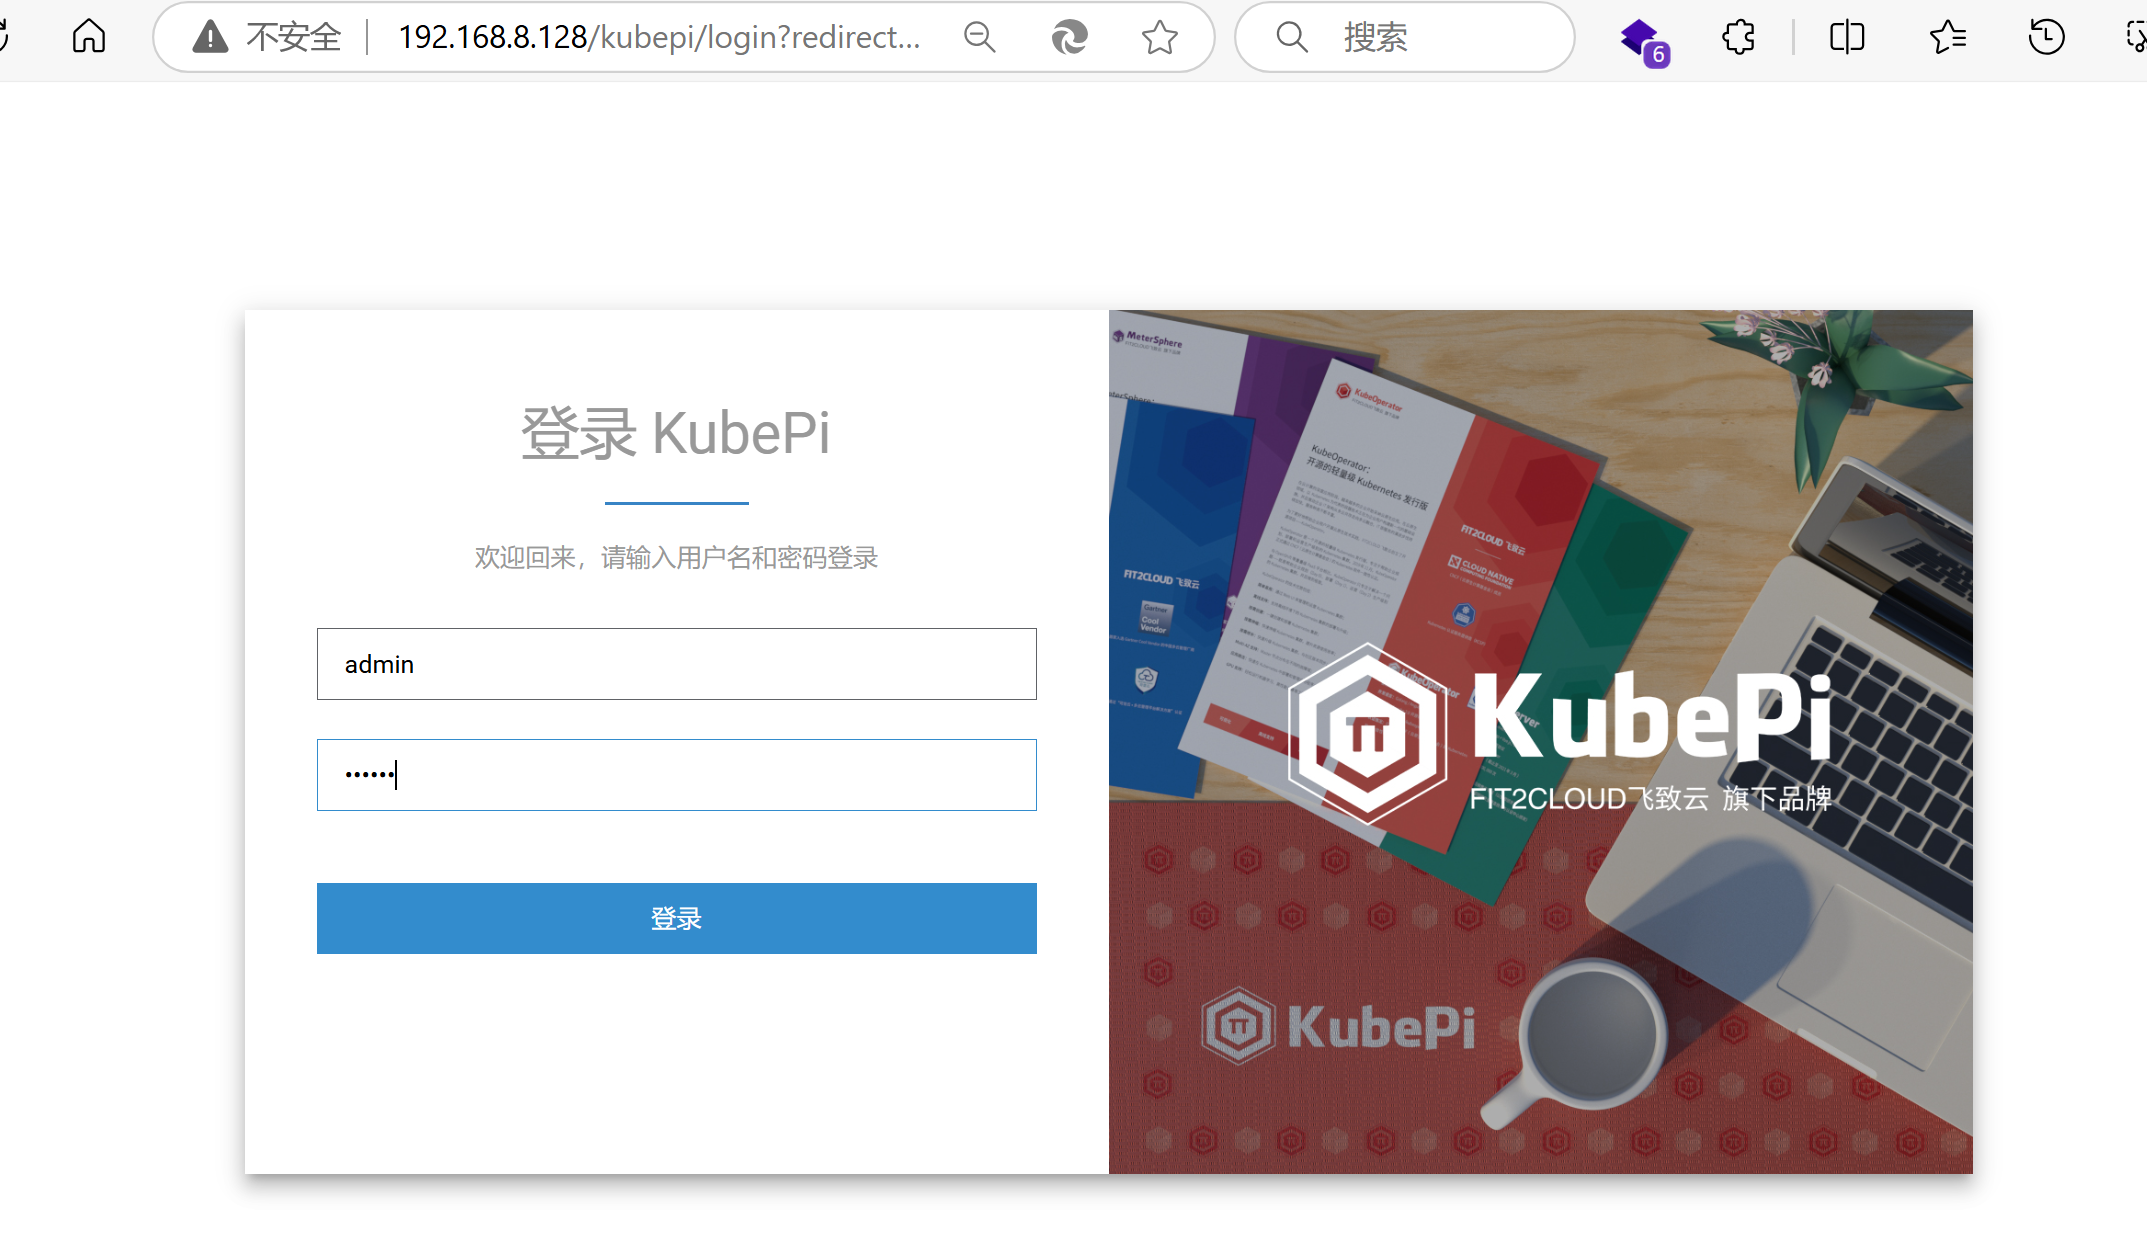
用户名: admin
密码: kubepi
你也可以通过 1Panel 应用商店 快速部署 KubePi。
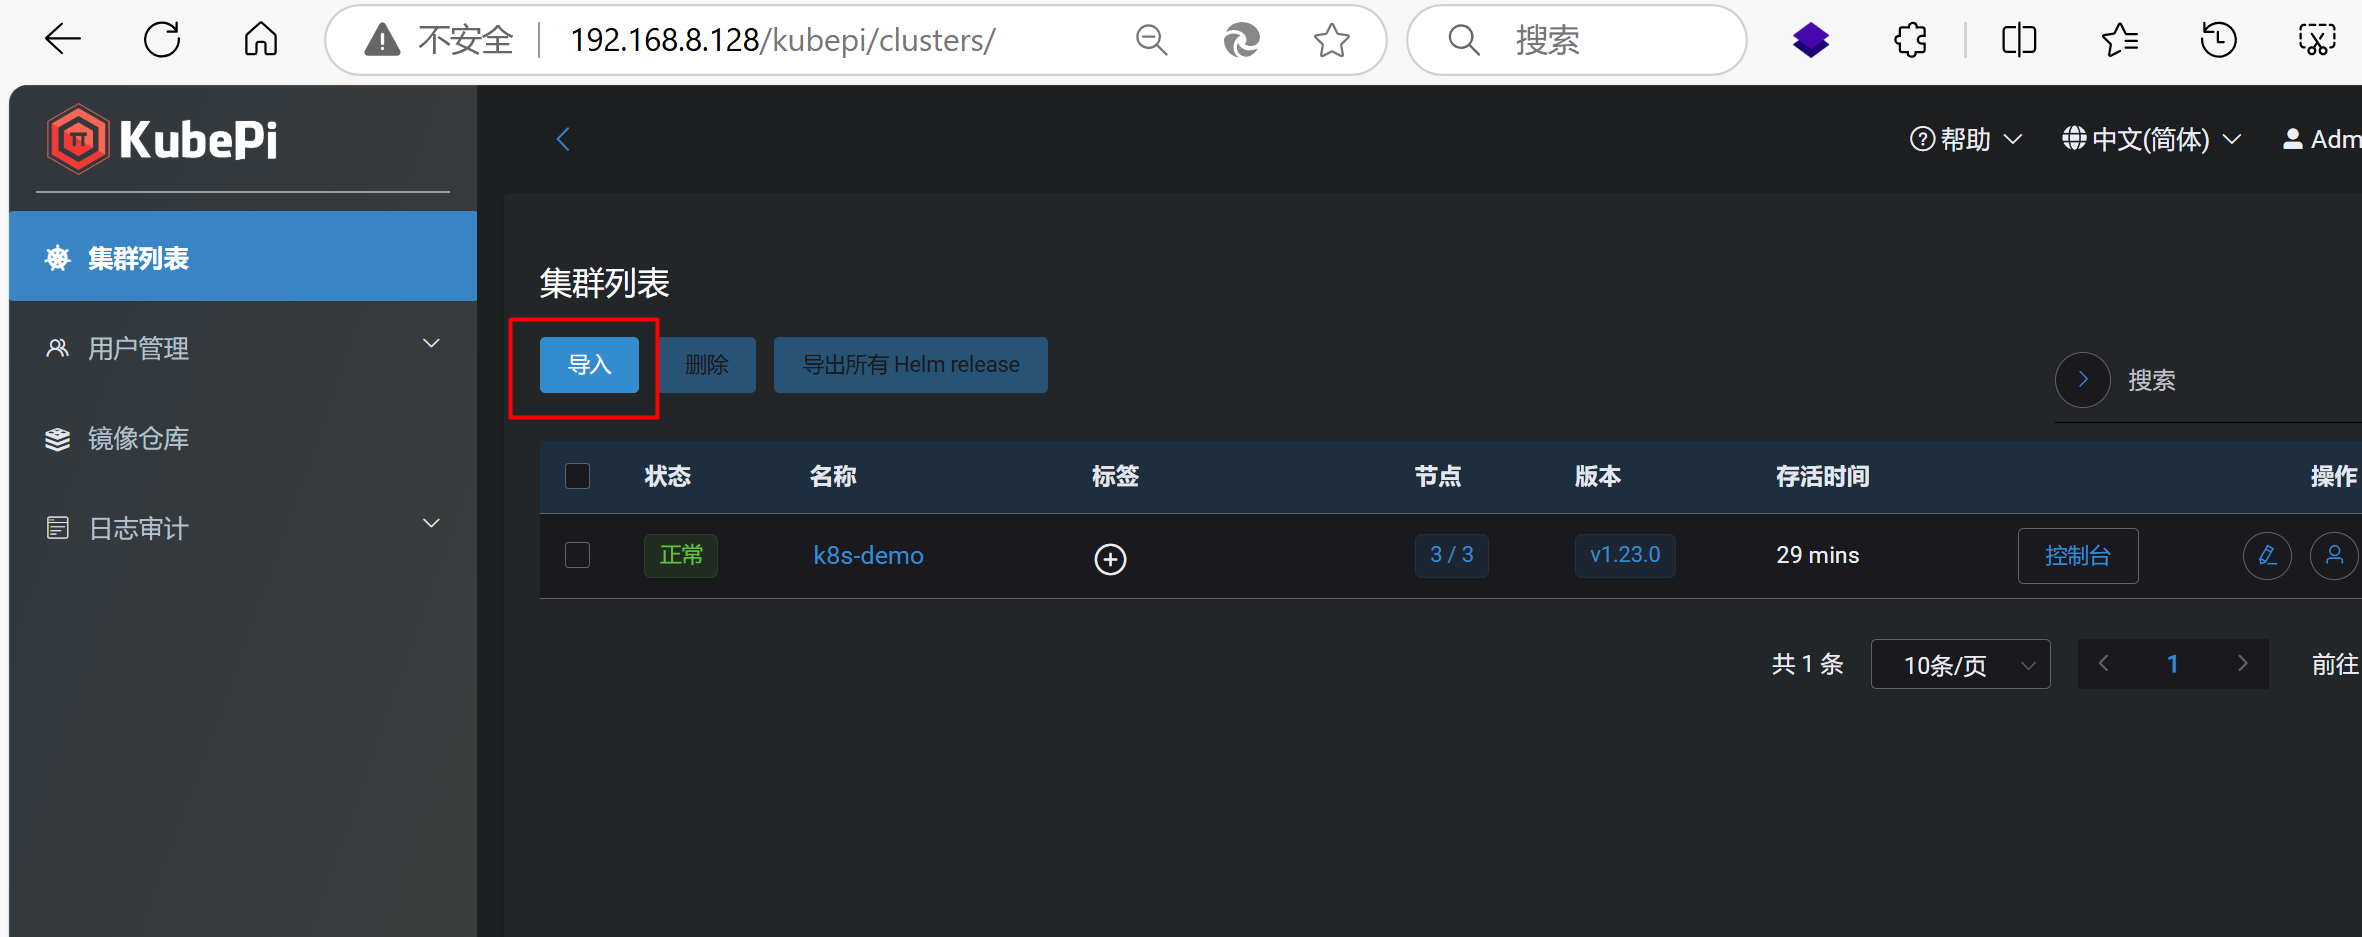
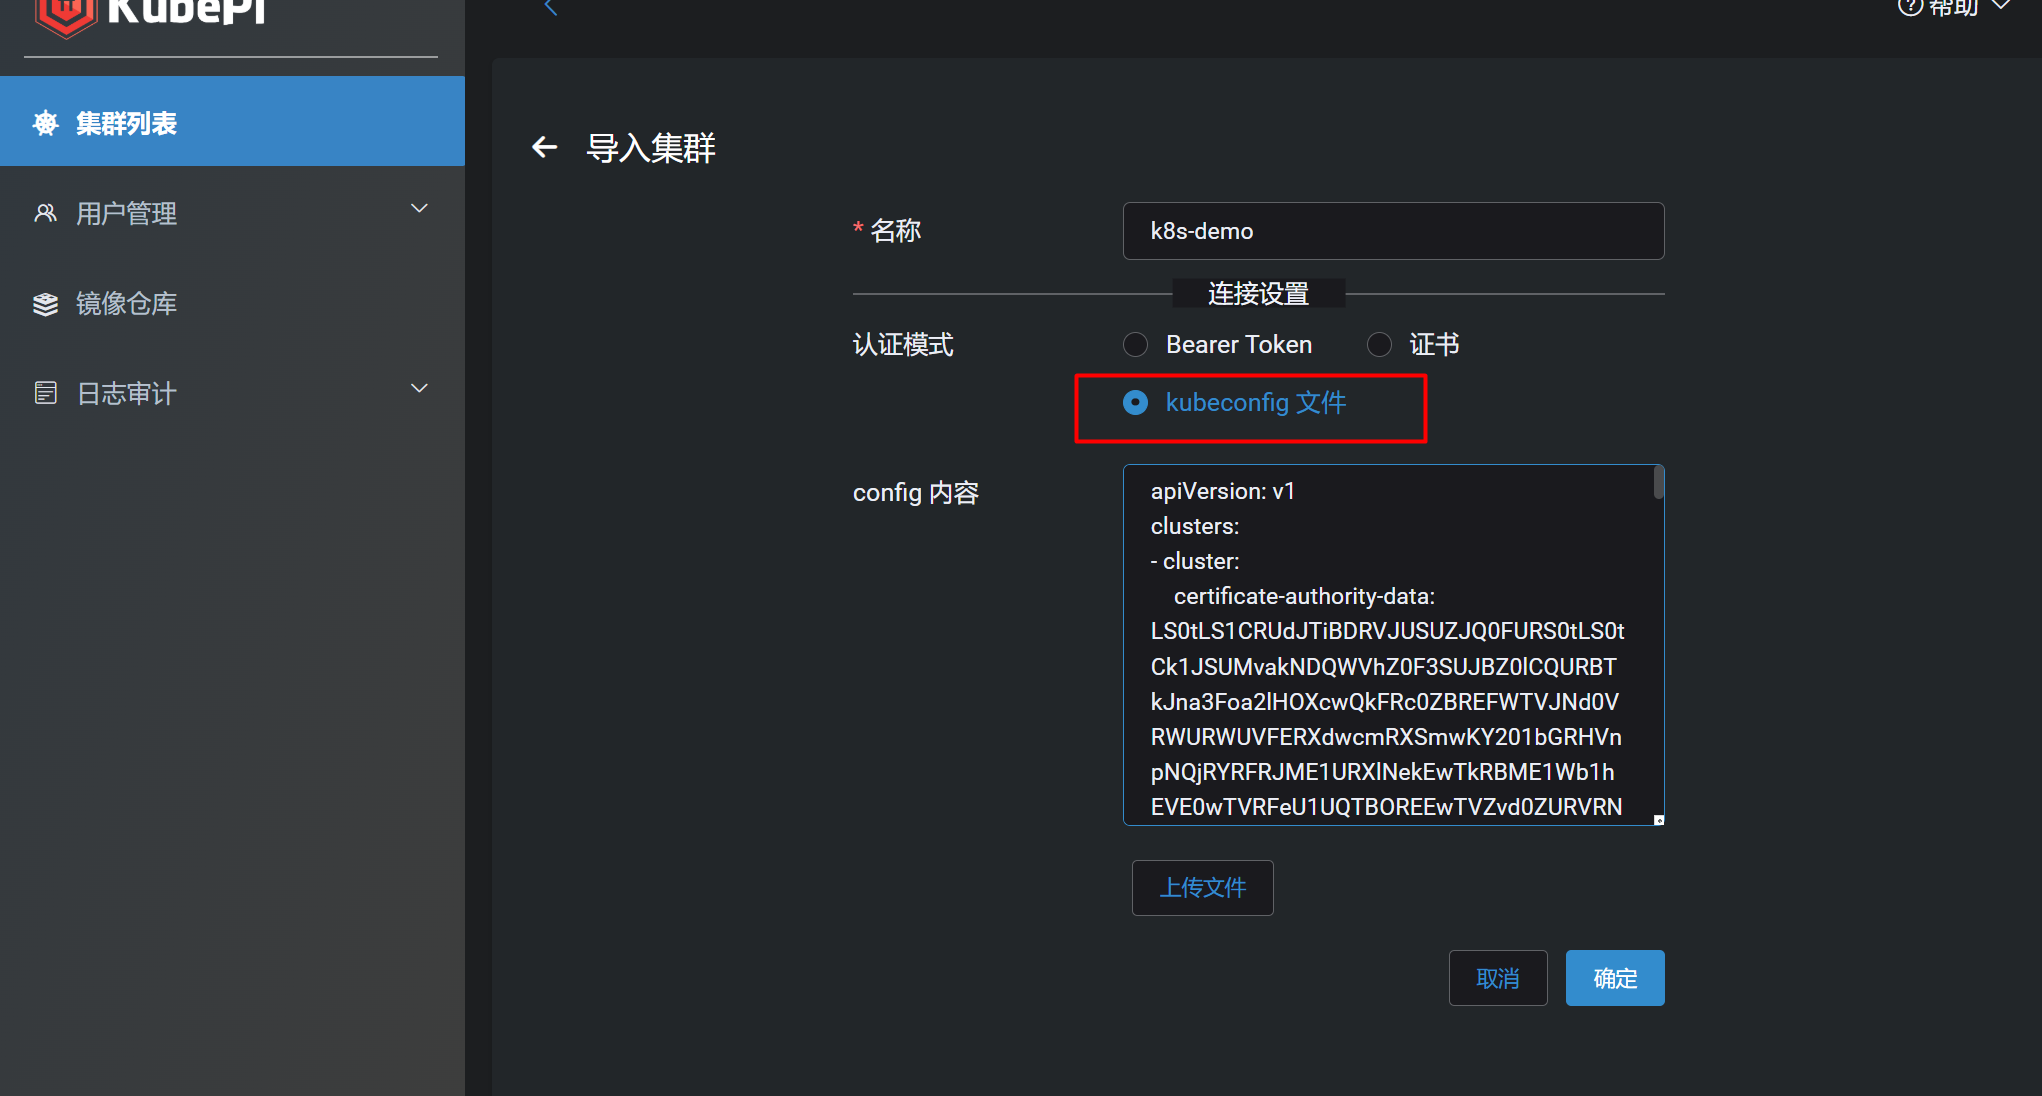
查看master上的kubeconfig文件
root@cjm-cyd:~# cat ~/.kube/config

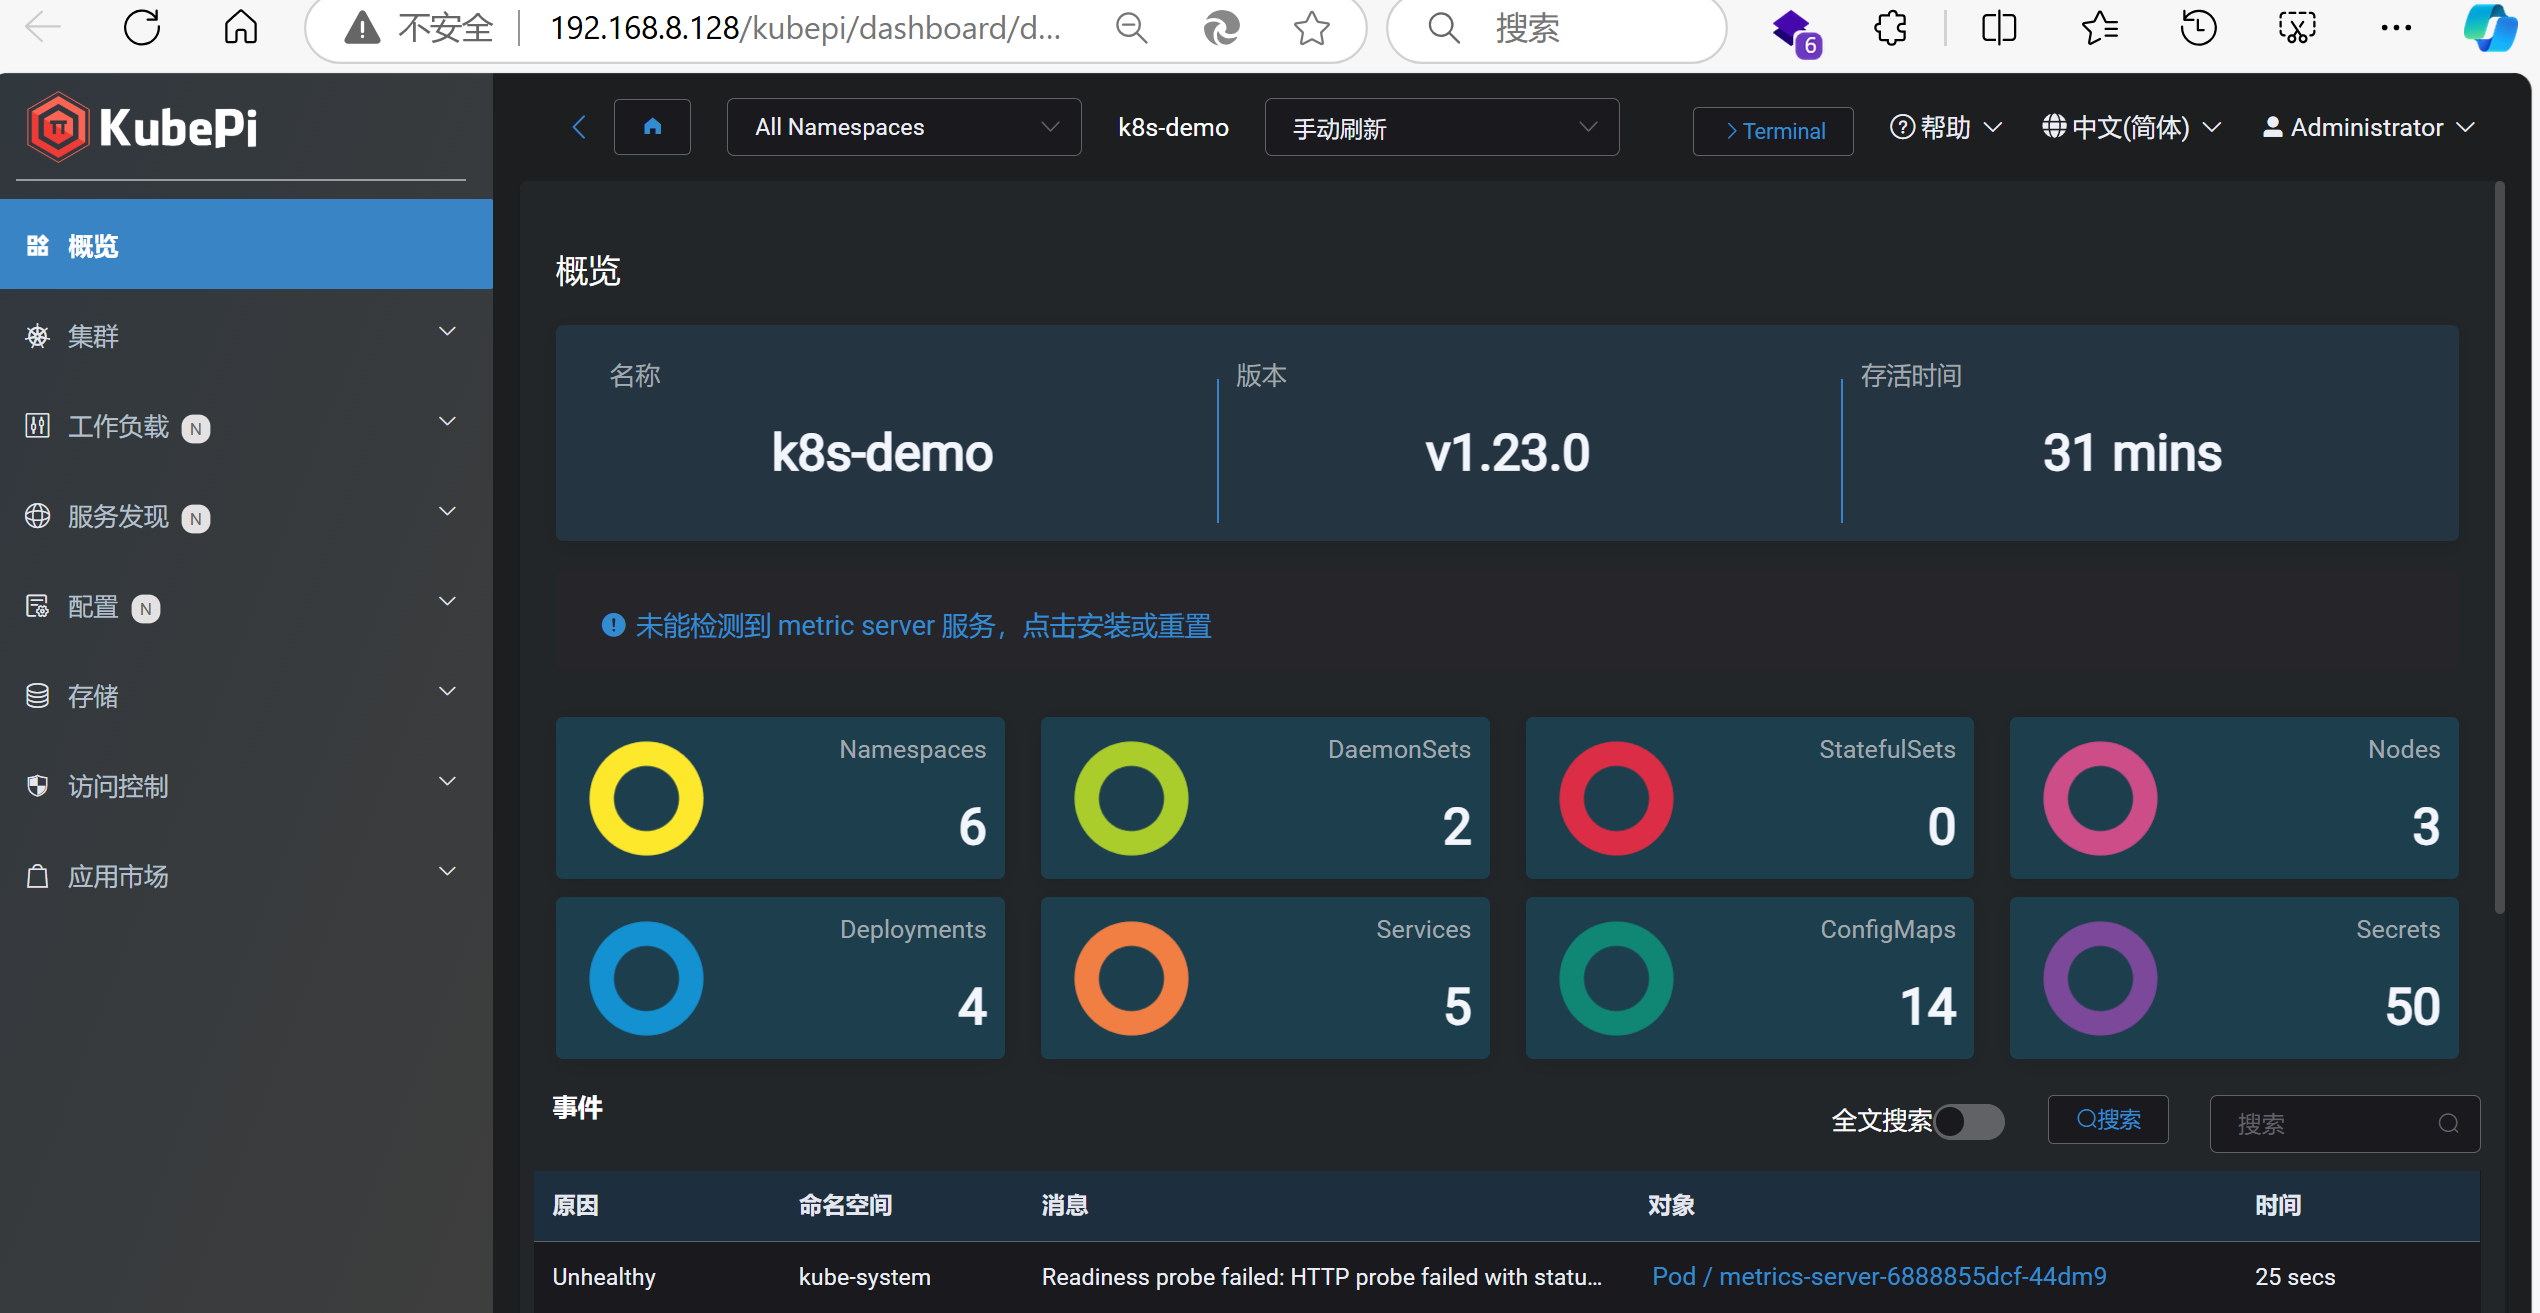
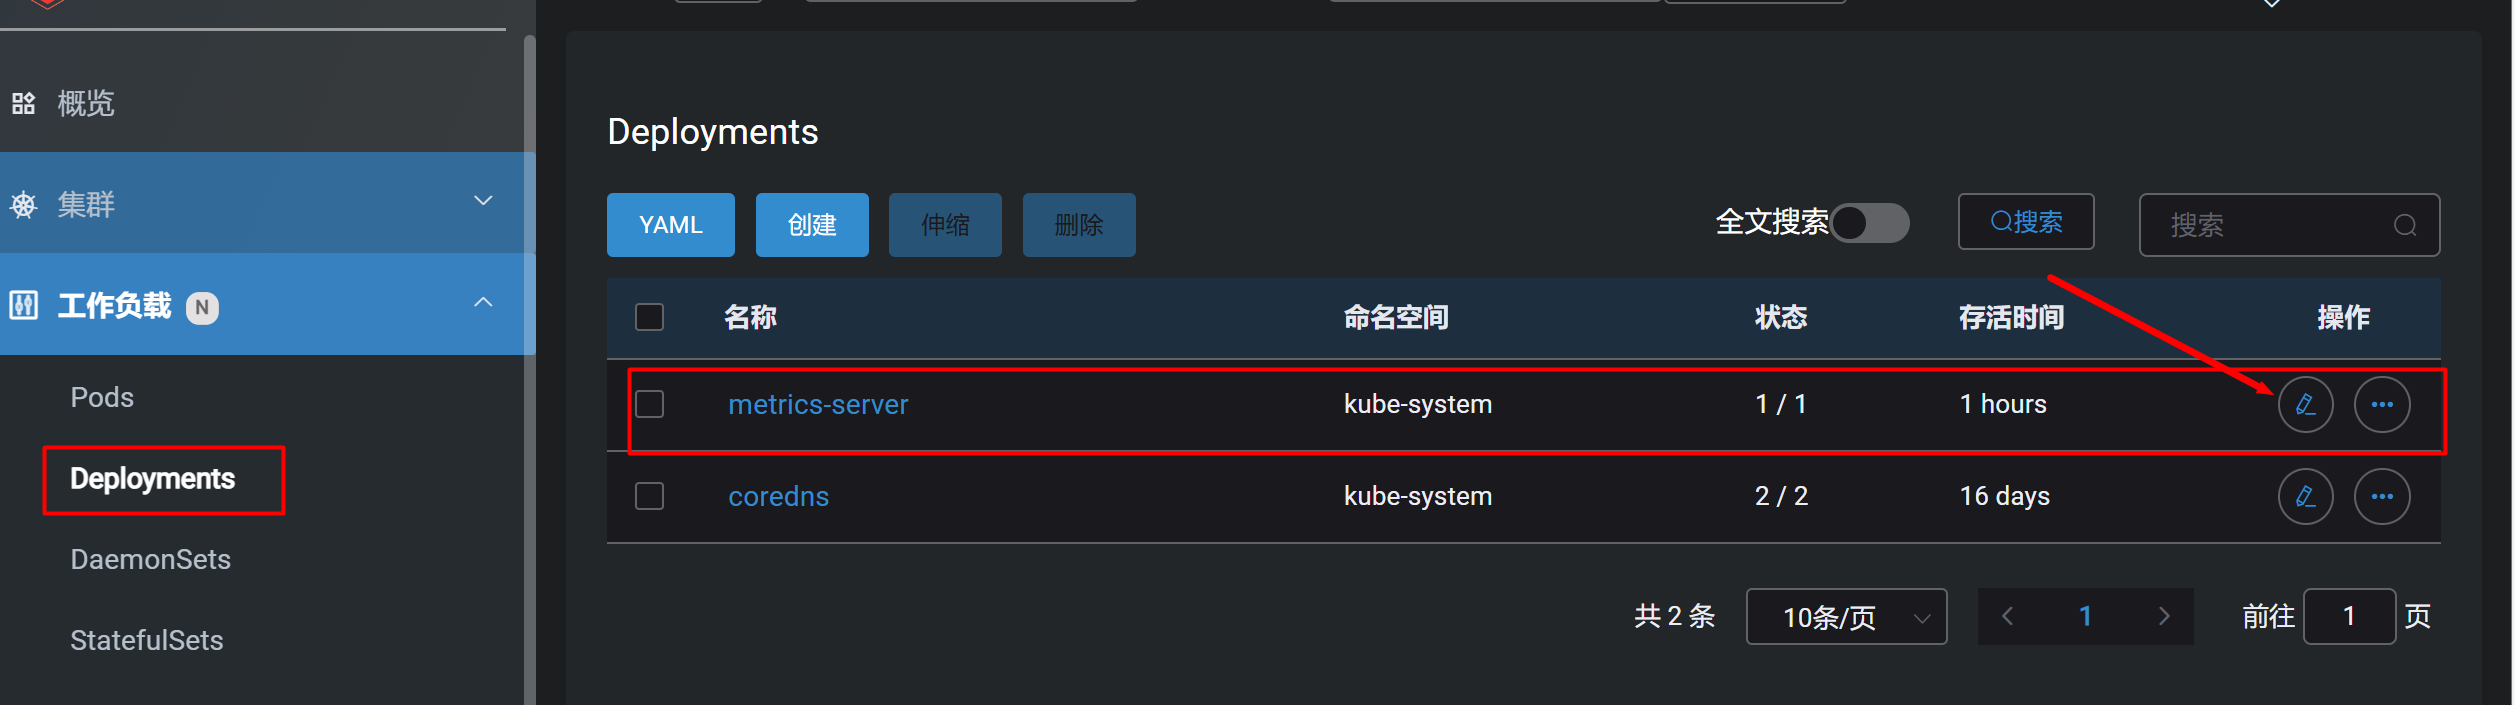
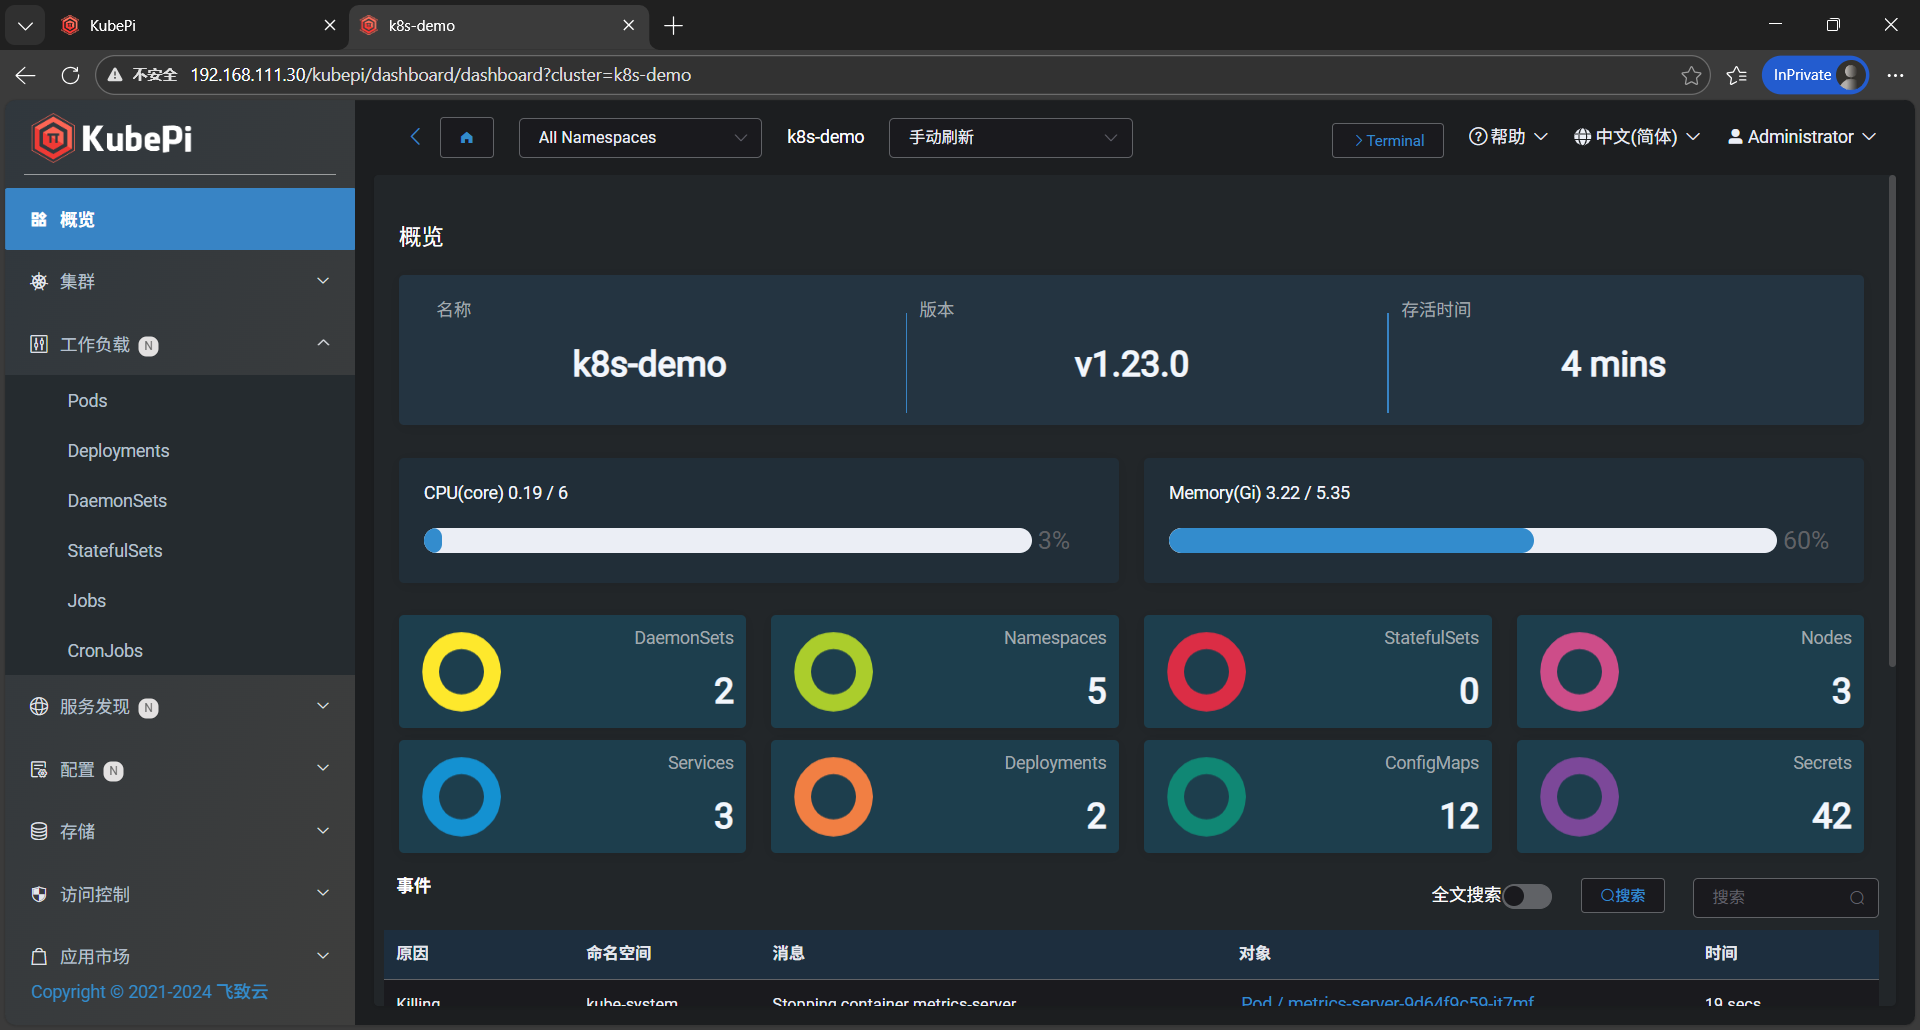
点击蓝色警告安装metric server
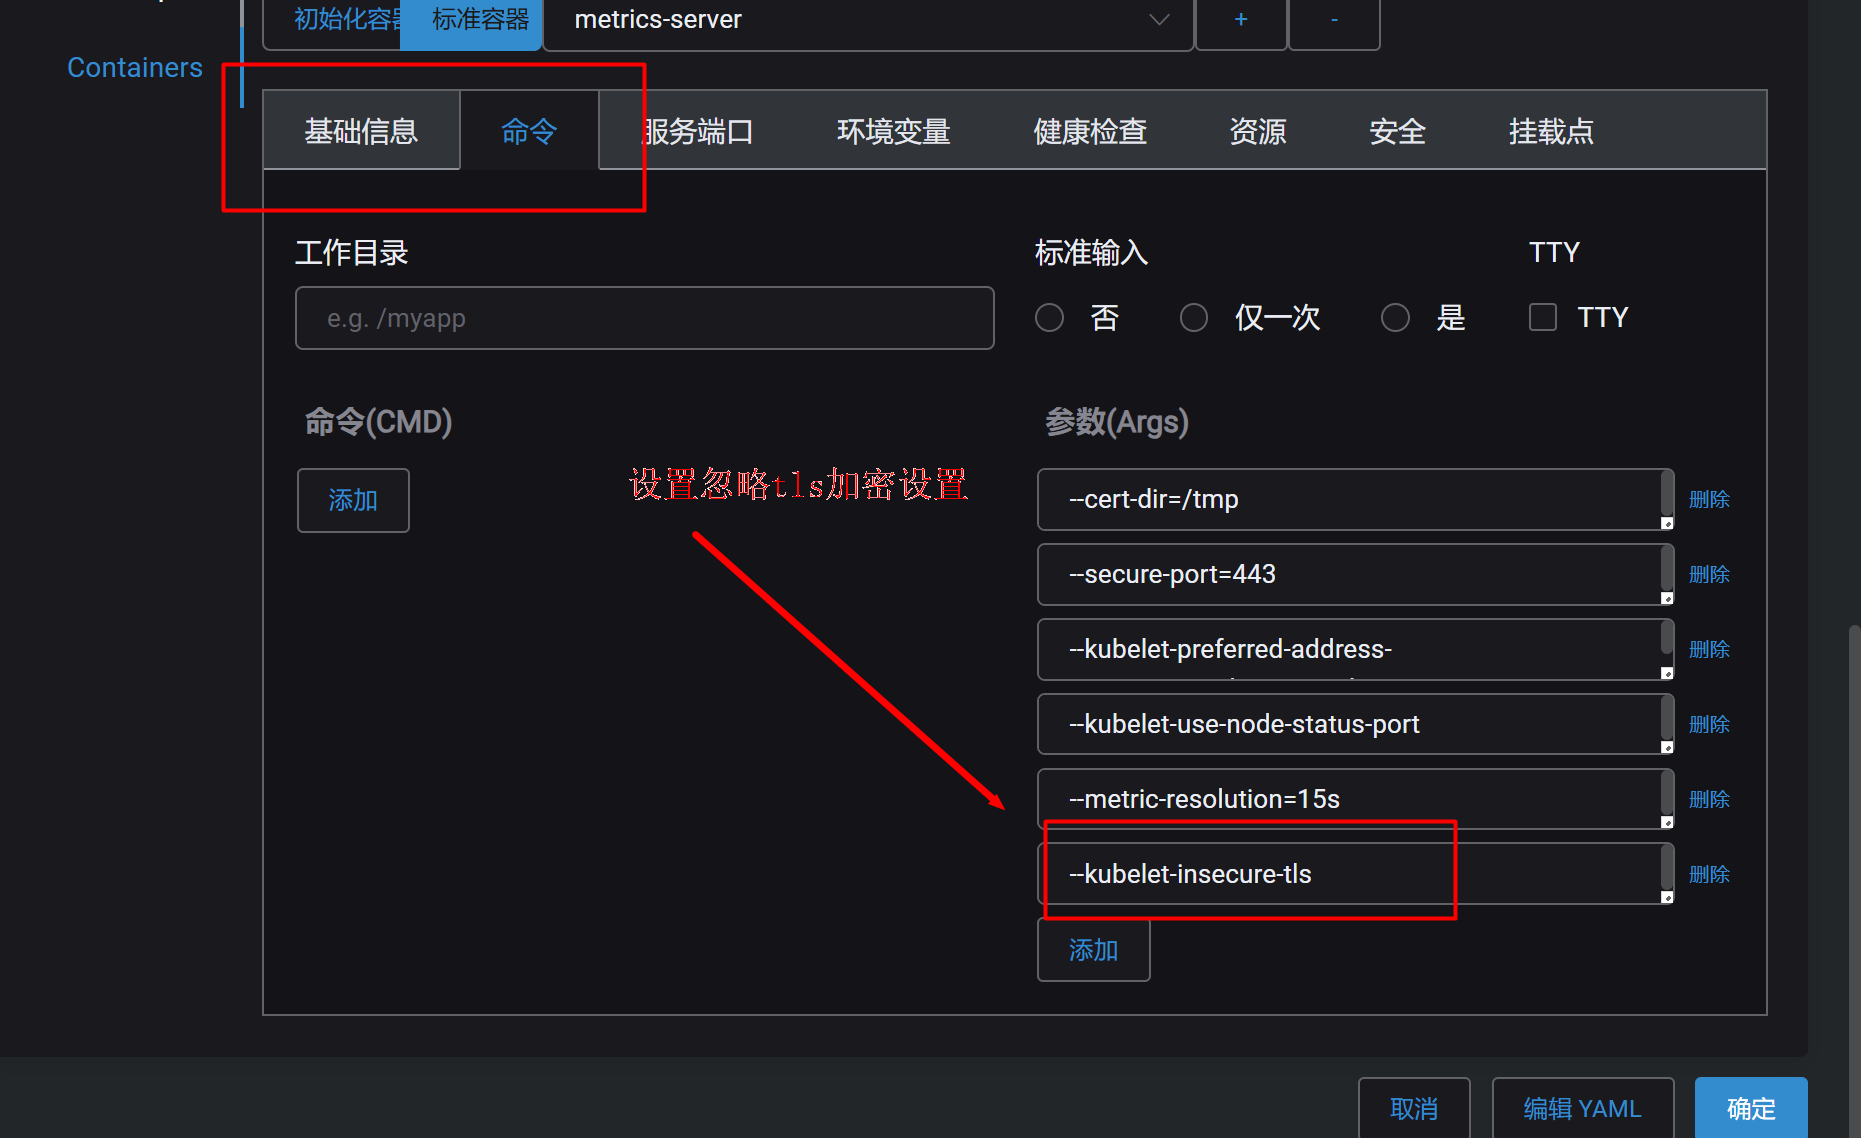
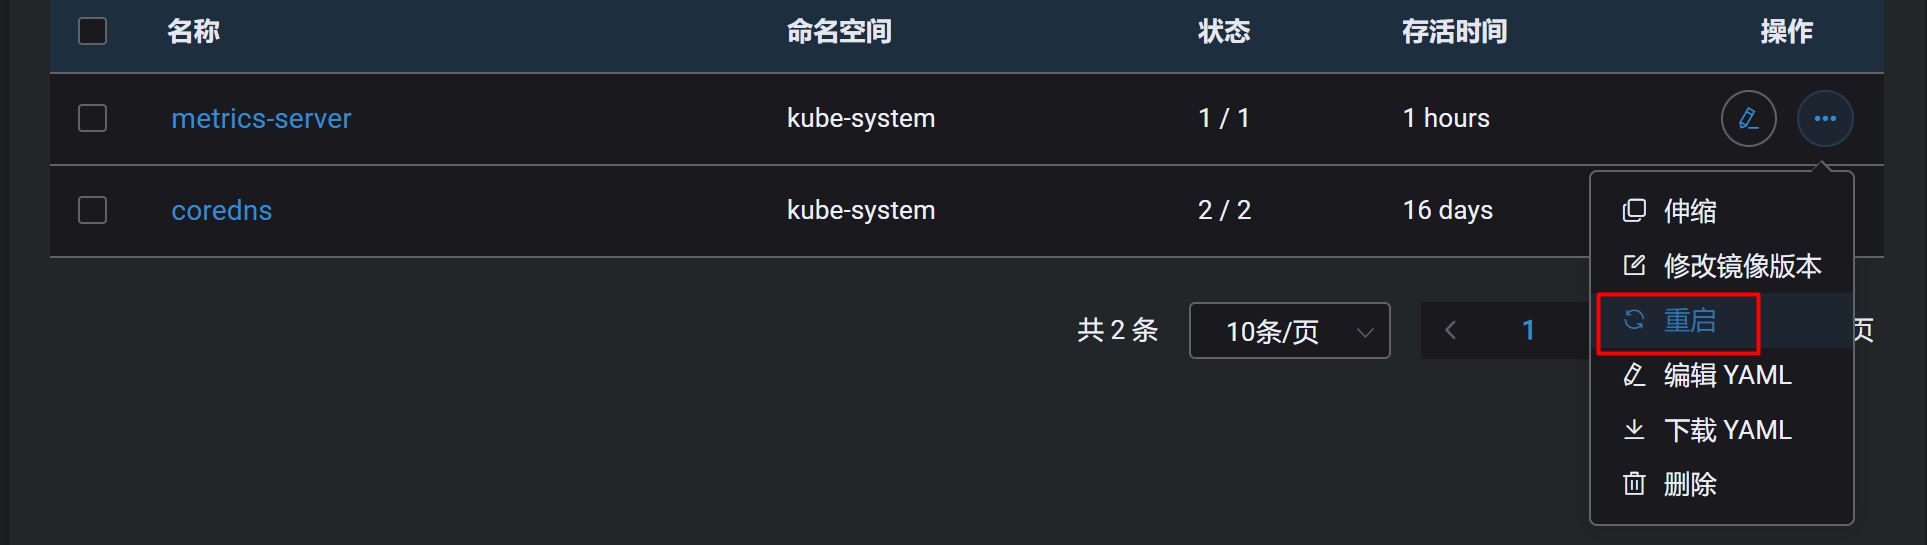
修改配置
忽略tls安全设置 --kubelet-insecure-tls
更多推荐
 19
19 0
0- 0


 已为社区贡献3条内容

所有评论(0)