
云原生(LVS NAT模式集群实验)
·
NAT模式环境设定
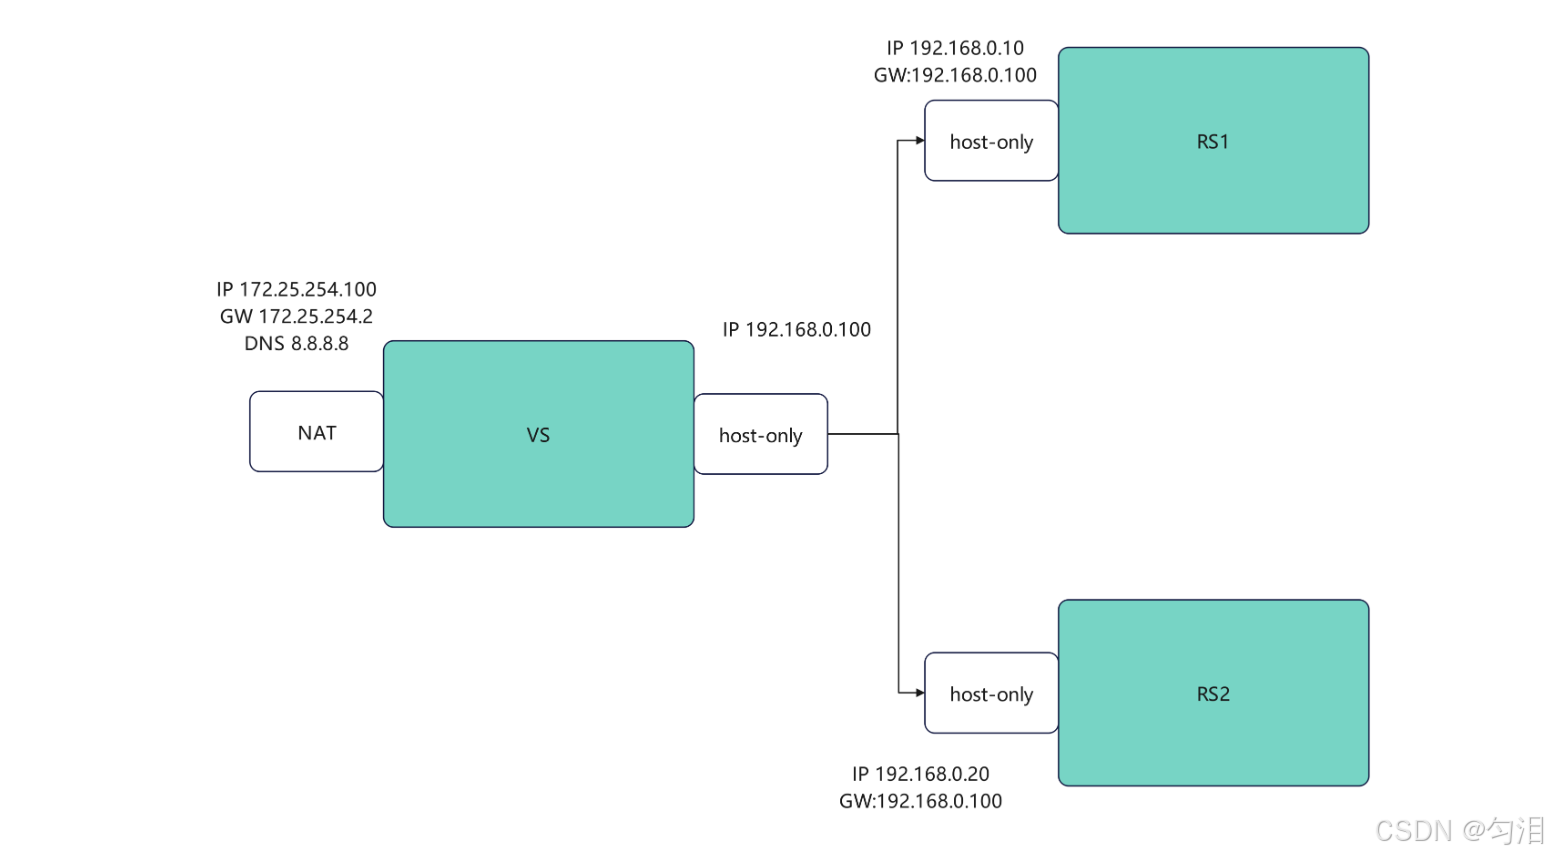
实验简介
搭建了 1 台 VS(Virtual Server,虚拟服务器)主机和 2 台 RS(Real Server,真实服务器):
- VS 主机:配置双网卡(eth0:172.25.254.100,eth1:192.168.0.100),作为负载均衡入口和 RS 的网关;
- RS1:eth0 配置 192.168.0.10,部署 httpd 服务,页面返回 “RS1 - 192.168.0.10”;
- RS2:eth0 配置 192.168.0.20,部署 httpd 服务,页面返回 “RS2 - 192.168.0.20”;
- RS 的网关均指向 VS 的 192.168.0.100,确保回程流量经 VS 转发。
实验核心步骤
- 开启 VS 内核路由:启用 IP 转发(
net.ipv4.ip_forward=1),让 VS 具备路由 / 转发能力,是 NAT 模式的基础; - 配置 IPVS 规则:
- 清空原有规则,创建虚拟服务(172.25.254.100:80),调度算法为加权轮询(wrr);
- 添加 2 台 RS,转发模式为 NAT(-m,Masq),初始权重均为 1;
- 验证负载均衡:
- 权重均为 1 时,访问 VS 的 172.25.254.100:80,请求交替分发到 RS1/RS2;
- 调整 RS1 权重为 2 后,RS1 被调度的频率是 RS2 的 2 倍;
- 规则持久化:
- 方式 1:通过
ipvsadm-save导出规则到自定义文件,ipvsadm-restore恢复; - 方式 2:将规则保存到
/etc/sysconfig/ipvsadm,通过 ipvsadm 服务自动加载。
- 方式 1:通过
vmset.sh脚本编写
[root@node ~]# vim /bin/vmset.sh
#!/bin/bash
[ "$#" -lt "3" ] && {
  echo "error!!"
  exit
}
CONNECTION=`nmcli connection show | awk "/$1/"'{print $1}'|grep $1`
[ "$?" -ne "0" ] && {
  echo "$1" is in used !!
  nmcli connection delete  $CONNECTION
}
[ "$4" = "noroute" ] && {
cat >>  /etc/NetworkManager/system-connections/$1.nmconnection <<EOF
[connection]
id=$1
type=ethernet
interface-name=$1


[ipv4]
method=manual
address1=$2/24
EOF
}||{
cat >>  /etc/NetworkManager/system-connections/$1.nmconnection <<EOF
[connection]
id=$1
type=ethernet
interface-name=$1


[ipv4]
method=manual
address1=$2/24,192.168.181.123
dns=8.8.8.8;
EOF
}

chmod 600 /etc/NetworkManager/system-connections/$1.nmconnection
nmcli connection reload
nmcli connection up $1
hostnamectl hostname $3

cat > /etc/hosts<< EOF
127.0.0.1   localhost localhost.localdomain localhost4 localhost4.localdomain4
::1         localhost localhost.localdomain localhost6 localhost6.localdomain6
$2     $3
EOF

ip a s $1
hostname
[root@node ~]# chmod  +x /bin/vmset.sh
VS主机配置
[root@vsnode yxs]# vmset.sh eth0 172.25.254.100 vsnode
连接已成功激活(D-Bus 活动路径:/org/freedesktop/NetworkManager/ActiveConnection/4)
2: eth0: <BROADCAST,MULTICAST,UP,LOWER_UP> mtu 1500 qdisc mq state UP group default qlen 1000
    link/ether 00:0c:29:ee:1b:c5 brd ff:ff:ff:ff:ff:ff
    altname enp3s0
    altname ens160
    inet 172.25.254.100/24 brd 172.25.254.255 scope global noprefixroute eth0
       valid_lft forever preferred_lft forever
    inet6 fe80::20c:29ff:feee:1bc5/64 scope link tentative noprefixroute
       valid_lft forever preferred_lft forever
vsnode
[root@vsnode yxs]# vmset.sh eth1 192.168.0.100 vsnode noroute
连接已成功激活(D-Bus 活动路径:/org/freedesktop/NetworkManager/ActiveConnection/5)
3: eth1: <BROADCAST,MULTICAST,UP,LOWER_UP> mtu 1500 qdisc mq state UP group default qlen 1000
    link/ether 00:0c:29:ee:1b:cf brd ff:ff:ff:ff:ff:ff
    altname enp19s0
    altname ens224
    inet 192.168.0.100/24 brd 192.168.0.255 scope global noprefixroute eth1
       valid_lft forever preferred_lft forever
    inet6 fe80::2368:18eb:c683:fc47/64 scope link tentative noprefixroute
       valid_lft forever preferred_lft forever
vsnode
检查配置
[root@vsnode yxs]# ip a
1: lo: <LOOPBACK,UP,LOWER_UP> mtu 65536 qdisc noqueue state UNKNOWN group default qlen 1000
    link/loopback 00:00:00:00:00:00 brd 00:00:00:00:00:00
    inet 127.0.0.1/8 scope host lo
       valid_lft forever preferred_lft forever
    inet6 ::1/128 scope host
       valid_lft forever preferred_lft forever
2: eth0: <BROADCAST,MULTICAST,UP,LOWER_UP> mtu 1500 qdisc mq state UP group default qlen 1000
    link/ether 00:0c:29:ee:1b:c5 brd ff:ff:ff:ff:ff:ff
    altname enp3s0
    altname ens160
    inet 172.25.254.100/24 brd 172.25.254.255 scope global noprefixroute eth0
       valid_lft forever preferred_lft forever
    inet6 fe80::20c:29ff:feee:1bc5/64 scope link noprefixroute
       valid_lft forever preferred_lft forever
3: eth1: <BROADCAST,MULTICAST,UP,LOWER_UP> mtu 1500 qdisc mq state UP group default qlen 1000
    link/ether 00:0c:29:ee:1b:cf brd ff:ff:ff:ff:ff:ff
    altname enp19s0
    altname ens224
    inet 192.168.0.100/24 brd 192.168.0.255 scope global noprefixroute eth1
       valid_lft forever preferred_lft forever
    inet6 fe80::2368:18eb:c683:fc47/64 scope link noprefixroute
       valid_lft forever preferred_lft forever
RS1配置
[root@redhat yxs]# vmset.sh eth0 192.168.0.10 RS1 noroute
连接已成功激活(D-Bus 活动路径:/org/freedesktop/NetworkManager/ActiveConnection/3)
2: eth0: <BROADCAST,MULTICAST,UP,LOWER_UP> mtu 1500 qdisc mq state UP group default qlen 1000
    link/ether 00:0c:29:d5:22:da brd ff:ff:ff:ff:ff:ff
    altname enp3s0
    altname ens160
    inet 172.25.254.100/24 brd 172.25.254.255 scope global noprefixroute eth0
       valid_lft forever preferred_lft forever
    inet6 fe80::20c:29ff:fed5:22da/64 scope link tentative noprefixroute
       valid_lft forever preferred_lft forever
RS1
[root@redhat yxs]# vmset.sh eth0 192.168.0.10 RS1 noroute
连接已成功激活(D-Bus 活动路径:/org/freedesktop/NetworkManager/ActiveConnection/8)
2: eth0: <BROADCAST,MULTICAST,UP,LOWER_UP> mtu 1500 qdisc mq state UP group default qlen 1000
    link/ether 00:0c:29:d5:22:da brd ff:ff:ff:ff:ff:ff
    altname enp3s0
    altname ens160
    inet 192.168.0.10/24 brd 192.168.0.255 scope global noprefixroute eth0
       valid_lft forever preferred_lft forever
    inet6 fe80::4deb:3eed:cdbf:2fc8/64 scope link tentative noprefixroute
       valid_lft forever preferred_lft forever
RS1

#设定访问业务真实数据
[root@RS1 yxs]# nmcli connection modify eth0 ipv4.gateway 192.168.0.100
[root@RS1 yxs]#  nmcli connection reload
[root@RS1 yxs]#  nmcli connection up eth0
连接已成功激活(D-Bus 活动路径:/org/freedesktop/NetworkManager/ActiveConnection/9)
[root@RS1 yxs]# route  -n
Kernel IP routing table
Destination     Gateway         Genmask         Flags Metric Ref    Use Iface
0.0.0.0         192.168.0.100   0.0.0.0         UG    100    0        0 eth0
192.168.0.0     0.0.0.0         255.255.255.0   U     100    0        0 eth0
[root@RS1 yxs]# dnf install httpd -y
[root@RS1 yxs]# systemctl enable --now httpd
Created symlink /etc/systemd/system/multi-user.target.wants/httpd.service → /usr/lib/systemd/system/httpd.service.
[root@RS1 yxs]# echo RS1 - 192.168.0.10 > /var/www/html/index.html
RS2配置
[root@RS2 yxs]# vmset.sh eth0 192.168.0.20 RS2 noroute
连接已成功激活(D-Bus 活动路径:/org/freedesktop/NetworkManager/ActiveConnection/8)
2: eth0: <BROADCAST,MULTICAST,UP,LOWER_UP> mtu 1500 qdisc mq state UP group default qlen 1000
    link/ether 00:0c:29:3a:be:ad brd ff:ff:ff:ff:ff:ff
    altname enp3s0
    altname ens160
    inet 192.168.0.20/24 brd 192.168.0.255 scope global noprefixroute eth0
       valid_lft forever preferred_lft forever
    inet6 fe80::ce51:18e8:3ae6:e47e/64 scope link tentative noprefixroute
       valid_lft forever preferred_lft forever
RS2
[root@RS2 yxs]# nmcli connection modify eth0 ipv4.gateway 192.168.0.100
[root@RS2 yxs]# nmcli connection reload
[root@RS2 yxs]# nmcli connection up eth0
连接已成功激活(D-Bus 活动路径:/org/freedesktop/NetworkManager/ActiveConnection/9)
[root@RS2 yxs]#  route  -n
Kernel IP routing table
Destination     Gateway         Genmask         Flags Metric Ref    Use Iface
0.0.0.0         192.168.0.100   0.0.0.0         UG    100    0        0 eth0
192.168.0.0     0.0.0.0         255.255.255.0   U     100    0        0 eth0

#设定访问业务真实数据
[root@RS2 yxs]# dnf install httpd -y
[root@RS2 yxs]# systemctl enable --now httpd
Created symlink /etc/systemd/system/multi-user.target.wants/httpd.service → /usr/lib/systemd/system/httpd.service.
[root@RS2 yxs]# echo RS2 - 192.168.0.20 > /var/www/html/index.html
在vs主机中测试环境
[yxs@vsnode ~]$ curl  192.168.0.10
RS1 - 192.168.0.10
[yxs@vsnode ~]$ curl  192.168.0.20
RS2 - 192.168.0.20
NAT模式实现
vs设置
#1,开启内核路由功能
[root@vsnode ~]# echo net.ipv4.ip_forward=1 >> /etc/sysctl.conf
[root@vsnode ~]# sysctl  -p
net.ipv4.ip_forward = 1

#2.编写策略
[root@vsnode ~]# ipvsadm -C
[root@vsnode ~]# ipvsadm -A -t 172.25.254.100:80 -s wrr
[root@vsnode ~]# ipvsadm -a -t 172.25.254.100:80 -r 192.168.0.10:80 -m  -w 1
[root@vsnode ~]# ipvsadm -a -t 172.25.254.100:80 -r 192.168.0.20:80 -m  -w 1
[root@vsnode ~]# ipvsadm -Ln
IP Virtual Server version 1.2.1 (size=4096)
Prot LocalAddress:Port Scheduler Flags
  -> RemoteAddress:Port           Forward Weight ActiveConn InActConn
TCP  172.25.254.100:80 wrr
  -> 192.168.0.10:80              Masq    1      0          0
  -> 192.168.0.20:80              Masq    1      0          0

#3.测试
[root@vsnode ~]# for i in {1..10};do curl 172.25.254.100;done
RS2 - 192.168.0.20
RS1 - 192.168.0.10
RS2 - 192.168.0.20
RS1 - 192.168.0.10
RS2 - 192.168.0.20
RS1 - 192.168.0.10
RS2 - 192.168.0.20
RS1 - 192.168.0.10
RS2 - 192.168.0.20
RS1 - 192.168.0.10

#更改权重
[root@vsnode ~]# ipvsadm -e -t 172.25.254.100:80 -r 192.168.0.10:80 -m  -w 2
[root@vsnode ~]# ipvsadm -Ln
IP Virtual Server version 1.2.1 (size=4096)
Prot LocalAddress:Port Scheduler Flags
  -> RemoteAddress:Port           Forward Weight ActiveConn InActConn
TCP  172.25.254.100:80 wrr
  -> 192.168.0.10:80              Masq    2      0          5
  -> 192.168.0.20:80              Masq    1      0          5
[root@vsnode ~]# for i in {1..10};do curl 172.25.254.100;done
RS2 - 192.168.0.20
RS1 - 192.168.0.10
RS1 - 192.168.0.10
RS2 - 192.168.0.20
RS1 - 192.168.0.10
RS1 - 192.168.0.10
RS2 - 192.168.0.20
RS1 - 192.168.0.10
RS1 - 192.168.0.10
RS2 - 192.168.0.20
规则持久化
实验过程可以用过打开另外一个shell的并执行监控命令的方式进行观察
[root@vsnode ~]# watch -n 1 ipvsadm -Ln
#利用自定义文件进行持久化
[root@vsnode ~]# ipvsadm-save -n
-A -t 172.25.254.100:80 -s wrr
-a -t 172.25.254.100:80 -r 192.168.0.10:80 -m -w 2
-a -t 172.25.254.100:80 -r 192.168.0.20:80 -m -w 1
[root@vsnode ~]# ipvsadm-save -n > /mnt/ipvs.rule

Every 1.0s: ipvsadm -Ln                                  vsnode: Sat Feb  7 14:30:07 2026

IP Virtual Server version 1.2.1 (size=4096)
Prot LocalAddress:Port Scheduler Flags
  -> RemoteAddress:Port           Forward Weight ActiveConn InActConn
TCP  172.25.254.100:80 wrr
  -> 192.168.0.10:80              Masq    2      0          0
  -> 192.168.0.20:80              Masq    1      0          0


[root@vsnode ~]# ipvsadm -C
Every 1.0s: ipvsadm -Ln                                  vsnode: Sat Feb  7 14:31:25 2026

IP Virtual Server version 1.2.1 (size=4096)
Prot LocalAddress:Port Scheduler Flags
  -> RemoteAddress:Port           Forward Weight ActiveConn InActConn


[root@vsnode ~]# ipvsadm-restore < /mnt/ipvs.rule

Every 1.0s: ipvsadm -Ln                                  vsnode: Sat Feb  7 14:32:05 2026

IP Virtual Server version 1.2.1 (size=4096)
Prot LocalAddress:Port Scheduler Flags
  -> RemoteAddress:Port           Forward Weight ActiveConn InActConn
TCP  172.25.254.100:80 wrr
  -> 192.168.0.10:80              Masq    2      0          0
  -> 192.168.0.20:80              Masq    1      0          0


#利用守护进程进行规则持久化
[root@vsnode ~]# ipvsadm-save -n > /etc/sysconfig/ipvsadm
[root@vsnode ~]# ipvsadm -C
[root@vsnode ~]# systemctl enable --now ipvsadm.service
Created symlink /etc/systemd/system/multi-user.target.wants/ipvsadm.service → /usr/lib/systemd/system/ipvsadm.service.

Every 1.0s: ipvsadm -Ln                                  vsnode: Sat Feb  7 14:33:01 2026

IP Virtual Server version 1.2.1 (size=4096)
Prot LocalAddress:Port Scheduler Flags
  -> RemoteAddress:Port           Forward Weight ActiveConn InActConn
TCP  172.25.254.100:80 wrr
  -> 192.168.0.10:80              Masq    2      0          0
  -> 192.168.0.20:80              Masq    1      0          0
更多推荐


 0
0 0
0- 0


 已为社区贡献40条内容

所有评论(0)