
老攻城狮的AI开发环境搭建全记录:从零到跑通本地大模型(一日速通版)
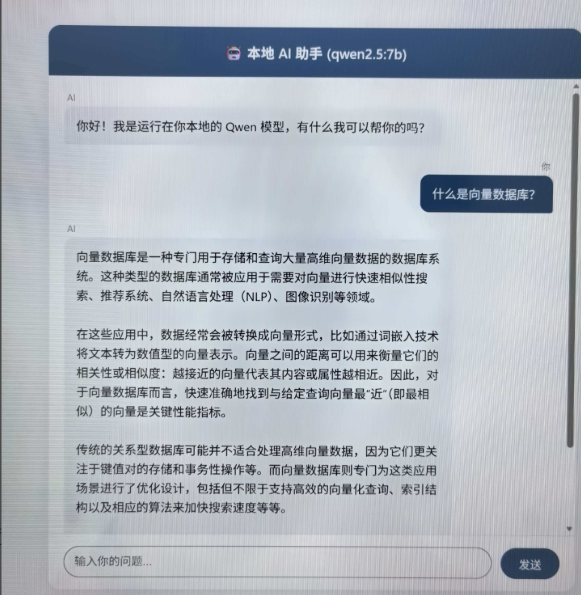
一台Windows笔记本,没有独显,没有云服务,从拆封新机到跑通本地AI聊天应用,用了我整整一天。
本文记录了我作为传统制造企业IT老兵,如何用一台自购设备完成AI开发环境“从零到一”的全过程。作者:Javy21(javy21@csdn)
时间:2026年6月21日
环境:华为MateBook 16S / Windows 11 家庭版 / WSL2 Ubuntu 22.04
一、写在前面
我是做传统企业信息化出身,最熟悉的是MySQL、GaussDB和Java/Python。AI浪潮来了,不想只当看客。手头没有GPU、没有云服务预算,咬牙自费买了一台华为MateBook 16S(i7-250H + 32GB内存 + 1TB硬盘)。
一天时间,从拆封新机到跑通AI聊天应用。本文就是这一天的完整记录。
效果图:
二、环境概览
| 项目 | 配置 |
|---|---|
| 笔记本 | 华为MateBook 16S (2025款) |
| CPU | Intel Core 7 250H,14核20线程 |
| 内存 | 32GB DDR5 |
| 硬盘 | 1TB NVMe SSD |
| 显卡 | Intel集成显卡(无独显) |
| 操作系统 | Windows 11 家庭版 (Build 26200) |
| Windows用户名 | javy21 |
| 目标模型 | Qwen2.5:7B (量化版,约4.7GB) |
核心思路:WSL2 + CPU推理 + 内存替代显存。32GB内存 + 现代CPU跑7B量化模型,推理速度约5-8 token/秒,学习场景完全够用。
三、部署全流程
第一阶段:系统准备与WSL2安装
3.1 关于VBS(基于虚拟化的安全性)
Windows 11默认开启VBS安全机制,会消耗约10-20%的CPU性能。我的决策:暂不关闭。当前阶段跑7B模型性能足够,安全是底线。等真正遇到性能瓶颈再考虑关闭。
powershell
# 查看VBS状态(Windows PowerShell管理员模式)
systeminfo | findstr "虚拟化"
# 如果显示"正在运行"——正常,不用管
3.2 开启WSL2
以管理员身份打开PowerShell,依次执行:
powershell
# 开启Windows功能
dism.exe /online /enable-feature /featurename:Microsoft-Windows-Subsystem-Linux /all /norestart
dism.exe /online /enable-feature /featurename:VirtualMachinePlatform /all /norestart

# 重启电脑后,设置WSL2为默认版本
wsl --set-default-version 2
注意:如果
wsl --set-default-version 2提示未安装WSL,直接跳过,下一步安装Ubuntu时会自动补全。
3.3 安装Ubuntu 22.04
powershell
# 安装Ubuntu 22.04 LTS(指定版本,避免不确定性)
wsl --install -d Ubuntu-22.04
首次启动设置用户名和密码,务必记住。
安装后第一步:更换APT国内镜像源(清华源,速度提升10倍以上)
bash
# 进入WSL后执行
# 备份原始源
sudo cp /etc/apt/sources.list /etc/apt/sources.list.backup

# 替换为清华源(Ubuntu 22.04适用)
sudo sed -i 's|archive.ubuntu.com|mirrors.tuna.tsinghua.edu.cn|g' /etc/apt/sources.list
sudo apt update && sudo apt upgrade -y
3.4 配置WSL资源限制
在Windows中创建 C:\Users\javy21\.wslconfig(注意:javy21是你的Windows用户名):
ini
[wsl2]
memory=16GB        # 限制WSL最多用16GB,留16GB给Windows
processors=12      # 留2个核心给Windows系统
swap=8GB           # 交换分区,防止内存溢出
localhostForwarding=true
保存后执行 wsl --shutdown 重启WSL生效。
3.5 创建系统备份(安全兜底)
每完成一个阶段立即备份,这是最重要的习惯。
powershell
# 查看发行版确切名称
wsl -l -v

# 导出Ubuntu纯净版备份(发行版名称以实际为准)
wsl --export Ubuntu-22.04 D:\WSL_Backup\Ubuntu_Base.tar
第二阶段:Python环境与开发工具

4.1 安装Windows端Python(供IDE使用)
-
选择版本:Python 3.12.10(Windows installer 64-bit)
-
关键:安装时务必勾选 "Add Python to PATH"
⚠️ 避坑:AI生态(LangChain、Chroma、Transformers)最高稳定支持到Python 3.12。不要装3.14测试版,大量库不兼容。
4.2 安装PyCharm Community Edition
-
选择Community版(免费)
-
安装时勾选:
Add "bin" folder to PATH和Add launchers dir to the PATH
版本说明:Community版不支持WSL远程解释器。如果遇到此限制,可改用VSCode + Remote-WSL插件,体验同样优秀。
4.3 WSL中安装Python环境
bash
# 进入WSL
sudo apt install -y python3 python3-pip python3-venv python-is-python3

# 验证
python --version  # 应显示Python 3.10.x
说明:Ubuntu 22.04默认Python 3.10,这是发行版的稳定策略,不影响AI库使用。
4.4 创建项目虚拟环境
bash
cd ~
mkdir ai_project && cd ai_project
python -m venv venv
source venv/bin/activate
每次开发前记得激活:source ~/ai_project/venv/bin/activate
第三阶段:Ollama部署
5.1 架构决策:Ollama装在哪里?
| 方案 | 优点 | 缺点 |
|---|---|---|
| Ollama on Windows | 安装简单,系统托盘管理方便 | 需配置防火墙,WSL访问需跨IP |
| Ollama on WSL(推荐) | localhost直接访问,无需额外配置 | 需手动管理服务进程 |
推荐直接装在WSL中(本次实践采用此方案):
bash
# 在WSL中安装Ollama
curl -fsSL https://ollama.com/install.sh | sh

# 设置模型存储路径(建议放在WSL内部或挂载的D盘)
export OLLAMA_MODELS=/home/javy21/ai_models/ollama

# 启动服务(后台运行)
ollama serve &
这样后续所有代码直接用 http://localhost:11434 访问,无需配置防火墙、无需动态探测IP。
5.2 下载并测试模型
bash
# 拉取Qwen2.5:7B模型(约4.7GB)
ollama run qwen2.5:7b

# 测试对话
>>> 你好,请介绍一下你自己
# 等待回复,输入/bye退出
第四阶段:Python依赖安装
在WSL虚拟环境中安装:
bash
source ~/ai_project/venv/bin/activate

# 用清华源加速(默认国外源极慢)
pip install flask requests -i https://pypi.tuna.tsinghua.edu.cn/simple --trusted-host pypi.tuna.tsinghua.edu.cn

# 永久配置PyPI镜像源
pip config set global.index-url https://pypi.tuna.tsinghua.edu.cn/simple
第五阶段:PyCharm集成WSL解释器
-
PyCharm → File → Settings → Project → Python Interpreter
-
点击齿轮 → Add → WSL
-
Distribution:
Ubuntu-22.04 -
Interpreter path:
/home/javy21/ai_project/venv/bin/python
终端配置(可选):Settings → Tools → Terminal → Shell path: wsl.exe
第六阶段:Flask Web应用开发
6.1 项目结构
text
~/ai_project/web_chat/
├── app.py              # Flask主程序
├── templates/
│   └── index.html      # 前端页面
└── venv/               # 共享虚拟环境
6.2 核心代码(带完整注解)
app.py —— Flask后端主程序
python
#!/usr/bin/env python3
# -*- coding: utf-8 -*-
"""
AI聊天应用 - Flask后端服务
功能:接收前端用户输入,调用本地Ollama模型生成回复
作者:Javy21
环境:WSL2 Ubuntu 22.04 + Python 3.10
"""

import socket
import re
import requests
from flask import Flask, render_template, request, jsonify

# 创建Flask应用实例
app = Flask(__name__)


def get_ollama_host():
    """
    自动探测可用的Ollama服务地址
    优先级:localhost > /etc/resolv.conf中的nameserver > 固定IP后备
    返回:可用的Ollama服务IP地址
    """
    # 1. 优先尝试localhost(Ollama装在WSL内部时直接可用)
    for host in ['localhost', '127.0.0.1']:
        try:
            sock = socket.socket(socket.AF_INET, socket.SOCK_STREAM)
            sock.settimeout(1)
            if sock.connect_ex((host, 11434)) == 0:
                sock.close()
                return host
            sock.close()
        except Exception:
            pass

    # 2. 从/etc/resolv.conf获取网关IP(WSL访问Windows宿主机场景)
    try:
        with open('/etc/resolv.conf', 'r') as f:
            content = f.read()
            # 匹配nameserver行,提取IP地址
            ips = re.findall(r'nameserver\s+([\d.]+)', content)
            for ip in ips:
                sock = socket.socket(socket.AF_INET, socket.SOCK_STREAM)
                sock.settimeout(1)
                if sock.connect_ex((ip, 11434)) == 0:
                    sock.close()
                    return ip
                sock.close()
    except Exception:
        pass

    # 3. 后备方案:固定IP(根据实际网络环境修改)
    return '192.168.1.28'


# 构建Ollama API地址,启动时打印便于调试
OLLAMA_URL = f'http://{get_ollama_host()}:11434/api/generate'
print(f'✅ Ollama服务地址: {OLLAMA_URL}')


@app.route('/')
def index():
    """渲染主页面"""
    return render_template('index.html')


@app.route('/chat', methods=['POST'])
def chat():
    """
    处理用户消息,调用Ollama模型生成回复
    请求体JSON格式:{"message": "用户输入内容"}
    返回JSON格式:{"reply": "模型回复内容"} 或 {"error": "错误信息"}
    """
    # 解析请求数据
    data = request.get_json()
    if not data:
        return jsonify({'error': '无效的请求数据'}), 400

    prompt = data.get('message', '').strip()
    if not prompt:
        return jsonify({'error': '请输入内容'}), 400

    # 构造Ollama API请求体
    payload = {
        'model': 'qwen2.5:7b',   # 使用的模型名称
        'prompt': prompt,         # 用户输入
        'stream': False           # 非流式输出,一次性返回完整结果
    }

    try:
        # 调用Ollama API,超时设为120秒(模型推理可能需要较长时间)
        resp = requests.post(OLLAMA_URL, json=payload, timeout=120)
        resp.raise_for_status()   # 非200状态码抛出异常

        result = resp.json()
        reply = result.get('response', '(模型未返回内容)')
        return jsonify({'reply': reply})

    except requests.exceptions.Timeout:
        return jsonify({'error': '模型推理超时,请稍后重试'}), 500
    except requests.exceptions.ConnectionError:
        return jsonify({'error': '无法连接到Ollama服务,请检查服务是否运行'}), 500
    except Exception as e:
        return jsonify({'error': f'服务器内部错误: {str(e)}'}), 500


if __name__ == '__main__':
    # 启动Flask服务
    # host='0.0.0.0' 监听所有网络接口,允许局域网内其他设备访问
    # port=5000 默认端口
    # debug=True 开发模式,代码修改后自动重启
    app.run(host='0.0.0.0', port=5000, debug=True)
templates/index.html —— 前端页面
html
<!DOCTYPE html>
<html lang="zh-CN">
<head>
    <meta charset="UTF-8">
    <meta name="viewport" content="width=device-width, initial-scale=1.0">
    <title>本地AI聊天</title>
    <style>
        /* ---------- 全局重置与布局 ---------- */
        * { margin: 0; padding: 0; box-sizing: border-box; }
        body {
            font-family: 'Segoe UI', sans-serif;
            background: #f0f2f5;
            height: 100vh;
            display: flex;
            justify-content: center;
            align-items: center;
        }
        .chat-container {
            width: 100%;
            max-width: 700px;
            height: 90vh;
            background: white;
            border-radius: 16px;
            box-shadow: 0 4px 20px rgba(0,0,0,0.1);
            display: flex;
            flex-direction: column;
            overflow: hidden;
        }

        /* ---------- 头部 ---------- */
        .chat-header {
            padding: 20px;
            background: #2d5a88;
            color: white;
            text-align: center;
            font-size: 18px;
            font-weight: 600;
        }

        /* ---------- 消息区域 ---------- */
        .chat-messages {
            flex: 1;
            padding: 20px;
            overflow-y: auto;
            background: #fafafa;
        }
        .message {
            margin-bottom: 16px;
            display: flex;
            flex-direction: column;
        }
        .message.user { align-items: flex-end; }
        .message.assistant { align-items: flex-start; }

        .message .bubble {
            max-width: 80%;
            padding: 12px 16px;
            border-radius: 12px;
            word-wrap: break-word;
            line-height: 1.6;
        }
        .message.user .bubble {
            background: #2d5a88;
            color: white;
            border-bottom-right-radius: 4px;
        }
        .message.assistant .bubble {
            background: #e9ecef;
            color: #1e1e1e;
            border-bottom-left-radius: 4px;
        }
        .message .label {
            font-size: 12px;
            color: #888;
            margin-bottom: 4px;
            padding: 0 4px;
        }

        /* ---------- 加载状态 ---------- */
        .loading {
            color: #888;
            font-style: italic;
            padding: 8px 16px;
            background: #f0f0f0;
            border-radius: 12px;
            display: inline-block;
        }
        .error {
            color: #d9534f;
            background: #f8d7da;
            padding: 8px 16px;
            border-radius: 12px;
        }

        /* ---------- 输入区域 ---------- */
        .chat-input-area {
            display: flex;
            padding: 16px 20px;
            border-top: 1px solid #ddd;
            background: white;
        }
        .chat-input-area input {
            flex: 1;
            padding: 10px 14px;
            border: 1px solid #ccc;
            border-radius: 24px;
            outline: none;
            font-size: 15px;
        }
        .chat-input-area input:focus {
            border-color: #2d5a88;
        }
        .chat-input-area button {
            margin-left: 12px;
            padding: 10px 24px;
            background: #2d5a88;
            color: white;
            border: none;
            border-radius: 24px;
            font-size: 15px;
            cursor: pointer;
            transition: background 0.2s;
        }
        .chat-input-area button:hover { background: #1f4569; }
        .chat-input-area button:disabled {
            background: #a0b8d0;
            cursor: not-allowed;
        }
    </style>
</head>
<body>
    <div class="chat-container">
        <!-- 头部 -->
        <div class="chat-header">🤖 本地 AI 助手 (Qwen2.5:7B)</div>

        <!-- 消息列表 -->
        <div class="chat-messages" id="messages">
            <div class="message assistant">
                <span class="label">AI</span>
                <div class="bubble">你好!我是运行在你本地的 Qwen 模型,有什么我可以帮你的吗?</div>
            </div>
        </div>

        <!-- 输入区域 -->
        <div class="chat-input-area">
            <input type="text" id="userInput" placeholder="输入你的问题..." />
            <button id="sendBtn">发送</button>
        </div>
    </div>

    <script>
        (function() {
            'use strict';

            // DOM元素引用
            const messagesDiv = document.getElementById('messages');
            const userInput = document.getElementById('userInput');
            const sendBtn = document.getElementById('sendBtn');

            /**
             * 添加一条消息到聊天区
             * @param {string} role - 'user' 或 'assistant'
             * @param {string} content - 消息内容
             */
            function addMessage(role, content) {
                const div = document.createElement('div');
                div.className = `message ${role}`;

                const label = document.createElement('div');
                label.className = 'label';
                label.textContent = role === 'user' ? '你' : 'AI';

                const bubble = document.createElement('div');
                bubble.className = 'bubble';
                // 支持换行显示
                bubble.innerHTML = content.replace(/\n/g, '<br>');

                div.appendChild(label);
                div.appendChild(bubble);
                messagesDiv.appendChild(div);
                messagesDiv.scrollTop = messagesDiv.scrollHeight;
            }

            /**
             * 显示/隐藏"思考中..."加载状态
             */
            function showLoading() {
                const div = document.createElement('div');
                div.className = 'message assistant';
                div.id = 'loadingMsg';

                const label = document.createElement('div');
                label.className = 'label';
                label.textContent = 'AI';

                const bubble = document.createElement('div');
                bubble.className = 'bubble loading';
                bubble.textContent = '思考中...';

                div.appendChild(label);
                div.appendChild(bubble);
                messagesDiv.appendChild(div);
                messagesDiv.scrollTop = messagesDiv.scrollHeight;
            }

            function removeLoading() {
                const loading = document.getElementById('loadingMsg');
                if (loading) loading.remove();
            }

            /**
             * 发送用户消息到后端
             */
            async function sendMessage() {
                const text = userInput.value.trim();
                if (!text) return;

                // 显示用户消息
                addMessage('user', text);
                userInput.value = '';
                sendBtn.disabled = true;
                userInput.disabled = true;

                // 显示加载状态
                showLoading();

                try {
                    const response = await fetch('/chat', {
                        method: 'POST',
                        headers: { 'Content-Type': 'application/json' },
                        body: JSON.stringify({ message: text })
                    });

                    const data = await response.json();
                    removeLoading();

                    if (response.ok) {
                        addMessage('assistant', data.reply);
                    } else {
                        addMessage('assistant', `❌ 错误: ${data.error || '未知错误'}`);
                    }
                } catch (err) {
                    removeLoading();
                    addMessage('assistant', `❌ 网络错误: ${err.message}`);
                } finally {
                    sendBtn.disabled = false;
                    userInput.disabled = false;
                    userInput.focus();
                }
            }

            // ---------- 事件绑定 ----------
            sendBtn.addEventListener('click', sendMessage);
            userInput.addEventListener('keydown', function(e) {
                if (e.key === 'Enter') {
                    sendMessage();
                }
            });

        })();
    </script>
</body>
</html>
6.3 运行与验证
bash
cd ~/ai_project/web_chat
source ../venv/bin/activate
python app.py
浏览器访问 http://localhost(或WSL的IP地址):5000,输入问题即可对话。
四、踩坑记录与解决方案
| 问题 | 现象 | 原因 | 解决方案 |
|---|---|---|---|
| 备份失败 | WSL_E_DISTRO_NOT_FOUND | 发行版名称不匹配 | wsl -l -v查看确切名称后重试 |
| pip安装超慢 | 几KB/s甚至断连 | 默认PyPI源在国外 | 换清华源 -i https://pypi.tuna.tsinghua.edu.cn/simple |
| Ollama连接拒绝 | Connection refused | 默认只绑定127.0.0.1 | 设置OLLAMA_HOST=0.0.0.0:11434(Windows方案)或直接装WSL内 |
| 防火墙拦截 | WSL中curl超时 | Windows防火墙拦截 | 添加入站规则允许TCP 11434,或改用WSL内部localhost |
| PyCharm无WSL选项 | Community版不支持 | 版本限制 | 改用VSCode + Remote-WSL,或升级Professional |
五、不足与改进方向
| 不足 | 改进方向 |
|---|---|
| 未使用流式输出 | 用SSE或WebSocket实现打字机效果 |
| 无对话记忆 | 维护消息历史,实现多轮对话 |
| 无模型切换 | 前端增加下拉菜单选择不同模型 |
六、总结
一天时间,从零到跑通本地AI聊天应用。
这不是终点,而是起点。后续可以继续探索:
-
本地PDF知识库问答(RAG)
-
多模态图搜 + 图片描述
-
Agent工具调用
AI时代,最贵的不是显卡,而是行动力。从"知道"到"做到"的距离,只有一步——动手。
作者:Javy21(javy21@csdn)
原文链接:https://blog.csdn.net/javy21/article/details/xxxxxxx
代码仓库:https://github.com/javy21/ai-chat-demo本文采用 CC BY-NC 4.0 许可协议。欢迎转载,请注明出处。
更多推荐
 20
20 0
0- 0


 已为社区贡献13条内容

所有评论(0)