
Ubuntu系统网络与包管理&工业级容器运行时containerd
管理系统网络
netplan
介绍
Netplan是Canonical(Ubuntu系统的开发和维护组织)开发的实用程序,能在Linux系统上轻松配置网络。要配置网络接口,只需创建所需网络接口的YAML描述,然后Netplan将为所选的渲染器工具生成所有必需的配置。
可以在 /usr/share/doc/netplan/examples 中找到Netplan网络配置文件。Netplan当前支持以下后端渲染器,例如NetworkManager和Systemd-networkd。
netplan只是NetworkManager和Systemd-networkd前端工具。
[root@ubuntu  ~]# ls /usr/share/doc/netplan/examples
bonding_router.yaml               openvswitch.yaml
bonding.yaml                      route_metric.yaml
bridge_vlan.yaml                  source_routing.yaml
bridge.yaml                       sriov_vlan.yaml
dhcp_wired8021x.yaml              sriov.yaml
dhcp.yaml                         static_multiaddress.yaml
direct_connect_gateway_ipv6.yaml  static_singlenic_multiip_multigateway.yaml
direct_connect_gateway.yaml       static.yaml
ipv6_tunnel.yaml                  vlan.yaml
loopback_interface.yaml           windows_dhcp_server.yaml
modem.yaml                        wireguard.yaml
network_manager.yaml              wireless.yaml
offload.yaml                      wpa_enterprise.yaml
Netplan定义文件位于/etc/netplan目录,例如/etc/netplan/00-ens32.yaml。
示例
示例1:定义一个静态配置ip
root@ubuntu :/usr/share/doc/netplan/examples# cat static.yaml
network:
  ethernets:
    ens32:
      dhcp4: no
      addresses:
        - 10.1.8.88/24
      routes:
        - to: default
          via: 10.1.8.2
      nameservers:
        addresses:
          - 10.1.8.2
          - 223.5.5.5
  version: 2
示例2:定义一个动态获取ip
root@ubuntu :/usr/share/doc/netplan/examples# cat dhcp.yaml
network:
  version: 2
  renderer: networkd
  ethernets:
    enp3s0:
      dhcp4: true
命令
应用上面定义的配置文件:
[root@ubuntu  ~]# netplan apply

# 获取当前配置信息
[root@ubuntu  ~]# netplan get
network:
  version: 2
  ethernets:
    ens32:
      addresses:
      - "10.1.8.88/24"
      nameservers:
        addresses:
        - 10.1.8.2
        - 223.5.5.5
      dhcp4: false
      routes:
      - to: "default"
        via: "10.1.8.2"
配置主机名
[root@ubuntu  ~]# hostnamectl -h
hostnamectl [OPTIONS...] COMMAND ...

Query or change system hostname.

Commands:
  status                 Show current hostname settings
  hostname [NAME]        Get/set system hostname
  icon-name [NAME]       Get/set icon name for host
  chassis [NAME]         Get/set chassis type for host
  deployment [NAME]      Get/set deployment environment for host
  location [NAME]        Get/set location for host

Options:
  -h --help              Show this help
     --version           Show package version
     --no-ask-password   Do not prompt for password
  -H --host=[USER@]HOST  Operate on remote host
  -M --machine=CONTAINER Operate on local container
     --transient         Only set transient hostname
     --static            Only set static hostname
     --pretty            Only set pretty hostname
     --json=pretty|short|off
                         Generate JSON output

See the hostnamectl(1) man page for details.
名称解析
配置文件 /etc/nsswitch.conf 中 hosts 开头行 控制系统名称服务的查询顺序。
root@ubuntu:~# grep host /etc/nsswitch.conf
hosts:          files dns
files 和 dns 是 名称服务开关(NSS) 的核心模块,分别对应两种完全不同的域名解析方式,遵循先 files 后 dns的查询优先级。
files 模块
files 是 NSS 中用于读取本地静态配置文件的模块,核心对应 /etc/hosts 文件。
核心特点
-
优先级最高:只要
files模块能在/etc/hosts中找到匹配的域名→IP映射,就会直接返回结果,不会再执行后续的dns模块查询。 -
无网络依赖:解析过程完全在本地完成,不需要联网、不需要DNS服务器,速度极快。
-
手动配置:内容需要人工编辑
/etc/hosts,格式为IP地址 域名 [别名],例如:127.0.0.1 localhost 192.168.1.10 myserver.local # 自定义映射 -
适用场景:
- 本地测试(比如把
test.com映射到本机127.0.0.1); - 局域网内固定IP的设备(避免依赖DNS,提升访问速度);
- 屏蔽恶意域名(把广告/恶意域名映射到
0.0.0.0)。
- 本地测试(比如把
验证
假设 /etc/hosts 中添加了 1.2.3.4 example.com,执行 ping example.com 时,会直接访问 1.2.3.4,而非 example.com 的真实IP——这就是 files 模块优先生效的结果。
dns 模块
dns 是 NSS 中用于通过网络DNS服务器解析域名的模块,核心对接系统的 DNS 服务(systemd-resolved)。
核心特点
-
仅在
files未匹配时执行:只有/etc/hosts中找不到目标域名,才会触发dns模块的查询。 -
依赖网络和DNS服务器:需要联网,并向配置好的DNS服务器(链路级/全局/Fallback DNS)发送解析请求,等待返回结果。
-
动态获取:解析结果来自公共/私有DNS服务器,无需手动配置(除非自定义DNS),适配互联网域名解析。
-
对接系统DNS服务:
dns模块不会直接访问DNS服务器,而是调用系统的systemd-resolved服务(底层通过/run/systemd/resolve/stub-resolv.conf指向本地DNS缓存服务),流程是:应用请求解析 → NSS的dns模块 → systemd-resolved → 配置的DNS服务器 → 返回结果
验证
如果 /etc/hosts 中没有 baidu.com 的映射,执行 resolvectl query baidu.com 时,系统会通过配置的DNS服务器(如8.8.8.8)查询 baidu.com 的真实IP,这就是 dns 模块的作用。
files vs dns 对比
| 特性 | files 模块 | dns 模块 |
|---|---|---|
| 对应文件 | /etc/hosts(静态) | 依赖 systemd-resolved(动态) |
| 网络依赖 | 无 | 必须联网 |
| 解析速度 | 极快(本地读取) | 较慢(网络请求) |
| 适用域名 | 本地/局域网自定义域名 | 互联网公共域名 |
| 优先级 | 更高(先执行) | 更低(后执行) |
| 可维护性 | 手动编辑,适合少量映射 | 自动解析,适合大量域名systemd-resolved 解析dns顺序 |
systemd-resolved 服务
systemd-resolved 是 DNS 解析的核心服务,其内部的 DNS 查询顺序是分层级、有明确优先级。当 nsswitch.conf 触发 dns 模块后会执行这套逻辑。
systemd-resolved 的 DNS 核心顺序:本地缓存 → 链路级 DNS → 全局 DNS → Fallback DNS,层级越高优先级越高。
DNS 解析顺序
systemd-resolved 会严格按照以下优先级尝试解析域名,只要某一级返回有效结果,就立即终止查询:
1. 本地 DNS 缓存
- 作用:
systemd-resolved会缓存已解析过的域名结果(默认缓存时间遵循 DNS 服务器返回的 TTL),避免重复网络请求。 - 特点:查询速度最快,完全本地操作;
常用缓存操作命令:
- 清空缓存:
resolvectl flush-caches - 查看缓存内容:
resolvectl show-cache - 查看缓存统计信息:
resolvectl statistics
2. 链路级 DNS 服务器
-
来源:当前网卡通过 DHCP 自动获取、或通过 Netplan 手动配置的 DNS 服务器(网卡专属)。
-
优先级:高于全局 DNS,是
systemd-resolved最核心的 DNS 配置来源。 -
示例:若你的网卡
ens32通过 Netplan 配置了nameservers.addresses: [223.5.5.5, 223.6.6.6],则优先使用这两个 DNS。 -
查看方式:
root@ubuntu~ 16:31:12# resolvectl status ens33
Link 2 (ens33)
    Current Scopes: DNS
         Protocols: +DefaultRoute -LLMNR -mDNS -DNSOverTLS DNSSEC=no/unsupported
       DNS Servers: 223.5.5.5
3. 全局 DNS 服务器
-
来源:
/etc/systemd/resolved.conf中DNS=字段配置的全局 DNS(对所有网卡生效)。 -
触发条件:仅当链路级 DNS 无配置、或链路级 DNS 解析失败时,才会使用全局 DNS。
-
示例配置(
/etc/systemd/resolved.conf):[Resolve] DNS=223.5.5.5 223.6.6.6 # 阿里 DNS # FallbackDNS=1.1.1.1 # 备用DNS(下一级)
4. Fallback DNS 服务器
- 来源:
systemd-resolved内置的公共 DNS(若未手动配置FallbackDNS=,默认包含:208.67.222.222、208.67.220.220、8.8.8.8、8.8.4.4 等)。 - 触发条件:链路级和全局 DNS 均失效时,作为最后兜底方案。
5. DNSSEC 降级/失败处理(可选)
- 若启用了
DNSSEC(resolved.conf中DNSSEC=非no),解析失败时会根据配置尝试降级(如allow-downgrade),但不会改变上述核心顺序。
补充规则
同一层级(如链路级)配置多个 DNS 服务器时,systemd-resolved 会采用 轮询+故障重试 策略:
- 优先尝试第一个 DNS 服务器;
- 超时/失败则尝试第二个,以此类推;
- 标记故障 DNS 服务器,短时间内不再优先使用。
验证解析实操命令
1. 查看当前 DNS 配置层级
root@ubuntu~ 16:32:15# resolvectl status
# 输出中会区分「Link」(链路级)、「Global」(全局)DNS
示例:
Global
         Protocols: -LLMNR -mDNS -DNSOverTLS DNSSEC=no/unsupported
  resolv.conf mode: stub

Link 2 (ens32)
    Current Scopes: DNS
         Protocols: +DefaultRoute -LLMNR -mDNS -DNSOverTLS DNSSEC=no/unsupported
Current DNS Server: 10.1.8.2
       DNS Servers: 10.1.8.2 223.5.5.5
2. 跟踪使用了哪个级别 DNS
root@ubuntu~ 16:32:45# resolvectl query laoma.cloud
laoma.cloud: 8.159.134.206                     -- link: ens32

-- Information acquired via protocol DNS in 150.9ms.
-- Data is authenticated: no; Data was acquired via local or encrypted transport: no
-- Data from: network
补充
- Netplan 配置的 DNS 并不会直接「存储」在某个固定的文本文件里,而是通过 Netplan 应用后,传递给
systemd-networkd和systemd-resolved这两个核心服务,最终以运行时配置的形式存在(链路级 DNS 配置)。 /etc/resolv.conf是软链接(指向/run/systemd/resolve/stub-resolv.conf),由systemd-resolved自动生成,其中的nameserver固定为127.0.0.53(本地 DNS 缓存服务),不会直接显示 Netplan 配置的公网 DNS。
管理系统软件包
分析deb软件包
deb 包结构
deb文件包含两部分:
- DEBIAN 目录
- 软件安装文件(如etc, usr, opt, tmp等)。
DEBIAN目录中文件包括control,postinst(post installation)、postrm(post remove)、preinst(pre installation)、prerm(pre remove)、copyright (版权)、changlog (修订记录)、conffiles等。
-
control 文件:描述软件包的名称(Package),版本(Version),描述(Description)等,是deb包必须剧本的描述性文件,以便于软件的安装管理和索引。为了能将软件包进行充分的管理,可能还具有以下字段:
- Section:申明软件的类别,常见的有
utils,net,mail,text,x11等; - Priority:申明软件对于系统的重要程度,如
required’,standard’,optional’,extra’ 等; - Essential:申明是否是系统最基本的软件包(选项为yes/no),如果是的话,这就表明该软件是维持系统稳定和正常运行的软件包,不允许任何形式的卸载(除非进行强制性的卸载)
- Architecture:软件包结构,如基于
i386′, ‘amd64’,m68k’,sparc’,alpha’, `powerpc’ 等; - Source:软件包的源代码名称;
- Depends:软件所依赖的其他软件包和库文件。如果是依赖多个软件包和库文件,彼此之间采用逗号隔开;
- Pre-Depends:软件安装前必须安装、配置依赖性的软件包和库文件,它常常用于必须的预运行脚本需求;
- Recommends:这个字段表明推荐的安装的其他软件包和库文件;
- Suggests:建议安装的其他软件包和库文件。
示例:
Package: mysoftware Version: 2016-02-26 Section: free Priority: optional Depends: libssl.0.0.so, libstdc++2.10-glibc2.2 Suggests: Openssl Architecture: i386 Installed-Size: 66666 Maintainer: Simon @ newdivide7037#gmail.com Provides: mysoftware Description: just for test - Section:申明软件的类别,常见的有
-
preinst文件:软件在进行正常目录文件拷贝到系统前,所需要执行的配置工作。
-
postinst文件:软件在进行正常目录文件拷贝到系统后,所需要执行的配置工作。
-
prerm文件:软件卸载前需要执行的脚本。
-
postrm文件:软件卸载后需要执行的脚本。
dpkg-query
作用:查询系统中已安装包信息。
帮助信息
root@ubuntu~ 16:34:18# dpkg-query --help
Usage: dpkg-query [<option>...] <command>

Commands:
  -s, --status [<package>...]      Display package status details.
  -p, --print-avail [<package>...] Display available version details.
  -L, --listfiles <package>...     List files 'owned' by package(s).
  -l, --list [<pattern>...]        List packages concisely.
  -W, --show [<pattern>...]        Show information on package(s).
  -S, --search <pattern>...        Find package(s) owning file(s).
      --control-list <package>     Print the package control file list.
      --control-show <package> <file>
                                   Show the package control file.
  -c, --control-path <package> [<file>]
                                   Print path for package control file.

  -?, --help                       Show this help message.
      --version                    Show the version.
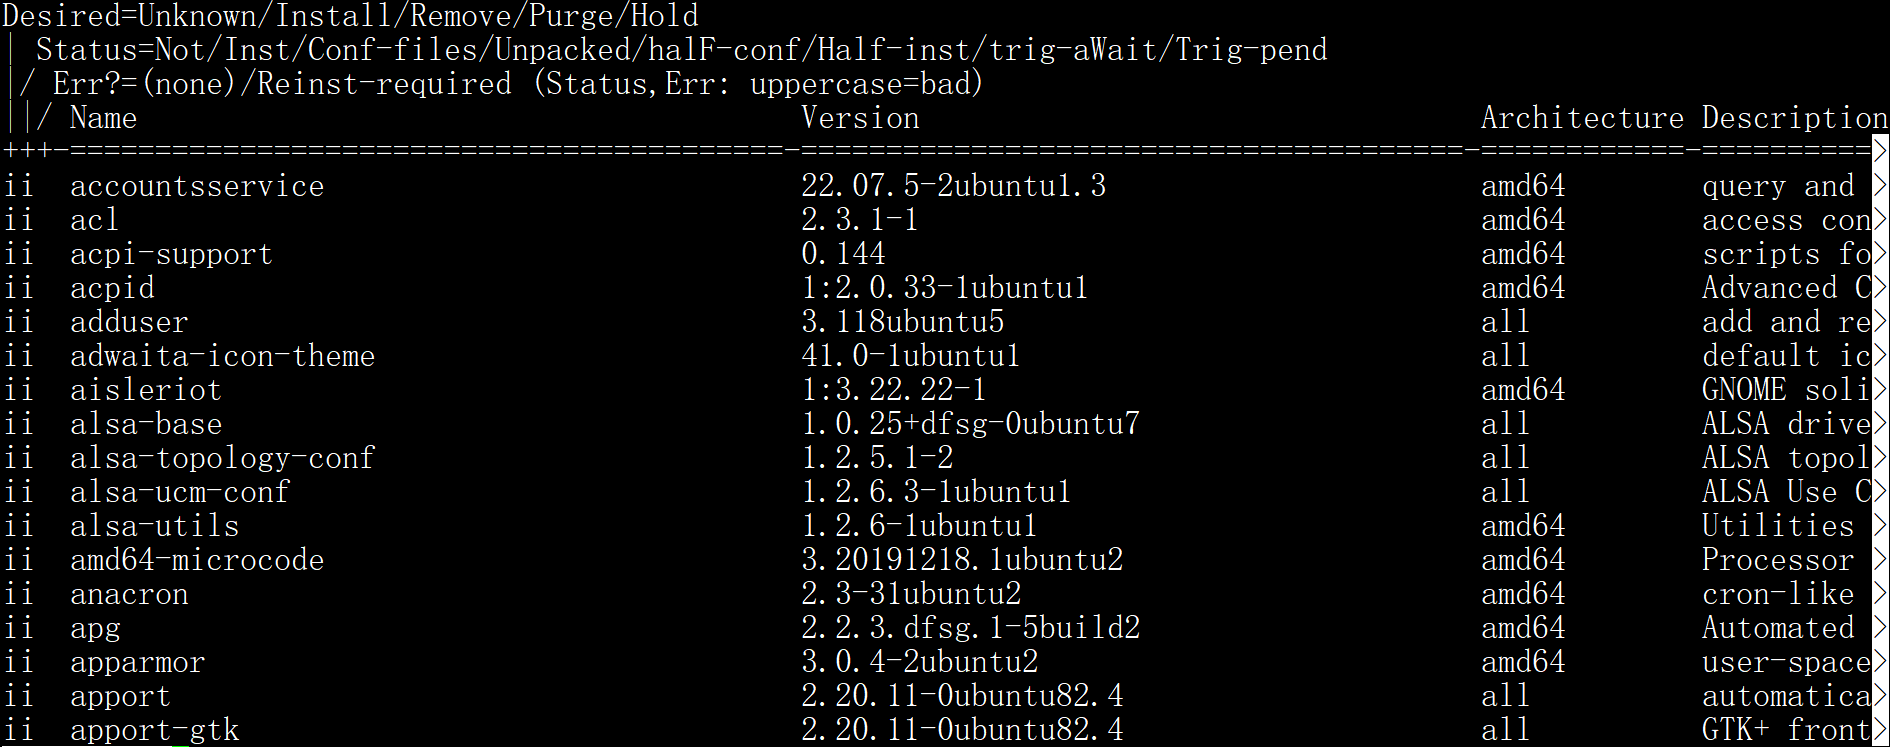
-l 查询系统中已安装软件包清单
root@ubuntu~ 16:34:32# dpkg-query -l
查看软件包是否安装
root@ubuntu~ 16:35:46# dpkg-query -l openssh-server

-s 查询系统中软件包状态
# 查询系统中所有安装软件包状态,状态信息存储在状态数据库
root@ubuntu~ 16:38:04# dpkg-query -s

# 查询系统中特定软件包状态
root@ubuntu~ 16:38:04# dpkg-query -s openssh-server
Package: openssh-server
Status: install ok installed
Priority: optional
Section: net
Installed-Size: 1501
Maintainer: Ubuntu Developers <ubuntu-devel-discuss@lists.ubuntu.com>
Architecture: amd64
Multi-Arch: foreign
Source: openssh
Version: 1:8.9p1-3ubuntu0.1
......
-p 查询系统中软件包详细信息
# 查询系统中安装软件包详细信息,详细信息存放在/var/lib/dpkg/available
# 部分软件包没有详细信息
root@ubuntu~ 16:39:04# dpkg-query -p

# 查询系统中特定软件包详细信息
root@ubuntu~ 16:39:04# dpkg-query -p adduser

......
-W 查询系统中已安装软件包版本
# 查询系统中所有安装软件包版本
root@ubuntu~ 16:40:06# dpkg-query -W

# 查询系统中特定软件包版本
root@ubuntu~ 16:40:06# dpkg-query -W openssh-server
openssh-server	1:8.9p1-3ubuntu0.1
-L 查看已安装软件包中文件清单
root@ubuntu~ 16:40:43# dpkg-query -L openssh-server
/.
/etc
/etc/default
/etc/default/ssh
/etc/init.d
......
-c 查看已安装软件包中控制文件
# 提供控制文件完整路径
root@ubuntu~ 16:42:08# dpkg-query -c openssh-server
/var/lib/dpkg/info/openssh-server.templates
/var/lib/dpkg/info/openssh-server.config
/var/lib/dpkg/info/openssh-server.md5sums
/var/lib/dpkg/info/openssh-server.preinst
/var/lib/dpkg/info/openssh-server.postinst
/var/lib/dpkg/info/openssh-server.postrm
/var/lib/dpkg/info/openssh-server.prerm

# 只提供控制文件名
root@ubuntu~ 16:42:36# dpkg-query --control-list openssh-server
templates
config
md5sums
preinst
postinst
postrm
prerm

# 查看控制文件内容,例如config
root@ubuntu~ 16:43:05# dpkg-query --control-show openssh-server config
#! /bin/sh
set -e

. /usr/share/debconf/confmodule
db_version 2.0
......
-S 查看系统中文件属于哪个软件包
root@ubuntu~ 16:44:28# dpkg-query -S 'bin/rz'
lrzsz: /usr/bin/rz
dpkg-deb
作用:分析deb文件信息。
帮助信息
root@ubuntu~ 16:44:44# dpkg-deb --help
Usage: dpkg-deb [<option>...] <command>

Commands:
  -b|--build <directory> [<deb>]   Build an archive.
  -c|--contents <deb>              List contents.
  -I|--info <deb> [<cfile>...]     Show info to stdout.
  -W|--show <deb>                  Show information on package(s)
  -f|--field <deb> [<cfield>...]   Show field(s) to stdout.
  -e|--control <deb> [<directory>] Extract control info.
  -x|--extract <deb> <directory>   Extract files.
  -X|--vextract <deb> <directory>  Extract & list files.
  -R|--raw-extract <deb> <directory>
                                   Extract control info and files.
  --ctrl-tarfile <deb>             Output control tarfile.
  --fsys-tarfile <deb>             Output filesystem tarfile.

  -?, --help                       Show this help message.
      --version                    Show the version.

<deb> is the filename of a Debian format archive.
<cfile> is the name of an administrative file component.
<cfield> is the name of a field in the main 'control' file.
-c 查看deb文件中文件清单
root@ubuntu~ 16:47:30# dpkg-deb -c openssh-server*deb
drwxr-xr-x root/root         0 2022-11-23 15:38 ./
drwxr-xr-x root/root         0 2022-11-23 15:38 ./etc/
drwxr-xr-x root/root         0 2022-11-23 15:38 ./etc/default/
-rw-r--r-- root/root       133 2022-11-15 11:31 ./etc/default/ssh
drwxr-xr-x root/root         0 2022-11-23 15:38 ./etc/init.d/
-rwxr-xr-x root/root      4060 2022-11-15 11:31 ./etc/init.d/ssh
......
-W 查看deb文件版本
root@ubuntu~ 16:48:08# dpkg-deb -W openssh-server_amd64.deb
openssh-server	1:8.9p1-3ubuntu0.1
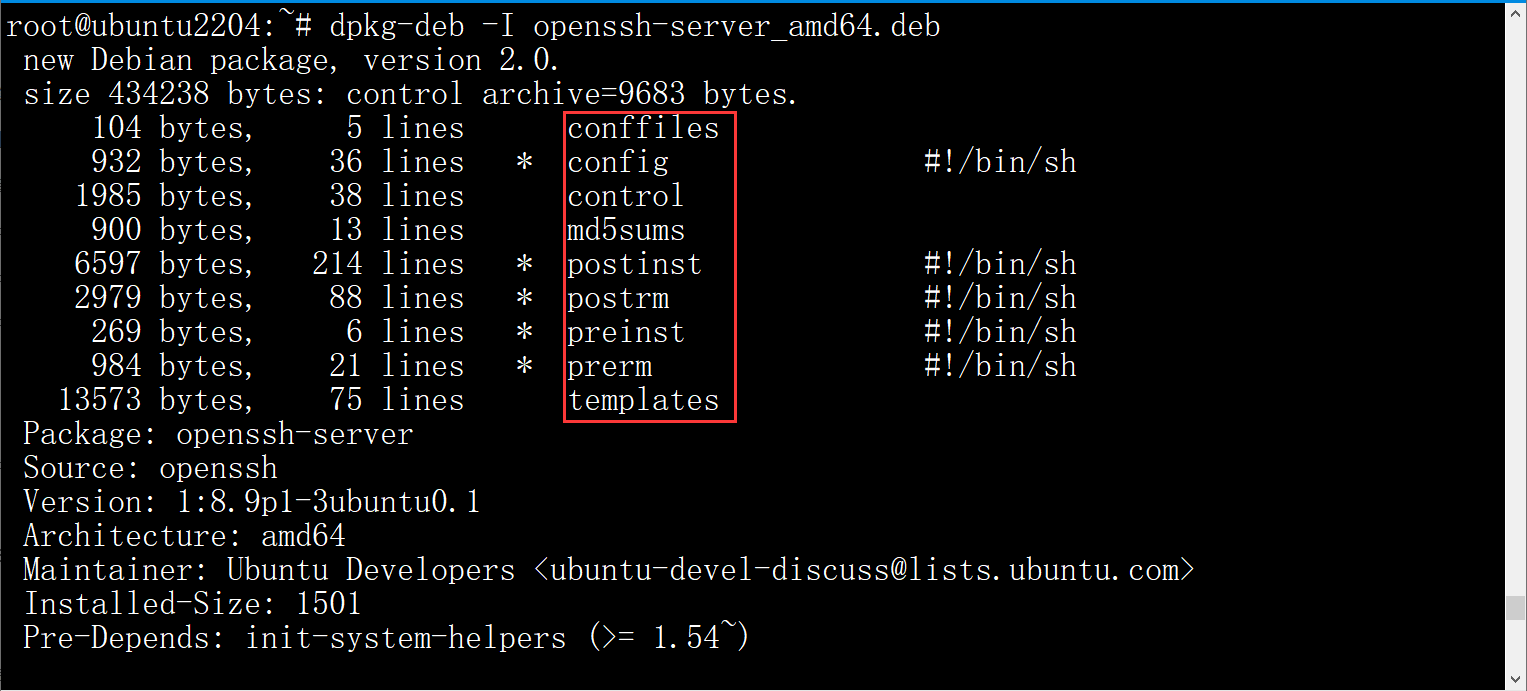
-I 查看deb文件中DEBIAN目录中元数据信息
DEBIAN目录中文件文件包括control、preinst、postinst、postrm、prerm、copyright、changlog、conffiles等。
# 显示deb文件中DEBIAN目录中文件清单信息,并显示control内容
root@ubuntu~ 16:49:11# dpkg-deb -I openssh-server_amd64.deb
 new Debian package, version 2.0.
 size 434238 bytes: control archive=9683 bytes.
     104 bytes,     5 lines      conffiles
     932 bytes,    36 lines   *  config               #!/bin/sh
    1985 bytes,    38 lines      control
     900 bytes,    13 lines      md5sums
    6597 bytes,   214 lines   *  postinst             #!/bin/sh
    2979 bytes,    88 lines   *  postrm               #!/bin/sh
     269 bytes,     6 lines   *  preinst              #!/bin/sh
     984 bytes,    21 lines   *  prerm                #!/bin/sh
   13573 bytes,    75 lines      templates
 Package: openssh-server
 Source: openssh
 Version: 1:8.9p1-3ubuntu0.1
 Architecture: amd64
 Maintainer: Ubuntu Developers <ubuntu-devel-discuss@lists.ubuntu.com>
.....
# 例如查看文件MD5值
root@ubuntu~ 16:49:11# dpkg-deb -I openssh-server_amd64.deb md5sums
8ec138e332aa1fbc3f081c17e81b62f9  lib/systemd/system/rescue-ssh.target
3841c38ccbff81c6bcab65bfd307c41c  lib/systemd/system/ssh.service
3f25171928b9546beb6a67bf51694eb3  lib/systemd/system/ssh.socket
bc5513f9fb433034b2986886e1af71df  lib/systemd/system/ssh@.service
4b50d38888a7c2093ea4928dca327287  usr/lib/openssh/ssh-session-cleanup
5899b256c7cff9db49c4555479b05b45  usr/sbin/sshd
f410eed89eecfb2bcf29440141a49d4f  usr/share/apport/package-hooks/openssh-server.py
77862d01cdeb1232790155687382fdad  usr/share/doc/openssh-client/examples/ssh-session-cleanup.service
b3cce9472de613cc6cb967aa63a7e28f  usr/share/man/man5/moduli.5.gz
d6f0d424d86f689708da000cfd8b9c0c  usr/share/man/man5/sshd_config.5.gz
ac7abad4e73226affab0c56e47cf8b68  usr/share/man/man8/sshd.8.gz
30e0fe758429c57d35a5e71dbd8dd2f8  usr/share/openssh/sshd_config
cb02155c6c0d5678ef2e827ebb983a3d  usr/share/openssh/sshd_config.md5sum
-f 查看deb文件control信息
root@ubuntu~ 16:49:38# dpkg-deb -f openssh-server_amd64.deb
Package: openssh-server
Source: openssh
Version: 1:8.9p1-3ubuntu0.1
Architecture: amd64
Maintainer: Ubuntu Developers <ubuntu-devel-discuss@lists.ubuntu.com>
Installed-Size: 1501
.....

# 显示control中特定属性信息
root@ubuntu~ 16:50:11# dpkg-deb -f openssh-server_amd64.deb Maintainer
Ubuntu Developers <ubuntu-devel-discuss@lists.ubuntu.com>
-e 提取deb文件中DEBIAN目录
root@ubuntu~ 16:51:04# dpkg-deb -e openssh-server_amd64.deb Maintainer

root@ubuntu~ 16:51:31# ls
DEBIAN  openssh-server_amd64.deb
root@ubuntu~ 16:51:46# ls DEBIAN
conffiles  config  control  md5sums  postinst  postrm  preinst  prerm  templates
-x 提取deb文件中软件安装文件
[root@ubuntu  ~]# dpkg-deb -x openssh-server_amd64.deb openssh-server
[root@ubuntu  ~]# ls openssh-server
etc  lib  usr
-X 提取并查看deb文件中软件安装文件
root@ubuntu~ 16:53:18# dpkg-deb -X openssh-server_amd64.deb ./openssh-server
./
./etc/
./etc/default/
./etc/default/ssh
./etc/init.d/
......
root@ubuntu~ 16:53:24# ls openssh-server
etc  lib  usr
-R 同时提取deb文件中DEBIAN目录和软件安装文件
root@ubuntu~ 16:53:53# dpkg-deb -R openssh-server_amd64.deb ./openssh-server
root@ubuntu~ 16:54:07# ls openssh-server
DEBIAN  etc  lib  usr
dpkg
作用:主要用于安装、卸载和验证deb文件,其他功能参考 dpkg-query 和 dpkg-deb 命令。
帮助信息
root@ubuntu~ 16:54:47# dpkg --help
Usage: dpkg [<option>...] <command>

Commands:
  -i|--install       <.deb file name>... | -R|--recursive <directory>...
  --unpack           <.deb file name>... | -R|--recursive <directory>...
  -A|--record-avail  <.deb file name>... | -R|--recursive <directory>...
  --configure        <package>... | -a|--pending
  --triggers-only    <package>... | -a|--pending
  -r|--remove        <package>... | -a|--pending
  -P|--purge         <package>... | -a|--pending
  -V|--verify [<package>...]       Verify the integrity of package(s).
  --get-selections [<pattern>...]  Get list of selections to stdout.
  --set-selections                 Set package selections from stdin.
  --clear-selections               Deselect every non-essential package.
  --update-avail [<Packages-file>] Replace available packages info.
  --merge-avail [<Packages-file>]  Merge with info from file.
  --clear-avail                    Erase existing available info.
  --forget-old-unavail             Forget uninstalled unavailable pkgs.

  -p|--print-avail [<package>...]  Display available version details.

  -C|--audit [<package>...]        Check for broken package(s).
  --yet-to-unpack                  Print packages selected for installation.
  --predep-package                 Print pre-dependencies to unpack.
  --add-architecture <arch>        Add <arch> to the list of architectures.
  --remove-architecture <arch>     Remove <arch> from the list of architectures.
  --print-architecture             Print dpkg architecture.
  --print-foreign-architectures    Print allowed foreign architectures.
  --assert-help                    Show help on assertions.
  --assert-<feature>               Assert support for the specified feature.
  --validate-<thing> <string>      Validate a <thing>'s <string>.
  --compare-versions <a> <op> <b>  Compare version numbers - see below.
  --force-help                     Show help on forcing.
  -Dh|--debug=help                 Show help on debugging.

  -?, --help                       Show this help message.
      --version                    Show the version.

Validatable things: pkgname, archname, trigname, version.

Use dpkg with -b, --build, -c, --contents, -e, --control, -I, --info,   -f, --field, -x, --extract, -X, --vextract, --ctrl-tarfile, --fsys-tarfile on archives (type dpkg-deb --help).

Options:
  --admindir=<directory>     Use <directory> instead of /var/lib/dpkg.
  --root=<directory>         Install on a different root directory.
  --instdir=<directory>      Change installation dir without changing admin dir.
  --pre-invoke=<command>     Set a pre-invoke hook.
  --post-invoke=<command>    Set a post-invoke hook.
  --path-exclude=<pattern>   Do not install paths which match a shell pattern.
  --path-include=<pattern>   Re-include a pattern after a previous exclusion.
  -O|--selected-only         Skip packages not selected for install/upgrade.
  -E|--skip-same-version     Skip packages whose same version is installed.
  -G|--refuse-downgrade      Skip packages with earlier version than installed.
  -B|--auto-deconfigure      Install even if it would break some other package.
  --[no-]triggers            Skip or force consequential trigger processing.
  --verify-format=<format>   Verify output format (supported: 'rpm').
  --no-pager                 Disables the use of any pager.
  --no-debsig                Do not try to verify package signatures.
  --no-act|--dry-run|--simulate
                             Just say what we would do - don't do it.
  -D|--debug=<octal>         Enable debugging (see -Dhelp or --debug=help).
  --status-fd <n>            Send status change updates to file descriptor <n>.
  --status-logger=<command>  Send status change updates to <command>'s stdin.
  --log=<filename>           Log status changes and actions to <filename>.
  --ignore-depends=<package>[,...]
                             Ignore dependencies involving <package>.
  --force-<thing>[,...]      Override problems (see --force-help).
  --no-force-<thing>[,...]   Stop when problems encountered.
  --refuse-<thing>[,...]     Ditto.
  --abort-after <n>          Abort after encountering <n> errors.
  --robot                    Use machine-readable output on some commands.

Comparison operators for --compare-versions are:
  lt le eq ne ge gt       (treat empty version as earlier than any version);
  lt-nl le-nl ge-nl gt-nl (treat empty version as later than any version);
  < << <= = >= >> >       (only for compatibility with control file syntax).

Use 'apt' or 'aptitude' for user-friendly package management.
等同 dpkg-query 命令的选项
  -s|--status [<package>...]       Display package status details.
  -p|--print-avail [<package>...]  Display available version details.
  -L|--listfiles <package>...      List files 'owned' by package(s).
  -l|--list [<pattern>...]         List packages concisely.
  -S|--search <pattern>...         Find package(s) owning file(s).
等同 dpkg-deb 命令的选项
Use dpkg with -b, --build, -c, --contents, -e, --control, -I, --info,
  -f, --field, -x, --extract, -X, --vextract, --ctrl-tarfile, --fsys-tarfile
on archives (type dpkg-deb --help).
自己特有的选项
  -i|--install       <.deb file name>... | -R|--recursive <directory>...
  --unpack           <.deb file name>... | -R|--recursive <directory>...
  -A|--record-avail  <.deb file name>... | -R|--recursive <directory>...
  --configure        <package>... | -a|--pending
  --triggers-only    <package>... | -a|--pending
  -r|--remove        <package>... | -a|--pending
  -P|--purge         <package>... | -a|--pending
  -V|--verify [<package>...]       Verify the integrity of package(s).
示例:
# 安装
root@ubuntu~ 16:54:54# dpkg -i dpkg -i lrzsz_0.12.21-10_amd64.deb
Selecting previously unselected package lrzsz.
(Reading database ... 201877 files and directories currently installed.)
Preparing to unpack lrzsz_0.12.21-10_amd64.deb ...
Unpacking lrzsz (0.12.21-10) ...
Setting up lrzsz (0.12.21-10) ...
Processing triggers for man-db (2.10.2-1) ...

# 验证
[root@ubuntu  ~]# mv /usr/share/man/man1/sz.1.gz .
[root@ubuntu  ~]# dpkg -V lrzsz
missing     /usr/share/man/man1/sz.1.gz
[root@ubuntu  ~]# mv sz.1.gz /usr/share/man/man1
[root@ubuntu  ~]# dpkg -V lrzsz

# 卸载
[root@ubuntu  ~]# dpkg -r lrzsz
(Reading database ... 201897 files and directories currently installed.)
Removing lrzsz (0.12.21-10) ...
Processing triggers for man-db (2.10.2-1) ...
无法解决有依赖的安装和卸载。
使用apt管理软件包
apt 和 其他apt命令的渊源
Debian是很多Linux发行版本的母版,比如Ubuntu,Linux Mint, elementary OS等。它有一个稳健的软件包系统,每一个组件和硬件程序构建成软件包,并安装到你的系统中。Debian使用一个名叫Advanced Packaging Tool (APT)的工具集,来管理这个软件包系统。
请注意:请不要将APT工具集与apt命令混淆,他们并不相同。
有很多工具可以与APT进行交互,允许你去安装、卸载和管理基于Linux发行版本的包。apt-get和apt-cache就是这样的命令行工具,且广泛使用。
引入apt命令集就是为了解决这个问题。apt由一些来自apt-get和apt-cache且广泛使用的特性组成,同时搁置了那些令人费解且少用的特性。它也能管理apt.conf文件。
使用apt,你不必在apt-get和apt-cache命令间来回切换。apt更加的结构化,给你提供必要选项,来管理软件包。
命令区别
虽然 apt 与 apt-get 有一些类似的命令选项,但它并不能完全向下兼容 apt-get 命令。也就是说,可以用 apt 替换部分 apt-get 系列命令,但不是全部。
| apt 命令 | 取代的命令 | 命令的功能 |
|---|---|---|
| apt install | apt-get install | 安装软件包 |
| apt remove | apt-get remove | 移除软件包 |
| apt purge | apt-get purge | 移除软件包及配置文件 |
| apt update | apt-get update | 刷新存储库索引 |
| apt upgrade | apt-get upgrade | 升级所有可升级的软件包 |
| apt autoremove | apt-get autoremove | 自动删除不需要的包 |
| apt full-upgrade | apt-get dist-upgrade | 在升级软件包时自动处理依赖关系 |
| apt search | apt-cache search | 搜索应用程序 |
| apt show | apt-cache show | 显示装细节 |
当然,apt 还有一些自己的命令:
| 新的apt命令 | 命令的功能 |
|---|---|
| apt list | 列出包含条件的包(已安装,可升级等) |
| apt edit-sources | 编辑源列表 |
我应该使用apt还是apt-get?
既然两个命令都有用,那么我该使用 apt 还是 apt-get 呢?作为一个常规 Linux 用户,系统极客建议大家尽快适应并开始首先使用 apt。不仅因为广大 Linux 发行商都在推荐 apt,更主要的还是它提供了 Linux 包管理的必要选项。
最重要的是,apt 命令选项更少更易记,因此也更易用,所以没理由继续坚持 apt-get。
apt
| apt 命令 | 等价旧命令 | 功能 |
|---|---|---|
apt install | apt-get install | 安装软件包 |
apt remove | apt-get remove | 移除软件包 |
apt purge | apt-get purge | 移除软件包及配置文件 |
apt update | apt-get update | 刷新仓库索引 |
apt upgrade | apt-get upgrade | 升级可更新包 |
apt full-upgrade | apt-get dist-upgrade | 升级并处理依赖关系 |
apt autoremove | apt-get autoremove | 自动删除无用依赖 |
apt search | apt-cache search | 搜索软件包 |
apt show | apt-cache show | 显示包详情 |
apt list | - | 列出包(支持 --installed、--upgradable) |
子命令
root@ubuntu~ 16:57:23# apt  --<tab><tab>
autoclean     depends       install       reinstall     update
autopurge     dist-upgrade  list          remove        upgrade
autoremove    download      moo           search
build-dep     edit-sources  policy        show
changelog     full-upgrade  purge         showsrc
clean         help          rdepends      source
帮助信息
root@ubuntu~ 16:58:17# apt --help
apt 2.7.14 (amd64)
Usage: apt [options] command

apt is a commandline package manager and provides commands for
searching and managing as well as querying information about packages.
It provides the same functionality as the specialized APT tools,
like apt-get and apt-cache, but enables options more suitable for
interactive use by default.

Most used commands:
  list - list packages based on package names
  search - search in package descriptions
  show - show package details
  install - install packages
  reinstall - reinstall packages
  remove - remove packages
  autoremove - automatically remove all unused packages
  update - update list of available packages
  upgrade - upgrade the system by installing/upgrading packages
  full-upgrade - upgrade the system by removing/installing/upgrading packages
  edit-sources - edit the source information file
  satisfy - satisfy dependency strings

See apt(8) for more information about the available commands.
Configuration options and syntax is detailed in apt.conf(5).
Information about how to configure sources can be found in sources.list(5).
Package and version choices can be expressed via apt_preferences(5).
Security details are available in apt-secure(8).
                                        This APT has Super Cow Powers.
update 子命令
update - update list of available packages
从软件仓库中获取最新软件清单。
**提醒:**这是执行大部分apt命令前要执行的命令。
root@ubuntu~ 16:59:23# apt update
list 子命令
list - list packages based on package names
查看软件仓库中软件清单。
# 可用于查看的选项
root@ubuntu~ 17:00:05# apt list --<tab><tab>
--all-versions      --manual-installed  --upgradable
--installed         --target-release    --verbose
# 查看软件包清单
root@ubuntu~ 17:01:14# apt list

WARNING: apt does not have a stable CLI interface. Use with caution in scripts.

Listing...
0ad-data-common/jammy,jammy 0.0.25b-1 all
0ad-data/jammy,jammy 0.0.25b-1 all
0ad/jammy 0.0.25b-2 amd64
0install-core/jammy 2.16-2 amd64
......

# 查看特定软件包
root@ubuntu~ 17:01:14# apt list openssh-server
Listing... Done
openssh-server/noble-updates 1:9.6p1-3ubuntu13.16 amd64 [upgradable from: 1:9.6p1-3ubuntu13]
N: There is 1 additional version. Please use the '-a' switch to see it

# 查看特定软件包所有版本
root@ubuntu~ 17:01:35# apt list openssh-server --all-versions
Listing... Done
openssh-server/noble-updates 1:9.6p1-3ubuntu13.16 amd64 [upgradable from: 1:9.6p1-3ubuntu13]
openssh-server/noble,now 1:9.6p1-3ubuntu13 amd64 [installed,upgradable to: 1:9.6p1-3ubuntu13.16]
show 子命令
show - show package details
查看仓库中软件包详细信息。
root@ubuntu~ 17:02:05# apt show openssh-server
# 类似 dpkg -s openssh-server
search 子命令
search - search in package descriptions
root@ubuntu~ 17:02:22# apt search --<tab><tab>
--full        --names-only

root@ubuntu~ 17:03:12# apt search --names-only apache2
install 子命令
install - install packages
从仓库中获取软件包并安装。
root@ubuntu~ 17:03:12# apt install --<tab><tab>
--allow-change-held-packages   --fix-broken                 --purge
--allow-downgrades             --fix-missing                --reinstall
--allow-insecure-repositories  --fix-policy                 --remove
--allow-remove-essential       --force-yes                  --show-progress
--allow-unauthenticated        --ignore-hold                --show-upgraded
--arch-only                    --ignore-missing             --simulate
--assume-no                    --install-recommends         --solver
--assume-yes                   --install-suggests           --target-release
--auto-remove                  --no-install-recommends      --trivial-only
--download                     --no-install-suggests        --upgrade
--download-only                --only-upgrade               --verbose-versions
--dry-run                      --print-uris

[root@ubuntu~ 17:03:12# apt install apache2 -y

# 安装特定版本
root@ubuntu~ 17:03:58# apt install apache2=2.4.52-1ubuntu4.5
reinstall 子命令
reinstall - reinstall packages
从仓库中获取软件包并再次安装(系统中已安装)。
root@ubuntu~ 17:04:09# apt reinstall apache2 -y
remove 子命令
remove - remove packages
卸载系统中已安装软件包。
root@ubuntu~ 17:04:51# apt remove apache2 -y
Reading package lists... Done
Building dependency tree... Done
Reading state information... Done
The following packages were automatically installed and are no longer required:
  apache2-bin apache2-data apache2-utils libapr1 libaprutil1 libaprutil1-dbd-sqlite3
  libaprutil1-ldap
Use 'apt autoremove' to remove them.
The following packages will be REMOVED:
  apache2
0 upgraded, 0 newly installed, 1 to remove and 282 not upgraded.
After this operation, 546 kB disk space will be freed.
(Reading database ... 202598 files and directories currently installed.)
Removing apache2 (2.4.52-1ubuntu4.5) ...
Processing triggers for man-db (2.10.2-1) ...
Processing triggers for ufw (0.36.1-4build1) ...
autoremove 子命令
autoremove - 自动移除所有未使用的软件包
root@ubuntu~ 17:04:51# apt autoremove -y
upgrade 子命令
upgrade - 通过安装/升级软件包来更新系统
# 升级系统所有可更新软件包
root@ubuntu~ 17:05:21# apt upgrade

# 升级系统中特定软件包
root@ubuntu~ 17:06:53# apt upgrade openssh-server -y
full-upgrade 子命令
full-upgrade - 通过移除/安装/升级软件包来升级系统
# 升级系统所有可更新软件包
root@ubuntu~ 17:07:06# apt full-upgrade

# 升级系统中特定软件包
root@ubuntu~ 17:07:56# apt full-upgrade openssh-server -y
download 子命令
download - 下载软件包
root@ubuntu~ 17:08:19# apt download openssh-server
root@ubuntu~ 17:08:31# ls
openssh-server_1%3a8.9p1-3ubuntu0.1_amd64.deb
edit-sources 子命令
edit-sources - 编辑源文件信息
root@ubuntu~ 17:19:05# export EDITOR=vim
root@ubuntu~ 17:19:21# apt edit-sources
# 使用vim编辑文件 /etc/apt/sources.list
apt-file
作用:查找软件包中文件。
apt-file需要手动安装,执行apt install apt-file -y
apt-file是一个用于在APT包管理系统的软件包
中搜索文件的命令行工具。
帮助信息
root@ubuntu~ 17:19:37# apt-file --help

apt-file [options] action [pattern]
apt-file [options] -f action <file>
apt-file [options] -D action <debfile>

Pattern options:
================

    --fixed-string     -F               Do not expand pattern
    --from-deb         -D               Use file list of .deb package(s) as
                                        patterns; implies -F
    --from-file        -f               Read patterns from file(s), one per line
                                        (use '-' for stdin)
    --ignore-case      -i               Ignore case distinctions
    --regexp           -x               pattern is a regular expression
    --substring-match                   pattern is a substring (no glob/regex)


Search filter options:
======================

    --architecture     -a  <arch>       Use specific architecture [L]
    --index-names      -I  <names>      Only search indices listed in <names> [L]
    --filter-suites        <suites>     Only search indices for the listed <suites> [L]
                                        (E.g. "unstable")
    --filter-origins       <origins>    Only search indices from <origins> [L]
                                        (E.g. "Debian")

Other options:
==============

    --config           -c <file>        Parse the given APT config file [R]
    --option           -o <A::B>=<V>    Set the APT config option A::B to "V" [R]
    --package-only     -l               Only display packages name
    --verbose          -v               run in verbose mode [R]
    --help             -h               Show this help.
                       --               End of options (necessary if pattern
                                        starts with a '-')

[L]: Takes a comma-separated list of values.
[R]: The option can be used repeatedly

Action:
    list|show          <pattern>        List files in packages
    list-indices                        List indices configured in APT.
    search|find        <pattern>        Search files in packages
    update                              Fetch Contents files from apt-sources.
示例
# 更新apt仓库中文件清单缓存
root@ubuntu~ 17:20:01# apt-file update

# 仓库中某个软件包的文件清单
root@ubuntu~ 17:20:16# apt-file lsit openssh-server
openssh-server: /etc/default/ssh
openssh-server: /etc/init.d/ssh
openssh-server: /etc/pam.d/sshd
openssh-server: /etc/ssh/moduli
openssh-server: /etc/ufw/applications.d/openssh-server
openssh-server: /lib/systemd/system/rescue-ssh.target
... ...

# 使用正则表达式查询ifconfig工具由哪个软件包提供
root@ubuntu~ 17:23:50# apt-file -x serach'.*bin/ifconfig$'
net-tools: /sbin/ifconfig
apt-get
参考apt命令即可。
root@ubuntu~ 17:23:50# apt-get --help
apt 2.4.5 (amd64)
Usage: apt-get [options] command
       apt-get [options] install|remove pkg1 [pkg2 ...]
       apt-get [options] source pkg1 [pkg2 ...]

apt-get is a command line interface for retrieval of packages
and information about them from authenticated sources and
for installation, upgrade and removal of packages together
with their dependencies.

Most used commands:
  update - Retrieve new lists of packages
  upgrade - Perform an upgrade
  install - Install new packages (pkg is libc6 not libc6.deb)
  reinstall - Reinstall packages (pkg is libc6 not libc6.deb)
  remove - Remove packages
  purge - Remove packages and config files
  autoremove - Remove automatically all unused packages
  dist-upgrade - Distribution upgrade, see apt-get(8)
  dselect-upgrade - Follow dselect selections
  build-dep - Configure build-dependencies for source packages
  satisfy - Satisfy dependency strings
  clean - Erase downloaded archive files
  autoclean - Erase old downloaded archive files
  check - Verify that there are no broken dependencies
  source - Download source archives
  download - Download the binary package into the current directory
  changelog - Download and display the changelog for the given package

See apt-get(8) for more information about the available commands.
Configuration options and syntax is detailed in apt.conf(5).
Information about how to configure sources can be found in sources.list(5).
Package and version choices can be expressed via apt_preferences(5).
Security details are available in apt-secure(8).
apt-cache
参考apt命令即可。
root@ubuntu~ 17:24:17# apt-cache --help
apt 2.4.5 (amd64)
Usage: apt-cache [options] command
       apt-cache [options] show pkg1 [pkg2 ...]

apt-cache queries and displays available information about installed
and installable packages. It works exclusively on the data acquired
into the local cache via the 'update' command of e.g. apt-get. The
displayed information may therefore be outdated if the last update was
too long ago, but in exchange apt-cache works independently of the
availability of the configured sources (e.g. offline).

Most used commands:
  showsrc - Show source records
  search - Search the package list for a regex pattern
  depends - Show raw dependency information for a package
  rdepends - Show reverse dependency information for a package
  show - Show a readable record for the package
  pkgnames - List the names of all packages in the system
  policy - Show policy settings

See apt-cache(8) for more information about the available commands.
Configuration options and syntax is detailed in apt.conf(5).
Information about how to configure sources can be found in sources.list(5).
Package and version choices can be expressed via apt_preferences(5).
Security details are available in apt-secure(8).
apt-key
作用:管理apt仓库key。
root@ubuntu~ 17:24:35# apt-key
Usage: apt-key [--keyring file] [command] [arguments]

Manage apt's list of trusted keys

  apt-key add <file>          - add the key contained in <file> ('-' for stdin)
  apt-key del <keyid>         - remove the key <keyid>
  apt-key export <keyid>      - output the key <keyid>
  apt-key exportall           - output all trusted keys
  apt-key update              - update keys using the keyring package
  apt-key net-update          - update keys using the network
  apt-key list                - list keys
  apt-key finger              - list fingerprints
  apt-key adv                 - pass advanced options to gpg (download key)

If no specific keyring file is given the command applies to all keyring files.
管理软件存储库
软件存储库格式
每行记录格式:
档案类型 镜像url 版本代号 软件包分类
示例:
deb http://mirrors.aliyun.com/ubuntu focal main restricted
deb http://mirrors.aliyun.com/ubuntu focal universe
deb http://mirrors.aliyun.com/ubuntu focal multiverse
deb http://mirrors.aliyun.com/ubuntu focal-updates main restricted
deb http://mirrors.aliyun.com/ubuntu focal-updates universe
deb http://mirrors.aliyun.com/ubuntu focal-updates multiverse
deb http://mirrors.aliyun.com/ubuntu focal-backports main restricted universe multiverse
deb http://mirrors.aliyun.com/ubuntu focal-security main restricted
deb http://mirrors.aliyun.com/ubuntu focal-security universe
deb http://mirrors.aliyun.com/ubuntu focal-security multiverse
deb https://mirrors.aliyun.com/kubernetes/apt/ kubernetes-xenial main
deb [arch=amd64] https://mirrors.aliyun.com/docker-ce/linux/ubuntu focal stable
档案类型
-
deb:档案类型为二进制预编译软件包,一般我们所用的档案类型。
-
deb-src:软件包的源代码。
简言之,一般我们只想要安装该软件而不想要去重新编译它时,就在这一栏填入deb,如果你想取得某软件的原始码(sources code),就得加入deb-src,当然也可以两行都写。
镜像url
镜像url指的就是软件套件来源位置。当执行apt指令时,就会到这些位置去搜寻软件数据库。位置可以是file、cdrom、http、ftp、copy、rsh、ssh等,用的最多的是http/https/ftp。
以阿里镜像为例,在浏览器打开出现以如下内容:
http://mirrors.aliyun.com/ubuntu/
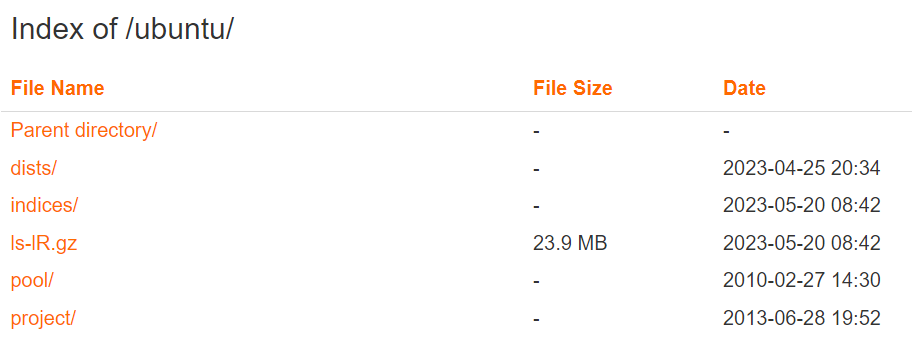
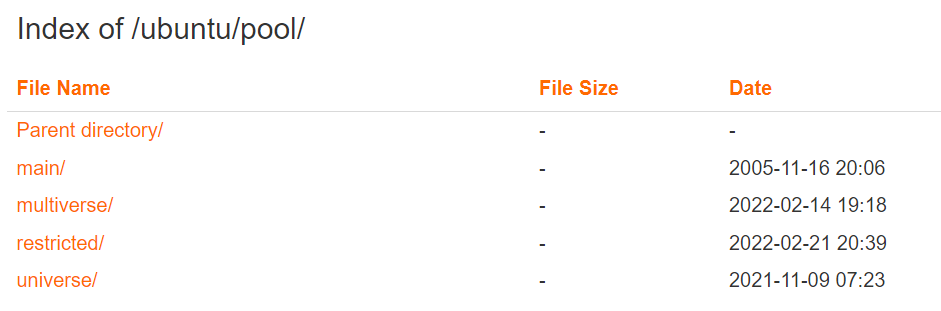
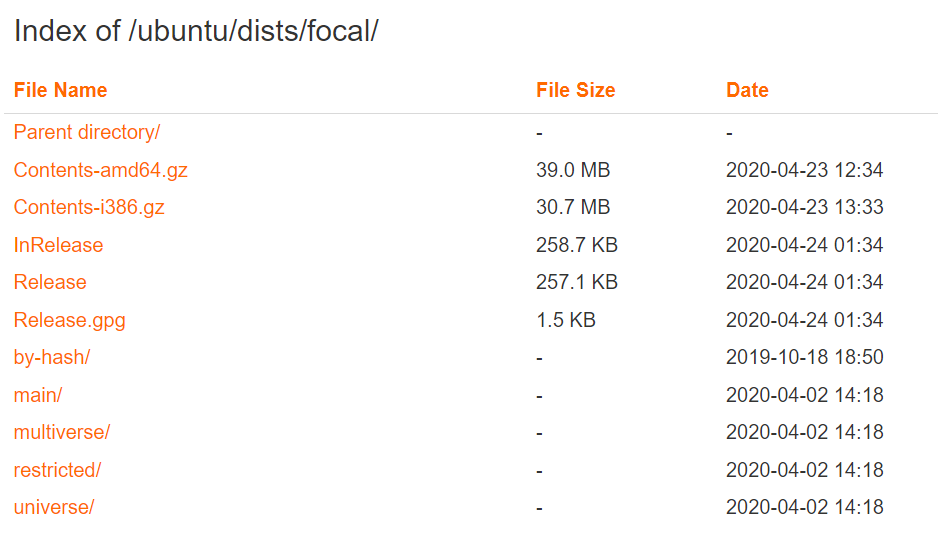
每一个源目录下都应该至少包含dists和pool两个目录,否则就是无效的源。
-
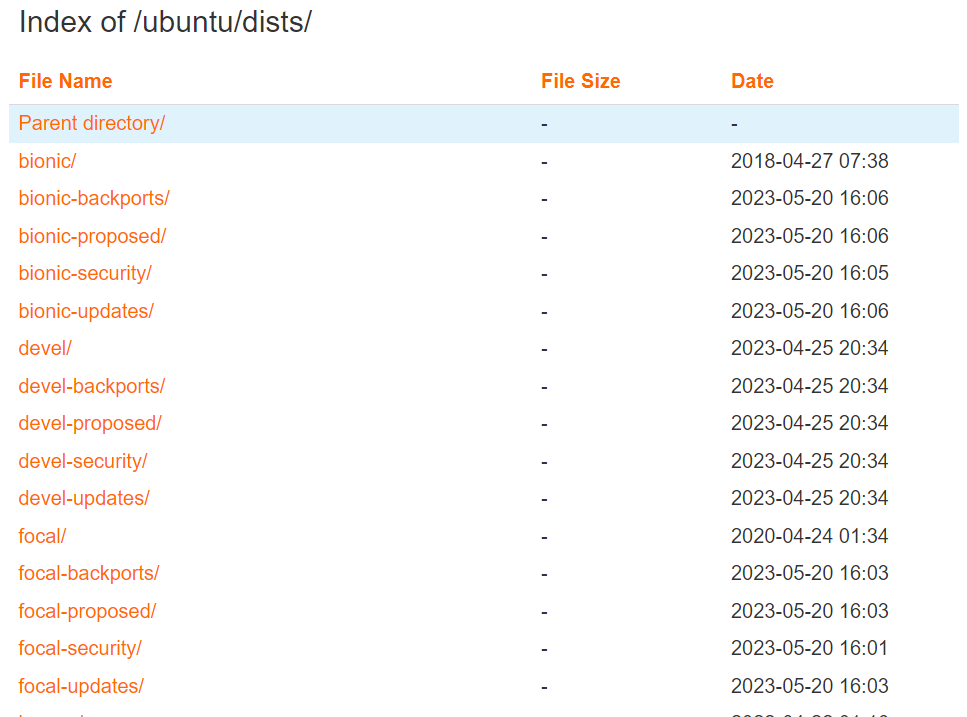
/dists/ 目录包含"发行版"(distributions), 此处是获得 Debian 发布版本(releases)和已发布版本(pre-releases)的软件包的正规途径. 有些旧软件包及 packages.gz 文件仍在里面.
-
/pool/ 目录为软件包的物理地址。软件包均放进一个巨大的 “池子(pool)”, 按照源码包名称分类存放. 为了方便管理, pool 目录下按属性再分类, 分类下面再按源码包名称的首字母归档. 这些目录包含的文件有: 运行于各种系统架构的二进制软件包, 生成这些二进制软件包的源码包.
-
/indices/:维护人员文件和重载文件.
-
/project/:大部分为开发人员的资源, 如:project/experimental/,本目录包含了处于开发中的软件包和工具, 它们均处于 alpha 测试阶段.
版本代号
发行版的具体代号,如ubuntu 20.04是focal,Ubuntu18.04是bionic,16.04是xenial等。另外,在发行版后还可能有进一步的指定,如xenial-updates等
软件包分类
-
main: 官方支持的自由软件。
-
restricted: 官方支持的非完全自由的软件。
-
universe: 社区维护的自由软件。
-
multiverse: 非自由软件。
配置软件存储库
配置文件
- /etc/apt/sources.list
- /etc/apt/sources.list.d/*.list
配置过程
# 1. 复制源文件备份,以防万一
root@ubuntu~ 17:24:56# cp /etc/apt/sources.list /etc/apt/sources.list.bak

# 2. 编辑源列表文件
root@ubuntu~ 17:26:10# vi /etc/apt/sources.list
deb http://mirrors.aliyun.com/ubuntu/ bionic main restricted universe multiverse
deb-src http://mirrors.aliyun.com/ubuntu/ bionic main restricted universe multiverse
deb http://mirrors.aliyun.com/ubuntu/ bionic-security main restricted universe multiverse
deb-src http://mirrors.aliyun.com/ubuntu/ bionic-security main restricted universe multiverse
deb http://mirrors.aliyun.com/ubuntu/ bionic-updates main restricted universe multiverse
deb-src http://mirrors.aliyun.com/ubuntu/ bionic-updates main restricted universe multiverse
deb http://mirrors.aliyun.com/ubuntu/ bionic-proposed main restricted universe multiverse
deb-src http://mirrors.aliyun.com/ubuntu/ bionic-proposed main restricted universe multiverse
deb http://mirrors.aliyun.com/ubuntu/ bionic-backports main restricted universe multiverse
deb-src http://mirrors.aliyun.com/ubuntu/ bionic-backports main restricted universe multiverse

# 3. 执行以下命令获取最新软件列表
root@ubuntu~ 17:26:54# apt-get update
Containerd 概述
Containerd 概述
很早之前的 Docker Engine 中就有了 containerd,现在已经 从 Docker Engine 里分离出来,作为一个独立的开源项目,目标是提供一个更加开放、稳定的容器运行基础设施。
containerd 是 CNCF 毕业的 工业级容器运行时(Container Runtime),强调简单性、健壮性和可移植性,是容器的「管家」:
- 向上:给 Kubernetes、nerdctl、crictl 等客户端提供标准化接口
- 向下:对接 runc、crun 等 OCI 运行时,负责真正的容器启动/管理
- 核心职责:镜像管理、容器生命周期、存储/网络、运行时管理、事件上报
Containerd 架构
containerd 采用清晰的模块化分层架构,从外到内分为 4 层:
客户端层 (K8s/nerdctl/crictl)
      ↓ gRPC API
服务层 (containerd daemon)
      ↓
核心组件层 (Plugins/Managers)
      ↓
底层依赖层 (OCI 运行时/CNI/CSI)
1. 客户端层
- 作用:用户/工具与 containerd 交互的入口
- 常见客户端:
ctr:containerd 自带的底层调试客户端,直接调用 gRPC APInerdctl:Docker 兼容的 containerd 客户端,命令和 docker 几乎一致crictl:Kubernetes CRI 客户端,通过 CRI 接口与 containerd 交互kubelet:Kubernetes 节点代理,通过 CRI 接口管理容器
- 通信方式:通过
/run/containerd/containerd.sock提供的 gRPC API 通信
2. 服务层
containerd 核心守护进程,负责处理客户端请求、协调各组件工作。
核心模块:
- API Server:对外提供 gRPC 接口,接收客户端请求
- Plugin Manager:加载和管理所有插件(镜像、容器、存储、网络等)
- Namespace Manager:实现多租户隔离(Kubernetes 用的是
k8s.io命名空间) - Event Manager:收集和上报容器/镜像事件,供上层工具(如 K8s)监听
3. 核心组件层
containerd 采用插件化架构,所有核心功能都由插件实现,可按需扩展。核心插件分为几大类:
(1) 镜像管理相关插件
- Content Store:负责镜像数据的存储和校验(支持 OCI 标准)
- Snapshotter:实现镜像分层存储,常见实现:
overlayfs:Linux 标准,性能好,生产环境首选devicemapper/aufs:旧版实现,已不推荐
- Registry Client:处理镜像拉取/推送,支持
certs.d加速配置(你当前用的就是这个) - Image Service:提供镜像生命周期管理(pull/push/rm/inspect)
(2) 容器管理相关插件
- Container Service:管理容器元数据(创建/删除/查询)
- Task Service:管理容器进程的生命周期(启动/停止/暂停/恢复)
- Runtime Manager:对接 OCI 运行时(runc/crun),负责真正的容器启动
- CRI Plugin:Kubernetes 专用插件,提供 CRI 接口(containerd 2.x 中为
io.containerd.cri.v1.images)
(3) 存储与网络相关插件
- Mount/Volume Plugin:管理容器挂载(宿主机目录、CSI 存储卷)
- CNI Plugin:容器网络配置,对接 CNI 插件实现网络管理(如 Calico/Flannel)
4. 底层依赖层
- OCI Runtime(runc/crun):符合 OCI 运行时规范,负责创建和运行容器进程,处理 namespace/cgroup/隔离等底层操作
- CNI(Container Network Interface):容器网络插件,负责容器网络配置
- CSI(Container Storage Interface):容器存储插件,负责容器持久化存储
- 内核模块:依赖 Linux 内核的 namespace、cgroup、overlayfs 等功能
Containerd 工作流程
以 K8s 拉取镜像启动容器为例
Containerd 版本
Ubuntu 系统可使用的 containerd 有两个版本。
| 维度 | Ubuntu 官方仓库 containerd | Docker CE 仓库 containerd.io |
|---|---|---|
| 包名 | containerd | containerd.io |
| 维护方 | Ubuntu 安全团队(遵循 Ubuntu 发布周期) | Docker Inc.(随 Docker CE 同步迭代) |
| 版本节奏 | 稳定滞后,仅安全 / 关键修复回 port;LTS 版大版本半年一更新 | 紧跟上游 containerd,4 个月一次小版本;每年 1 个 LTS 版(支持 2 年 +) |
| 典型版本(24.04) | 1.6.x(LTS 稳定版) | 1.7.x/2.1.x(最新稳定版) |
| 依赖捆绑 | 独立运行时,需手动搭配 runc、CNI 插件 | 与 runc、docker-ce-cli 捆绑,依赖自动对齐Docker |
| 适用场景 | 追求极致稳定、与系统内核强绑定的基础设施 | 快速迭代、使用 Docker 生态或 K8s 需新版本的场景 |
| 冲突风险 | 与 Docker CE 共存需手动处理依赖 | 不可与 Ubuntu 官方 containerd 共存,安装前需卸载旧包Docker |
选型建议
| 场景 | 推荐选择 | 理由 |
|---|---|---|
| 生产环境追求极致稳定、与系统强绑定 | Ubuntu 官方 containerd | 安全验证充分、长期稳定、无意外更新风险 |
| 使用 Docker 生态、需快速获取新特性 | Docker CE containerd.io | 与 Docker 组件同步更新、开箱即用、迭代快 |
| K8s 集群需新版本 containerd(如 1.24+) | Docker CE containerd.io | 满足 K8s 对高版本运行时的要求,兼容性好 |
| 轻量服务器、仅需独立运行时 | Ubuntu 官方 containerd | 体积小、依赖少、可灵活搭配组件 |
#查询版本
root@ubuntu~ 17:30:35# apt list containerd -a
Listing... Done
containerd/noble-updates 2.2.1-0ubuntu1~24.04.2 amd64 [upgradable from: 1.7.12-0ubuntu4]
containerd/noble,now 1.7.12-0ubuntu4 amd64 [installed,upgradable to: 2.2.1-0ubuntu1~24.04.2]
Containerd 客户端工具
容器运行时与客户端工具对应关系如下:
| 客户端工具 | 容器运行时 |
|---|---|
| docker | docker |
| podman | cri-o |
| nerdctl和ctr | containerd |
| crictl | cri(k8s的容器运行时接口) |
Containerd 部署
实验环境
- vmware workstation 17
- ubuntu-24.04
- containerd(推荐使用1.7.x或者2.x版本)
Containerd 部署
以 containerd=1.7.12 版本为例。
安装软件
root@ubuntu~ 17:33:36# apt install -y containerd=1.7.12-0ubuntu4
创建配置文件
root@ubuntu~ 17:33:56# mkdir /etc/containerd
root@ubuntu~ 17:34:31# containerd config default > /etc/containerd/config.toml
配置镜像加速
不同版本的 containerd 配置镜像加速方法是不同的。
| containerd 版本 | config 版本 | 推荐方式 | 旧版 mirrors |
|---|---|---|---|
| 1.5.x 及更早 | v2 | mirrors | 支持 |
| 1.6.x(Ubuntu 24.04 默认) | v2 | config_path + certs.d | 兼容 |
| 1.7.x | v2/v3 | config_path + certs.d | 兼容(弃用) |
| 2.x(2.0–2.4) | v3 默认 | config_path + certs.d(强制推荐) | 废弃,不再读取 |
新方式:config_path + certs.d
# 修改 config_path 值为 /etc/containerd/certs.d
root@ubuntu~ 17:34:31# vim /etc/containerd/config.toml
    [plugins."io.containerd.grpc.v1.cri".registry]
      config_path = "/etc/containerd/certs.d"
# 只保留一个路径,所有的加速都配置在该目录

# containerd 1.712 版本中 config_path 默认值为:空
# containerd 2.2.1 版本中 config_path 默认值为:/etc/containerd/certs.d:/etc/docker/certs.d
提示: 对于 containerd 2.2.1版本,必须删除 config_path 配置中不存在的 /etc/docker/certs.d路径。
配置 docker.io 加速
root@ubuntu~ 17:36:46# mkdir -p /etc/containerd/certs.d/docker.io
root@ubuntu~ 17:37:11# cat > /etc/containerd/certs.d/docker.io/hosts.toml << EOF
server = "https://registry-1.docker.io"

[host."https://docker.m.daocloud.io"]
  capabilities = ["pull", "resolve"]

[host."https://09def58152000fc00ff0c00057bad7e0.mirror.swr.myhuaweicloud.com"]
  capabilities = ["pull", "resolve"]
EOF
配置 registry.k8s.io 加速
root@ubuntu~ 17:37:29# mkdir -p /etc/containerd/certs.d/registry.k8s.io
root@ubuntu~ 17:37:53# cat > /etc/containerd/certs.d/registry.k8s.io/hosts.toml << EOF
server = "https://registry.k8s.io"

# 首选 DaoCloud
[host."https://k8s.m.daocloud.io"]
  capabilities = ["pull", "resolve"]

[host."https://09def58152000fc00ff0c00057bad7e0.mirror.swr.myhuaweicloud.com"]
  capabilities = ["pull", "resolve"]
EOF
root@ubuntu~ 17:38:07# systemctl restart containerd
验证加速
# 提醒: ctr pull 命令必须加选项`--hosts-dir /etc/containerd/certs.d`。
root@ubuntu~ 17:38:45# ctr image pull --hosts-dir /etc/containerd/certs.d docker.io/library/busybox:latest
docker.io/library/busybox:latest:                                                 resolved       |++++++++++++++++++++++++++++++++++++++|
index-sha256:1487d0af5f52b4ba31c7e465126ee2123fe3f2305d638e7827681e7cf6c83d5e:    done           |++++++++++++++++++++++++++++++++++++++|
manifest-sha256:b8d1827e38a1d49cd17217efd7b07d689e4ea1744e39c7dcbb95533d175bea65: done           |++++++++++++++++++++++++++++++++++++++|
layer-sha256:481282afbc4304ffee4792258ea114f09e423a4a082335b30695b50310394f47:    done           |++++++++++++++++++++++++++++++++++++++|
config-sha256:925ff61909aebae4bcc9bc04bb96a8bd15cd2271f13159fe95ce4338824531dd:   done           |++++++++++++++++++++++++++++++++++++++|
elapsed: 11.7s                                                                    total:  2.1 Mi (185.4 KiB/s)
unpacking linux/amd64 sha256:1487d0af5f52b4ba31c7e465126ee2123fe3f2305d638e7827681e7cf6c83d5e...
done: 104.968929ms

root@ubuntu~ 17:39:13# ctr image pull registry.k8s.io/pause:3.8 --hosts-dir /etc/containerd/certs.d
registry.k8s.io/pause:3.8:                                                        resolved       |++++++++++++++++++++++++++++++++++++++|
index-sha256:7031c1b283388d2c2e09b57badb803c05ebed362dc88d84b480cc47f72a21097:    done           |++++++++++++++++++++++++++++++++++++++|
manifest-sha256:8d4106c88ec0bd28001e34c975d65175d994072d65341f62a8ab0754b0fafe10: done           |++++++++++++++++++++++++++++++++++++++|
layer-sha256:61fec91190a0bab34406027bbec43d562218df6e80d22d4735029756f23c7007:    done           |++++++++++++++++++++++++++++++++++++++|
config-sha256:e6f1816883972d4be47bd48879a08919b96afcd344132622e4d444987919323c:   done           |++++++++++++++++++++++++++++++++++++++|
elapsed: 6.9 s                                                                    total:  3.8 Ki (565.0 B/s)
unpacking linux/amd64 sha256:7031c1b283388d2c2e09b57badb803c05ebed362dc88d84b480cc47f72a21097...
done: 40.53432ms

root@ubuntu~ 17:39:13# ctr image ls| awk '{print $1}'
REF
docker.io/library/busybox:latest
registry.k8s.io/pause:3.9
提示:nerdctl 工具只会读取 /etc/containerd/certs.d 目录下配置。
旧方式:mirrors
root@ubuntu~ 17:40:01# vim /etc/containerd/config.toml
...
    [plugins."io.containerd.grpc.v1.cri".registry]
      # config_path 配置项值为未空
      config_path = ""
...
      # 查找 mirrors行
      [plugins."io.containerd.grpc.v1.cri".registry.mirrors]
        # 添加如下四行记录,注意缩进
        [plugins."io.containerd.grpc.v1.cri".registry.mirrors."docker.io"]
          endpoint = ["https://docker.m.daocloud.io","https://09def58152000fc00ff0c00057bad7e0.mirror.swr.myhuaweicloud.com"]
        [plugins."io.containerd.grpc.v1.cri".registry.mirrors."registry.k8s.io"]
          endpoint = ["https://k8s.m.daocloud.io","https://09def58152000fc00ff0c00057bad7e0.mirror.swr.myhuaweicloud.com"]
使用旧方式配置的加速,ctr 命令无法拉取镜像。
- 旧 mirrors 配置 是 CRI 插件专属配置。
- ctr 是 containerd 原生客户端,不读取 CRI 配置。
此时可以通过 crictl 工具验证。
root@ubuntu~ 17:41:33# crictl pull hello-world
Image is up to date for sha256:e2ac70e7319a02c5a477f5825259bd118b94e8b02c279c67afa63adab6d8685b
root@ubuntu~ 17:41:59# crictl images
IMAGE                           TAG                 IMAGE ID            SIZE
docker.io/library/hello-world   latest              e2ac70e7319a0       16.2kB
镜像加速总结
1. containerd 1.x(config version=2)
-
CRI 插件:
io.containerd.grpc.v1.cri -
两种加速都能用:
- 旧:
[plugins."io.containerd.grpc.v1.cri".registry.mirrors]内嵌配置 - 新:
config_path+certs.d
- 旧:
-
旧配置只给 CRI(K8s)用,ctr 不认
2. containerd 2.x(config version=3)
-
CRI 插件改名:
io.containerd.cri.v1.images -
彻底废弃内嵌 mirrors
-
强制只认:
config_path = "/etc/containerd/certs.d"
3. K8s/CRI 怎么读加速?
-
不管 1.x/2.x,K8s 只走 CRI 插件
-
2.x 以后:
kubelet → CRI → containerd → certs.d/域名/hosts.toml -
ctr 永远不经过 CRI,所以不认 mirrors,只认 --hosts-dir
ctr 工具
ctr 是 containerd 自带的、用于管理 containerd 的底层调试工具。
缺点:ctr 难用、不友好、不适合日常使用!
ctr 命令帮助
root@ubuntu :~# ctr
NAME:
   ctr -
        __
  _____/ /______
 / ___/ __/ ___/
/ /__/ /_/ /
\___/\__/_/

containerd CLI


USAGE:
   ctr [global options] command [command options] [arguments...]

VERSION:
   1.6.24

DESCRIPTION:

ctr is an unsupported debug and administrative client for interacting
with the containerd daemon. Because it is unsupported, the commands,
options, and operations are not guaranteed to be backward compatible or
stable from release to release of the containerd project.

COMMANDS:
   plugins, plugin            provides information about containerd plugins
   version                    print the client and server versions
   containers, c, container   manage containers
   content                    manage content
   events, event              display containerd events
   images, image, i           manage images
   leases                     manage leases
   namespaces, namespace, ns  manage namespaces
   pprof                      provide golang pprof outputs for containerd
   run                        run a container
   snapshots, snapshot        manage snapshots
   tasks, t, task             manage tasks
   install                    install a new package
   oci                        OCI tools
   shim                       interact with a shim directly
   help, h                    Shows a list of commands or help for one command

GLOBAL OPTIONS:
   --debug                      enable debug output in logs
   --address value, -a value    address for containerd's GRPC server (default: "/run/containerd/containerd.sock") [$CONTAINERD_ADDRESS]
   --timeout value              total timeout for ctr commands (default: 0s)
   --connect-timeout value      timeout for connecting to containerd (default: 0s)
   --namespace value, -n value  namespace to use with commands (default: "default") [$CONTAINERD_NAMESPACE]
   --help, -h                   show help
   --version, -v                print the version
命名空间
Containerd 支持命名空间,用于隔离不同命名空间的镜像和容器。
root@ubuntu~ 17:42:54# ctr namespace
NAME:
   ctr namespaces - manage namespaces

USAGE:
   ctr namespaces command [command options] [arguments...]

COMMANDS:
   create, c   create a new namespace
   list, ls    list namespaces
   remove, rm  remove one or more namespaces
   label       set and clear labels for a namespace

OPTIONS:
   --help, -h  show help
示例:
root@ubuntu~ 17:43:01# ctr namespace ls
NAME    LABELS
default

# 通过 -n 选项指定操作的命名空间
root@ubuntu~ 17:43:17# ctr -n k8s.io container ls
CONTAINER                                                           IMAGE                               RUNTIME
6afe638b117d8d8470948b944efd2b913b0a91d366fcd3f88c48baa661c7fcf7    docker.io/library/busybox:latest    io.containerd.runc.v2
bab94a9f169c0305c47c247d258d90d9e25f2172ec09ecdf14c9452436ed5c15    docker.io/library/busybox:latest    io.containerd.runc.v2
dd82eea219b39c0b53257201b7528c2c52d8a886cd35108b55136c78b9525a48    docker.io/library/busybox:latest    io.containerd.runc.v2
nerdctl 工具
nerdctl 介绍
nerdctl 就是为了替代 docker 而生的,命令 99% 跟 docker 一样!生产环境日常使用首选。
nerdctl 安装
我们推荐使用 nerdctl 管理containerd,命令语法与 docker 一致。
github项目地址:https://github.com/containerd/nerdctl/releases
cni插件项目地址:https://github.com/containernetworking/plugins/releases
# 下载并安装
root@ubuntu~ 17:45:57# wget http://192.168.42.200/course-materials/softwares/stage03/nerdctl-1.7.7-linux-amd64.tar.gz
root@ubuntu~ 17:46:15# tar -xf nerdctl-1.7.7-linux-amd64.tar.gz -C /usr/bin/

# 配置命令补全
root@ubuntu~ 17:46:40# apt install -y bash-completion
root@ubuntu~ 17:46:52# [ ! -d /etc/bash_completion.d ] && mkdir /etc/bash_completion.d
root@ubuntu~ 17:47:11# nerdctl completion bash > /etc/bash_completion.d/nerdctl
root@ubuntu~ 17:47:39# source /etc/bash_completion.d/nerdctl

# 下载 nerdctl 所需要的 cni 插件
root@ubuntu~ 17:49:07# wget http://192.168.42.200/course-materials/softwares/stage03/cni-plugins-linux-amd64-v1.6.0.tgz
root@ubuntu~ 17:49:30# mkdir -p /opt/cni/bin
root@ubuntu~ 17:49:50# tar -xf cni-plugins-linux-amd64-v1.6.0.tgz -C /opt/cni/bin

# nerdctl 依赖防火墙
root@ubuntu~ 17:50:18# apt install -y iptables

# 加载模块
root@ubuntu~ 17:50:35# modprobe -a overlay br_netfilter
root@ubuntu~ 17:50:54# cat > /etc/modules-load.d/k8s-net.conf << EOF
br_netfilter
overlay
EOF

# 配置内核参数
root@ubuntu~ 17:51:28# cat > /etc/sysctl.d/k8s.conf << 'EOF'
net.bridge.bridge-nf-call-iptables=1
net.bridge.bridge-nf-call-ip6tables=1
net.ipv4.ip_forward=1
EOF
root@ubuntu~ 17:51:42# sysctl -p /etc/sysctl.d/k8s.conf
验证部署
root@ubuntu~ 17:52:03# nerdctl version
WARN[0000] unable to determine buildctl version: exec: "buildctl": executable file not found in $PATH
Client:
 Version:	v1.7.7
 OS/Arch:	linux/amd64
 Git commit:	5882c720f4e7f358fb26b759e514b3ae9dd8ea83
 buildctl:
  Version:

Server:
 containerd:
  Version:	1.7.12
  GitCommit:
 runc:
  Version:	1.3.4-0ubuntu1~24.04.1

root@ubuntu~ 17:52:12# nerdctl info
Client:
 Namespace:	default
 Debug Mode:	false

Server:
 Server Version: 1.7.12
 Storage Driver: overlayfs
 Logging Driver: json-file
 Cgroup Driver: systemd
 Cgroup Version: 2
 Plugins:
  Log: fluentd journald json-file syslog
  Storage: native overlayfs
 Security Options:
  apparmor
  seccomp
   Profile: builtin
  cgroupns
 Kernel Version: 6.8.0-31-generic
 Operating System: Ubuntu 24.04 LTS
 OSType: linux
 Architecture: x86_64
 CPUs: 2
 Total Memory: 3.778GiB
 Name: ubuntu
 ID: 9f3569cd-5ac4-40d4-acdc-5ff271ad5916
nerdctl 配置
nerdctl 配置文件:
- rootful(sudo/root):
/etc/nerdctl/nerdctl.toml - rootless(普通用户):
~/.config/nerdctl/nerdctl.toml
配置内容:
# 1. containerd socket 地址(默认位置)
address = "unix:///run/containerd/containerd.sock"

# 2. 镜像加速目录(自动读取 certs.d)
hosts_dir = ["/etc/containerd/certs.d", "/etc/docker/certs.d"]

# 3. 默认命名空间(k8s 用 k8s.io)
namespace = "default"
nerdctl 与 containerd 通信
nerdctl 按:命令行 → 环境变量 → nerdctl.toml → 默认路径 的顺序找 socket。
默认使用 /run/containerd/containerd.sock,所以平时不用配。
- 命令行参数(临时)
nerdctl -H unix:///path/to/containerd.sock images
# 或
nerdctl --address unix:///path/to/containerd.sock ps
- 环境变量(会话级)
export CONTAINERD_ADDRESS=unix:///run/k3s/containerd/containerd.sock
nerdctl images  # 自动用这个 sock
- 配置文件(持久化)
- rootful(sudo/root):
/etc/nerdctl/nerdctl.toml - rootless(普通用户):
~/.config/nerdctl/nerdctl.toml
设置address:
address = "unix:///run/containerd/containerd.sock"
- 上面都没配,使用默认值
unix:///run/containerd/containerd.sock
nerdctl 管理镜像
root@ubuntu~ 17:52:26# nerdctl image <tab><tab>
build    (Build an image from a Dockerfile. Needs buildkitd to be running.)
convert  (convert an image)
decrypt  (decrypt an image)
encrypt  (encrypt image layers)
history  (Show the history of an image)
inspect  (Display detailed information on one or more images.)
load     (Load an image from a tar archive or STDIN)
ls       (List images)
pull     (Pull an image from a registry. Optionally specify "ipfs://" or "ipns://" scheme to pull image from …)
push     (Push an image or a repository to a registry. Optionally specify "ipfs://" or "ipns://" scheme to pu…)
rm       (Remove one or more images)
save     (Save one or more images to a tar archive (streamed to STDOUT by default))
tag      (Create a tag TARGET_IMAGE that refers to SOURCE_IMAGE)
配置镜像加速
nerdctl 不会读取 CRI 专属的 registry 配置(crictl专用),而是使用 containerd 原生 API,也就是新方式:config_path + certs.d。
# 修改 config_path 值为 /etc/containerd/certs.d
root@ubuntu~ 17:53:19# vim /etc/containerd/config.toml
    [plugins."io.containerd.grpc.v1.cri".registry]
      config_path = "/etc/containerd/certs.d"

# 创建加速配置目录
root@ubuntu~ 17:55:05# mkdir -p /etc/containerd/certs.d

# 配置 docker.io 加速
root@ubuntu~ 17:55:23# mkdir -p /etc/containerd/certs.d/docker.io
root@ubuntu~ 17:55:43# cat > /etc/containerd/certs.d/docker.io/hosts.toml << EOF
server = "https://registry-1.docker.io"

[host."https://docker.m.daocloud.io"]
  capabilities = ["pull", "resolve"]

[host."https://09def58152000fc00ff0c00057bad7e0.mirror.swr.myhuaweicloud.com"]
  capabilities = ["pull", "resolve"]
EOF

# 配置 registry.k8s.io 加速
root@ubuntu~ 17:56:02# mkdir -p /etc/containerd/certs.d/registry.k8s.io
root@ubuntu~ 17:56:19# cat > /etc/containerd/certs.d/registry.k8s.io/hosts.toml << EOF
server = "https://registry.k8s.io"

# 首选 DaoCloud
[host."https://k8s.m.daocloud.io"]
  capabilities = ["pull", "resolve"]

[host."https://09def58152000fc00ff0c00057bad7e0.mirror.swr.myhuaweicloud.com"]
  capabilities = ["pull", "resolve"]
EOF
root@ubuntu~ 17:56:36# systemctl restart containerd

# 验证加速
root@ubuntu~ 17:57:10# nerdctl pull hello-world
docker.io/library/hello-world:latest:                                             resolved       |++++++++++++++++++++++++++++++++++++++|
index-sha256:f9078146db2e05e794366b1bfe584a14ea6317f44027d10ef7dad65279026885:    done           |++++++++++++++++++++++++++++++++++++++|
manifest-sha256:d1a8d0a4eeb63aff09f5f34d4d80505e0ba81905f36158cc3970d8e07179e59e: done           |++++++++++++++++++++++++++++++++++++++|
config-sha256:e2ac70e7319a02c5a477f5825259bd118b94e8b02c279c67afa63adab6d8685b:   done           |++++++++++++++++++++++++++++++++++++++|
layer-sha256:4f55086f7dd096d48b0e49be066971a8ed996521c2e190aa21b2435a847198b4:    done           |++++++++++++++++++++++++++++++++++++++|
elapsed: 3.3 s                                                                    total:  15.8 K (4.8 KiB/s)
ls
作用:查看本地镜像清单。
示例:
root@ubuntu~ 17:57:29# nerdctl image ls
REPOSITORY    TAG    IMAGE ID    CREATED    PLATFORM    SIZE    BLOB SIZE

# 可简写如下
root@ubuntu~ 17:57:35# nerdctl images
pull
作用:从网络上下载镜像。
示例:
root@ubuntu~ 17:57:47# nerdctl image pull busybox
# 可简写如下
root@ubuntu~ 17:57:57# nerdctl pull busybox

# 下载其他站点镜像
root@ubuntu~ 17:58:17# nerdctl pull docker.io/library/mysql:latest

root@ubuntu~ 17:59:41# nerdctl image ls
REPOSITORY                     TAG       IMAGE ID        CREATED           PLATFORM       SIZE         BLOB SIZE
busybox                        latest    560af6915bfc    4 minutes ago     linux/amd64    4.8 MiB      2.5 MiB
docker.io/library/mysql    latest    66990ab1ab7d    26 seconds ago    linux/amd64    411.2 MiB    134.1 MiB
rm
作用:删除本地不用的镜像。
示例:
root@ubuntu~ 17:59:53# nerdctl image rm docker.io/library/mysql
root@ubuntu~ 18:00:04# nerdctl images
REPOSITORY           TAG       IMAGE ID        CREATED               PLATFORM       SIZE       BLOB SIZE
busybox              latest    560af6915bfc    11 minutes ago        linux/amd64    4.8 MiB    2.5 MiB
tag
作用:给镜像打标签。
示例:
root@ubuntu~ 18:00:51# nerdctl tag busybox mage16196/busybox
root@ubuntu~ 18:01:35# nerdctl image ls
REPOSITORY                   TAG       IMAGE ID        CREATED          PLATFORM       SIZE         BLOB SIZE
busybox                      latest    fd8d9aa63ba2    4 days ago       linux/amd64    4.4 MiB      2.1 MiB
mysql                        latest    3b1edfde8351    4 days ago       linux/amd64    938.3 MiB    254.0 MiB
nginx                        latest    86d1d130d9ed    4 days ago       linux/amd64    166.1 MiB    61.0 MiB
ubuntu                       latest    f3d28607ddd7    4 days ago       linux/amd64    109.8 MiB    39.6 MiB
mage16196/busybox            latest    fd8d9aa63ba2    5 seconds ago    linux/amd64    4.4 MiB      2.1 MiB
hub.laoma.cloud/hgq/nginx    v1        86d1d130d9ed    4 days ago       linux/amd64    166.1 MiB    61.0 MiB
registry.k8s.io/pause        3.9       7031c1b28338    4 days ago       linux/amd64    732.0 KiB    314.0 KiB
push
作用:将镜像推送到服务器。
示例:推动到docker服务
# 登录
nerdctl login
nerdctl push mage16196/busybox
save
作用:将本地镜像导出为文件。
示例:
root@ubuntu~ 18:02:03# nerdctl image save busybox -o busybox.tar
# 可简写为
root@ubuntu~ 18:02:13# nerdctl save busybox -o busybox.tar

# 删除镜像
root@ubuntu~ 18:03:58# nerdctl images
REPOSITORY                   TAG       IMAGE ID        CREATED          PLATFORM       SIZE         BLOB SIZE
mysql                        latest    3b1edfde8351    4 days ago       linux/amd64    938.3 MiB    254.0 MiB
nginx                        latest    86d1d130d9ed    4 days ago       linux/amd64    166.1 MiB    61.0 MiB
ubuntu                       latest    f3d28607ddd7    4 days ago       linux/amd64    109.8 MiB    39.6 MiB
mage16196/busybox            latest    fd8d9aa63ba2    2 minutes ago    linux/amd64    4.4 MiB      2.1 MiB
hub.laoma.cloud/hgq/nginx    v1        86d1d130d9ed    4 days ago       linux/amd64    166.1 MiB    61.0 MiB
registry.k8s.io/pause        3.9       7031c1b28338    4 days ago       linux/amd64    732.0 KiB    314.0 KiB
load
作用:导入tar文件中镜像。
示例:
root@ubuntu~ 18:04:12# nerdctl image load -i busybox.tar
# 可简写为
root@ubuntu~ 18:04:41# nerdctl load -i busybox.tar

root@ubuntu~ 18:05:23# nerdctl images
REPOSITORY                   TAG       IMAGE ID        CREATED           PLATFORM       SIZE         BLOB SIZE
busybox                      latest    fd8d9aa63ba2    21 seconds ago    linux/amd64    4.4 MiB      2.1 MiB
mysql                        latest    3b1edfde8351    4 days ago        linux/amd64    938.3 MiB    254.0 MiB
nginx                        latest    86d1d130d9ed    4 days ago        linux/amd64    166.1 MiB    61.0 MiB
ubuntu                       latest    f3d28607ddd7    4 days ago        linux/amd64    109.8 MiB    39.6 MiB
mage16196/busybox            latest    fd8d9aa63ba2    3 minutes ago     linux/amd64    4.4 MiB      2.1 MiB
hub.laoma.cloud/hgq/nginx    v1        86d1d130d9ed    4 days ago        linux/amd64    166.1 MiB    61.0 MiB
registry.k8s.io/pause        3.9       7031c1b28338    4 days ago        linux/amd64    732.0 KiB    314.0 KiB
history
作用:查看镜像构建时的历史命令层次结构。
示例:
root@ubuntu~ 18:05:54# nerdctl image pull docker.io/library/mysql
root@ubuntu~ 18:05:54# nerdctl image history mysql
inspect
作用:查看镜像详细信息。
示例:
root@ubuntu~ 18:06:19# nerdctl image inspect docker.io/library/mysql:latest
......
        "Config": {
            "AttachStdin": false,
            "ExposedPorts": {
                "3306/tcp": {}
            },
            "Env": [
                "PATH=/usr/local/sbin:/usr/local/bin:/usr/sbin:/usr/bin:/sbin:/bin",
                "GOSU_VERSION=1.7",
                "MYSQL_MAJOR=5.7",
                "MYSQL_VERSION=5.7.18-1debian8"
            ],
            "Cmd": [
                "mysqld"
            ],
            "Volumes": {
                "/var/lib/mysql": {}
            },
            "Entrypoint": [
                "docker-entrypoint.sh"
            ]
        },
......
prune
作用:删除所有未使用的镜像。
示例:
root@ubuntu~ 18:06:54# nerdctl image prune --all --force

root@ubuntu~ 18:07:33# nerdctl image ls
REPOSITORY    TAG       IMAGE ID        CREATED       PLATFORM       SIZE         BLOB SIZE
nginx         latest    86d1d130d9ed    4 days ago    linux/amd64    166.1 MiB    61.0 MiB
nerdctl 管理容器
帮助信息
root@ubuntu~ 18:07:53# nerdctl container <tab><tab>
commit   (Create a new image from a container's changes)
cp       (Copy files/folders between a running container and the local filesystem.)
create   (Create a new container. Optionally specify "ipfs://" or "ipns://" scheme to pull image from IPFS.)
exec     (Run a command in a running container)
inspect  (Display detailed information on one or more containers.)
kill     (Kill one or more running containers)
logs     (Fetch the logs of a container. Currently, only containers created with `nerdctl run -d` are support…)
ls       (List containers)
pause    (Pause all processes within one or more containers)
port     (List port mappings or a specific mapping for the container)
rename   (rename a container)
restart  (Restart one or more running containers)
rm       (Remove one or more containers)
run      (Run a command in a new container. Optionally specify "ipfs://" or "ipns://" scheme to pull image fr…)
start    (Start one or more running containers)
stop     (Stop one or more running containers)
unpause  (Unpause all processes within one or more containers)
update   (Update one or more running containers)
wait     (Block until one or more containers stop, then print their exit codes.)
ls
作用:查看容器清单。
示例:
root@ubuntu~ 18:07:53# nerdctl container ls
CONTAINER ID    IMAGE    COMMAND    CREATED    STATUS    PORTS    NAMES
# 可简写为
root@ubuntu~ 18:08:33# nerdctl ps
CONTAINER ID    IMAGE    COMMAND    CREATED    STATUS    PORTS    NAMES

# 使用-a选项查看所有容器,包括未运行的
root@ubuntu~ 18:08:47# nerdctl container ls -a
CONTAINER ID    IMAGE                             COMMAND                   CREATED       STATUS     PORTS    NAMES
28c597bcab8f    docker.io/library/nginx:latest    "/docker-entrypoint.…"    4 days ago    Created             nginx-28c59
8a7274356018    docker.io/library/nginx:latest    "/docker-entrypoint.…"    4 days ago    Created             nginx-8a727
常用选项:
- -a, --all Show all containers (default shows just running)
- -f, --filter strings Filter matches containers based on given conditions
- –format string Format the output using the given Go template, e.g, ‘{{json .}}’, ‘wide’
run
作用:创建并运行容器。
示例:
# 语法:
Usage: nerdctl container run [flags] IMAGE [COMMAND] [ARG...]

root@ubuntu~ 18:10:16# nerdctl container run -it ubuntu
root@249c162d8db6:/# exit
exit

# 可简写为
root@ubuntu~ 18:10:30# nerdctl container run -it ubuntu

# 容器状态为Exited
root@ubuntu~ 18:11:05# nerdctl container ls
CONTAINER ID    IMAGE    COMMAND    CREATED    STATUS    PORTS    NAMES
root@ubuntu~ 18:11:59# nerdctl container ls -a
CONTAINER ID    IMAGE                              COMMAND        CREATED           STATUS                       PORTS    NAMES
249c162d8db6    docker.io/library/ubuntu:latest    "/bin/bash"    24 seconds ago    Exited (0) 22 seconds ago             ubuntu-249c1
常用选项:
- –cpu-shares uint CPU shares (relative weight)
- –cpus float Number of CPUs
- -d, --detach Run container in background and print container ID
- –dns strings Set custom DNS servers
- -e, --env stringArray Set environment variables
- -h, --hostname string Container host name
- -i, --interactive Keep STDIN open even if not attached
- –ip string Pv4 address to assign to the container
- –mac-address string MAC address to assign to the container
- -m, --memory string Memory limit
- –name string Assign a name to the container
- –net strings Connect a container to a network (“bridge”|“host”|“none”|) (default [bridge])
- –network strings Connect a container to a network (“bridge”|“host”|“none”|“container:”|) (default [bridge])
- –privileged Give extended privileges to this container
- –pull string Pull image before running (“always”|“missing”|“never”) (default “missing”)
- –restart string Restart policy to apply when a container exits (implemented values: “no”|“always|on-failure:n|unless-stopped”) (default “no”)
- –rm Automatically remove the container when it exits
- –runtime string Runtime to use for this container, e.g.
- –stop-signal string Signal to stop a container (default “SIGTERM”)
- –stop-timeout Timeout (in seconds) to stop a container
- -t, --tty Allocate a pseudo-TTY
- -v, --volume Bind mount a volume
rm
作用:删除容器。
示例:
root@ubuntu~ 18:12:19# nerdctl container rm 249c162d8db6
249c162d8db6
root@ubuntu~ 18:12:38# nerdctl container ls -a
CONTAINER ID    IMAGE    COMMAND    CREATED    STATUS    PORTS    NAMES
prune
作用:删除所有未运行的容器。
示例:
root@ubuntu~ 18:13:08# nerdctl container run ubuntu
root@ubuntu~ 18:13:18# nerdctl container run ubuntu
root@ubuntu~ 18:13:37# nerdctl container ls -a
CONTAINER ID    IMAGE                              COMMAND        CREATED          STATUS                      PORTS    NAMES
62a3258de309    docker.io/library/ubuntu:latest    "/bin/bash"    6 seconds ago    Exited (0) 6 seconds ago             ubuntu-62a32
d84bb674f77f    docker.io/library/ubuntu:latest    "/bin/bash"    8 seconds ago    Exited (0) 7 seconds ago             ubuntu-d84bb

root@ubuntu~ 18:13:37# nerdctl container prune --force
Deleted Containers:
62a3258de309b3e01b1108cd0ac8fcb23918cfe05ba00719d47f9c907e83a938
d84bb674f77f3731a33958dbc74e7596dacc99688b33c64512f24bd067c9a67a
rename
作用:重命名容器。
示例:
root@ubuntu~ 18:14:07# nerdctl container run --name ubuntu-1 ubuntu
root@ubuntu~ 18:14:25# nerdctl container rename ubuntu-1 ubuntu
root@ubuntu~ 18:14:35# nerdctl container ls -a
CONTAINER ID    IMAGE                              COMMAND        CREATED           STATUS                       PORTS    NAMES
2f2aa825864f    docker.io/library/ubuntu:latest    "/bin/bash"    25 seconds ago    Exited (0) 24 seconds ago             ubuntu

root@ubuntu~ 18:16:20# nerdctl container rm ubuntu
stop 和 start
作用:停止和启动容器。
示例:
root@ubuntu~ 18:16:47# nerdctl container run -d nginx
root@ubuntu~ 18:17:15# nerdctl container ls --format "{{.Names}} {{.Status}}"
nginx-de224 Up

root@ubuntu~ 18:17:31# nerdctl container stop nginx-de224
nginx-de224
root@ubuntu~ 18:17:44# nerdctl container ls -a --format "{{.Names}} {{.Status}}" -a
nginx-de224 Exited (0) 7 seconds ago

root@ubuntu~ 18:18:05# nerdctl container start nginx-de224
nginx-de224
root@ubuntu~ 18:18:19# nerdctl container ls --format "{{.Names}} {{.Status}}"
nginx-de224 Up
restart
作用:重启容器。
示例:
root@ubuntu~ 18:18:34# nerdctl container restart nginx-de224
pause 和 unpause
作用:挂起和取消挂起容器。
示例:
root@ubuntu~ 18:18:52# nerdctl container pause nginx-de224
nginx-de224
root@ubuntu~ 18:19:02# nerdctl container ls -a --format "{{.Names}} {{.Status}}"
nginx-de224 Paused

root@ubuntu~ 18:19:18# nerdctl container unpause nginx-de224
nginx-de224
root@ubuntu~ 18:19:46# nerdctl container ls --format "{{.Names}} {{.Status}}"
nginx-de224 Up
kill
作用:给容器发信号,默认发KILL信号。
示例:
root@ubuntu~ 18:21:20# nerdctl container kill nginx-de224
root@ubuntu~ 18:21:32# nerdctl container ls -a --format "{{.Names}} {{.Status}}"
nginx-de224 Exited (137) 24 seconds ago
exec
作用:在运行的容器内部执行命令。
示例:
root@ubuntu~ 18:21:45# nerdctl container start nginx-de224
root@ubuntu~ 18:21:58# nerdctl container exec -it nginx-de224 bash
root@de2241441cb6:/# exit
exit
cp
作用:将宿主机文件复制给容器。
示例:
root@ubuntu~ 18:23:55# nerdctl container cp /etc/hostname nginx-de224:
root@ubuntu~ 18:24:07# nerdctl container exec nginx-de224 ls hostname
hostname
inspect
作用:查看容器详细信息。
示例:
root@ubuntu~ 18:24:19# nerdctl container inspect nginx-de224
[
    {
        "Id": "de2241441cb6122fa90fc68462684c9fe260e5eed20e44c83d2a9401fa7108d7",
        "Created": "2023-05-26T09:52:49.849804164Z",
        "Path": "/docker-entrypoint.sh",
        "Args": [
            "nginx",
            "-g",
            "daemon off;"
        ],
        "State": {
            "Status": "running",
            "Running": true,
            "Paused": false,
            "Restarting": false,
            "Pid": 4888,
            "ExitCode": 0,
            "Error": "",
            "FinishedAt": "0001-01-01T00:00:00Z"
        },
        "Image": "docker.io/library/nginx:latest",
        "ResolvConfPath": "/var/lib/nerdctl/1935db59/containers/default/de2241441cb6122fa90fc68462684c9fe260e5eed20e44c83d2a9401fa7108d7/resolv.conf",
        "HostnamePath": "/var/lib/nerdctl/1935db59/containers/default/de2241441cb6122fa90fc68462684c9fe260e5eed20e44c83d2a9401fa7108d7/hostname",
        "LogPath": "/var/lib/nerdctl/1935db59/containers/default/de2241441cb6122fa90fc68462684c9fe260e5eed20e44c83d2a9401fa7108d7/de2241441cb6122fa90fc68462684c9fe260e5eed20e44c83d2a9401fa7108d7-json.log",
        "Name": "nginx-de224",
        "RestartCount": 0,
        "Driver": "overlayfs",
        "Platform": "linux",
        "AppArmorProfile": "nerdctl-default",
        "Mounts": null,
        "Config": {
            "Hostname": "de2241441cb6",
            "AttachStdin": false,
            "Labels": {
                "containerd.io/restart.explicitly-stopped": "false",
                "io.containerd.image.config.stop-signal": "SIGQUIT",
                "nerdctl/extraHosts": "null",
                "nerdctl/hostname": "de2241441cb6",
                "nerdctl/log-uri": "binary:///usr/bin/nerdctl?_NERDCTL_INTERNAL_LOGGING=%2Fvar%2Flib%2Fnerdctl%2F1935db59",
                "nerdctl/name": "nginx-de224",
                "nerdctl/namespace": "default",
                "nerdctl/networks": "[\"bridge\"]",
                "nerdctl/platform": "linux/amd64",
                "nerdctl/state-dir": "/var/lib/nerdctl/1935db59/containers/default/de2241441cb6122fa90fc68462684c9fe260e5eed20e44c83d2a9401fa7108d7"
            }
        },
        "NetworkSettings": {
            "GlobalIPv6Address": "",
            "GlobalIPv6PrefixLen": 0,
            "IPAddress": "10.4.0.14",
            "IPPrefixLen": 24,
            "MacAddress": "3e:51:10:ab:23:0b",
            "Networks": {
                "unknown-eth0": {
                    "IPAddress": "10.4.0.14",
                    "IPPrefixLen": 24,
                    "GlobalIPv6Address": "",
                    "GlobalIPv6PrefixLen": 0,
                    "MacAddress": "3e:51:10:ab:23:0b"
                }
            }
        }
    }
]
logs
作用:显示容器console终端内容。
示例:
root@ubuntu~ 18:24:33# nerdctl container logs nginx-de224
/docker-entrypoint.sh: /docker-entrypoint.d/ is not empty, will attempt to perform configuration
/docker-entrypoint.sh: Looking for shell scripts in /docker-entrypoint.d/
/docker-entrypoint.sh: Launching /docker-entrypoint.d/10-listen-on-ipv6-by-default.sh
10-listen-on-ipv6-by-default.sh: info: IPv6 listen already enabled
/docker-entrypoint.sh: Launching /docker-entrypoint.d/20-envsubst-on-templates.sh
/docker-entrypoint.sh: Launching /docker-entrypoint.d/30-tune-worker-processes.sh
/docker-entrypoint.sh: Configuration complete; ready for start up
2023/05/26 10:55:17 [notice] 1#1: using the "epoll" event method
2023/05/26 10:55:17 [notice] 1#1: nginx/1.25.0
2023/05/26 10:55:17 [notice] 1#1: built by gcc 10.2.1 20210110 (Debian 10.2.1-6)
2023/05/26 10:55:17 [notice] 1#1: OS: Linux 5.15.0-72-generic
2023/05/26 10:55:17 [notice] 1#1: getrlimit(RLIMIT_NOFILE): 1024:1024
2023/05/26 10:55:17 [notice] 1#1: start worker processes
2023/05/26 10:55:17 [notice] 1#1: start worker process 22
2023/05/26 10:55:17 [notice] 1#1: start worker process 23
port
作用:显示宿主机和容器之间端口映射关系。
示例:
root@ubuntu~ 18:24:51# nerdctl container run --name nginx -d -p 8080:80 nginx
root@ubuntu~ 18:25:11# nerdctl container port nginx
80/tcp -> 0.0.0.0:8080
nerdctl 管理网络
Containerd 中的网络与Docker类似,所有网络接口默认都是虚拟接口。
当使用nerdctl创建容器时,nerdctl命令会创建一个名称为bridge的Linux网桥(其上有一个nerdctl0内部接口),利用了Linux虚拟网络技术,在本地主机和容器内分别创建一个虚拟接口,并让它们彼此连通(这样的一对接口叫做vethpair)。Containerd 默认指定了nerdctl0接口的IP地址和子网掩码,让主机和容器之间可以通过网桥相互通信。
示例
root@ubuntu~ 18:27:06# nerdctl run -d busybox -- sleep infinity
bab94a9f169c0305c47c247d258d90d9e25f2172ec09ecdf14c9452436ed5c15

root@ubuntu~ 18:27:15# nerdctl container ls
CONTAINER ID    IMAGE                               COMMAND               CREATED           STATUS    PORTS    NAMES
bab94a9f169c    docker.io/library/busybox:latest    "sleep infinity"    19 seconds ago    Up                 busybox-bab94

root@ubuntu~ 18:27:27# nerdctl exec busybox-bab94 -- ip a
1: lo: <LOOPBACK,UP,LOWER_UP> mtu 65536 qdisc noqueue qlen 1000
    link/loopback 00:00:00:00:00:00 brd 00:00:00:00:00:00
    inet 127.0.0.1/8 scope host lo
       valid_lft forever preferred_lft forever
    inet6 ::1/128 scope host
       valid_lft forever preferred_lft forever
2: eth0@if7: <BROADCAST,MULTICAST,UP,LOWER_UP,M-DOWN> mtu 1500 qdisc noqueue
    link/ether 7a:a2:3f:04:16:d7 brd ff:ff:ff:ff:ff:ff
    inet 10.4.0.4/24 brd 10.4.0.255 scope global eth0
       valid_lft forever preferred_lft forever
    inet6 fe80::78a2:3fff:fe04:16d7/64 scope link
       valid_lft forever preferred_lft forever
容器内看到的网卡名:2: eth0@if7,@if7代表对端是7号网卡。
root@ubuntu~ 18:27:49# ip a
......
6: nerdctl0: <BROADCAST,MULTICAST,UP,LOWER_UP> mtu 1500 qdisc noqueue state UP group default qlen 1000
    link/ether a6:4c:c0:32:6a:5c brd ff:ff:ff:ff:ff:ff
    inet 10.4.0.1/24 brd 10.4.0.255 scope global nerdctl0
       valid_lft forever preferred_lft forever
    inet6 fe80::a44c:c0ff:fe32:6a5c/64 scope link
       valid_lft forever preferred_lft forever
7: vethf9f77444@if2: <BROADCAST,MULTICAST,UP,LOWER_UP> mtu 1500 qdisc noqueue master nerdctl0 state UP group default
    link/ether 76:51:da:0a:6a:a3 brd ff:ff:ff:ff:ff:ff link-netnsid 0
    inet6 fe80::7451:daff:fe0a:6aa3/64 scope link
       valid_lft forever preferred_lft forever
对应容器主机的网卡:7: vethf9f77444@if2,@if2代表对端容器内对应2号网卡。
示例:
root@ubuntu~ 18:28:07# nerdctl network ls
NETWORK ID      NAME      FILE
17f29b073143    bridge    /etc/cni/net.d/nerdctl-bridge.conflist
                host
                none

root@ubuntu~ 18:28:16# nerdctl network inspect bridge
[
    {
        "Name": "bridge",
        "Id": "17f29b073143d8cd97b5bbe492bdeffec1c5fee55cc1fe2112c8b9335f8b6121",
        "IPAM": {
            "Config": [
                {
                    "Subnet": "10.4.0.0/24",
                    "Gateway": "10.4.0.1"
                }
            ]
        },
        "Labels": {
            "nerdctl/default-network": "true"
        }
    }
]

# 主机中nerdctl0就是容器的网关
root@ubuntu~ 18:28:35# ip addr show nerdctl0
6: nerdctl0: <BROADCAST,MULTICAST,UP,LOWER_UP> mtu 1500 qdisc noqueue state UP group default qlen 1000
    link/ether a6:4c:c0:32:6a:5c brd ff:ff:ff:ff:ff:ff
    inet 10.4.0.1/24 brd 10.4.0.255 scope global nerdctl0
       valid_lft forever preferred_lft forever
    inet6 fe80::a44c:c0ff:fe32:6a5c/64 scope link
       valid_lft forever preferred_lft forever
目前 Containerd 网桥是Linux网桥,用户可以使用brctl show命令查看网桥和端口连接信息。
root@ubuntu~ 18:28:56# apt install -y bridge-utils
root@ubuntu~ 18:28:04# brctl show
bridge name	bridge id		STP enabled	interfaces
nerdctl0		8000.a64cc0326a5c	no		vethf9f77444
nerdctl network 命令使用帮助
root@ubuntu~ 18:29:11# nerdctl network
Manage networks

Usage: nerdctl network [flags]

Commands:
  create   Create a network
  inspect  Display detailed information on one or more networks
  ls       List networks
  prune    Remove all unused networks
  rm       Remove one or more networks

Flags:
  -h, --help   help for network

See also 'nerdctl --help' for the global flags such as '--namespace', '--snapshotter', and '--cgroup-manager'.
nerdctl 管理存储
nerdctl 命令创建容器的时候,可以使用 -v 选项将本地目录挂载给容器实现数据持久化。
示例:
root@ubuntu~ 18:29:36# nerdctl run -d -v /data:/data busybox -- sleep infinity
6afe638b117d8d8470948b944efd2b913b0a91d366fcd3f88c48baa661c7fcf7
root@ubuntu~ 18:29:45# touch /data/f1
root@ubuntu~ 18:29:56# nerdctl exec busybox-6afe6 -- ls /data
f1
nerdctl 命令创建容器的时候,也可以使用 -v 选项指定volume。
root@ubuntu~ 18:30:08# nerdctl run -d -v data:/data busybox -- sleep infinity
dd82eea219b39c0b53257201b7528c2c52d8a886cd35108b55136c78b9525a48
root@ubuntu~ 18:30:30# nerdctl exec busybox-dd82e -- touch /data/f1

root@ubuntu~ 18:30:47# nerdctl volume ls
VOLUME NAME    DIRECTORY
data           /var/lib/nerdctl/1935db59/volumes/k8s.io/data/_data
root@ubuntu~ 18:31:08# ls /var/lib/nerdctl/1935db59/volumes/k8s.io/data/_data
f1
nerdctl volume 命令使用帮助
root@ubuntu~ 18:31:22# nerdctl volume
Manage volumes

Usage: nerdctl volume [flags]

Commands:
  create   Create a volume
  inspect  Display detailed information on one or more volumes
  ls       List volumes
  prune    Remove all unused local volumes
  rm       Remove one or more volumes

Flags:
  -h, --help   help for volume

See also 'nerdctl --help' for the global flags such as '--namespace', '--snapshotter', and '--cgroup-manager'.
nerdctl 管理命名空间
root@ubuntu~ 18:31:49# nerdctl namespace
Unrelated to Linux namespaces and Kubernetes namespaces

Usage: nerdctl namespace [flags]

Aliases: namespace, ns
Commands:
  create   Create a new namespace
  inspect  Display detailed information on one or more namespaces.
  ls       List containerd namespaces
  remove   Remove one or more namespaces
  update   Update labels for a namespace

Flags:
  -h, --help   help for namespace

See also 'nerdctl --help' for the global flags such as '--namespace', '--snapshotter', and '--cgroup-manager'
示例:
root@ubuntu~ 18:31:52# nerdctl namespace ls
 nerdctl namespace ls
NAME      CONTAINERS    IMAGES    VOLUMES    LABELS
k8s.io    3             2         1
crictl 工具
crictl 介绍
crictl 命令是遵循 CRI 接口规范的一个命令行工具,通常用它来检查和管理kubelet节点上的容器运行时和镜像。
在kubernetes集群环境中,当我们执行kubectl 命令式,kubelet 代理会自动调用crictl命令管理镜像和容器。
手动执行 crictl 命令时,一般用于查看镜像和容器。
1. 安装与配置
# 添加 Kubernetes 仓库
curl -fsSL https://mirrors.aliyun.com/kubernetes-new/core/stable/v1.30/deb/Release.key | \
  sudo gpg --dearmor -o /etc/apt/keyrings/kubernetes-apt-keyring.gpg

echo "deb [signed-by=/etc/apt/keyrings/kubernetes-apt-keyring.gpg] \
  https://mirrors.aliyun.com/kubernetes-new/core/stable/v1.30/deb/ /" | \
  sudo tee /etc/apt/sources.list.d/kubernetes.list

sudo apt update && sudo apt install -y cri-tools=1.30.1-1.1

# 配置对接 containerd
sudo crictl config --set runtime-endpoint=unix:///var/run/containerd/containerd.sock
2. 常用命令
镜像命令
- images, image, img List images
- pull Pull an image from a registry
- inspecti Return the status of one or more images
- imagefsinfo Return image filesystem info
- rmi Remove one or more images
容器命令
- ps List containers
- create Create a new container
- run Run a new container inside a sandbox
- inspect Display the status of one or more containers
- info Display information of the container runtime
- attach Attach to a running container
- exec Run a command in a running container
- logs Fetch the logs of a container
- update Update one or more running containers
- stats List container(s) resource usage statistics
- checkpoint Checkpoint one or more running containers
- start Start one or more created containers
- stop Stop one or more running containers
- rm Remove one or more containers
pod命令
- pods List pods
- runp Run a new pod
- inspectp Display the status of one or more pods
- statsp List pod resource usage statistics
- port-forward Forward local port to a pod
- stopp Stop one or more running pods
- rmp Remove one or more pods
其他命令
- version Display runtime version information
- config Get and set crictl client configuration options
- completion Output shell completion code
- help, h Shows a list of commands or help for one command
关键对比总结
| 场景 | 推荐工具 | 说明 |
|---|---|---|
| 日常容器/镜像管理 | nerdctl | 命令兼容 Docker,体验最佳 |
| K8s 节点调试 | crictl | 通过 CRI 接口操作,查看 Pod/容器状态 |
| 底层调试/学习 | ctr | 直接调用 containerd API,功能原始 |
2 1
# crictl 工具

## crictl 介绍

`crictl` 命令是遵循 CRI 接口规范的一个命令行工具,通常用它来检查和管理`kubelet`节点上的容器运行时和镜像。

在kubernetes集群环境中,当我们执行`kubectl` 命令式,`kubelet` 代理会自动调用crictl命令管理镜像和容器。

手动执行 `crictl` 命令时,一般用于查看镜像和容器。

### 1. 安装与配置

```bash
# 添加 Kubernetes 仓库
curl -fsSL https://mirrors.aliyun.com/kubernetes-new/core/stable/v1.30/deb/Release.key | \
  sudo gpg --dearmor -o /etc/apt/keyrings/kubernetes-apt-keyring.gpg

echo "deb [signed-by=/etc/apt/keyrings/kubernetes-apt-keyring.gpg] \
  https://mirrors.aliyun.com/kubernetes-new/core/stable/v1.30/deb/ /" | \
  sudo tee /etc/apt/sources.list.d/kubernetes.list

sudo apt update && sudo apt install -y cri-tools=1.30.1-1.1

# 配置对接 containerd
sudo crictl config --set runtime-endpoint=unix:///var/run/containerd/containerd.sock
2. 常用命令
镜像命令
- images, image, img List images
- pull Pull an image from a registry
- inspecti Return the status of one or more images
- imagefsinfo Return image filesystem info
- rmi Remove one or more images
容器命令
- ps List containers
- create Create a new container
- run Run a new container inside a sandbox
- inspect Display the status of one or more containers
- info Display information of the container runtime
- attach Attach to a running container
- exec Run a command in a running container
- logs Fetch the logs of a container
- update Update one or more running containers
- stats List container(s) resource usage statistics
- checkpoint Checkpoint one or more running containers
- start Start one or more created containers
- stop Stop one or more running containers
- rm Remove one or more containers
pod命令
- pods List pods
- runp Run a new pod
- inspectp Display the status of one or more pods
- statsp List pod resource usage statistics
- port-forward Forward local port to a pod
- stopp Stop one or more running pods
- rmp Remove one or more pods
其他命令
- version Display runtime version information
- config Get and set crictl client configuration options
- completion Output shell completion code
- help, h Shows a list of commands or help for one command
关键对比总结
| 场景 | 推荐工具 | 说明 |
|---|---|---|
| 日常容器/镜像管理 | nerdctl | 命令兼容 Docker,体验最佳 |
| K8s 节点调试 | crictl | 通过 CRI 接口操作,查看 Pod/容器状态 |
| 底层调试/学习 | ctr | 直接调用 containerd API,功能原始 |
| 镜像加速 | certs.d + hosts.toml | 2.x 版本唯一推荐方式 |
更多推荐


 7
7 0
0- 0


 已为社区贡献10条内容

所有评论(0)