
Claude Code 实战案例:全栈电商平台Next.js + Express + MongoDB 从零到上线
目录
第一部分:项目规划与架构设计
1.1 项目概览
| 属性 | 前端 | 后端 |
| 框架 | Next.js 14(App Router) | Express 4 + TypeScript |
| 数据库 | — | MongoDB + Mongoose |
| 样式 | Tailwind CSS + shadcn/ui | — |
| 支付 | Stripe(前端集成) | Stripe Webhook(后端) |
| 状态管理 | Zustand | — |
| 认证 | NextAuth.js | JWT 验证中间件 |
| 部署 | Vercel | Railway |
| 目标耗时 | 25小时 | 传统方式80小时 |
1.2 核心功能清单
- 商品模块:商品列表、详情、搜索、分类筛选、库存管理
- 购物车模块:加入/删除商品、数量修改、本地持久化
- 订单模块:下单、支付(Stripe)、订单状态追踪
- 用户模块:注册/登录、个人中心、历史订单
- 管理后台:商品管理、订单管理、数据统计仪表盘
- 基础设施:图片上传(Cloudinary)、邮件通知、错误监控
1.3 系统架构图
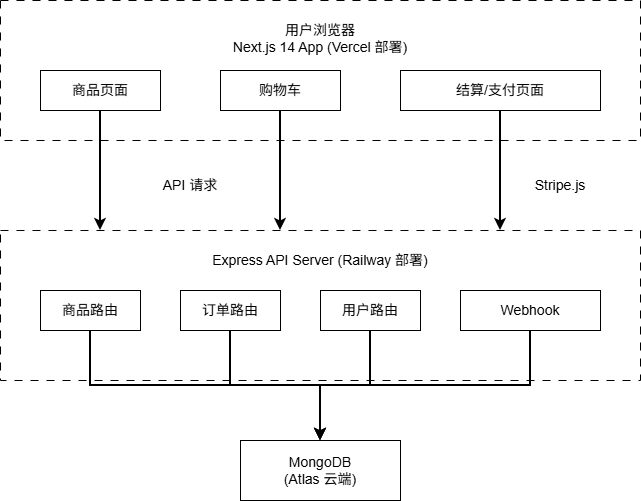
第二部分:完整目录结构
2.1 Monorepo 结构
全栈项目采用 Monorepo 组织,前后端在同一个仓库中管理:
ecommerce/

├── frontend/                    # Next.js 前端

│   ├── app/

│   │   ├── (shop)/             # 商城页面组

│   │   │   ├── page.tsx        # 首页 / 商品列表

│   │   │   ├── product/[id]/   # 商品详情

│   │   │   └── cart/           # 购物车

│   │   ├── (auth)/             # 认证页面组

│   │   │   ├── login/

│   │   │   └── register/

│   │   ├── dashboard/          # 管理后台

│   │   │   ├── products/

│   │   │   └── orders/

│   │   ├── api/                # Next.js API Routes

│   │   │   └── auth/[...nextauth]/

│   │   └── layout.tsx

│   ├── components/

│   │   ├── ui/                 # shadcn/ui 基础组件

│   │   ├── product/            # 商品相关组件

│   │   └── cart/               # 购物车组件

│   ├── store/                  # Zustand 状态管理

│   │   └── cartStore.ts

│   ├── lib/

│   │   ├── api.ts              # API 请求封装

│   │   └── stripe.ts           # Stripe 客户端

│   └── types/                  # 共享类型定义

│       └── index.ts

│

├── backend/                     # Express 后端

│   ├── src/

│   │   ├── models/             # Mongoose 模型

│   │   │   ├── Product.ts

│   │   │   ├── Order.ts

│   │   │   └── User.ts

│   │   ├── routes/             # API 路由

│   │   │   ├── products.ts

│   │   │   ├── orders.ts

│   │   │   └── users.ts

│   │   ├── middleware/

│   │   │   ├── auth.ts         # JWT 验证

│   │   │   └── errorHandler.ts

│   │   ├── services/

│   │   │   ├── stripeService.ts

│   │   │   └── emailService.ts

│   │   └── app.ts

│   └── package.json

│

├── shared/                      # 前后端共享

│   └── types/

│       └── index.ts            # 统一类型定义

│

└── package.json                 # 根 package.json(workspaces)
第三部分:关键代码详解
3.1 共享类型定义(解决前后端对齐问题)
全栈最大的痛点是前后端类型不一致。解决方案:在 shared/ 目录统一定义,前后端都引用同一份。
// shared/types/index.ts

// ── 商品 ──

export interface Product {

  _id:         string

  name:        string

  description: string

  price:       number

  stock:       number

  images:      string[]

  category:    string

  tags:        string[]

  createdAt:   string

}


export interface ProductQuery {

  page?:     number

  limit?:    number

  category?: string

  minPrice?: number

  maxPrice?: number

  search?:   string

}


// ── 购物车 ──

export interface CartItem {

  product:  Product

  quantity: number

}


// ── 订单 ──

export type OrderStatus = 'pending' | 'paid' | 'shipped' | 'delivered' | 'cancelled'


export interface Order {

  _id:            string

  userId:         string

  items:          CartItem[]

  totalAmount:    number

  status:         OrderStatus

  stripePaymentId?: string

  shippingAddress: Address

  createdAt:      string

}


// ── 地址 ──

export interface Address {

  street:   string

  city:     string

  province: string

  zipCode:  string

  country:  string

}


// ── API响应 ──

export interface ApiResponse<T> {

  success: boolean

  data:    T

  message?: string

}


export interface PaginatedResponse<T> extends ApiResponse<T[]> {

  total:      number

  page:       number

  totalPages: number

}
3.2 Zustand 购物车状态管理
// frontend/store/cartStore.ts

import { create } from 'zustand'

import { persist } from 'zustand/middleware'

import type { CartItem, Product } from '../../shared/types'


interface CartStore {

  items:        CartItem[]

  totalItems:   number

  totalAmount:  number

  addItem:      (product: Product, quantity?: number) => void

  removeItem:   (productId: string) => void

  updateQty:    (productId: string, quantity: number) => void

  clearCart:    () => void

}


export const useCartStore = create<CartStore>()(

  persist(

    (set, get) => ({

      items:       [],

      totalItems:  0,

      totalAmount: 0,


      addItem: (product, quantity = 1) => {

        const existing = get().items.find(i => i.product._id === product._id)

        const newItems = existing

          ? get().items.map(i =>

              i.product._id === product._id

                ? { ...i, quantity: i.quantity + quantity }

                : i

            )

          : [...get().items, { product, quantity }]


        set({

          items:       newItems,

          totalItems:  newItems.reduce((sum, i) => sum + i.quantity, 0),

          totalAmount: newItems.reduce((sum, i) => sum + i.product.price * i.quantity, 0),

        })

      },


      removeItem: (productId) => {

        const newItems = get().items.filter(i => i.product._id !== productId)

        set({

          items:       newItems,

          totalItems:  newItems.reduce((sum, i) => sum + i.quantity, 0),

          totalAmount: newItems.reduce((sum, i) => sum + i.product.price * i.quantity, 0),

        })

      },


      updateQty: (productId, quantity) => {

        if (quantity <= 0) { get().removeItem(productId); return }

        set({ items: get().items.map(i =>

          i.product._id === productId ? { ...i, quantity } : i

        )})

      },


      clearCart: () => set({ items: [], totalItems: 0, totalAmount: 0 }),

    }),

    { name: 'cart-storage' }   // 自动持久化到 localStorage

  )

)
3.3 Stripe 支付集成(最关键部分)
前端:创建支付会话
// frontend/app/(shop)/checkout/page.tsx

import { loadStripe } from '@stripe/stripe-js'

import { useCartStore } from '@/store/cartStore'


const stripePromise = loadStripe(process.env.NEXT_PUBLIC_STRIPE_KEY!)


export default function CheckoutPage() {

  const { items, totalAmount } = useCartStore()


  const handlePayment = async () => {

    const stripe = await stripePromise

    if (!stripe) return


    // 调用后端创建 Stripe Session

    const res = await fetch('/api/create-checkout-session', {

      method: 'POST',

      headers: { 'Content-Type': 'application/json' },

      body: JSON.stringify({ items }),

    })


    const { sessionId } = await res.json()


    // 跳转到 Stripe 支付页

    await stripe.redirectToCheckout({ sessionId })

  }


  return (

    <div className='max-w-lg mx-auto p-8'>

      <h1 className='text-2xl font-bold mb-6'>确认订单</h1>

      <p className='text-lg mb-4'>总计:¥{totalAmount.toFixed(2)}</p>

      <button

        onClick={handlePayment}

        className='w-full bg-blue-600 text-white py-3 rounded-lg font-bold'

      >

        前往支付

      </button>

    </div>

  )

}


后端:处理支付 Webhook

// backend/src/routes/webhook.ts

import Stripe from 'stripe'

import { Order } from '../models/Order'


const stripe = new Stripe(process.env.STRIPE_SECRET_KEY!)


export async function handleWebhook(req: Request, res: Response) {

  const sig = req.headers['stripe-signature'] as string

  let event: Stripe.Event


  try {

    // 验证 Webhook 签名(防止伪造)

    event = stripe.webhooks.constructEvent(

      req.body,                        // 原始 Buffer

      sig,

      process.env.STRIPE_WEBHOOK_SECRET!

    )

  } catch (err) {

    return res.status(400).send('Webhook 签名验证失败')

  }


  // 处理支付成功事件

  if (event.type === 'checkout.session.completed') {

    const session = event.data.object as Stripe.Checkout.Session


    await Order.findOneAndUpdate(

      { stripeSessionId: session.id },

      {

        status:          'paid',

        stripePaymentId: session.payment_intent as string,

        paidAt:          new Date(),

      }

    )


    // 触发发货邮件通知(异步,不阻塞响应)

    sendOrderConfirmationEmail(session.customer_email!).catch(console.error)

  }


  res.json({ received: true })

}
3.4 Next.js 商品列表页(服务端渲染)
// frontend/app/(shop)/page.tsx

import ProductCard from '@/components/product/ProductCard'

import type { Product, ProductQuery } from '../../shared/types'


// Next.js 服务端组件 - 直接在服务端获取数据

export default async function ShopPage({

  searchParams

}: {

  searchParams: ProductQuery

}) {

  const params = new URLSearchParams({

    page:     String(searchParams.page  ?? 1),

    limit:    String(searchParams.limit ?? 12),

    category: searchParams.category ?? '',

    search:   searchParams.search   ?? '',

  })


  // 服务端直接请求后端 API

  const res = await fetch(

    `${process.env.BACKEND_URL}/api/products?${params}`,

    { next: { revalidate: 60 } }   // ISR:每60秒重新验证缓存

  )


  const { data: products, total, totalPages } = await res.json()


  return (

    <main className='container mx-auto px-4 py-8'>

      <h1 className='text-3xl font-bold mb-8'>全部商品</h1>


      {/* 商品网格 */}

      <div className='grid grid-cols-1 sm:grid-cols-2 lg:grid-cols-4 gap-6'>

        {products.map((product: Product) => (

          <ProductCard key={product._id} product={product} />

        ))}

      </div>


      {/* 分页信息 */}

      <p className='text-center mt-8 text-gray-600'>

        共 {total} 件商品,第 {searchParams.page ?? 1} / {totalPages} 页

      </p>

    </main>

  )

}
第四部分:全栈协作的核心挑战
4.1 三大典型挑战与解决方案
挑战1:前后端类型不同步
❌ 问题:前端写的 product.price(number)
后端返回的 price: '199.00'(string)
→ 结算时总价计算错误
✅ 解决:统一在 shared/types/index.ts 定义 Product 接口
前后端都引用同一份,TypeScript 编译时捕获不一致
挑战2:Stripe Webhook 必须接收原始 Body
❌ 问题:Express 全局使用了 express.json() 解析请求体
Stripe 签名验证需要原始 Buffer,JSON解析后验证失败
✅ 解决:Webhook 路由单独配置,跳过全局 JSON 中间件
// app.ts
app.post('/webhook', express.raw({ type: 'application/json' }), handleWebhook)
app.use(express.json()) // 其余路由正常使用 JSON 解析
挑战3:Next.js App Router 的缓存策略
❌ 问题:用户下单后,商品库存已减少
但商品列表还显示旧库存(Next.js 缓存未更新)
✅ 解决:下单成功后主动触发缓存重验证
// 下单 API Route

import { revalidatePath } from 'next/cache'

export async function POST(req: Request) {

  // ... 创建订单逻辑 ...

  revalidatePath('/')              // 首页商品列表

  revalidatePath('/product/[id]') // 对应商品详情页

  return Response.json({ success: true })

}
4.2 Claude Code 处理全栈的提示词策略
全栈开发中,提示词需要同时说清楚前端和后端的期望:
提示词示例(生成商品创建功能):
"实现电商平台的'创建商品'功能,要求:
【后端】Express + TypeScript
- POST /api/products 路由
- 需要管理员 JWT 验证
- 支持图片上传(Cloudinary)
- Mongoose 模型中库存必须 >= 0
- 返回格式遵循 ApiResponse<Product>(shared/types)
【前端】Next.js + TypeScript
- 管理后台表单页面 /dashboard/products/new
- 字段:名称、描述、价格、库存、分类、图片上传
- 使用 react-hook-form 管理表单
- 上传成功后跳转到商品列表页
- 错误状态需要友好提示
类型从 shared/types/index.ts 引用,不要重复定义"
第五部分:最终数据与效果
5.1 开发耗时明细
| 模块 | Claude Code | 手写传统 | 节省 | 备注 |
| 架构设计 + 目录 | 30分钟 | 180分钟 | ⬇ 83% | Monorepo |
| 共享类型定义 | 20分钟 | 60分钟 | ⬇ 67% | |
| 后端 API | 90分钟 | 300分钟 | ⬇ 70% | 4个路由模块 |
| 前端页面 | 120分钟 | 360分钟 | ⬇ 67% | 6个主要页面 |
| Stripe集成 | 45分钟 | 180分钟 | ⬇ 75% | 含Webhook |
| 状态管理 | 30分钟 | 90分钟 | ⬇ 67% | Zustand |
| Docker + 部署 | 30分钟 | 120分钟 | ⬇ 75% | |
| 调试与修复 | 135分钟 | 510分钟 | ⬇ 74% | 人工主导 |
| 合计 | 500分钟(≈25h) | 1800分钟(≈80h) | ⬇ 72% |
5.2 上线效果指标
| 指标 | Claude Code版 | 手写版 | 评价 |
| Lighthouse 性能分 | 91 | 94 | 略低 |
| 首页加载时间(LCP) | 1.4秒 | 1.2秒 | 相当 |
| API平均响应时间 | 42ms | 38ms | 相当 |
| TypeScript覆盖率 | 100% | 78% | Code大优 |
| 测试覆盖率 | 76% | 55% | Code更优 |
| 代码复用率 | 41%(共享类型) | 18% | Code大优 |
第六部分:系列总结与最终建议
6.1 五篇实战的核心数据汇总
| 篇章 | 项目类型 | Code耗时 | 传统耗时 | 节省 |
| 第3篇 | Web前端 | 12小时 | 40小时 | 70% |
| 第4篇 | Python后端 | 16小时 | 50小时 | 68% |
| 第5篇 | 全栈项目 | 25小时 | 80小时 | 69% |
| 平均 | — | 17.7小时 | 56.7小时 | 69% |
6.2 最终使用建议
经过5篇的系统测评,我得出一个清晰的结论:
- 原型和新项目:Claude Code 是第一选择,节省 70% 时间
- 已有项目维护:传统 IDE 更稳,Claude Code 辅助生成特定模块
- 学习阶段:先用 IDE 手写建立理解,再用 Claude Code 提速
- 团队协作:Claude Code 生成框架,人工审查合并,建立提示词模板库
- 质量保证:Claude Code 的类型和文档往往比手写更完整,但需要人工把关逻辑
6.3 Claude Code 的边界
有一些事情 Claude Code 目前还做不好,需要你来补:
- 业务逻辑设计:数据库表结构、API 设计方案,这些需要你决策
- 性能优化:索引选择、缓存策略、SQL 优化,需要你主导
- 安全审查:生成的代码要过安全检查,不能无脑上线
- 复杂算法:涉及特定业务规则的复杂逻辑,还是手写更可控
感谢你跟完这 5 篇系列。如果这个系列对你有帮助,欢迎评论区分享你用 Claude Code 的实战经验!
更多推荐
 23
23 0
0- 0


 已为社区贡献4条内容

所有评论(0)