
使用Amazon Deep Learning AMI 快速实现 CUDA,cuDNN 和深度学习框架版本兼容
前言在开展深度学习项目时,我们通常会选择合适的深度学习框架。使用深度学习框架进行模型开发,能减少大量的重复代码工作。目前最流行的深度学习框架有:TensorFlow,PyTorch,MXN...

前言
在开展深度学习项目时,我们通常会选择合适的深度学习框架。使用深度学习框架进行模型开发,能减少大量的重复代码工作。目前最流行的深度学习框架有:TensorFlow,PyTorch,MXNect,Caffe等。在深度学习项目的开发过程中,使用GPU加速训练是必不可少的。以TensorFlow为例,GPU加速环境需要在系统中安装 CUDA/cuDNN/TensorFlow。而到目前为止CUDA、cuDNN和TensorFlow有很多可用的版本,这可能会让开发人员困惑,无法选择兼容的组合来构建他们的开发环境。例如我们在深度学习模型中使用batch normalization, layer normalization,我们的代码可以在CPU上正常的运行,但如果深度学习环境CUDA/cuDNN/TensorFlow的版本不兼容,代码就无法使用GPU加速运行。如果要自行搭建版本兼容的深度学习环境,我们需要在一台机器上经过一系列复杂操作来实现。如果使用Amazon EC2中的Amazon Deep Learning AMI 来构建我们的深度学习环境,则可以简化这个过程。Amazon Deep Learning AMI预装了GPU驱动程序和最近多个版本的加速库,AMI默认配置为NVIDA CUDA 10.0环境。你可以通过几条命令轻松地在不同的版本之间进行切换,以兼容我们使用的深度学习框架用于部署我们自定义的深度学习环境。下面我们将以TensorFlow为例,来演示如何快速搭建 CUDA/cuDNN/TensorFlow版本兼容的GPU加速深度学习环境。
使用Ubuntu Deep Learning AMI
创建Amazon EC2
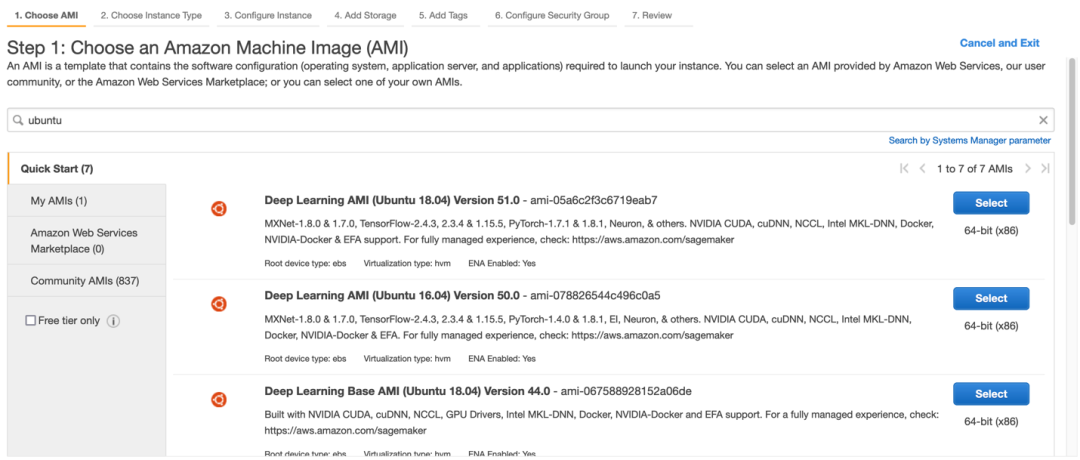
在亚马逊云科技服务界面中,选择Amazon EC2服务,并选择我们希望创建Amazon EC2的可用区(演示使用中国宁夏区cn-northwest-1)。点击Launch Instance。

搜索ubuntu并选择Amazon Deep Learning AMI(Ubuntu 18.04) Version 51.0。
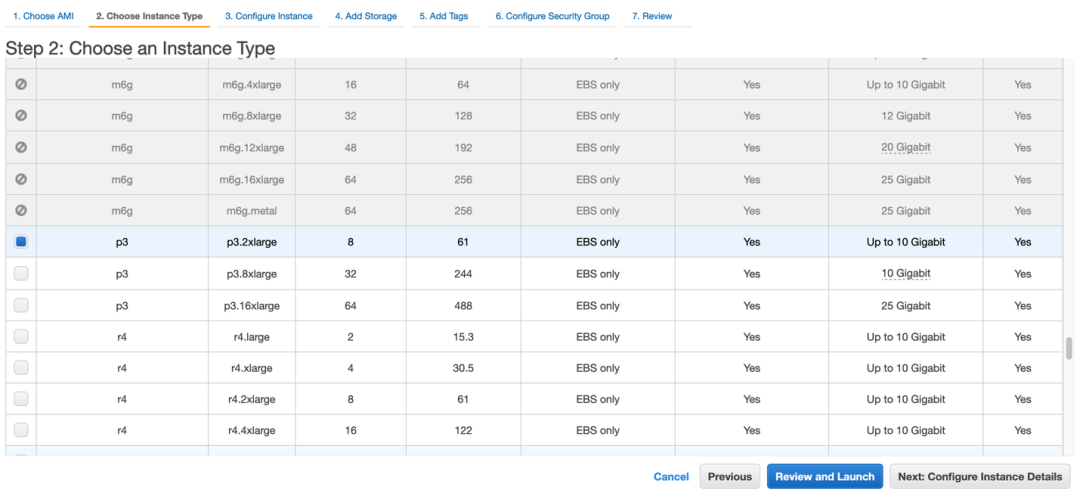
选择GPU型号P3.2xlarge点击Review and Lanuch创建Amazon EC2。
CPU 运行Layer Normalization
在创建好Amazon EC2实例之后,登陆到机器测试TensorFlow中的Layer Normalization功能。首先我们用python pip工具安装TensorFlow 2.3.0。
pip3 install tensorflow-gpu==2.3.0
下面是一个Layer Normalization示例,对于给定张量输入,对指定的轴执行归一化。
import os
import tensorflow as tf
import numpy as np
os.environ['CUDA_VISIBLE_DEVICES'] = '-1' # Hide GPU from visible devices
data = tf.constant(np.arange(10).reshape(5, 2) * 10, dtype=tf.float32)
print('data:',data)
layer = tf.keras.layers.LayerNormalization(axis=1) # Layer normalization
output = layer(data)
print('output:',output)
*左滑查看更多
代码中屏蔽了GPU资源,让代码在CPU中运行。代码成功运行,得到了期望的输出结果。
data: tf.Tensor(
[[ 0. 10.]
 [20. 30.]
 [40. 50.]
 [60. 70.]
 [80. 90.]], shape=(5, 2), dtype=float32)
output: tf.Tensor(
[[-0.99998  0.99998]
 [-0.99998  0.99998]
 [-0.99998  0.99998]
 [-0.99998  0.99998]
 [-0.99998  0.99998]], shape=(5, 2), dtype=float32)
*左滑查看更多
GPU 运行Layer Normalization
接下来删掉上面代码中屏蔽 GPU 的部分,我们尝试着使用 GPU 来运行 Layer Normalization 的代码。
import os
import tensorflow as tf
import numpy as np
data = tf.constant(np.arange(10).reshape(5, 2) * 10, dtype=tf.float32) ge
print('data:',data)
layer = tf.keras.layers.LayerNormalization(axis=1) # Layer normalization
output = layer(data)
print('output:',output)
*左滑查看更多
代码运行时报错 “InternalError: cuDNN launch failure”。查看报错信息 “Loaded runtime CuDNN library: 7.5.1 but source was compiled with: 7.6.4.”。系统提示我们需要使用CuDNN library 7.6.4或者更高级的版本来兼容TersorFlow版本。
2021-11-12 04:04:46.223483: I tensorflow/stream_executor/cuda/cuda_gpu_executor.cc:982] successful NUMA node read from SysFS had negative value (-1), but there must be at least one NUMA node, so returning NUMA node zero
2021-11-12 04:04:46.224430: I tensorflow/core/common_runtime/gpu/gpu_device.cc:1402] Created TensorFlow device (/job:localhost/replica:0/task:0/device:GPU:0 with 14764 MB memory) -> physical GPU (device: 0, name: Tesla V100-SXM2-16GB, pci bus id: 0000:00:1e.0, compute capability: 7.0)
data: tf.Tensor(
[[ 0. 10.]
 [20. 30.]
 [40. 50.]
 [60. 70.]
 [80. 90.]], shape=(5, 2), dtype=float32)
2021-11-12 04:04:46.591870: I tensorflow/stream_executor/platform/default/dso_loader.cc:48] Successfully opened dynamic library libcudnn.so.7
2021-11-12 04:04:51.113380: E tensorflow/stream_executor/cuda/cuda_dnn.cc:318] Loaded runtime CuDNN library: 7.5.1 but source was compiled with: 7.6.4.  CuDNN library major and minor version needs to match or have higher minor version in case of CuDNN 7.0 or later version. If using a binary install, upgrade your CuDNN library.  If building from sources, make sure the library loaded at runtime is compatible with the version specified during compile configuration.
2021-11-12 04:04:51.114387: W ./tensorflow/stream_executor/stream.h:2049] attempting to perform DNN operation using StreamExecutor without DNN support
Traceback (most recent call last):
  File "LN_test.py", line 8, in <module>
    output = layer(data)
  File "/home/ubuntu/.local/lib/python3.6/site-packages/tensorflow/python/keras/engine/base_layer.py", line 985, in __call__
    outputs = call_fn(inputs, *args, **kwargs)
  File "/home/ubuntu/.local/lib/python3.6/site-packages/tensorflow/python/keras/layers/normalization.py", line 1251, in call
    data_format=data_format)
  File "/home/ubuntu/.local/lib/python3.6/site-packages/tensorflow/python/util/dispatch.py", line 201, in wrapper
    return target(*args, **kwargs)
  File "/home/ubuntu/.local/lib/python3.6/site-packages/tensorflow/python/ops/nn_impl.py", line 1647, in fused_batch_norm
    name=name)
  File "/home/ubuntu/.local/lib/python3.6/site-packages/tensorflow/python/ops/gen_nn_ops.py", line 4268, in fused_batch_norm_v3
    _ops.raise_from_not_ok_status(e, name)
  File "/home/ubuntu/.local/lib/python3.6/site-packages/tensorflow/python/framework/ops.py", line 6843, in raise_from_not_ok_status
    six.raise_from(core._status_to_exception(e.code, message), None)
  File "<string>", line 3, in raise_from
tensorflow.python.framework.errors_impl.InternalError: cuDNN launch failure : input shape ([1,5,2,1]) [Op:FusedBatchNormV3]
*左滑查看更多
查看Amazon EC2 Deep Learning AMI中CUDA/cuDNN版本:
nvcc --version
默认版本是NVIDIA CUDA 10.0
nvcc: NVIDIA (R) Cuda compiler driver
Copyright (c) 2005-2018 NVIDIA Corporation
Built on Sat_Aug_25_21:08:01_CDT_2018
Cuda compilation tools, release 10.0, V10.0.130
*左滑查看更多
查看 Amazon EC2 Deep Learning AMI 中 cuDNN 版本:
cat /usr/local/cuda/include/cudnn.h | grep CUDNN_MAJOR -A 2
默认版本cuDNN 7.5.1
#define CUDNN_MAJOR 7
#define CUDNN_MINOR 5
#define CUDNN_PATCHLEVEL 1
--
#define CUDNN_VERSION (CUDNN_MAJOR * 1000 + CUDNN_MINOR * 100 + CUDNN_PATCHLEVEL)

#include "driver_types.h"
*左滑查看更多
我们可以去官方网站查询TensorFlow和CUDA/cuDNN的版兼容信息
https://www.tensorflow.org/install/source#tested_build_configurations 。下表列出来 CUDA,cuDNN 和 TensorFlow 的兼容版本:

表中可以看到推荐的兼容版本为CUDA 10.1,cuDNN 7.6,TensorFlow 2.3.0。检查目前Amazon EC2中预装的CUDA版本。
cd /usr/local/
可以看到Amazon EC2 Deep Learning AMI中预装CUDA版本有 10.0/10.1/10.2/11.0/11.1。
bin   cuda-10.0  cuda-10.2  cuda-11.1  etc    include  lib  sbin   src
cuda  cuda-10.1  cuda-11.0  dcgm       games  init     man  share
*左滑查看更多
用以下命令将CUDA切换到版本10.1从而兼容TensorFlow 2.3.0。
sudo rm /usr/local/cuda
sudo ln -s /usr/local/cuda-10.1 /usr/local/cuda
*左滑查看更多
切换后查看 CUDA 版本:
nvcc -V
可以看到,CUDA 版本已经切换至 10.1。
nvcc: NVIDIA (R) Cuda compiler driver
Copyright (c) 2005-2019 NVIDIA Corporation
Built on Sun_Jul_28_19:07:16_PDT_2019
Cuda compilation tools, release 10.1, V10.1.243
*左滑查看更多
查看 cuDNN 版本。
cat /usr/local/cuda/include/cudnn.h | grep CUDNN_MAJOR -A 2
cuDNN版本已经切换到7.6.5。到此已经实现了TensorFlow官方推荐的兼容版本。
#define CUDNN_MAJOR 7
#define CUDNN_MINOR 6
#define CUDNN_PATCHLEVEL 5
--
#define CUDNN_VERSION (CUDNN_MAJOR * 1000 + CUDNN_MINOR * 100 + CUDNN_PATCHLEVEL)

#include "driver_types.h"
*左滑查看更多
再次运行 Layer Normalization 代码,代码成功运行,得到了期望的输出结果。
data: tf.Tensor(
[[ 0. 10.]
 [20. 30.]
 [40. 50.]
 [60. 70.]
 [80. 90.]], shape=(5, 2), dtype=float32)
2021-11-11 16:40:18.997086: I tensorflow/stream_executor/platform/default/dso_loader.cc:48] Successfully opened dynamic library libcudnn.so.7
output: tf.Tensor(
[[-0.99998    0.99998  ]
 [-0.99998    0.99998  ]
 [-0.99998    0.99998  ]
 [-0.99998    0.99998  ]
 [-0.9999809  0.999979 ]], shape=(5, 2), dtype=float32)
*左滑查看更多
总结
Amazon Deep Learning AMI为机器学习从业者和研究人员提供基础设施和深度学习环境。您可以快速启动预装了主流深度学习框架的Amazon EC2实例,并且快速地切换CUDA版本实现与深度学习框架的兼容,轻松构建深度学习环境。从而让我们将更多的时间用于尝试新算法,学习新技术。
本篇作者

陈恒智
专业服务团队数据科学家


听说,点完下面4个按钮
就不会碰到bug了!


亚马逊云科技开发者 Build On 是由亚马逊团队策划、开发者社区联合打造的动手实操系列活动。
更多推荐
 0
0 0
0- 0


 已为社区贡献18条内容

所有评论(0)